

You are using an out of date browser. It may not display this or other websites correctly.
You should upgrade or use an alternative browser.
You should upgrade or use an alternative browser.
- Joined
- Sep 14, 2008
- Messages
- 24,836
- Reaction score
- 6,076
- Points
- 113
- Location
- Wibbleton
- Website
- www.tuffty.co.uk
Was there a reason why you used the 1.8t throttle body over the r32 one ? Or is a case of it would be cleaner look as the vr tb is water cooled
Drilled and tapped the holes for the 70mm TB... just need to get some M6 grub screws to seal into the R32 TB mount holes...
View attachment 183810
Throttle body fits quite neatly on there and should give a bit more room...
View attachment 183811
View attachment 183812
Next job was to sort the SAI delete out... there are various after market solutions available but are fairly pricey plus introduce potential for a coolant leak so.... take one OE SAI fitting...
View attachment 183813
...add one hacksaw...
View attachment 183814
....mix it around a bit with a welding rod...
View attachment 183815
...and finish with a dab of your favourite paint...
View attachment 183817
Job jobbed!..
Next was the lower timing chain... this is actually pretty easy (with the engine out).... interestingly the Febi kit I bought appears to use actual OE kit but with the logos ground off...
View attachment 183818
Lower chain fitted
View attachment 183819
While cleaning the sprockets I noticed that the smaller one that drives the chain to the cams was a bit worn...
View attachment 183820
Retail at TPS these are about 17 quid so will add that to the order next week (along with eleventy billion other bits I need too lol)
I finished off fitting ancillaries to the block and thats about it bar a few other parts I need to get... I am leaving the sump until I have put the lower chain cover back on to ensure a good seal...
View attachment 183821
Head should be back next week and I have gone and ordered Supertech exhaust valves as it kinda makes sense to... I need to put together a longish list of little odds and sods to get from TPS (20 head bolts!!!) and still waiting on a few more bits...
Not too scary this engine swap so far... things might start getting interesting once its in the engine bay though (thats the easy bit)
The inlet mani and cam cover should be off for powder coating soon too...
<tuffty/>
- Joined
- Sep 14, 2008
- Messages
- 24,836
- Reaction score
- 6,076
- Points
- 113
- Location
- Wibbleton
- Website
- www.tuffty.co.uk
It's not a 1.8t TB dude... 1.8t is 60mm...this is 70mm from a V6... R32 is 75mm..
I used the 70mm for a couple of reasons... First was I made over 600hp using it on the 20v engine... Secondly it fits better in the available space...
You have to hack it about a bit to get it to clear the fans... And that's with the V6 slim fan pack too which of course is a must have
<tuffty/>
I used the 70mm for a couple of reasons... First was I made over 600hp using it on the 20v engine... Secondly it fits better in the available space...
You have to hack it about a bit to get it to clear the fans... And that's with the V6 slim fan pack too which of course is a must have
<tuffty/>
My bad didn’t realise the v6 and and r32 were different just presumed it was the 1.8t when you adjusted the inlet fixings, yeah I have the slim fans fitted and it’s tight just wondering if the r32 one I got will fit as obviously it’s not meant to be fitted there with standard inlet, not looking forward to
Trying to Pipe the fmic it’s already tight for room
Trying to Pipe the fmic it’s already tight for room

- Joined
- Sep 14, 2008
- Messages
- 24,836
- Reaction score
- 6,076
- Points
- 113
- Location
- Wibbleton
- Website
- www.tuffty.co.uk
45rA Guy
Yeah I should pay attention to the little details and make life easier for myself haThat's why I did mine the way I did it... Gives me all the room
<tuffty/>
- Joined
- Sep 14, 2008
- Messages
- 24,836
- Reaction score
- 6,076
- Points
- 113
- Location
- Wibbleton
- Website
- www.tuffty.co.uk
Little update.... things are moving quite slowly... I haven't really done much to the car other than drag her *** out once in a while for a drive... and to charge the battery lol
Anyhoo... I now have the parts ready for the next 'phase'...

ACL big end bearings... already had the ARP rod bolts but in there for effect... also the weld on fitting for the oil drain in the sump...
I have a cap to use for now as I want to finish the engine side of the mods in this phase ready to then get the remaining parts ready for the turbo fitting...
Turbo is at AET having the hot side removed as try as I might I have been unable to free it and so rather it was dealt with someone more setup for it... hopefully it will just pop off easily and the turbo survive and still be usable...
I have some aircon pipes coming too so will get that sorted as well...
Once I know where I stand with the turbo I will start collecting the remaining bits to do the fitting... bends etc for the downpipe and wastegate, stainless tube and fittings for the coolant lines, oil feed and drain lines...
I also need to sort out an oil cooling solution... the oil temps have been exceeding 100deg in the warmer weather... this may change once the aircon is working again and slow speed fans are always on but I have been meaning to sort something for a while now so this will be done in due course...
In fairness... I don't actually miss the power of my 20v... I do however wish I had a bit more just to get over the flatness after the initial pickup... the 3.2 certainly feels more lively at lower rpm so with the turbo picking up the slack she should be pretty damn drivable...
Feeling a bit more motivated to crack on with her now... be nice to make some progress at least")
<tuffty/>
Anyhoo... I now have the parts ready for the next 'phase'...
ACL big end bearings... already had the ARP rod bolts but in there for effect... also the weld on fitting for the oil drain in the sump...
I have a cap to use for now as I want to finish the engine side of the mods in this phase ready to then get the remaining parts ready for the turbo fitting...
Turbo is at AET having the hot side removed as try as I might I have been unable to free it and so rather it was dealt with someone more setup for it... hopefully it will just pop off easily and the turbo survive and still be usable...
I have some aircon pipes coming too so will get that sorted as well...
Once I know where I stand with the turbo I will start collecting the remaining bits to do the fitting... bends etc for the downpipe and wastegate, stainless tube and fittings for the coolant lines, oil feed and drain lines...
I also need to sort out an oil cooling solution... the oil temps have been exceeding 100deg in the warmer weather... this may change once the aircon is working again and slow speed fans are always on but I have been meaning to sort something for a while now so this will be done in due course...
In fairness... I don't actually miss the power of my 20v... I do however wish I had a bit more just to get over the flatness after the initial pickup... the 3.2 certainly feels more lively at lower rpm so with the turbo picking up the slack she should be pretty damn drivable...
Feeling a bit more motivated to crack on with her now... be nice to make some progress at least
<tuffty/>
Looking forward to this mate, it’s been a king time coming. Hope AET can sort out your turbo, like you mentioned it’s in good hands.
Have you got room anywhere for an oil cooler? I was in traffic yesterday for an hour stand still business down near Stonehenge and my temps were creeping up, I’ll be pinching the 13 row oil cooler off my A3.
Sent from my iPhone using Tapatalk
Have you got room anywhere for an oil cooler? I was in traffic yesterday for an hour stand still business down near Stonehenge and my temps were creeping up, I’ll be pinching the 13 row oil cooler off my A3.
Sent from my iPhone using Tapatalk
- Joined
- Sep 14, 2008
- Messages
- 24,836
- Reaction score
- 6,076
- Points
- 113
- Location
- Wibbleton
- Website
- www.tuffty.co.uk
Yeah I have room... prob put it up top of the FMIC like we normally do tbh...
Just need to sort out the sandwich plate setup etc
<tuffty/>
Just need to sort out the sandwich plate setup etc
<tuffty/>
I have no doubt that you will be up and running before mine and that it will look like it came out the factory with knowing how you like your oem+Little update.... things are moving quite slowly... I haven't really done much to the car other than drag her *** out once in a while for a drive... and to charge the battery lol
Anyhoo... I now have the parts ready for the next 'phase'...
View attachment 208502
ACL big end bearings... already had the ARP rod bolts but in there for effect... also the weld on fitting for the oil drain in the sump...
I have a cap to use for now as I want to finish the engine side of the mods in this phase ready to then get the remaining parts ready for the turbo fitting...
Turbo is at AET having the hot side removed as try as I might I have been unable to free it and so rather it was dealt with someone more setup for it... hopefully it will just pop off easily and the turbo survive and still be usable...
I have some aircon pipes coming too so will get that sorted as well...
Once I know where I stand with the turbo I will start collecting the remaining bits to do the fitting... bends etc for the downpipe and wastegate, stainless tube and fittings for the coolant lines, oil feed and drain lines...
I also need to sort out an oil cooling solution... the oil temps have been exceeding 100deg in the warmer weather... this may change once the aircon is working again and slow speed fans are always on but I have been meaning to sort something for a while now so this will be done in due course...
In fairness... I don't actually miss the power of my 20v... I do however wish I had a bit more just to get over the flatness after the initial pickup... the 3.2 certainly feels more lively at lower rpm so with the turbo picking up the slack she should be pretty damn drivable...
Feeling a bit more motivated to crack on with her now... be nice to make some progress at least
<tuffty/>
Yeah I have room... prob put it up top of the FMIC like we normally do tbh...
Just need to sort out the sandwich plate setup etc
<tuffty/>
I was watching some of youtuber decimal tenths strokaaa motaaaa stuff he sourced his sandwich plate from somewhere and made some notable comments about what to look for and he got it cheap. I don’t honestly remember though.
Sent from my iPhone using Tapatalk
- Joined
- Sep 14, 2008
- Messages
- 24,836
- Reaction score
- 6,076
- Points
- 113
- Location
- Wibbleton
- Website
- www.tuffty.co.uk
OEM + will be tricky to pull of tbh... I have have plans for a clean and co-ordinated look thoughI have no doubt that you will be up and running before mine and that it will look like it came out the factory with knowing how you like your oem+
<tuffty/>
I’m sure it will look tidy, where as I’m sure mine won’t have been looking at a few to get an idea of how to make it look tidy, that Darren francis on Facebook engine bay is fantastic, makes me want to take mine out and start again haOEM + will be tricky to pull of tbh... I have have plans for a clean and co-ordinated look though
<tuffty/>
I’ve wanted to do a wire tuck and hide some things, hats off to those have take the time to do it! I’m sure yours will look good TJ..... after all, it’ll have a 3.2 turbo in the engine bay. Only a handful can say they’ve done that.
Sent from my iPhone using Tapatalk
Sent from my iPhone using Tapatalk
- Joined
- Sep 14, 2008
- Messages
- 24,836
- Reaction score
- 6,076
- Points
- 113
- Location
- Wibbleton
- Website
- www.tuffty.co.uk
Darren has done a few of these tbh... he was behind Eddies conversion too...
I drew a little inspiration from it in terms of direction as tbh there isn't much info out there which is why hopefully my thread and subsequently yours will help others with this type of conversion
<tuffty/>
I drew a little inspiration from it in terms of direction as tbh there isn't much info out there which is why hopefully my thread and subsequently yours will help others with this type of conversion
<tuffty/>

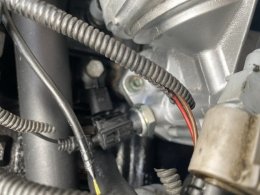
So I started to tackle the wiring and have a few questions there was two plugs and a ground wire that headed to where the throttle body was originally one is for the throttle body I can’t make out what the other one and ground wire are for

After the injector wires there’s a plug( not sure if it’s for oil level sensor in sump?) and a knock sensor where should these being going to? Does it have 3 knock sensors? As I have a two already at front of the block by the oil housing

After the injector wires there’s a plug( not sure if it’s for oil level sensor in sump?) and a knock sensor where should these being going to? Does it have 3 knock sensors? As I have a two already at front of the block by the oil housing
Attachments
Last edited:
- Joined
- Sep 14, 2008
- Messages
- 24,836
- Reaction score
- 6,076
- Points
- 113
- Location
- Wibbleton
- Website
- www.tuffty.co.uk
Assuming that the 6 pin plug is the TB the 2 pin next to it is the PCV valve on the inlet mani
There are only two knock sensors... one on the front of the block between cyl 4/6 and one round the back by cyl 1/3... other wire is the sump sensor...
Ground wire went to a bolt for the SAI/coolant flange out back iirc... I just moved it to another bolt when I relocated the TB wiring...
<tuffty/>
There are only two knock sensors... one on the front of the block between cyl 4/6 and one round the back by cyl 1/3... other wire is the sump sensor...
Ground wire went to a bolt for the SAI/coolant flange out back iirc... I just moved it to another bolt when I relocated the TB wiring...
<tuffty/>
ah right I was thinking this was a knock sensor Near the clucth end of the block but I guess it’s not

Anyway rained off for the minute but having a bit of trouble with the injectors doesn’t seem to sit right

Anyway rained off for the minute but having a bit of trouble with the injectors doesn’t seem to sit right
- Joined
- Sep 14, 2008
- Messages
- 24,836
- Reaction score
- 6,076
- Points
- 113
- Location
- Wibbleton
- Website
- www.tuffty.co.uk
1st pic is the crank sensor...
Injector body looks too short mate tbh... mine are Bosch PN: 0280158123

<tuffty/>
Injector body looks too short mate tbh... mine are Bosch PN: 0280158123
<tuffty/>
Yeah I thought so , Ive spoke to rushworth and will send them back , as always thanks for the help been putting the wiring off for two long found a shattered connector on the 3.2 loom local Audi want £20 for it could buy a full loom for that lol
- Joined
- Sep 14, 2008
- Messages
- 24,836
- Reaction score
- 6,076
- Points
- 113
- Location
- Wibbleton
- Website
- www.tuffty.co.uk
The plug will have a part number on it... search ebay as most of the VAG plugs are available cheaply on therefound a shattered connector on the 3.2 loom local Audi want £20 for it could buy a full loom for that lol
<tuffty/>
- Joined
- Aug 31, 2019
- Messages
- 1,329
- Reaction score
- 490
- Points
- 83
- Location
- London / Norfolk
- Website
- www.instagram.com
What plug do you after mate as I've got a few spare ones knocking aboutYeah I thought so , Ive spoke to rushworth and will send them back , as always thanks for the help been putting the wiring off for two long found a shattered connector on the 3.2 loom local Audi want £20 for it could buy a full loom for that lol
Sent from Syknet Global Defence Network
- Joined
- Sep 14, 2008
- Messages
- 24,836
- Reaction score
- 6,076
- Points
- 113
- Location
- Wibbleton
- Website
- www.tuffty.co.uk
This week turned out to be pretty decent...
I have been struggling to get the hotside off my GT35 and with Covid I have not really been to Bills much at all this year to sort it all out...
In the end I got Alex to send it off to AET to see if they would have more success... this week it returned...
Ta Da!!

There was an issue with carbon apparently... it was suggested it was the seal but the turbo never smoked at all and the cost for the work was most of the way to the cost of a replacement CHRA brand new so I just asked for it to be returned as is and if it becomes an issue later then I'll deal with it then...
Cleaned up the CHRA... actually looks mint tbh... and the bearings are fine too...


And gave the hotside a blast too

Happy days... feeling a little more motivated to crack on... maybe next week lol...
Few more things to sort obvs but this was a big hurdle to get over to allow me to even fit the thing at all
<tuffty/>
I have been struggling to get the hotside off my GT35 and with Covid I have not really been to Bills much at all this year to sort it all out...
In the end I got Alex to send it off to AET to see if they would have more success... this week it returned...
Ta Da!!
There was an issue with carbon apparently... it was suggested it was the seal but the turbo never smoked at all and the cost for the work was most of the way to the cost of a replacement CHRA brand new so I just asked for it to be returned as is and if it becomes an issue later then I'll deal with it then...
Cleaned up the CHRA... actually looks mint tbh... and the bearings are fine too...
And gave the hotside a blast too
Happy days... feeling a little more motivated to crack on... maybe next week lol...
Few more things to sort obvs but this was a big hurdle to get over to allow me to even fit the thing at all
<tuffty/>

That’s a result mate! Glad to see it wasn’t a major issue. So are you saying...... it might be all bolted up next week? 
Looking forward to seeing how you get on.
Sent from my iPhone using Tapatalk

Looking forward to seeing how you get on.
Sent from my iPhone using Tapatalk
- Joined
- Sep 14, 2008
- Messages
- 24,836
- Reaction score
- 6,076
- Points
- 113
- Location
- Wibbleton
- Website
- www.tuffty.co.uk
lol... comedianSo are you saying...... it might be all bolted up next week?
<tuffty/>
Sorry couldn’t resist! But joking aside mate, good news.... I’m actually as excited as you are! I’m hoping to be up in a couple weeks, be good to catch up with you then.
Sent from my iPhone using Tapatalk
I’m actually as excited as you are! I’m hoping to be up in a couple weeks, be good to catch up with you then. Sent from my iPhone using Tapatalk
Hey Tufty you going to use the standard 6 speed quattro gearbox? I heard the turbo r32 boys like to use a modified 02M with diesel final drive to make most of the extra power. The reason I am asking as I am interested in this gearbox setup for my stage 2 1.8t too.
- Joined
- Sep 14, 2008
- Messages
- 24,836
- Reaction score
- 6,076
- Points
- 113
- Location
- Wibbleton
- Website
- www.tuffty.co.uk
I am using a standard 4-motion box... the ratios are alleged to be a little taller than the R32 apparently but not really looked into it too muchHey Tufty you going to use the standard 6 speed quattro gearbox? I heard the turbo r32 boys like to use a modified 02M with diesel final drive to make most of the extra power. The reason I am asking as I am interested in this gearbox setup for my stage 2 1.8t too.
I had considered the derv ratios but tbh given I had 620hp out of the 20v on a std S3 gearbox and got on with that ok I think a VR6 running 450/500hp will be ok on std ratios...
I suspect the main reason the VR guys run the derv ratios is for better top end speed/lower cruise ratios... my 20v redline was 7.8k but I have no intention of revving the VR that high so you will lose 10/15mph per gear...
I plan to leave the manual standard as it will make it easier/cheaper to replace if needs be... the only other thing I may do at some point is fit a DQ500 as IECU will be supporting DSG properly in the next firmware update
<tuffty/>
- Joined
- Sep 14, 2008
- Messages
- 24,836
- Reaction score
- 6,076
- Points
- 113
- Location
- Wibbleton
- Website
- www.tuffty.co.uk
Not much to update on as no work has really been done but...
Stumbled across this item in my research for oil and water line suggestions for the VR... apparently its what HPA use...

Essentially you use the cam chain tensioner to bolt this to the head... (and copper sealing washers)... you can then take the oil feed off this for the turbo and is obviously already filtered... I have got one now so might try this rather than off the back of the t-piece and having to use a separate inline filter...
The other little development is this...

This is a cutting jig for making a 6 into 1 merge collector.... I'll leave it at that for now as this is still being decided on but this would make life a bit easier for turbo fitment, wastegate fitment and everything in between...
<tuffty/>
Stumbled across this item in my research for oil and water line suggestions for the VR... apparently its what HPA use...
Essentially you use the cam chain tensioner to bolt this to the head... (and copper sealing washers)... you can then take the oil feed off this for the turbo and is obviously already filtered... I have got one now so might try this rather than off the back of the t-piece and having to use a separate inline filter...
The other little development is this...
This is a cutting jig for making a 6 into 1 merge collector.... I'll leave it at that for now as this is still being decided on but this would make life a bit easier for turbo fitment, wastegate fitment and everything in between...
<tuffty/>
Just a BIG thumbs up from me.
Its been great reading for last 3 months.
Great insight and a massive learning curve.
I love my 2003 S3 and have been inspired to do more to my car.
Its been great reading for last 3 months.
Great insight and a massive learning curve.
I love my 2003 S3 and have been inspired to do more to my car.
- Joined
- Sep 14, 2008
- Messages
- 24,836
- Reaction score
- 6,076
- Points
- 113
- Location
- Wibbleton
- Website
- www.tuffty.co.uk
Thanks dudeJust a BIG thumbs up from me.
Its been great reading for last 3 months.
Great insight and a massive learning curve.
I love my 2003 S3 and have been inspired to do more to my car.
<tuffty/>

Where did you get the injector plugs from? Been trying to find a adapter lead for them the less wiring I have to do the better
Loom mods... I stripped all the tape off the loom and it was as sticky as a very sticky thing... cleaned it up with APC and brake cleaner and made a start on the mods...
Bought some fancy braided shizzle to make the loom look fancy... started with the coil pack wiring...
View attachment 187065
As the braided stuff is a 'tube' I de-pinned the plugs to help get the braid over the cable...
View attachment 187066 View attachment 187067
A few attempts later...
View attachment 187068
Not really that happy with it to be honest... its horrible stuff to work with and looks cr@p unless you build the loom from scratch using heat shrink to close off the ends... I will be rethinking the coil pack wiring later but before I got too much into it I needed to offer up the loom to the engine and work out the cable runs for the additional stuff I need to add..
The VR engine is normally aspirated and uses a MAF so has no need for a MAP sensor and the IAT sensor is in the MAF... I needed to add a MAP sensor as I am using speed density for fuelling and when turbo charged will need an N75 for boost control and an IAT sensor in the plenum...
I also needed to move the throttle body wiring from the rear of the engine to the front of the engine and I wanted to remove the wiring for the PCV valve and the inlet vacuum system that operates the inlet runner change over mech..
Laid out the loom on the engine... you may notice that I have also changed the injector plugs as the 630cc injectors are a different type to OE...
View attachment 187069 View attachment 187070
Ran the extra wires for the N75, MAP, IAT, sensor +5v and ground... I also ran the wires for the oil pressure sender and fuel pressure sender while I had the opportunity to tidy that aspect of the wiring up...
View attachment 187071
Changed the standard 4bar FPR of the VR to 3bar as I don't need the overhead for the level of power I am after...
View attachment 187072
As I am not using an aftermarket fuel rail with AN fittings I got a new fuel filter so I could allow Torques to take even more of my money on fittings
View attachment 187073
That will get plumbed in properly later once the engine is up and running...
Removed the loom to review and secure the new cables so I can sort it all out properly...
View attachment 187074
The turbo adaptor flange arrived in the week... obviously needs welding up but that will be done as part of the turbo phase later...
View attachment 187075
Still waiting on a solution for the wastegate... I have an adaptor flange on its way... no idea if its going to be of any use but will cross that bridge later..
So... next task was to integrate the new wiring... the ECU switches the earth/ground of the N75 so running the wire to the ECU is obviously not enough... the S3 wiring showed the N75 picking the 12v from a shared supply that the N205 (VVT) solenoid is on so tapped off that for the 12v
View attachment 187076
The loom I am using is from a TT 3.2 with DSG... the DQ250 doesn't have a speedo sender... the speed signal is picked up from the ABS... Ignitron can be configured to do this but I wanted to add the wiring all the same as my R32 gearbox has the sender...
This wiring is in the large 14 pin plug that is attached to the inner wing so I took the wires from the S3 loom and added them to the TT plug... I then ran wires from the gearbox speedo sender and joined them to the tails... there are three wires in total.. the ground is off the common ground (pin 7 of the 14pin plug)
View attachment 187077
The VR engine also uses a constant circulation pump (bit like the after run pump of the 1.8t)... the wiring is again in the 14pin plug but the S3 half doesn't have it pinned... I attempted to find the correct terminal to be ale to add it but there are so many variants its difficult to know if they would fit so I opted to use a separate connector instead...
I unpinned the wire and terminated it with the single pin plug... I just need to terminate the other side and run the wire to the fan controller...
View attachment 187078
At this point I refitted the loom to make sure it was all lining up ok...
View attachment 187079
You may notice I have painted the heatshield in VHT 'black'... which is kinda more grey than black... looks ok though and added the coolant hardline for the pipe to the expansion bottle...
I added more of the OE brackets and clips this time to hold it all in place...
View attachment 187080
Happy with the progress so far... just a couple more bits to do and I can fit it and leave it in...
I now need to buzz all the cables I have changed before pinning the ECU plug to make sure they are all connected to the right pins... and terminate the second MAP sensor, fuel and oil pressure sender wires too...
I have a few more plugs on the way to wire those three sensors in as the wiring crosses over into the larger ECU plug..
View attachment 187081
The LCR radiator fan pack turned up and so I tested the fans... sadly it seems that the low speed side of the fans doesn't work... this is a fairly typical failure on fans due to them being run at low speed while the aircon is on
Have msg'd the seller so will see what happens... I have a couple more on watch but arguably won't stop me starting the engine...
...which is the plan for the end of the week as I have next week off to try and get the engine running and the car as close to road worthy as I can...
<tuffty/>
- Joined
- Aug 31, 2019
- Messages
- 1,329
- Reaction score
- 490
- Points
- 83
- Location
- London / Norfolk
- Website
- www.instagram.com
https://www.auto-click.co.uk/ good site for oem connectorsWhere did you get the injector plugs from? Been trying to find a adapter lead for them the less wiring I have to do the better

Sent from Syknet Global Defence Network
- Joined
- Sep 14, 2008
- Messages
- 24,836
- Reaction score
- 6,076
- Points
- 113
- Location
- Wibbleton
- Website
- www.tuffty.co.uk