

My MMI High Basic/Dumb Retrofit Guide
I purchased my car last month not realising that NAV wasn’t standard or the 7” screen was even a feature of the car… The main thing for me was the quality of the screen not the features.
So I set about buying items and finding as much as possible about retrofitting it and here is MY OWN experiences/opinions/warnings about what you need to do/don’t do to get it working.
First off the parts I used to get this working…
MMI Unit High: 8V0 035 043 D - £200 delivered
MMI 7” Screen: - 150 Euro delivered
CP Removal - £45 (Independent garage with GEKO)
To locate the box I’ve searched on eBay Germany/UK to find the parts (Germany is fairly cheap)
From what I’ve read people say you need the touch controller/dash piece to complete this but mine works completely fine without it - as such I think you only need this for the touch control/handwriting feature.
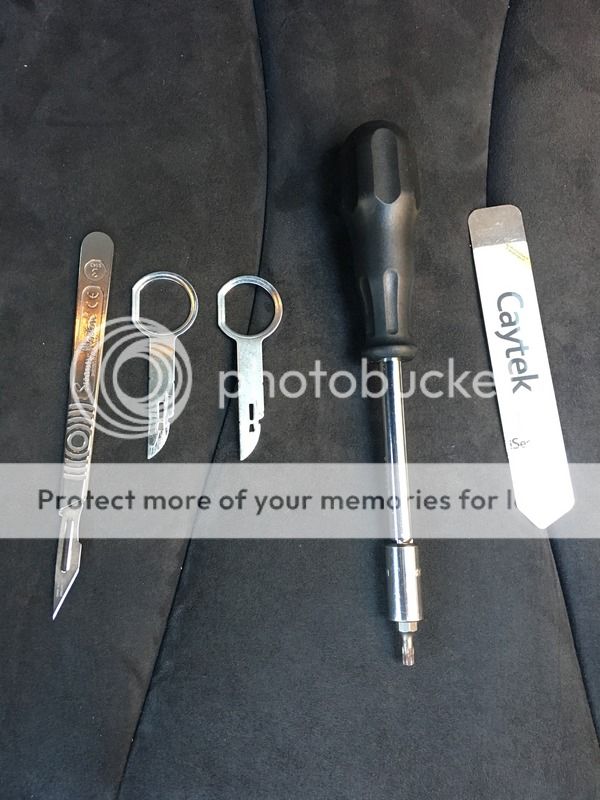
Next, the tools I’ve used to get complete the job..
iSesamo (Good bendy but sturdy trim removal tool)
Scalpel/Sharp tool
Radio Removal Keys
Torx Set
A GENUINE VCDS cable/access to one (You won’t be able to code your 5F with a fake one as it can’t code your box due to not running new enough software)
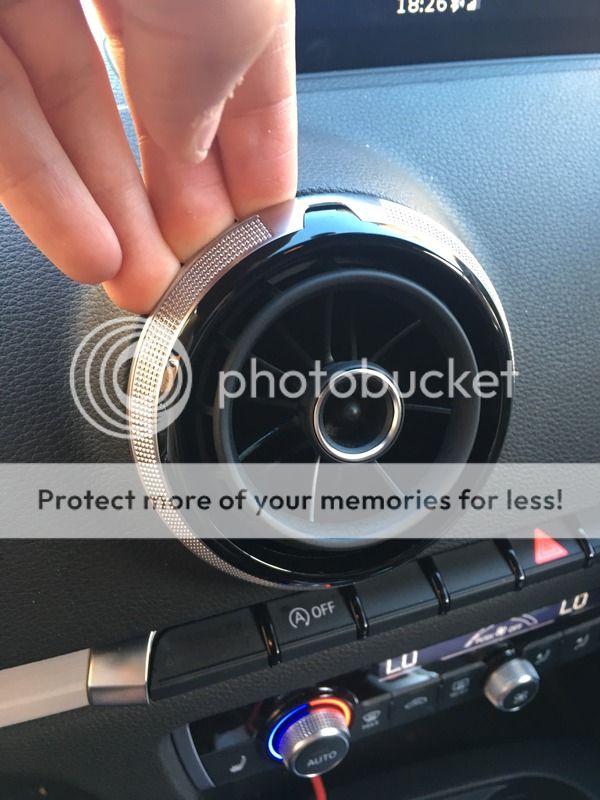
Next was getting the parts fitted in.. To remove the screen you need your trim removal tool to pop off the dash trim around the screen, it can be a little hard to get the clips off. TRY NOT TO TOUCH YOUR SCREEN AS THE COATING WEARS OFF VERY EASILY


After you need to remove both of your vents, which will reveal two screws inside the vents (Some people stick a screwdriver through the vent to get to them but I didn’t want to risk damaging them). You can get these off with your nails behind them and pulling them out. After remove the two screws. These do stay in when unscrewed but I pulled them out as not to loose them in the dash to be on the safe side.
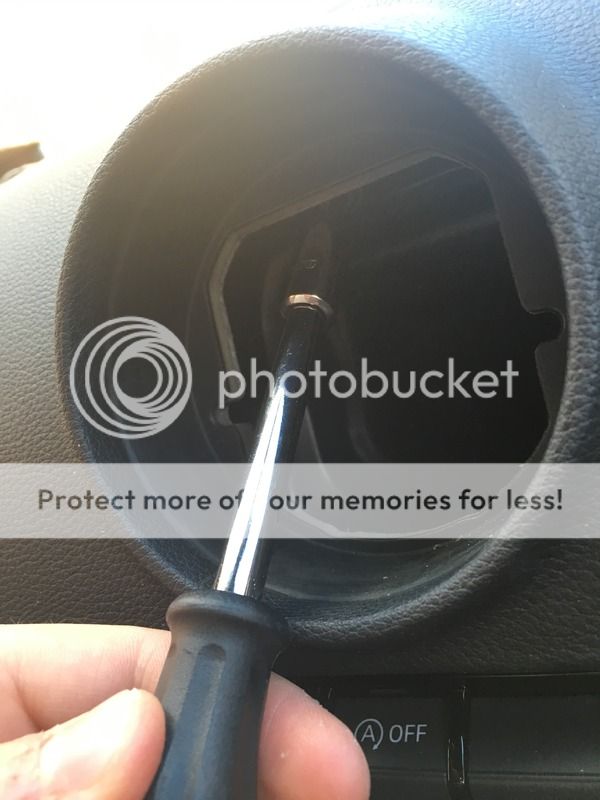
After this the screen is ready to come out.. If you look through your vents you will see a clip in each holding the screen in. I used my iSesamo to push one a time pulling on the screen at the top.
When you get the screen out, simply unplug the wires. You have to prise the clips off of the radio and undo the tie wrap holding the screen on.
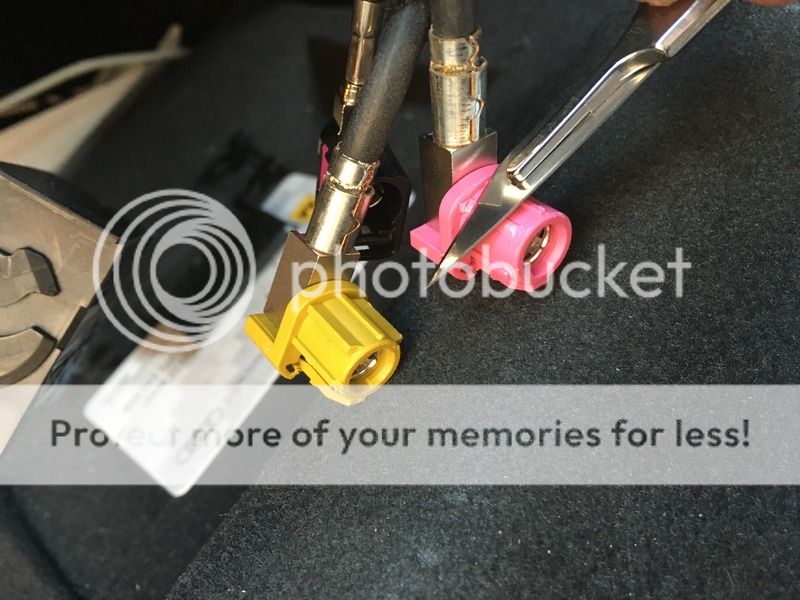
Next, get your new screen and and have a look at the yellow cable that plugs into the screen, and on the socket on the screen it’s likely to have a different fitment. Work out what is different and get a scalpel/some other sharp tool and shave the fitment off. Plug everything in and the refit in reverse order.
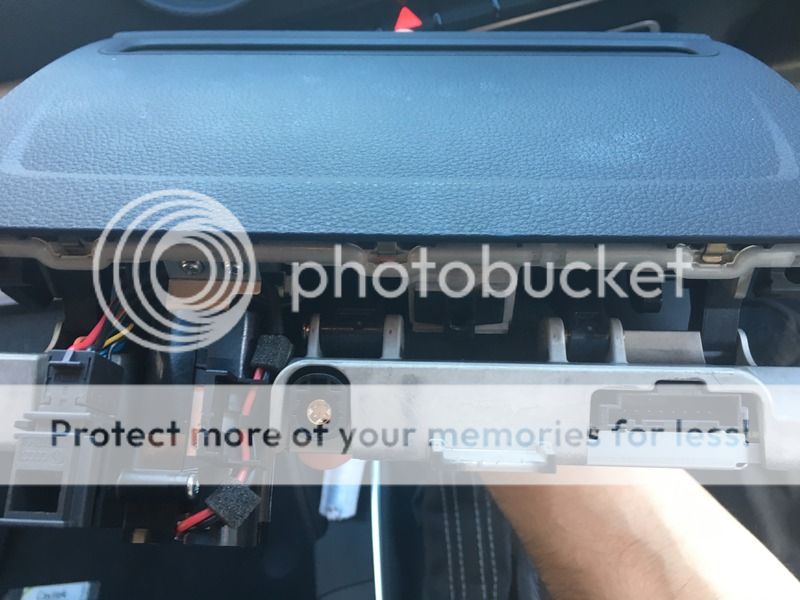
After this you can install your MMI Box, open the glovebox and put your radio keys in to remove it. Simply unplug all the connectors and replug them in on your new box. I didn’t had to shave one more of the connections to get it to fit. When plugged in you can put your mmi box back in.
Next turn your ignition on to see if everything works. You’ll likely notice everything works other than your sound, this is due to the component protection on your box.

CODING/COMPONENT PROTECTION REMOVAL
I personally got component protection removed before I coded the box do my car so you can do this in any order.
To get the protection removed either find somebody with the authorised tool or visit an Audi/VW garage thats willing to do it for you. If they tell you that it’s not compatible with your car it’s likely they’re trying to code the box for your car as well which isn’t possible so tell them you only want the protection removed.
Now onto the coding…
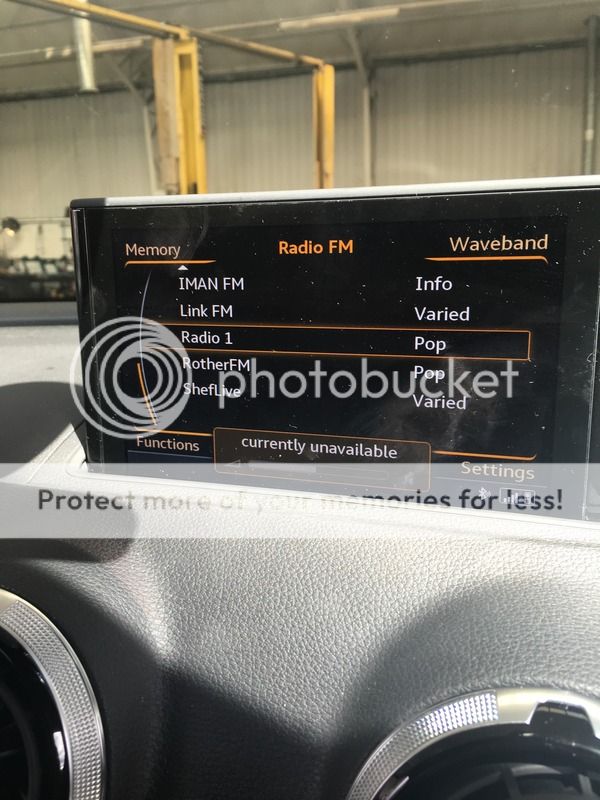
After removing my component protection the sound worked fine, but not very good quality. This then stopped and displayed currently unavailable again. After another trip to the garage thinking CP is on it turns out it wasn’t and something else was wrong.
I then purchased a genuine VCDS cable and began trying to code the box to my car.. unfortunately for me the label files still wasn’t around for my box so it’s all a bit of guess work, even on the beta version.
I started by copying the coding from my old box onto my new box, this gave my sound again but It felt like it was only half hearted (I have B&O). Reading around the forums I can tell you the following about the coding on a 5F box… Don’t take it as gospel.
Byte 0-3
000000 - Control Module not Coded
017300 - Audi A3 8V1 (3DR)
017305 - Audi A3 Cabriolet
017301 - Audi A3 Limousine
017303 - Audi A3 Sportback
Byte 04
Bit 0-7 - 00 - NAV Not installed
Bit 0-7 - 01 - Navigation database Europe (I presume it means installed)
Byte 11 Sound System
This should be set at 11 for Europe.
Byte 10 This is the tuner area for the DAB Radio.
This should be set at 11 for Europe.
Byte 16 -This is to enable all of your bluetooth features.
Bit 0 - Bluetooth Enabled
Bit 1 - BT Multimedia enable/active
Bit 2 - BT Function Active/Supported
Bit 3 - BT Audio Function active/supported
Bit 4/5 - BT Visible
Byte 19
Bit 1 - Right Hand Drive
Bit 4 - Rear View Camera Installed
Bit 6/7 - USB Port Installed
Byte 20
Bit 0 - Screen installed/connected
Things of note
Don’t pull on your screen without releasing the clips, your likely to pull to hard and end up with a bruised forehead/nose.
The MMI High unit can easily be noticed as it says Harman on it instead of Panasonic.
Make sure you buy a box that meets your needs… I bought one without DAB thinking it came standard, it doesn’t.
The NAV worked fine on my car before I got the CP removed, it now doesn’t work and says it’s not enabled when clicking on the NAV, I presume this is due to it being deactivated in the process.
The coating on the screen wore off because of my finger pressing too tight on it, don’t make the same mistake it seems to come off easily.
If your screen doesn’t close properly after the installing it, it’s likely because you need to put the wire with the tie wrap back in it’s place and secure it with another one.
I initially plugged my screen and box in without shaving any connections to test to see if they worked before cutting my car up. This won’t work. I thought it was an aerial in the back of the screen, turns out it’s the power cable for the screen. I had mug on for a good day before realising this (Then again you might not be as dumb") )
)
Issues I currently have
I can’t get the OPS to show up on my new box even though it’s activated. Can anybody help me with that one?
I’ve used many guides around the internet, read through many pages of translated Italian/German to figure some things out. Hopefully it helps you if you decide to do it. This is my first guide, so it may seem like I’m telling you the basics but it’s things I had to research so maybe you will do!
I purchased my car last month not realising that NAV wasn’t standard or the 7” screen was even a feature of the car… The main thing for me was the quality of the screen not the features.
So I set about buying items and finding as much as possible about retrofitting it and here is MY OWN experiences/opinions/warnings about what you need to do/don’t do to get it working.
First off the parts I used to get this working…
MMI Unit High: 8V0 035 043 D - £200 delivered
MMI 7” Screen: - 150 Euro delivered
CP Removal - £45 (Independent garage with GEKO)
To locate the box I’ve searched on eBay Germany/UK to find the parts (Germany is fairly cheap)
From what I’ve read people say you need the touch controller/dash piece to complete this but mine works completely fine without it - as such I think you only need this for the touch control/handwriting feature.
Next, the tools I’ve used to get complete the job..
iSesamo (Good bendy but sturdy trim removal tool)
Scalpel/Sharp tool
Radio Removal Keys
Torx Set
A GENUINE VCDS cable/access to one (You won’t be able to code your 5F with a fake one as it can’t code your box due to not running new enough software)
Next was getting the parts fitted in.. To remove the screen you need your trim removal tool to pop off the dash trim around the screen, it can be a little hard to get the clips off. TRY NOT TO TOUCH YOUR SCREEN AS THE COATING WEARS OFF VERY EASILY
After you need to remove both of your vents, which will reveal two screws inside the vents (Some people stick a screwdriver through the vent to get to them but I didn’t want to risk damaging them). You can get these off with your nails behind them and pulling them out. After remove the two screws. These do stay in when unscrewed but I pulled them out as not to loose them in the dash to be on the safe side.
After this the screen is ready to come out.. If you look through your vents you will see a clip in each holding the screen in. I used my iSesamo to push one a time pulling on the screen at the top.
When you get the screen out, simply unplug the wires. You have to prise the clips off of the radio and undo the tie wrap holding the screen on.
Next, get your new screen and and have a look at the yellow cable that plugs into the screen, and on the socket on the screen it’s likely to have a different fitment. Work out what is different and get a scalpel/some other sharp tool and shave the fitment off. Plug everything in and the refit in reverse order.
After this you can install your MMI Box, open the glovebox and put your radio keys in to remove it. Simply unplug all the connectors and replug them in on your new box. I didn’t had to shave one more of the connections to get it to fit. When plugged in you can put your mmi box back in.
Next turn your ignition on to see if everything works. You’ll likely notice everything works other than your sound, this is due to the component protection on your box.
CODING/COMPONENT PROTECTION REMOVAL
I personally got component protection removed before I coded the box do my car so you can do this in any order.
To get the protection removed either find somebody with the authorised tool or visit an Audi/VW garage thats willing to do it for you. If they tell you that it’s not compatible with your car it’s likely they’re trying to code the box for your car as well which isn’t possible so tell them you only want the protection removed.
Now onto the coding…
After removing my component protection the sound worked fine, but not very good quality. This then stopped and displayed currently unavailable again. After another trip to the garage thinking CP is on it turns out it wasn’t and something else was wrong.
I then purchased a genuine VCDS cable and began trying to code the box to my car.. unfortunately for me the label files still wasn’t around for my box so it’s all a bit of guess work, even on the beta version.
I started by copying the coding from my old box onto my new box, this gave my sound again but It felt like it was only half hearted (I have B&O). Reading around the forums I can tell you the following about the coding on a 5F box… Don’t take it as gospel.
Byte 0-3
000000 - Control Module not Coded
017300 - Audi A3 8V1 (3DR)
017305 - Audi A3 Cabriolet
017301 - Audi A3 Limousine
017303 - Audi A3 Sportback
Byte 04
Bit 0-7 - 00 - NAV Not installed
Bit 0-7 - 01 - Navigation database Europe (I presume it means installed)
Byte 11 Sound System
- 01 - Sound System with internal amp (Base system/***)
- 02 - B&O - I found simply selecting box 2 doesn’t work. You should change the coding in the box!
- 00 00 - Base sound system
- FF 00 - ***
- FF 0A - B&O
This should be set at 11 for Europe.
Byte 10 This is the tuner area for the DAB Radio.
This should be set at 11 for Europe.
Byte 16 -This is to enable all of your bluetooth features.
Bit 0 - Bluetooth Enabled
Bit 1 - BT Multimedia enable/active
Bit 2 - BT Function Active/Supported
Bit 3 - BT Audio Function active/supported
Bit 4/5 - BT Visible
Byte 19
Bit 1 - Right Hand Drive
Bit 4 - Rear View Camera Installed
Bit 6/7 - USB Port Installed
Byte 20
Bit 0 - Screen installed/connected
Things of note
Don’t pull on your screen without releasing the clips, your likely to pull to hard and end up with a bruised forehead/nose.
The MMI High unit can easily be noticed as it says Harman on it instead of Panasonic.
Make sure you buy a box that meets your needs… I bought one without DAB thinking it came standard, it doesn’t.
The NAV worked fine on my car before I got the CP removed, it now doesn’t work and says it’s not enabled when clicking on the NAV, I presume this is due to it being deactivated in the process.
The coating on the screen wore off because of my finger pressing too tight on it, don’t make the same mistake it seems to come off easily.
If your screen doesn’t close properly after the installing it, it’s likely because you need to put the wire with the tie wrap back in it’s place and secure it with another one.
I initially plugged my screen and box in without shaving any connections to test to see if they worked before cutting my car up. This won’t work. I thought it was an aerial in the back of the screen, turns out it’s the power cable for the screen. I had mug on for a good day before realising this (Then again you might not be as dumb
)Issues I currently have
I can’t get the OPS to show up on my new box even though it’s activated. Can anybody help me with that one?
I’ve used many guides around the internet, read through many pages of translated Italian/German to figure some things out. Hopefully it helps you if you decide to do it. This is my first guide, so it may seem like I’m telling you the basics but it’s things I had to research so maybe you will do!


