

Trailing arm bush replacement (s3)
- Thread starter s3dave
- Start date
You are using an out of date browser. It may not display this or other websites correctly.
You should upgrade or use an alternative browser.
You should upgrade or use an alternative browser.
- Joined
- Mar 28, 2010
- Messages
- 10,073
- Reaction score
- 2,697
- Points
- 113
- Location
- Liverpool/Southport. N west
4 bolts hold the trailing arm and bush to the chassis. Accessible with a socket set.Doing this soon
How do you access the bolt to be able to undo the front of the trailing at the moment to then get to the bush???
It seems hidden...
been thinking about doing this for ages, anyone found a or know of a guide with photos ? how do you get the bush out of the arm itself ?
- Joined
- Mar 28, 2010
- Messages
- 10,073
- Reaction score
- 2,697
- Points
- 113
- Location
- Liverpool/Southport. N west
I used a drill with a large bit.been thinking about doing this for ages, anyone found a or know of a guide with photos ? how do you get the bush out of the arm itself ?
isnt the rubber boned in a metal sleeve with a smaller central sleeve in the middle for the bolt ?

- Joined
- Mar 28, 2010
- Messages
- 10,073
- Reaction score
- 2,697
- Points
- 113
- Location
- Liverpool/Southport. N west
Outer sleeve will lever out with a screw driver and inner bolt bit comes out with the rubber you've just drilled the crap out ofisnt the rubber boned in a metal sleeve with a smaller central sleeve in the middle for the bolt ?
- Joined
- Sep 14, 2008
- Messages
- 24,836
- Reaction score
- 6,078
- Points
- 113
- Location
- Wibbleton
- Website
- www.tuffty.co.uk
been thinking about doing this for ages, anyone found a or know of a guide with photos ? how do you get the bush out of the arm itself ?
I have done this in my thread (with pics)... I also believe superkarl has a few pics in his thread too
<tuffty/>
Okay so I got one side all changed with Polly bush and bolted back in but the alignment of the trailing arm bracket is all off. I can't get the marks I made to line up 
What's the best way to get it back into the correct position or will they fix it at the shop when he goes in for an alignment ?
What's the best way to get it back into the correct position or will they fix it at the shop when he goes in for an alignment ?
- Joined
- Sep 14, 2008
- Messages
- 24,836
- Reaction score
- 6,078
- Points
- 113
- Location
- Wibbleton
- Website
- www.tuffty.co.uk
Can you please elaborate ? I don't see where I could never from while under there .
Also the bush a used allow for extra toe correction or something but I've just put them in the standard position I hope that's Alright. What would you need the extra toe for anyway ?
Also the bush a used allow for extra toe correction or something but I've just put them in the standard position I hope that's Alright. What would you need the extra toe for anyway ?

- Joined
- Sep 14, 2008
- Messages
- 24,836
- Reaction score
- 6,078
- Points
- 113
- Location
- Wibbleton
- Website
- www.tuffty.co.uk
I had the bolts tight enough that hitting with a sizeable rubber hammer will move it... its not an exact science sadly and I didn't get mine 100% exact but worked out ok once aligned...
If its still proving difficult to get even close then the only real alternative is to release the tension a bit by removing the tie bars which would make the arm free floating
<tuffty/>
If its still proving difficult to get even close then the only real alternative is to release the tension a bit by removing the tie bars which would make the arm free floating
<tuffty/>
WhaaaI had the bolts tight enough that hitting with a sizeable rubber hammer will move it... its not an exact science sadly and I didn't get mine 100% exact but worked out ok once aligned...
If its still proving difficult to get even close then the only real alternative is to release the tension a bit by removing the tie bars which would make the arm free floating
<tuffty/>
I don't wanna have to take the tie bars off again ...
LOL
I'll give the rubber mallet thing a go. I was using a plank of wood in between mallet and metal. So I'll try without the wood.
so the kit i got was this
SuperPro SPF2536K (Rear Trailing Arm, Front Bush Kit)
Replaces OEM Part No: 1J0505171B
which allows you to have the bushes a certain way in which they are under stock configuration or to give you "toe correction"
do i put it as normal or in the toe corrected setup???
keeping in mind i will be lowering with coilovers (but only to the top of the tyre on 18" rims...)
- Joined
- Sep 14, 2008
- Messages
- 24,836
- Reaction score
- 6,078
- Points
- 113
- Location
- Wibbleton
- Website
- www.tuffty.co.uk
Normal... assuming you have adjustable tie bars toe can be fine tuned in combo with getting camber right... the extra toe setup on these bushes are more likely for extreme cases or cars that don't have adjustable tie bars fitted...
Superpro also do camber adjust bushes for std tie bars... I guess the idea is if you lower your car and use their bushes you should be able to get the geo somewhere decent without needing adjustable tie bars...
I have powerflex rear arm bushes and they are just drop in replacements... the superpro ones are more 'entertaining' to fit though... Bill fitted some to a customers car once although in fairness the word 'entertaining' was not one he used to describe the experience lol...
Its nice that these have flexible adjustment but it can also be a pain in the a*se... all you are really looking to achieve is to get the toe as close to zero as poss (very small amount of toe in is fine but toe out will make the back end very nervous in my experience) and get the camber somewhere close to OE or just a tad more as you don't need loads of camber on the back...
Have fun
<tuffty/>
awesome - thanks for the in depth answer <tuffty/> (110% satisfied my query
have also installed adjustable tie bars so i will play around with it all tomorrow morning, get the height right and then get cracking with the front.
i'm surprised how easy these bushes are to fit into their holes! if only the stock bushes would only come out as easily as these go in. the rest of the suspension... lots of up and down action with the jack/s but got bolted up in the end!
LOL@entertaining... yes. well... i hadn't had that much white stuff all over the place since i was 13
the bushes??? nah but seriously it's as easy!!! grease up the trailing arm hole, greasing the sides of the poly, push them in as per the diagram (by hand), grease up the bush & the inner tube of the poly, again push in by hand, grease up the spacers & the flat faces of the rubber that are now in the trailing arm and push into the bracket (this is the trickiest bit - i ended up putting the spacers into the brackets first and then offered the bracket and trailing arm that way - you will need to pull the bracket from front to back to slowly inch the two sides together) line the holes up, pop in your bolt and torque to 90Nm
video of the are and the bits i unfastened- Audi S3 8L rear trailing / control arm bush
got the 16mm bolts undone and the trailing arm drops - how i attacked it - drill and while going in and out move the drill at different angles to chew up the rubber and break the integrity of it

cleaned and lubed

and pushed in
getting the bracket back into its place is the farker ...

tree + ratcheting strap = very close to where it was (thanks tree)
video of the are and the bits i unfastened- Audi S3 8L rear trailing / control arm bush
got the 16mm bolts undone and the trailing arm drops - how i attacked it - drill and while going in and out move the drill at different angles to chew up the rubber and break the integrity of it
cleaned and lubed
and pushed in
getting the bracket back into its place is the farker
...tree + ratcheting strap = very close to where it was (thanks tree)
Last edited:
Ian did you get any pics ?
hope that's what you mean and not from when i was 13 LOLOLOL
am i right in saying you unbolt the cradle the arms sit in that is bolted to the chassis ? bit unsure of how this process works should the car be on axle stands ?
Yep correct.
I did mine on jack stands by having the car rest on the back "doughnuts". Then watch the video and look at the bolts I'm pointing to. They're the ones you undo.
The trailing arm will drop and the bolt you need to undo is revealed (on the outside of the car)
I did mine on jack stands by having the car rest on the back "doughnuts". Then watch the video and look at the bolts I'm pointing to. They're the ones you undo.
The trailing arm will drop and the bolt you need to undo is revealed (on the outside of the car)
all makes sense, hopefully no alignment issues afterwards. How difficult are the tie arms bushes to do ? i believe there is 4 to do but cant work out how they connect to the hub & never really looked.
same thing with the tie arm bushes - hardest part is getting originals out (remove them yourself & take them to a shop for the easy way)
superpro ones come in two halves so you lube up the contacting faces of the polybush and just push it all together by hand, push in metal bush. Done! Correct you need 4 - so buy two sets as you get a pair in a kit.
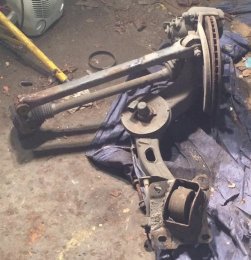
Diagram of the inner control arm bushes
The ones you change are actually the inner bushes. The bushes close to the hub are like the tie rod connections on the front (that they pivot) except instead of the bolt with a nut it's a rubber bush that you push a bolt through and tighten a nut of the other end. stick your head under and it'll all make sense. the most confusing (because it's hidden) is the trailing arm bush.
you MUST remove the sub-frame bolts in order to get the top inner tie arm bolts out because they're in the way. screw them part-way in after removal so when you do the other side, the sub-frame doesn't drop too low that you can't get the bolt back in without having to push like a mofo to get it back in.
i'm not sure if there is a polybush for the hub to tie-arm connection? @<tuffty/> would you know?
superpro ones come in two halves so you lube up the contacting faces of the polybush and just push it all together by hand, push in metal bush. Done!
Correct you need 4 - so buy two sets as you get a pair in a kit.Diagram of the inner control arm bushes
The ones you change are actually the inner bushes. The bushes close to the hub are like the tie rod connections on the front (that they pivot) except instead of the bolt with a nut it's a rubber bush that you push a bolt through and tighten a nut of the other end. stick your head under and it'll all make sense. the most confusing (because it's hidden) is the trailing arm bush.
you MUST remove the sub-frame bolts in order to get the top inner tie arm bolts out because they're in the way. screw them part-way in after removal so when you do the other side, the sub-frame doesn't drop too low that you can't get the bolt back in without having to push like a mofo to get it back in.
i'm not sure if there is a polybush for the hub to tie-arm connection? @<tuffty/> would you know?
- Joined
- Sep 14, 2008
- Messages
- 24,836
- Reaction score
- 6,078
- Points
- 113
- Location
- Wibbleton
- Website
- www.tuffty.co.uk
...i'm not sure if there is a polybush for the hub to tie-arm connection? @<tuffty/> would you know?
There isn't... its a rose joint from the factory but there is an alternative listed too which is a stiff bonded rubber joint that has very little articulation
The rose joints are known to sieze which leads to the tie bar failure that people go on about... the rubber bushes were a 'fix' but have less articulation so arguable not much better... I believe you can still get the rose joints though and there are a couple of threads covering this already in this section
<tuffty/>