Facelift S3 2017 wiring loom damage at boot lid swan neck!!!!! WARNING!!!!

Potterswheel

S3 Compact Limo
Joined
Nov 26, 2020
Messages
593
Reaction score
330
Points
63
Location
West Mids
Look what I found today whilst routing the cables for my rear camera and rear PDC sensors through the boot, My car has done 1600 miles and has seen very little use, especially in the boot area its like new, the wiring loom for the boot lamp units, boot release and N° plate lamps is clipped to the swan neck hinges and is chaffing on the bolt heads which fix the hinge in position to the body shell.
this may be the cause of some strange faults in the future if left to its own devices, at least it should be in the dry. I was looking closely because I thought the loom was being tortured the way its routed at the hinge and the range of movement it is subjected to each time the boot is opened and closed.
Rear pdc loom damage at hinge 2s
 
How is your back?????
What do you do - chop in a new section? or splice just the cables that have broken?
 
After some deliberation I decided that the loom had been either intentionally or unintentionally twisted on installation just at the point where it passes on to the moving hinge, causing it to distort when the boot was opened, so reluctantly I disconnected the loom stating at the furthest rear boot light and moving along the length of the loom until I got back to the hinge, I then unwound the whole turn of twist before returning the loom back to its rightful position, (4 hrs work!!!) check out the difference between the first and second photos. I also decided that if the hex head bolts weren't there they could not chafe the loom - routing through my 'bitsa' tin and found 2 x thick 8 mm washers and 2 x 8 mm countersunk bolts, I countersunk the washers and replaced the 2 bolts on the inboard fixings of the hinge plate ( boy were they tight!) (expanding sleeving is the camera loom, and just in case you were wondering the loose earth on the first image is the camera earth)
Rear pdc loom damage at hinge repaired s
I'll tell you in a couple of years if I have been successful!!
 
  • Like
Reactions: CraigM
How is your back?????
What do you do - chop in a new section? or splice just the cables that have broken?
Lol my back is screwed anyway as I am getting old!

I normally repair and reinforce. I just looked at your original photo again and to me that looks a little strange, the cable route is not what I would expect to see. Any signs that your boot area has been worked on, accident repair etc?
 
I am normally pretty good (he says modestly) at spotting accident and paintwork issues, for that read 'OCD bodywork' so I think not, I had not got to polishing the bumper yet as I knew that the PDC job was going to be my first project and may have necessitated paint, but you are right it just does not look very 'Audi' and its a good job the boot is not opened very often. At work we used to have machine movements which happened 500 times in 8 hrs and for that duty you have to take special care of the cable paths!
I think that the car is an early facelift so I hope Audi have improved things since, it would be very interesting to see what others find when they ever have to go through the pain of removing the boot side trim panels. and that's the issue it's "out of sight" isn't it?
The white on the second image is the reflection of the garage door, the saloon only just fits in and I took the photos quickly this morning.
Incidentally which grommet hole is the 'factory' hole for the PDC bumper loom?
Rear pdc inside boot corner s
Rear pdc outside boot corner s
 
I believe the loom should route like this. Excuse the poor drawing but I think you can get the idea, there should be a loop / slack in the loom to allow for movement, which is tucked to the side of the hinge on the wing side.

IMG 3133
 
  • Like
Reactions: Potterswheel
Thanks for that, but as you can see my loom is just not long enough - there is no - zero slack from either direction and all the fixings match up with the holes etc. in the shell.
 
that's really strange. I had a 2015 S3 Saloon over for facelift rear lights last week Friday but did not take any photos. Am gonna make a point of checking when the next saloon comes over.
 
  • Like
Reactions: Potterswheel
Now I have had time to think it through, the route you show would make more sense by taking control of the loom rather than leaving it to chance like mine currently is, it also spreads the loads over a longer length which has got to be good for the life of the loom, not investigated this as yet but I have had a thought about installing a 'bungie' to load the loom in the direction I want to space permitting!!!!

Some photos of yours or anyone's loom would be greatly appreciated, although I don't see what I can do about it other than limit the damage.

It looks like I will shortly be getting in to the boot and letting my wife close the lid on me - it's been nice knowing you! I will take more photos of both up and down - maybe even a video.

Incidentally which grommet hole is the 'factory' hole for the PDC bumper loom out of the boot space and into the bumper cover?

Have you any hints for removing the door/sill trims? or do you just tuck cables out of the way under the bottom edge??

Thank you for all your help it is really appreciated
 
Should be able to access the boot by dropping the rear seats if you wanted to check the loom with the boot closed. Tips for removing trims? A good / proper set of trim tools that don't flex. Test lift in order to see where clips might be then pull hard!
 
  • Like
Reactions: Potterswheel
Yes, I was joking about the wife and seats!!!! that would be wishful thinking on he part, she is already jealous my new 'woman'!
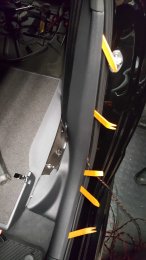
Trim tools I have - confidence to 'pull hard' I have not. I have put a heater in the car tonight in an attempt to soften things a bitRear pdc rear nearside door trim removal s
 
Yes, I was joking about the wife and seats!!!! that would be wishful thinking on he part, she is already jealous my new 'woman'!
Trim tools I have - confidence to 'pull hard' I have not. I have put a heater in the car tonight in an attempt to soften things a bitView attachment 214681

The clips can certainly be a pain. I just took all those panels off to wire a direct TPMS module in. The sill panel you have in your photo is clipped against the body vs down from the top like the others. Biggest challenge for me was making sure the clips lined up when going back on. Heat will certainly help but be sure to have some spare clips on hand incase they bend going back in.