S3 GTX2860R gen II build

Finally found out what chassis car has, FK au45 coilovers and most likely took to limit of -60mm since almost nothing fits below oilpan.
Please dont rape me but I havent actually ever adjusted coilovers or well I have over 15 years ago and I dont remember **** and car wasnt S3

Basics I know, Lift car up, take wheel off but what then? Do I need to compress spring? which way I move what collar?
I googled honestly for 2 hours and didnt really find similiar topic. I want to raise car about 30mm so I should just move it halfway to other way?

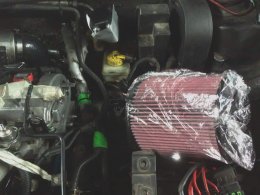
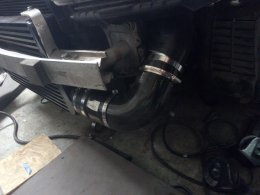
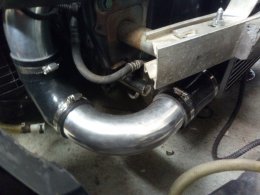
Tomorrow arrives K&N filter. Had to choose bit bigger diameter for inlet hole but I guess I use some plastic or something to cover the 9mm difference.Flange Inside Diameter 3.5 in (89 mm)
Flange Length 1.5 in (38 mm)
Height 8 in (203 mm)
Base Outside Diameter 8 in (203 mm)
Top Outside Diameter 6.625 in (168 mm)

JR filter was out of stock and would have taken 2 weeks to get it so I had to go for that one.
Ordered also steel undertray to protect engine&gearbox and that oh so weak oilpan.

If I have time and help, car should be running in 2 weeks.

Is it possible to use gears from 02M 1.8t a3 gearbox? the second gear on s3 is short what I have searched and my A3 accelerates with 2nd gear to 110Km/h(68Mph) when limiter hits (6800rpm)
EDIT: I found excel from badger5. Going to study it.
 
Last edited:
Coilovers are typically just a standard thread, so just think of the adjustment/spring perch as a nut and wind it up.

On the fronts they're pretty much at the same location as the wheel, and although I'm not super familiar with the S3 rear suspension, from memory the springs don't sit too much further inboard so wind it up by a little under the 30mm you are after and fine tune from there.

Edit: Depending on the coilovers, there may be a grub screw or lockring which needs undoing before you can adjust the perch. Should be easy to spot either way :)
 
  • Like
Reactions: Warsuperior
Coilovers are typically just a standard thread, so just think of the adjustment/spring perch as a nut and wind it up.

On the fronts they're pretty much at the same location as the wheel, and although I'm not super familiar with the S3 rear suspension, from memory the springs don't sit too much further inboard so wind it up by a little under the 30mm you are after and fine tune from there.

Edit: Depending on the coilovers, there may be a grub screw or lockring which needs undoing before you can adjust the perch. Should be easy to spot either way :)
Thank you :) Its better to have info before doing it. The kit is from 2001 or at least TUV paper is, so there might be lots of struggle to get the rings moving..
I would love to have air chassis but they are so damn expensive still. I rather buy the haldex controller :)
 
Probably worth giving threads a quick squirt with a good penetrant (fnarr...) once or twice before the day of reckoning in that case
 
I think I made a mistake on water hoses for turbo. They are banjo->Barbed end->rubber hose. Hose is abrasion resistant oil hose but I think it might be too close to turbine still.. they are on middle of CHRA(I think you guys know what I mean) I could not re-use the metal ones, since they didnt fit this turbo. I could perhaps saw and reuse some of the metal pipes.
I linked a bad picture showing on red where the hoses are.

Turbo has turbo cover tho but I dont think its enough.

Stupid stupid me that I didnt think this earlier... I need to remove the water hoses and its going to be pain in *** since I had to setup them before I put the turbo on exhaust manifold. ARGH!

Im going to use the old hoses and cut the other end from flexible one off and connect the water hose with clamp on it.
The longer metal pipe (which I hope is still somewhere to be found) I hope I can bend it without breaking.

Thanks to Tuffty that this came to mind. I read your topic and you had melted hose too and it seems it might have been bit farther than my hoses are.

I was hoping to get this together fast but now these setbacks(just because I didnt think..) are making things slow. Of course it is better to fix it now and not when catastrophe happens.
 

Attachments

  • images.jpg
    images.jpg
    10.4 KB · Views: 256
  • fds.jpg
    fds.jpg
    483.5 KB · Views: 289
Last edited:
My setup was very similar and I used hoses made by Pirtek. They were high temp high pressure resistant. This is them when I removed the engine after 4000 miles.
896fe678ef3bdbc4995b21b5b2911225.jpg


Additional heat resistant tape or wrap would also help


Sent from my iPhone using Tapatalk
 
Stainless hard pipes are preferable at least until out of the way of the hot stuff.... rubber based or even silicon based hose will eventually degrade from radiant heat even when wrapped (as I found out the hard way) which is why I mad all mine from stainless tubing and PTFE lined flexi's...

Routing is as important too... heat management is a big consideration especially on turbo cars

This kinda stuff helps too
https://www.ebay.co.uk/itm/Silicone...ve-Heat-Shield-Sleeve-Black-0-5m/192217278688

...but doesn't mean you can then get away with cable tying the hose to the downpipe of course... :)

<tuffty/>
 
Yeah hoses were bad choice. I cant reach the hoses because I put the car on low stands and its too low to get under the car. I try reuse the old metal piping and mod them. Most likely I will not touch hoses now and build car so it can be driven and then go to place where i can lift it proper.

Here is some pics fitting this big *** k&n
 

Attachments

  • FB_IMG_1531473687038.jpg
    FB_IMG_1531473687038.jpg
    84.4 KB · Views: 273
Do I need pcv with oil catch can? Im fabricating TIP and was wondering how many connections it needs. List afaik: dv valve, n75 and what else? I removed n249, sai. Evap i still have.
 
Got answer now when came home. Just need connection for DV and N75.
I wasted time today trying to reuse old TIP. Idea was to put in metal 70mm pipe to reinforce it and clamp the hose down.


Well it worked but I would have had to resize it back to 76mm.
I think it might have been tight enough to hold air too but since I wasnt 100% sure I decided to make new one from silicone hoses and 90degree Stainless steel pipes and 60 degree normal pipe.
Below is filter and TIP fitted

Here is how it looks, some clamps missing. I weld the DV hose place to first 90degree SS pipe and the N75 connection

Fmic with install parts. Dont laugh! My dad made those from very thick stainless steel. He is 70years old and working like young boy with me :D
 

Attachments

  • IMG_20180713_142520.jpg
    IMG_20180713_142520.jpg
    873.8 KB · Views: 277
  • IMG_20180713_142506.jpg
    IMG_20180713_142506.jpg
    852.2 KB · Views: 284
  • IMG_20180713_142603.jpg
    IMG_20180713_142603.jpg
    794.1 KB · Views: 305
  • IMG_20180713_142549.jpg
    IMG_20180713_142549.jpg
    882 KB · Views: 294
  • IMG_20180713_174626.jpg
    IMG_20180713_174626.jpg
    882.3 KB · Views: 379
  • IMG_20180713_180858.jpg
    IMG_20180713_180858.jpg
    885.8 KB · Views: 291
  • IMG_20180713_181503.jpg
    IMG_20180713_181503.jpg
    870.9 KB · Views: 305
  • Like
Reactions: andrew_wright
Can anyone remember the diamater of those OEM metal pipes? I left mine with car and Im over 30km away. I would go buy more pipe if I knew the outer diameter so I dont have to guess.
3/8" might be the size...
 
TIP versio 4
Mig weld so looks are not best on weld but 100% air tight.

Currently trying to unbolt compressor housing so I can get water hoses out. Pain in *** let me tell you! So little room for untight bolts so I have to make new tools!
 

Attachments

  • FB_IMG_1531567883364.jpg
    FB_IMG_1531567883364.jpg
    74.3 KB · Views: 260
Had to unbolt compressor and turbine to get old water hoses off. I used the old turbo water pipes and bend them to fit.
Forgot to take picture of the other pipe.
37221237 10209566544519282 946191809388740608 n37179122 10209566544159273 8366618080977092608 n
Took me nearly a day to get all loose and back again! Hands are filled with tiny cuts too because didnt have lot room and had to push hands from tiny holes.

Lifted the front end of car up and took front wheels off so I could adjust coilovers. Well they are stuck of course and look horrible. Didnt move at all when I tried with huge pliers. Hopefully I find tomorrow some kind of key for adjusting those rings.
 

Attachments

  • 37272450_10209566545239300_7198414507205459968_n.jpg
    37272450_10209566545239300_7198414507205459968_n.jpg
    86.3 KB · Views: 234
I'll just drop these here.... :sob:
2 Bend fin tips and they have rubbed on compressor casing. Lesson learned: Dont let the compressor spin when removing it.
Blades/Fins are now bend back to where they were carefully and compressor casing slightly polished.
Turbo retailer said that should not affect strenght of the blades since bends are not so big. Said to check them after coule hundred kilometers.
 

Attachments

  • 37077658_10209559426861345_643711354519158784_n.jpg
    37077658_10209559426861345_643711354519158784_n.jpg
    46.1 KB · Views: 148
  • 37117250_10209559425821319_3059812530772770816_n.jpg
    37117250_10209559425821319_3059812530772770816_n.jpg
    42.5 KB · Views: 150
  • 37161102_10209559423581263_6081809218829025280_n.jpg
    37161102_10209559423581263_6081809218829025280_n.jpg
    55.2 KB · Views: 157
  • 37174848_10209559427221354_462415923052019712_n.jpg
    37174848_10209559427221354_462415923052019712_n.jpg
    58.6 KB · Views: 142
  • 37179907_10209559425181303_7249076730248298496_n.jpg
    37179907_10209559425181303_7249076730248298496_n.jpg
    51.2 KB · Views: 173
  • 37228683_10209559425461310_1915445694781456384_n.jpg
    37228683_10209559425461310_1915445694781456384_n.jpg
    43 KB · Views: 145
it will affect the balance though... remember its spinning at 120,000 rpm...

<tuffty/>
 
  • Like
Reactions: Warsuperior
it will affect the balance though... remember its spinning at 120,000 rpm...

<tuffty/>
I asked the same but the guy who balances them said that, if you get them to same position, it should not be any problem since they are not missing any mass or parts. He asked from the engineer guy too and he said same after seeing pictures. If you can get the blades to same position and polis compressor bit its going to be ok.
Blades are aluminium and I bend them back with fingers and the one showing tent, I did with padded small pliers carefully. Then I checked many times vs other fins and if there is something different, I cannot see it with eyes or measure it accurately enough.
So I guess I take their word for it and if it breaks then it breaks and then we buy new wheel/casing.

I took the compressor casing very carefully off and have no clue at what point I could have done those and I never have had this kind of problem with other turbos, alltho this turbo is very different build (more lighter materials, smaller clearances)

Let this be warning to all: be extra careful with these gen II series. I admit it tho, still my fault all this, expensive lesson learned.

If anything good today, my dad managed to get the coilovers to move and we raised front 2cm. Didnt have strenght to see how lot the car raised. We are having heat wave here. +30c in shadows and in garage without A/C near 40c.
 
All is well with turbocharger. It is now fixed and ready to rock.
I was offered used blue haldex controller for 470€, is it worth it?
If its a genuine one maybe... a sports haldex controller makes a noticeable difference to the way the car drives out of corners etc but the blue controller is now obsolete so they seem to hold prices well... there are also a lot of scams where std controllers are painted blue and sold for silly money...

Personally I prefer HPA's approach which uses the std controller but sits in the data stream to 'enhance' the std firmware... I have one of these and it works very well... the other advantage is if (or more likely when) the std controller packs up you can just buy another secondhand one cheaply and you are back in the game...

<tuffty/>
 
  • Like
Reactions: tomjol and Tj 0785
If its a genuine one maybe... a sports haldex controller makes a noticeable difference to the way the car drives out of corners etc but the blue controller is now obsolete so they seem to hold prices well... there are also a lot of scams where std controllers are painted blue and sold for silly money...

Personally I prefer HPA's approach which uses the std controller but sits in the data stream to 'enhance' the std firmware... I have one of these and it works very well... the other advantage is if (or more likely when) the std controller packs up you can just buy another secondhand one cheaply and you are back in the game...

<tuffty/>
Its genuine. Where can you buy HPA controller in Uk/eu? any ideas? all that are listed on HPA page are not delivering it.
 
Hmm I cannot edit my original post, I wanted to update the list.
Here is the parts list as requested.

- Stock APY small port head, restored less than 10 000km ago
- BAM honed block with Wössner 8.5:1 CR pistons with new piston rings
- Maxspeedingrods H-profile conrods measured and balanced
- New oil pump, water pump, gaskets etc. Rebuild from new parts
- Audi R8 redtop coils
- 630cc(actually rate 618cc and matched) longtip injectors
- Rennsport intake
- Wideband conversion and ME7.5 ECU 032H
- HPF intank 265LPH pump
- K&N RC-5112 air filter
- DIY TIP 76mm
- Forge 007 DV
- Oil catch can
- Removed N249, SAI, Evap etc.
- Garret GTX2860R Gen II with A/R .64 internal wastegate and v-band adapter. 1bar actuator
- T25 cast iron exhaust manifold
- 3" DIY downpipe
- 3" 200cel cat+pipes, rear mufflers are stock and piping
- Modified original water pipes and oil return pipe
- Luk DMF with sachs SRE 4-plate paddle disk
- New gaskets between transferbox/gearbox
- 5000 km ago renewed gearbox bearings
- FK automotive coilover kit
- Boost pressure, fuel pressure, EGT meters
- PLX AFR meter
- 600x300x76 FMIC
- Polyurethane filled new OEM engine mounts
- Dog bone mount with powerflex purple/yellow bushes


I was aiming for 400hp but it is really pushing the turbo so I have to settle for less but spool should be quite minimal.
Boost creep is going to be a problem, I admit it.
Oh well, I have AGU engine on my daily driver so if this car really works, I can build perhaps stroker engine from it :p
Have to admit tho that this project has been not so fun so I guess I wont rebuild whole car anymore :D

Today I continue building car. Where I live has been nonstop +30c day and night and on garage near +40c so I havent been able to build it. Just too damn hot!
 
Tips&Tricks for bleeding clutch, brakes, water system and power steering(idk does it need one)?
I have service manuals from Audi but not the tools they recommended, although I do have pressure bleeder that you can bleed them alone.

The brake fluid canister is bit empty since clutch spilled fluid lots.
Im asking because you guys have lot more experience on S3 than I do :)
 
I lifted the front end of car 3.5cm since it wouldnt go more. Now I got 13cm room from lowest point of car, its dog bone.

Steel undertray is going to be handy.
Also got "new" wheels, avus 17" with 225/45r17. Rear wheels are my winter tires with black avus wheels.


Im in hurry to get car moving. 3 weeks till summer vacation and I want to get 2500km break-in and go for tune while Im off work
 

Attachments

  • 37394766_10209594132488964_7534030321231069184_n.jpg
    37394766_10209594132488964_7534030321231069184_n.jpg
    80.2 KB · Views: 205
  • 37416550_10209594135729045_4506163825925423104_n.jpg
    37416550_10209594135729045_4506163825925423104_n.jpg
    95.5 KB · Views: 202
Took rear wheel off today and there is not adjustable springs on rear! bit WTF moment. It looks like original spring, black with 5 blue dots, looking pretty new too. EDIT: found receipt on car papers that rear springs replaced late 2016.
Bled clutch and brakes today and installed intercooler piping. Tomorrow going to install FMIC and put the front end together.
Only missing oil catch can hoses and place for it and then pretty much done.
Coolant needs to be refilled and then I can hook battery on car and start to program the new ECU
 
Cooking some delicious diverter valve for dinner! Black hose as sidedish
 

Attachments

  • 37582223_10209599877592588_2934471160143806464_o.jpg
    37582223_10209599877592588_2934471160143806464_o.jpg
    397.1 KB · Views: 139
context would be useful....

purple bushes suggest they are powerflex poly's... superpro bushes are a bluey colour...

<tuffty/>
Sorry, I mean the L wishbone flat bush that connects it to chassis, rear one outer near door. Im just wondering have they been upgraded since coloring was so strange. They are more bluey color, bit darker than purple. Im ordering parts so now I know I wont order those bushes.

Lähetetty minun K10000 Pro laitteesta Tapatalkilla
 
what are you putting in? be aware that the original OE part number is for a voided bush... if you are installing OE bushes then you want the solid 8N0 version from the Mk1 TT

<tuffty/>
 
what are you putting in? be aware that the original OE part number is for a voided bush... if you are installing OE bushes then you want the solid 8N0 version from the Mk1 TT

<tuffty/>
Thanks for tip! I was thinking powerflex ones but Im open to suggestions. Im not going for hardcore racer chassis, since its going to be daily driver summer/winter.
 
Mines fully polybushed... its perfectly streetable... I do have superpro caster adjust bushes in my arms so no real need for you to go that far but solid TT or super pro poly's for that particular bush... not convinced on powerflex for that particular bush as it has a tendency to squeeze out... super pro one is a proper press fit like the OE..

I'd poly bush whatever you can suspension wise... car will feel better for it... you already have coil overs that will account for most of the 'ride quality'... bushes won't make much difference in that context but tightens up the way the car feels...

<tuffty/>
 
Fmic pipes did not still fit behind bumber as I started to guess after reading the fmic topic more... so no stealth insert there.
Considering different route aka Superkarl route :) =Weld 63mm alu pipes straight to FMIC outlet which is 76mm and using 63mm 90degree silicone hose, then aluminium 63 90degree on both sides.

I know the left side is made wrong(my 70 yo dad did that) but either way, they dont fit behind bumber.
 

Attachments

  • 5.jpg
    5.jpg
    319 KB · Views: 229
  • IMG_20180723_200436.jpg
    IMG_20180723_200436.jpg
    305.2 KB · Views: 210
  • IMG_20180723_184231.jpg
    IMG_20180723_184231.jpg
    340.4 KB · Views: 227
  • IMG_20180723_184221.jpg
    IMG_20180723_184221.jpg
    323.7 KB · Views: 207