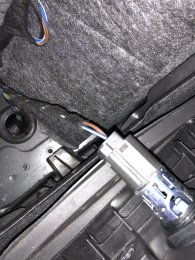
I recently did the PFL to FL dynamic taillights conversion with self made wiring loom, someone was asking me the details so I figured I'll just make a post for it.
First of all, here's the pinouts for the FL dynamic taillights (This is same for SB/Sedan)
Outer Lamp (Same for left and right side)
Pin 1 - Ground
Pin 2 - Tail lamp
Pin 3 - Brake lamp
Pin 4 - Turn signal lamp
Pin 5 - Dynamic control - This is the wire that needs to tap to live power
Pin 6 - Tail lamp 2 (connected to inner lamp's running lamp)
Inner Lamp (Same for left and right side)
Pin 1 - Ground
Pin 2 - Tail lamp
Pin 3 - Turn signal lamp
Pin 4 - Fog lamp
Pin 5 - Reverse lamp
Pin 6 - Dynamic control - This is the wire that needs to tap to live power
On the PFL, there's only 5 wires each for the inner and outer lamps, but on the FL dynamic, there's 6 wires each, the additional wire (in red above) is the power for the dynamic module inside the tail lamp, without this wire, everything will still functions normally, just without the dynamic sweeping function.
The FL dynamic taillights has different housing for SB and Sedan, but the connectors and pinouts are identical. On the PFL taillights, SB and Sedan shares the same OUTER lamp connector, but the INNER lamp connectors are different, SB has 8 pins connector while Sedan uses 5 pins connector.
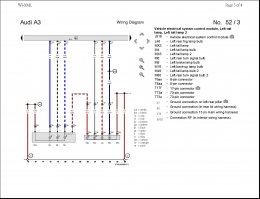
And here's the wiring diagram for PFL SB:
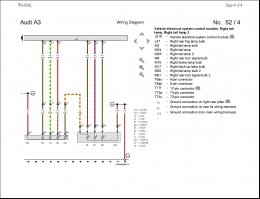
And here's the wiring diagram for PFL Sedan:


Outer Lamps:
The connector for both SB/Sedan's OUTER lamp needed is this (Part number 4H0 973 713 C): (** Some PFL SB came standard with this connector for the outer taillight already, so check first)

The outer lamp for both SB and Sedan is pretty straight forward, all you need to do is re-pin the wires to this connector using the PFL to FL pinouts above. You can remove the wires by unlocking the purple lock tab inside the connector by sliding it out to the open slot using a screwdriver, and the best way to loosen up the pin locks are by using Molex pin extractor OR two iPhone SIM card removal pins, works like a charm The wires all have waterproof plugs, for the additional control wire, you can order some waterproof plugs or just poke a hole to the empty pin that's plugged with a closed plug. The toughest part here is running the additional control wire through the rubber grommet into the trunk. I tied a metal wire to the pin wire and just poked a hole on the grommet from the inside by removing the side linings.
Inner Lamps:
Here's where the original PFL connectors are different for SB and Sedan, but both need this connector to connect to the FL taillight connector (Part number 4B0 971 636):
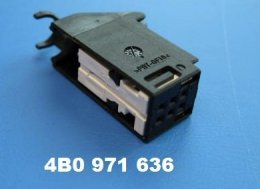
For Sedan, this is the 5 pins male connector I also ordered since I didn't want to cut any wire (Part number 5G0 972 715) and the wiring loom I made using these connectors for my Sedan:

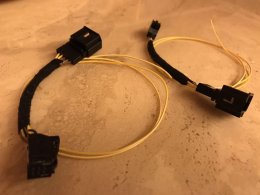
The extra yellow wire on my wiring loom is the inner lamp's control wire.
For Sportback, I do NOT have the male connector's part number, but this is what the PFL 8 pins looks like, you can check it's part number and should easily find it's counterpart online:

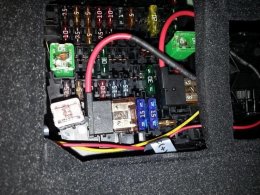
Once you have the wiring loom made according to the pinouts above and connected them up, run the control wire to the left side of the trunk (Coz the fuse box is on the left side), connect all four control wires into one and run it to the fuse box in the glove compartment, I used fuse F38 for constant power like this (borrowed from Blackvue install thread ) And that's it! Enjoy your new dynamic taillights
The taillight cost about £600 from my supplier, the connectors etc another £50 or so, but my original taillight were sold for £300 so this whole project cost me about £350
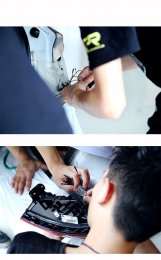
*** Depends on how anal you are, you don't really have to use any connectors at all, you can opt to just remove the pins from the original connector and isolate them with heat shrink then plug them directly into the FL taillights and seal it with hotmelt or something, like these guys...

**** Also the FL taillights' plastic trims are different, you can still use the PFL ones but it's not a perfect fit, I ordered FL ones for my Sedan since they're only like $30 total or so, here're the part numbers for Sedan:
8V5 945 253 B
8V5 945 254 B
8V5 945 255 B
8V5 945 256 B
***** I wrote this quick and based on the assumption that the person chose to do this have the basic knowledge of reading the pinouts and tearing down the car, I would not be held responsible for any damage done following this guide, proceed at your own risk, but of course, I'll be happy to answer any questions if there's any
And here's the result:
First of all, here's the pinouts for the FL dynamic taillights (This is same for SB/Sedan)
Outer Lamp (Same for left and right side)
Pin 1 - Ground
Pin 2 - Tail lamp
Pin 3 - Brake lamp
Pin 4 - Turn signal lamp
Pin 5 - Dynamic control - This is the wire that needs to tap to live power
Pin 6 - Tail lamp 2 (connected to inner lamp's running lamp)
Inner Lamp (Same for left and right side)
Pin 1 - Ground
Pin 2 - Tail lamp
Pin 3 - Turn signal lamp
Pin 4 - Fog lamp
Pin 5 - Reverse lamp
Pin 6 - Dynamic control - This is the wire that needs to tap to live power
On the PFL, there's only 5 wires each for the inner and outer lamps, but on the FL dynamic, there's 6 wires each, the additional wire (in red above) is the power for the dynamic module inside the tail lamp, without this wire, everything will still functions normally, just without the dynamic sweeping function.
The FL dynamic taillights has different housing for SB and Sedan, but the connectors and pinouts are identical. On the PFL taillights, SB and Sedan shares the same OUTER lamp connector, but the INNER lamp connectors are different, SB has 8 pins connector while Sedan uses 5 pins connector.
And here's the wiring diagram for PFL SB:


And here's the wiring diagram for PFL Sedan:


Outer Lamps:
The connector for both SB/Sedan's OUTER lamp needed is this (Part number 4H0 973 713 C): (** Some PFL SB came standard with this connector for the outer taillight already, so check first)

The outer lamp for both SB and Sedan is pretty straight forward, all you need to do is re-pin the wires to this connector using the PFL to FL pinouts above. You can remove the wires by unlocking the purple lock tab inside the connector by sliding it out to the open slot using a screwdriver, and the best way to loosen up the pin locks are by using Molex pin extractor OR two iPhone SIM card removal pins, works like a charm
Inner Lamps:
Here's where the original PFL connectors are different for SB and Sedan, but both need this connector to connect to the FL taillight connector (Part number 4B0 971 636):

For Sedan, this is the 5 pins male connector I also ordered since I didn't want to cut any wire (Part number 5G0 972 715) and the wiring loom I made using these connectors for my Sedan:


The extra yellow wire on my wiring loom is the inner lamp's control wire.
For Sportback, I do NOT have the male connector's part number, but this is what the PFL 8 pins looks like, you can check it's part number and should easily find it's counterpart online:

Once you have the wiring loom made according to the pinouts above and connected them up, run the control wire to the left side of the trunk (Coz the fuse box is on the left side), connect all four control wires into one and run it to the fuse box in the glove compartment, I used fuse F38 for constant power like this (borrowed from Blackvue install thread

The taillight cost about £600 from my supplier, the connectors etc another £50 or so, but my original taillight were sold for £300 so this whole project cost me about £350
*** Depends on how anal you are, you don't really have to use any connectors at all, you can opt to just remove the pins from the original connector and isolate them with heat shrink then plug them directly into the FL taillights and seal it with hotmelt or something, like these guys...


**** Also the FL taillights' plastic trims are different, you can still use the PFL ones but it's not a perfect fit, I ordered FL ones for my Sedan since they're only like $30 total or so, here're the part numbers for Sedan:
8V5 945 253 B
8V5 945 254 B
8V5 945 255 B
8V5 945 256 B
***** I wrote this quick and based on the assumption that the person chose to do this have the basic knowledge of reading the pinouts and tearing down the car, I would not be held responsible for any damage done following this guide, proceed at your own risk, but of course, I'll be happy to answer any questions if there's any
And here's the result:


