Hi all, I've just finished retro fitting auto Wipers and lights to my PFL S3.
Firstly to do this, your car is going to need to have climate control fitted, if not, you will have source and install the loom. I didn't need to do that as I have climate control.
To do this you're going to need 3 parts.
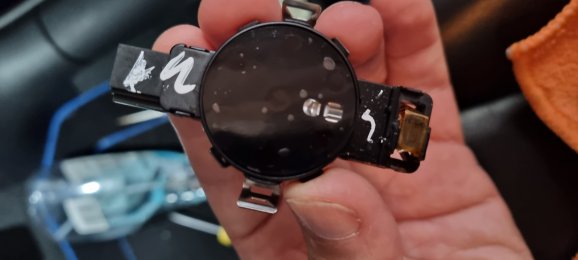
1. A sensor. The standard sensor part number is 8U0 955 559 this is the humidity sensor for the climate control.
For PFL you want to swap that out for a rain/light/humidity sensor part number
8U0 955 559 B, and for a facelift 8U0 955 559 C.
2. In addition to the sensor (if your sensor doesn't include it) you will need to replace the gel pad.
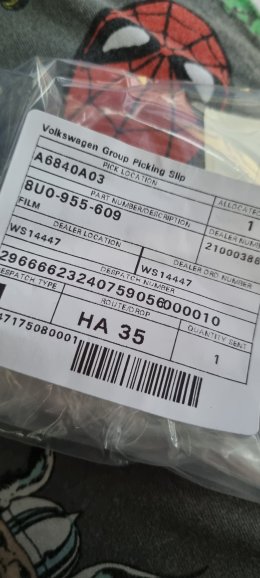
Part number 8U0 955 609. Can get them from China for about £7 or if like me you're impatient, direct from VW for a pricey £40!!!!
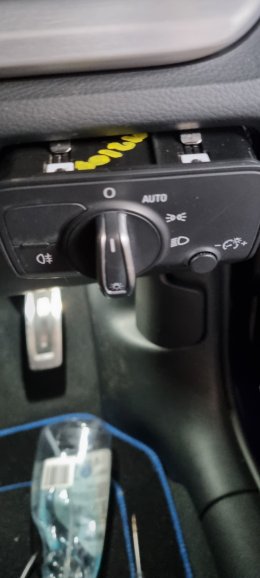
3. A switch with Auto position. The switches are going to be slightly different for everyone depending on what lighting arrangement you have. I think they are all a variant of
8V0 941 531 with lettering at the end, mine was a H and I swapped it for a K
(Xenon, rear fogs only)
Ok, once you have your parts, it's time to fit them. Start with the switch, pop the panel off from the drivers side of the dash and and push out the switch from behind, it's pretty easy, swap it over, plug it in and reseat it.
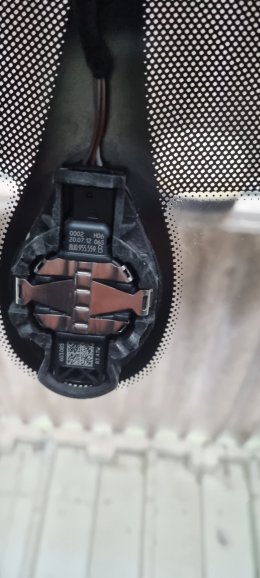
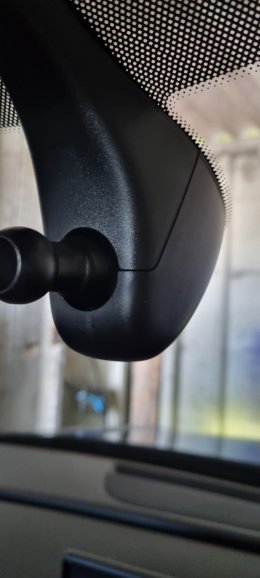
Next the sensor. Pull the rear view mirror off the mounting. Once off, with your fingers, squeeze the housing trim at its widest part and pull the narrowing section away. Then pull down on the remaining half cylinder shaped section.
Look at the mounting, twist it off it's lugs and pull down.
Use a small pick or screwdriver to oish in the connection tab and pull the connector from the sensor.
Unclip the silver clips either side of the sensor and pull the sensor away from the housing. Clean up the windscreen
Now put your gel pad on your new B or C sensor and do the reverse of the above.
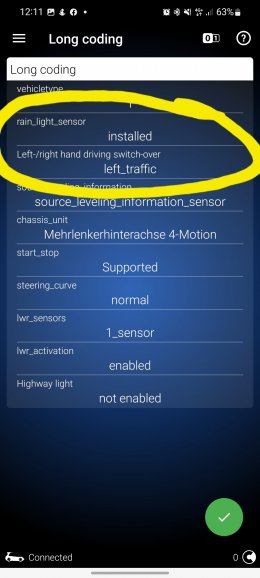
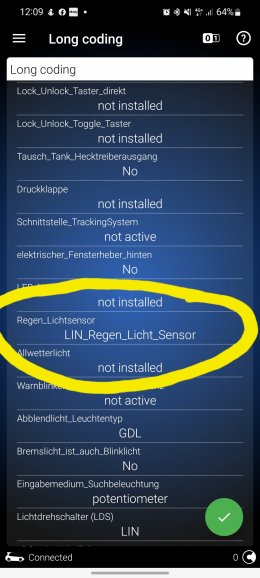
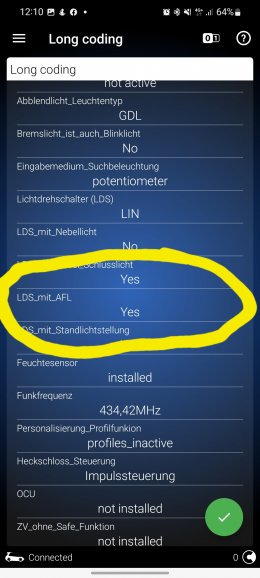
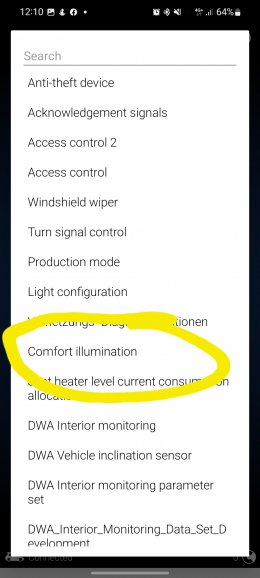
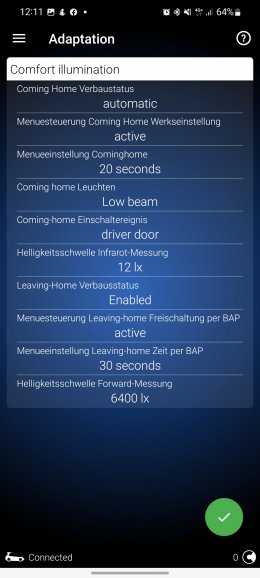
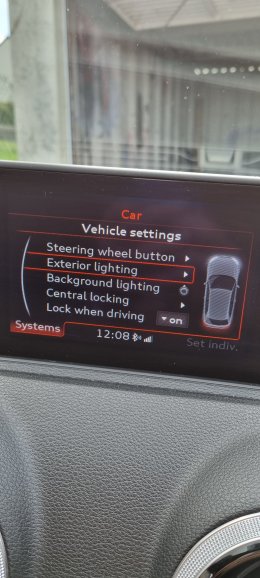
Now for the coding, this is why I thought I would do a guide cause there's a few options you need to sort to make this work without errors. I had a lighting malfunction light on the dash with no OBD fault codes...
Firstly to do this, your car is going to need to have climate control fitted, if not, you will have source and install the loom. I didn't need to do that as I have climate control.
To do this you're going to need 3 parts.
1. A sensor. The standard sensor part number is 8U0 955 559 this is the humidity sensor for the climate control.
For PFL you want to swap that out for a rain/light/humidity sensor part number
8U0 955 559 B, and for a facelift 8U0 955 559 C.
2. In addition to the sensor (if your sensor doesn't include it) you will need to replace the gel pad.
Part number 8U0 955 609. Can get them from China for about £7 or if like me you're impatient, direct from VW for a pricey £40!!!!
3. A switch with Auto position. The switches are going to be slightly different for everyone depending on what lighting arrangement you have. I think they are all a variant of
8V0 941 531 with lettering at the end, mine was a H and I swapped it for a K
(Xenon, rear fogs only)
Ok, once you have your parts, it's time to fit them. Start with the switch, pop the panel off from the drivers side of the dash and and push out the switch from behind, it's pretty easy, swap it over, plug it in and reseat it.
Next the sensor. Pull the rear view mirror off the mounting. Once off, with your fingers, squeeze the housing trim at its widest part and pull the narrowing section away. Then pull down on the remaining half cylinder shaped section.
Look at the mounting, twist it off it's lugs and pull down.
Use a small pick or screwdriver to oish in the connection tab and pull the connector from the sensor.
Unclip the silver clips either side of the sensor and pull the sensor away from the housing. Clean up the windscreen
Now put your gel pad on your new B or C sensor and do the reverse of the above.
Now for the coding, this is why I thought I would do a guide cause there's a few options you need to sort to make this work without errors. I had a lighting malfunction light on the dash with no OBD fault codes...