

Hi all,
I did a foglight retrofit last weekend and find it quite easy to do. There wasn't many information found about the subject and giving your A3 some foglights can really change it appearance and give it a more "aggressive" look. Next to that Kufatec did another superduper job in creating a manual that is more complicated than one from Ikea... I don't know what intern makes the manuals there, they really suck..
What you need.
- Retrofitcable:
The whole kit (MJ 02/07): https://www.kufatec.com/en/audi/a3/a3-8p-8pa-cabrio/retrofit-kit-fog-lights-for-audi-a3-8p-8pa-36768
- Cable H7/H11: https://www.kufatec.com/en/audi/a3/...ght-cable-set-for-audi-a3-8p-8p-sport-33787-1
- Foglights H7/H11 depending on what set you buy.
- The button that enables foglights to turn on (the slider in your dashboard)
- Foglights trim
- M10 Wrench
- Philips head screwdriver
- Tie-wraps.
- VCDS/VAGCOM
Note(s) before starting.
1. Working with electronics especially plugging in/out cables from modules. Always disconnect the battery! This prevens faults being generated in the modules of your car.
2. H7/H11 is a bulb standard. H7 (plastic cap) is used in normale editions A3, H11 (glass cap) is S-Line. Not sure wich model fit what car. I know that the pre-facelift had foglights with a flat top and after the MJ07 they are round. It doesn't make any difference for the wiring, but for the connector on the wire it does. So make sure you have the right bulb for your cable and that the foglight will fit your foglights trim.
3. This how-to is done on a RHD car. It serves the same purpose on a LHD but a few points on a RHD are different in a LHD obviously.
4. Before even attempting or buying anything make sure your BCM supports foglights. You can do this by coding them first before buying anything. If the coding gets accepted and your car begins to whine there is no foglight connected you are sure they thing will work. If the coding won't be accepted or you don't see the option at all you need to also replace your BCM.
What is in the package?
- The retrofit loom
- Additional loom for lightswitch (not optional)
- Optional: foglights if you order them through Kufatec.


Manual.
This is the way you want to lay the cable. The longer end is for the foglight that is the furthest away from the driver seat.
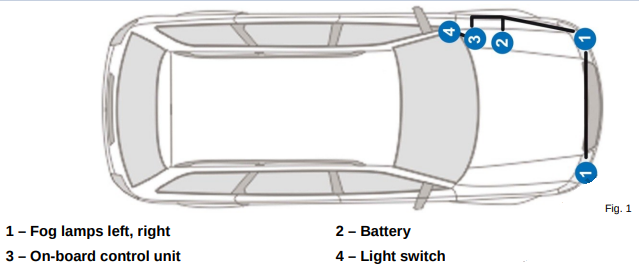
NOTE: THIS IS A RHD!!!
Step 1.
This step is kind of optional, I wanted to feed the cable in a neat way through the bumper so I took the whole front bumper off. This gives me access to all the front parts and I can feed the cable neatly next to my condensor and fan with tie-wraps.


Step 2.
When both foglight connectors are fed through the bumper you can work your way up to the place the battery is sitting in a RHD. Now on a RHD the battery sits on the right side of the engine compartment and right behind it there is a rubber where you can poke through to get the cable into the car itself through the firewall.
Step 2.1
Take out your battery and take out the plastic covers.


Step 3.
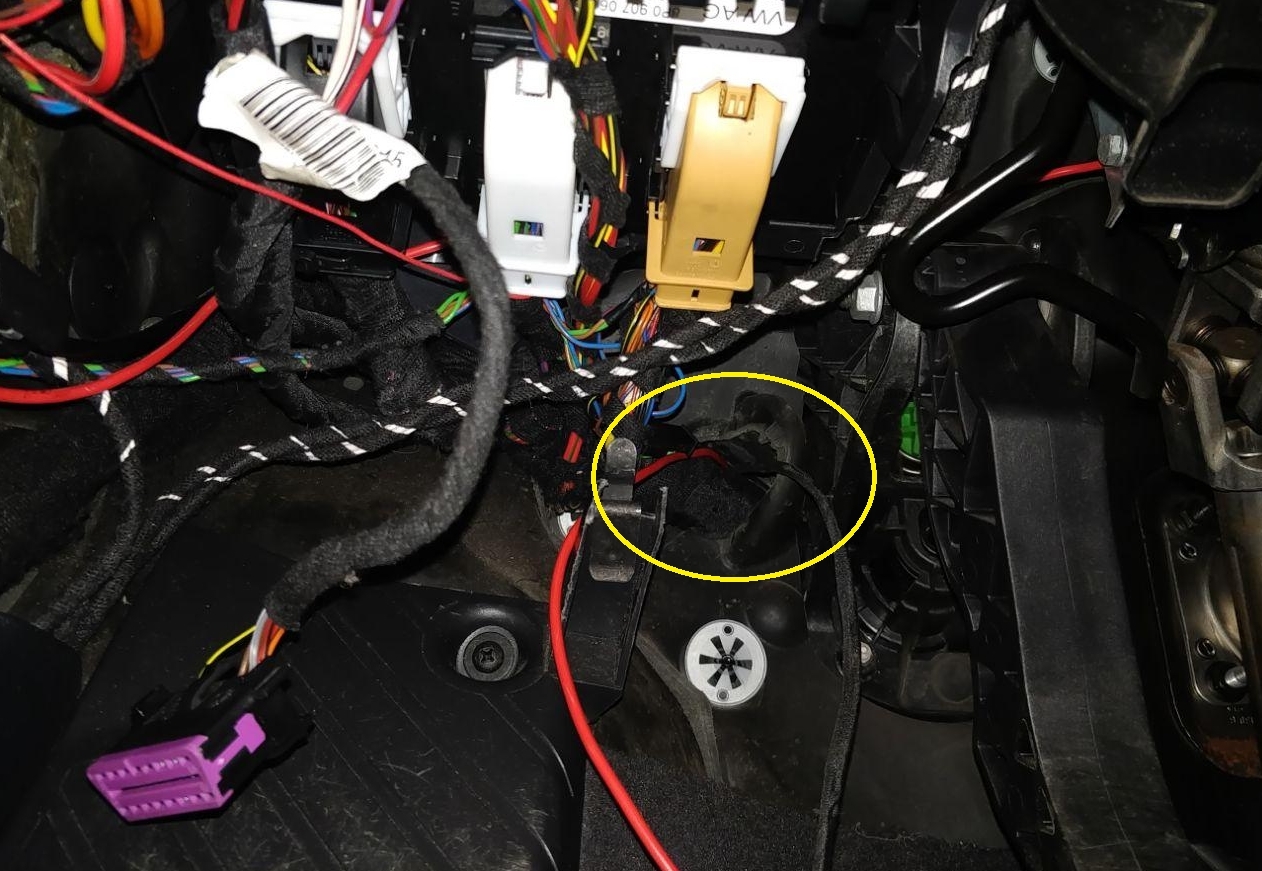
Screw down the dashboard plate under your steeringwheel to access the BCM and it's connectors. The dashboard plate is hold by three M8 or M10 bolts and will clip off easily. When screwed down you'll see these black, white and beige connectors.
On the photo underneath you'll see a yellow cirkle. The cables you just fed through the rubber from the engine compartment will come out here. On a LHD I'm not sure where you can poke through the firewall but I guess there should be a same spot with a rubber you can poke through.

Step 4.
The wiring. Now unclip all connectors from the BCM module by pressing the thick plastic cover in the middle the handle will be able so slide down and the connectorhousing will pop-off. It's just like 32pins grey doormodule connector.
When you got the connector out cut the tie-wrap holding the cable and housing together. After that's off you need to turn the connector a fair big and hold down the clips on either side so shove the actual connector out of it's housing (see below, i don't have an actual photo of a BCM housing connector but it's the same as on this connector).
Step 4.1
When the actual connector got out they need to split again. You can feel the connector is a bit wobbly and will slide of the other half easily.
On the Kufatec cable some details about connecting are imprinted on the cable itself. Kutfatec won't be Kufatec to even **** this up.. I bought a H11 cable and the imprints on my cable were for a H7 AND pre-facelift.
Now look for numbers imprinted on your BCM connector (they are on the inside) and connect the lights as the diagram below.
The diagram won't make sense now, but when you got the cable and see the imprints on the cable you'll get the idea.


Step 5.
The additional wire serves the purpose to turn the foglights on with the slidebutton. Take a look at the three connectors that come out of your lightslidebutton to control the lights. You'll need to connect the additional wire into PIN5 of your lightswitch plug.
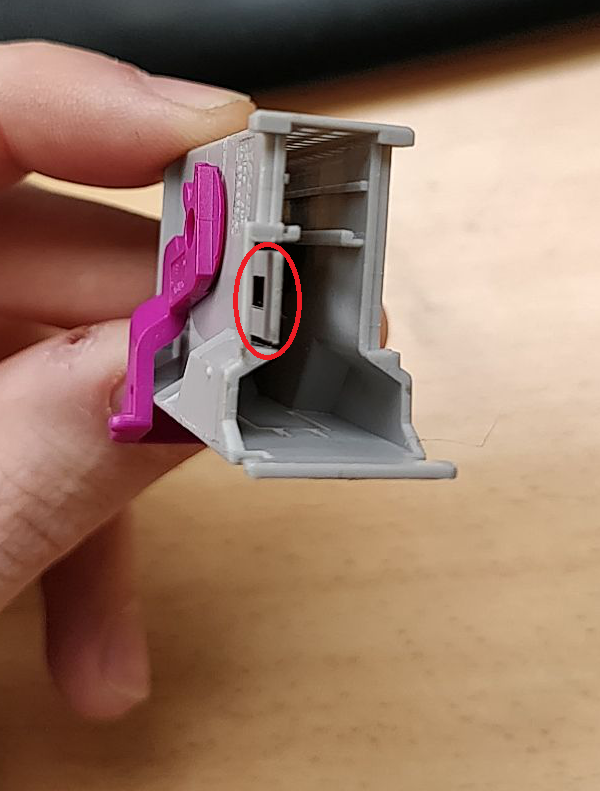
Now comes in Kufatec's great manual again "Plug in the connector in PIN5 of the switch". But what they don't tell you is that you need to take apart the plug for this. I was trying to fit the thing in it where I was almost at the point of just cutting the connector and crimp it in.
Take a small pincet or other thin object and pierce it on the side of the connector. There are two very small and fragile plastic clips that hold the cables on it's place inside the actual connector. You can't pull wires from it or put new ones in it withouth this clip being lose.

After this you can slide the wire into PIN5 of the plug. Take caution in the manner you slide it in, the "lock" side on the top facing the plastic lock.

Now for the other end get back to the black (Plug A) again. This time search for PIN21. Again, take caution and put the cable in with the "locking" side towards you so the clip will hold the terminal in place inside the plug.
Step 6.
The last connector is the ground. Now you don't want to pull the ground cable through the firewall inside the car because your car battery has a great feature called (-) that serves the purpose of grounding electrics .
.
Attach the ground cable to the (-) pole of your battery and connect to BCM plugs and lighting switch to the connectors. Feed the car your battery and pull out your VCDS to code the BCM.
Step 7.
Coding. To get the foglights work hook up your A3 to VCDS and code the following:
Enable foglights
[09-Cent. Elect.]
[Coding - 07]
[Longcoding helper]
Byte 14
Bit (0) - Activate (1)
Byte 14: 1xxxxxxx
Optional:
Enable foglights as corneringlights
[09-Cent. Elect.]
[Coding - 07]
[Longcoding helper]
Byte 14
Bit (7) - Activate (1)
Byte 14: 1xxxxxx1
Step 8.
Turn off your car, turn it on and test if the lighting works.

Build everything yourself back in reverse order and you got yourself a new retrofit.


I did a foglight retrofit last weekend and find it quite easy to do. There wasn't many information found about the subject and giving your A3 some foglights can really change it appearance and give it a more "aggressive" look. Next to that Kufatec did another superduper job in creating a manual that is more complicated than one from Ikea... I don't know what intern makes the manuals there, they really suck..
What you need.
- Retrofitcable:
The whole kit (MJ 02/07): https://www.kufatec.com/en/audi/a3/a3-8p-8pa-cabrio/retrofit-kit-fog-lights-for-audi-a3-8p-8pa-36768
- Cable H7/H11: https://www.kufatec.com/en/audi/a3/...ght-cable-set-for-audi-a3-8p-8p-sport-33787-1
- Foglights H7/H11 depending on what set you buy.
- The button that enables foglights to turn on (the slider in your dashboard)
- Foglights trim
- M10 Wrench
- Philips head screwdriver
- Tie-wraps.
- VCDS/VAGCOM
Note(s) before starting.
1. Working with electronics especially plugging in/out cables from modules. Always disconnect the battery! This prevens faults being generated in the modules of your car.
2. H7/H11 is a bulb standard. H7 (plastic cap) is used in normale editions A3, H11 (glass cap) is S-Line. Not sure wich model fit what car. I know that the pre-facelift had foglights with a flat top and after the MJ07 they are round. It doesn't make any difference for the wiring, but for the connector on the wire it does. So make sure you have the right bulb for your cable and that the foglight will fit your foglights trim.
3. This how-to is done on a RHD car. It serves the same purpose on a LHD but a few points on a RHD are different in a LHD obviously.
4. Before even attempting or buying anything make sure your BCM supports foglights. You can do this by coding them first before buying anything. If the coding gets accepted and your car begins to whine there is no foglight connected you are sure they thing will work. If the coding won't be accepted or you don't see the option at all you need to also replace your BCM.
What is in the package?
- The retrofit loom
- Additional loom for lightswitch (not optional)
- Optional: foglights if you order them through Kufatec.
Manual.
This is the way you want to lay the cable. The longer end is for the foglight that is the furthest away from the driver seat.
NOTE: THIS IS A RHD!!!
Step 1.
This step is kind of optional, I wanted to feed the cable in a neat way through the bumper so I took the whole front bumper off. This gives me access to all the front parts and I can feed the cable neatly next to my condensor and fan with tie-wraps.
Step 2.
When both foglight connectors are fed through the bumper you can work your way up to the place the battery is sitting in a RHD. Now on a RHD the battery sits on the right side of the engine compartment and right behind it there is a rubber where you can poke through to get the cable into the car itself through the firewall.
Step 2.1
Take out your battery and take out the plastic covers.
Step 3.
Screw down the dashboard plate under your steeringwheel to access the BCM and it's connectors. The dashboard plate is hold by three M8 or M10 bolts and will clip off easily. When screwed down you'll see these black, white and beige connectors.
On the photo underneath you'll see a yellow cirkle. The cables you just fed through the rubber from the engine compartment will come out here. On a LHD I'm not sure where you can poke through the firewall but I guess there should be a same spot with a rubber you can poke through.
Step 4.
The wiring. Now unclip all connectors from the BCM module by pressing the thick plastic cover in the middle the handle will be able so slide down and the connectorhousing will pop-off. It's just like 32pins grey doormodule connector.
When you got the connector out cut the tie-wrap holding the cable and housing together. After that's off you need to turn the connector a fair big and hold down the clips on either side so shove the actual connector out of it's housing (see below, i don't have an actual photo of a BCM housing connector but it's the same as on this connector).
Step 4.1
When the actual connector got out they need to split again. You can feel the connector is a bit wobbly and will slide of the other half easily.
On the Kufatec cable some details about connecting are imprinted on the cable itself. Kutfatec won't be Kufatec to even **** this up.. I bought a H11 cable and the imprints on my cable were for a H7 AND pre-facelift.
Now look for numbers imprinted on your BCM connector (they are on the inside) and connect the lights as the diagram below.
- Imprint on Kufatec wire: (A Vier 4) > Plug C (Beige) PIN25 (Powerfeed left foglight)
- Imprint on Kufatec wire: (C Zwei 2 or D Zwei 2) >Plug A (Black) PIN25 (Powerfeed right foglight)
The diagram won't make sense now, but when you got the cable and see the imprints on the cable you'll get the idea.
Step 5.
The additional wire serves the purpose to turn the foglights on with the slidebutton. Take a look at the three connectors that come out of your lightslidebutton to control the lights. You'll need to connect the additional wire into PIN5 of your lightswitch plug.
Now comes in Kufatec's great manual again "Plug in the connector in PIN5 of the switch". But what they don't tell you is that you need to take apart the plug for this. I was trying to fit the thing in it where I was almost at the point of just cutting the connector and crimp it in.
Take a small pincet or other thin object and pierce it on the side of the connector. There are two very small and fragile plastic clips that hold the cables on it's place inside the actual connector. You can't pull wires from it or put new ones in it withouth this clip being lose.
After this you can slide the wire into PIN5 of the plug. Take caution in the manner you slide it in, the "lock" side on the top facing the plastic lock.
Now for the other end get back to the black (Plug A) again. This time search for PIN21. Again, take caution and put the cable in with the "locking" side towards you so the clip will hold the terminal in place inside the plug.
Step 6.
The last connector is the ground. Now you don't want to pull the ground cable through the firewall inside the car because your car battery has a great feature called (-) that serves the purpose of grounding electrics
.Attach the ground cable to the (-) pole of your battery and connect to BCM plugs and lighting switch to the connectors. Feed the car your battery and pull out your VCDS to code the BCM.
Step 7.
Coding. To get the foglights work hook up your A3 to VCDS and code the following:
Enable foglights
[09-Cent. Elect.]
[Coding - 07]
[Longcoding helper]
Byte 14
Bit (0) - Activate (1)
Byte 14: 1xxxxxxx
Optional:
Enable foglights as corneringlights
[09-Cent. Elect.]
[Coding - 07]
[Longcoding helper]
Byte 14
Bit (7) - Activate (1)
Byte 14: 1xxxxxx1
Step 8.
Turn off your car, turn it on and test if the lighting works.
Build everything yourself back in reverse order and you got yourself a new retrofit
.
Last edited by a moderator: