Not another Nogaro!!!

Surge and compressor stall are two different things btw...

<tuffty/>
 
  • Like
Reactions: IPG
LMAO!!!... thats funny right there... anti surge has got feck all to do with the function of a DV/BOV...

<tuffty/>
That's why I was confused!!! Didn't make sense to me at all...

How much is the bill...? ££££'s

Let's not go there!!! Another interesting note. While at the fab shop I asked about Ti exhaust. Oh my god he weight difference is staggering! The cost, however, is also staggering!!! Apparently sounds more tinny too. So I'm sticking with stainless.
 
  • Like
Reactions: SHUk
Just when i thought the parts ordering was over...


These should finish up the build nicely!
P1320539 P1320541 P1320540
 
This is my Saturday night... with no car to work on, it's out of my hands for now...

P1320545 P1320546 P1320547P1320551 P1320548 P1320550
P1320552

... of course, i find something to mod!
Stack oil pressure gauge red backlight to match the rest of the dash.
 
Finally got the car back after waiting a week while it sat at the shop waiting for me to have time off work to go and get it.
Upload 2017 9 9 11 4 48


There is shoved in the naughty corner! hahaha

Got up early this morning to begin finalising things.
Plugged in AFR, routed wiring, then wrapped the top section of DP - the lower V-band almost had me defeated but i figured it out after about what felt like an hour LOL
P1320560 P1320570

This is how the engine bay has turned out... i love love love everything about it!
P1320572
P1320578
P1320579
P1320587
P1320590
P1320595
P1320596
P1320598
P1320604
P1320561
 
  • Like
Reactions: feck_on_a_stick, SamHendry, S3 Hilife and 6 others
So... this has just happened.


I can't believe the engine is working. A lot of hesitation on my end to crank the engine , then to start it! I've not done this before so I was super nervous.

Gordie ended up pushing me to "just start it, go!" And she fired up. The exhaust sound. Amazing!

Even though I've got a timing code error to fix. You can hear it. Misfire in 3 and 4.

And spotted a small oil leak. Other than that she's cooling down for the night ready for fault finding tomorrow after work.

So at this point in time. I'm just happy the engine actually works.
 
  • Like
Reactions: SamHendry, basil brush, hydro s3 and 3 others
Right-o

So since first startup i had these errors

17748 - Camshaft Position Sensor (G40) / Engine Speed Sensor (G28)
P1340 - 35-10 - Incor. Correlation - Intermittent
16684 - Random/Multiple Cylinder Misfire Detected
P0300 - 35-10 - - Intermittent
16687 - Cylinder 3
P0303 - 35-10 - Misfire Detected - Intermittent
16688 - Cylinder 4
P0304 - 35-10 - Misfire Detected - Intermittent
18010 - Power Supply Terminal 30
P1602 - 35-00 - Voltage too Low

Looked like cams were out of time and when i checked the spark plugs it looks like 3 & 4 haven't been sparking at all...
Screen Shot 2017 09 14 at 194832

So I went about and re did the timing at the crank (after a whole bunch of hassle with the stupid belt slipping off every time i wanted to re-tension the sprng loaded tensioner) - made sure the flywheel notch was visible, tensioned the tensioner. I ended up having trouble getting the inlet cam marks to line up with the arrows. Ended up just making the marks line up to the arrows (links now look like the exhaust one is really off to the left when i can see the notch on the flywheel) as counting 16 links makes the mark on the inlet cam sit off to the right.

2nd start up and it fired up - sounding a bunch better than before however had this error

16727 - Camshaft Position Sensor (G40)
P0343 - 35-00 - Signal too High

Readiness: 0110 0100

No more misfire errors and CPS incorrelation... HOWEVER

had to turn off due to a coolant leak.

Fixed the leak and went to start the car but it didn't want to. VCDS scan shows the previous error has now turned into...

Screen Shot 2017 09 14 at 070901

With the car not starting... Can hear that it's trying to start but isn't getting there...

I've changed the CPS for a known good one and still no good.
Strange that it started up after re-doing the timing and now it doesn't? I don't understand...

Little help please?
 
Did you set cam to cam with the top pad of the tensioner in the extended position?

cam to cam was set with the compression tool in place...

how do i set it with them fully extended?

Oh yes... i also spotted this... I didn't realise this also should have been changed...

Screen Shot 2017 09 14 at 201352

completely different to the BAM one which looks like

Screen Shot 2017 09 14 at 201401

so i changed IT and the CPS and still no joy - still implausible :(
 
cam to cam was set with the compression tool in place...

Sadly the incorrect way to do it...

how do i set it with them fully extended?

Remove the tool... set exhaust cam to the mark (which will be TDC) then rotate inlet cam back so the top tensioner pad rises to as far as it will go...

Oh yes... i also spotted this... I didn't realise this also should have been changed...

Yeah... also the wrong trigger wheel... but its changed now so the issue will be cam to cam timing..

All the details/examples/other links in the actual world will be in that one thread I linked too... :)

<tuffty/>
 
i was reading all the first 4 pages when i needed the last page LOL

THanks i'll refer to other thread

so elsa says to do the cam chain links with the tensioner still on.... this is wrong? urrrrrrggghhhh followed the instructions and they are wrong!!!! wtf!
 
so elsa says to do the cam chain links with the tensioner still on.... this is wrong?

Yes.... with the tensioner compressed you would not get 16 rollers to ever line up while the cam notches both on the triangular marks...

If people are following elsa in this way (can't say I ever noticed it before as I have always used the physical alignment marks and 16 roller count method)

I have built more 20v heads than I care to remember and have always done it with the tool removed and the chain as high as it will go...

Note that the tensioner in this configuration is compressed at the bottom but fully extended at the top...

<tuffty/>
 
  • Like
Reactions: SHUk and IPG
Ok so I have it right in my head, and sorry if you've said it and it's not stuck...

I'm going to start the cams again. Please clarify. When does the tensioner tool 3366 get removed???

The instructions I'm following say to set the 16 rollers cams out of head, bolt down the tensioner with the chain set at 16, bolt down caps 2 & 4, bolt down the arrowed caps and check there are 16 rollers , THEN remove tensioner tool 3366... this is wrong though???
 
You only really need tool 3366 to allow you to take the tensioner out, replace it or to insert the inlet cam if the head is partially assembled... its assembly/disassembly its need for

Set engine to TDC... confirm exhaust cam mark is aligned with triangle mark... this is the start point... it would be easier if you removed the plugs too so you don't have to fight compression...

Use 3366 to compress tensioner, remove inlet cam (using methods described in previous links etc... you will need to undo the bolts for the tensioner too as you have to turn the inlet cam to roll it and the tensioner out to remove the cam sprocket from the chain... I have included narrative and pics on my build thread link which is in the thread I posted earlier)... do not remove 3366 yet...

Mark roller one by the exhaust cam mark... normally this is slightly to the outside of the mark facing rather than directly above as indicated in the pic in this post
http://www.audi-sport.net/xf/threads/car-struggles-to-start.340125/page-4#post-3087802

Count off 16 rollers (first being number 1 that you just marked) and mark that...

Insert the inlet cam so the notch aligns with the 16th roller you just marked (again see pic in link above) and then do the reverse of what you have just done to get the cam and the tensioner back in... only fit the two cam caps initially and drop the end cap on as now you need to validate alignment...

Now remove the 3366 tool... as there are no flats on OE cams you will need to rotate the engine back so that the inlet cam mark aligns then rotate the engine back to realign the exhaust mark... this should allow the tensioner to rise...

If all is well then the tensioner will be on its top most position and both notches will align with the triangle marks on the end caps

<tuffty/>
 
  • Like
Reactions: IPG and SamHendry
Thanks for the clarification there @<tuffty/>

I swear that's how I did it the first round...

When you say "as there are no flats... tensioner to rise" you mention rotating the engine back. This is the point (when the 2 cam caps + arrow cap) where I notice the inlet cams notch is slightly ahead of its mark...

So the first time you say "Back" = rotate engine in reverse direction to how it runs?
Then you say "back" again so just wanna clarify this means going in the direction of how the engine runs. In my head you're saying to move crank back to let the inlet mark line up. Which sets the exhaust cam off. Then forward to being exhaust cam back to mark & the tensioner (with out the tool) should rise.

Then I believe this is where I'd then go ahead and crank the engine over TDC 4-5 times to check all the timing marks
- crank dampener notch to lower metal timing belt cover notch
- crank dampener notch to front crank housing "rib"
- exhaust cam and inlet cam to arrows
- 16 links between cam notches on cam chain
- cam timing belt sprocket notch to cam cover notch
 
Have also removed spark plugs 3&4 again and they still look pretty fresh while 1&2 are a bit black compared to the first time I pulled them

I don't get why they wouldn't be sparking... used a circuit test light to confirm each coil is getting 12v and the ground is good too because I ran the test light in reverse on them...
 
  • Like
Reactions: S3TWN
OK so a lot has been happening over the past weeks...

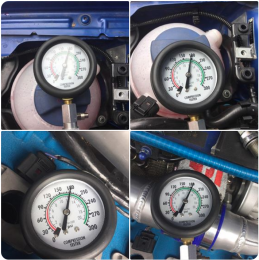
After thinking "why the hell is this not working" i decided to go ahead and compression test the engine...

1
Dry 150
Wet

2
Dry 190
Wet

3
Dry 45
Wet 45

4
Dry 0
Wet 20

Disaster.

This is when my heart sank and nearly all hope faded to zilch. All i wanted to do is get this thing going, break it in and have a good time. Of course i was expecting hiccups along the way but nothing like this. I was thinking
- have the valves smashed into the pistons
- i'm going to have to get a new set of valves
- i'm going to have to pull the head
- this means i'm going to have to remove the turbo
- to remove the turbo i'll have to drop the sub frame to disconnect the wastegate
- i might as well take the engine out
- can i really be bothered taking the engine out again?
- OMFG what have i done
- who can i think who will want to fix this?
- i should just sell it...


After thinking it through and along with lots of help from local and overseas brains trust i decided to persevere...

I re did the timing and took as many photos to sanity check myself
1AD4493B D7F8 4FCE 8EC7 B09AC15289E5
The thing that was putting me off were the original (ones i bought the car with) TDC marking position... which is looked to be a tooth off (the top red mark on the crank sprocket).
Tricky thing with the cam to cam timing is if the tensioner is not released the links and notches look wrong... thanks to @<tuffty/> for all the help on that one!

Still... checking the timing doesn't fully explain why there's low to no compression in 3 and 4... so i did this to try and see if these valves had bent or were staying open... looks some of them in the respective dead cylinders aren't seating... i'm still thinking i bent valves


So i was recommended to look into a borescope

Screen Shot 2017 10 01 at 112306 pm

Where i freaked out that the indentations were from valve contact but i looked back at my previous photos and to my relief - that's the way they come! And surely enough... 3 and 4 look to not have been firing at all looking all shiny still.

Then I ended up doing this (which actually took a while the very first time in undoing everything as i had to re-learn how to take everything off with the new setup)

IMG 0377
Time to fit another tester. This time i wanna check if the chamber is sealed without the cams using the leak down tester. The valve springs should bring the valves back to their seat IF they are not bent...

IMG 4141

So getting the leak down tester on and learning how to use it properly (i was first using it completely wrong which gave me very inconsistent results) i found...

84594D54 281C 4C62 9269 B6C9F05AC532

All within pretty much the same spec... HRMMMMM!!!

So with the cams off i decided to check the "new" lifters.


Most of them were able to be squeezed by hand - this is after about 4 runs... all short runs BUT still there should have been oil pressure built up in most of them at least. Here is one out so you can see exactly how much play was in there and how much oil is being released when most of it should stay inside due to the centre of the tappet holding oil and you shouldn't be able to squeeze it down this much


I ended up pulling my old known working listers from the BAM head, serviced them as per this guide "http://www.audi-sport.net/xf/threads/how-to-rebuild-and-clean-hydraulic-lifters-vag-1-8t.118251/"

IMG 0376

Already i could feel the difference between one that can hold pressure and one that just fails...
So in went the refreshed BAM lifters and I set off to re do all the timing yet again. Making sure all the marks line up (mind you this would have been the 5th time in a row to do timing) and making sure they still line up after cranking by hand

IMG 4052

... and i got this...


OK so by now i think i've figured it out!!! Let it run to get to temperature and check for leaks etc (my front crank seal PTFE seal had leaked from the very first engine run so i changed that somewhere in the middle of all of this). All looks to be good!
This engine start i was recommended to run the engine from 2 - 3k trying to hold the revs up higher to get oil pumped around and help seat rings, bearings etc...

I let the car cool down a little bit then wanted to check for compression...

Screen Shot 2017 10 01 at 115351 pm

*massive sigh of relief* As all those numbers look pretty good to me (and everyone else i showed!!!)

Looks like the lifters that i bought were holding valves open a tad not letting them seat giving me shizenhausen compression in 3 &4.
Now here i am getting all excited that, yes, maybe now i can finally drive the car... BUT


I couldn't get reverse engaged for some reason. The video above is looking through the reverse light switch hole to see if the shifting shaft is engaging the switch which would mean it's engaging the gear.... but it's not! Most of the hole should be covered when it's in reverse. So now i'm thinking... daaammmnnn i'm going to need to pull the gearbox now!

I needed to pull this out to have access to the shifter cable ends - i still can't believe the DV's size!
IMG 0369

A little bit more sleuthing led me to re adjusting the shifter cables along along with manually selecting reverse gear without the cables tightened on. I was able to get it to engage in this manner so that means i didn't have to open the gearbox. Thank god! I just had to get the cables adjusted correctly again AND it seemed like the switch was torqued on too tight previously, make the switch block the engagement into reverse. Once the switch was only snugged up it would slip right into reverse very easily.
Some testing while the front wheels were up also show the clutch is engaging as I could get the front wheels spinning when in gear.

So after all of that - dedicating pretty much every spare hour of my weekends to the car (and some mornings before/evenings after work) I can now rest in peace that yes, the engine is working and has good compression and the gearbox and clutch are installed and working right!!!

I've still not yet driven it as i'm now tracking down why my battery keeps running flat (probably doesn't help when i'm been priming the engine all the time and my brakes are super hard exactly like when vacuum assist is broken. I still have some gauges not working that i can investigate ... but they are minor compared to the above!!!
 

Attachments

  • Screen Shot 2017-10-01 at 11.53.51 pm.png
    Screen Shot 2017-10-01 at 11.53.51 pm.png
    653.8 KB · Views: 295
  • Like
Reactions: SHUk, superkarl, SamHendry and 1 other person
****** he'll you've been busy glad you got to the bottom of the low compression. I wouldn't of cried if that was me. What happened to you mfa?
 
Fantastic work dude, nicely done. Always a killer when you hit a hurdle and start to lose hope, but just goes to show how working through methodically can get you back on track. Always helps with motivation to get that sense of achievement too :)
 
****** he'll you've been busy glad you got to the bottom of the low compression. I wouldn't of cried if that was me. What happened to you mfa?

What would you have done instead of cried? LOL

The colorMFA I had originally planned for the car had been sold to someone else, I still have a spare kit that I will need to install for this car. They have started to become popular down in Oz land.

Fantastic work dude, nicely done. Always a killer when you hit a hurdle and start to lose hope, but just goes to show how working through methodically can get you back on track. Always helps with motivation to get that sense of achievement too :)

Thanks a lot!!! My main thing was doing everything I could to diagnose before pulling the head. Good thing is now Is that I have equipment that can be used in the future come diagnosing a not so healthy engine.

Along with that and now knowing absolutely how to Time this particular engine, hopefully the Same principle applies to most others, I have learnt a bucket load that I can take with me from now on and know what to look for and what NOT to do.

Every day is a school day!!!
 
  • Like
Reactions: Rainbird
Haha that's a typo I would of definitely cried and they cried again when I sorted it haha
 
Modifying cars is so much fun... so nobody that has ever done it themselves :)

<tuffty/>
 
Haha that's a typo I would of definitely cried and they cried again when I sorted it haha

hahaha too many laugh and cry moments with this car for sure!

Modifying cars is so much fun... so nobody that has ever done it themselves :)

<tuffty/>

I was actually thinking to myself the other day "i am the only person that would know how to work on this car relatively quickly, engine wise, to get to what needs to be gotten to since the setup is so different to stock" for example just to remove the cam cover this is the palava i need to go through

- jack car up on each side to put a brick under the wheels (or drive onto the bricks)
- jack car up further from subframe to get stands underneath since i can't just roll the trolley jack under from it being too low
- remove bendy charge pipe
- remove v-bands from top half of DP
- remove turbo coolant feed (the one close to firewall... i think it's the feed?) - try not to lose the o-ring
- loosen bolts from turbo compressor cover (this is why the DP needs to be removed - to be able to reach the back bolts)
- rotate compressor cover
- undo coilpack wiring + remove coilpacks
- finally loosen cam cover nuts
- lift up cam cover and rotate and angle it so the most top right bolt comes out last
- cam cover removed

:highly amused:
 
excellent update as always Ian - well done for removing all of the cam's without removing the head et 'al
 
  • Like
Reactions: IPG
Well done mate I imagine it's hard to keep motivated with all the obstacles you've encountered. Hopefully soon you can start having some fun driving it


Sent from my iPhone using Tapatalk
 
  • Like
Reactions: SamHendry and IPG


so my alternator wasn't charing - a couple of flat batteries, a charging unit purchase, a second hand alternator purchase and 3x swappage of alternators i discovered i had wired in the alternator charge cable into the spare post on the battery -ve!!!

The one and only time when the black wire IS NOT a negative!!! ermigerd!
 
  • Like
Reactions: Rainbird and Dohcwp
This is technically a brand new car now :sunglasses:

are you going to fit a top strut brace ?

Amazing work and perseverance

Edit: Nevermind just saw the brace in one of your earlier posts
 
This is technically a brand new car now :sunglasses:

are you going to fit a top strut brace ?

Amazing work and perseverance

Edit: Nevermind just saw the brace in one of your earlier posts

I have it laying around. can add it whenever really.

break in time!
 
... of course something has to happen!

Sigma6 side to side cable end has somehow let go of the cable and i have no more threads to do any sort of tightening.... hmmmmmm....

Anyone had this happen before?
 
LOL

F3F87FFD 5F85 4529 B3CD 6C96C2EC8B9E

The one on the right is not gripping the shifter cable anymore

During the short blasting about I could feel the side to side was definitely very loose.
 
Yeah that’s what I’ll do today (hopefully there is a fix)
 
Side to side dieselgeek shifter end modified to have another slit on the bottom and two extra bolts. now it's clamping on both sides rather than the one.

This means - Nogaro back to breaking in duties!

 
  • Like
Reactions: SHUk, Roadtrain, killfame and 2 others
Despite I haven't enough time to stay here as I would, I try take a look sometimes when I can, because Ian is the best world expert of S3 8L sure. Cheers from Italy Bro.
 

Similar threads

Replies
0
Views
858
Replies
0
Views
1K
Replies
31
Views
6K
Replies
90
Views
15K