My S3 Build Thread

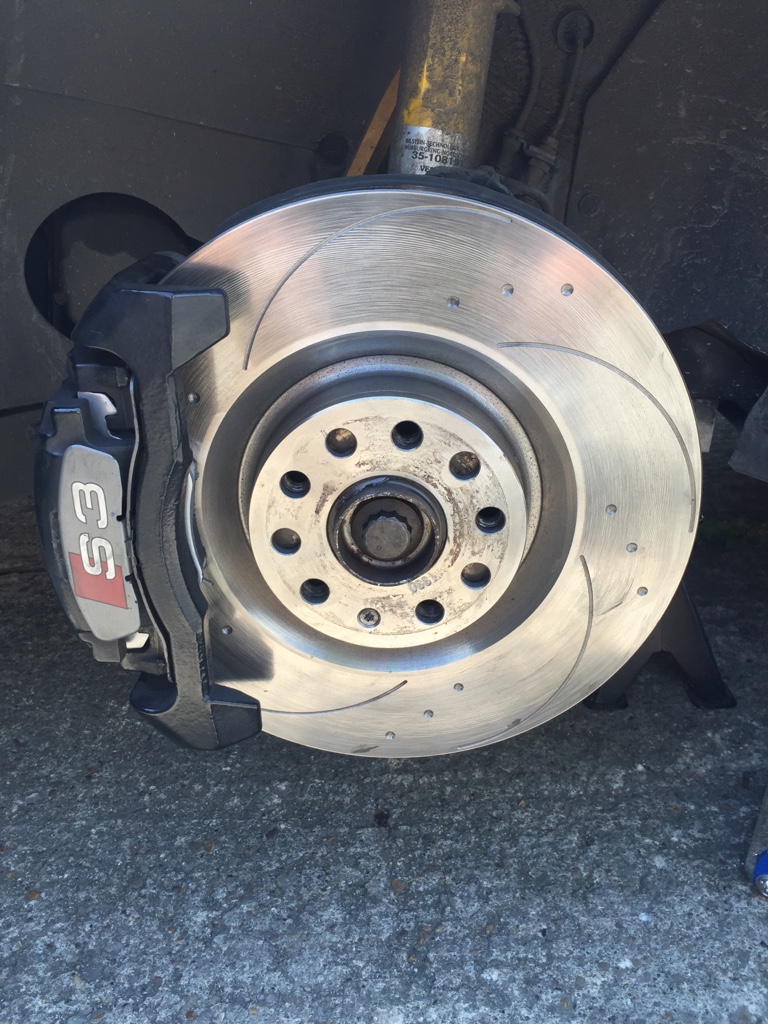
Well I didn't get beaten by the rain and got the Zerosixtys and Brembo Hp2000s on the front today. Not only look good but have really good bite from cold, only took half hour to bed them in now you can feel the difference.

IMG 2478
IMG 2479
 
looking good and i could be completely wrong mate but are the discs on the right way around...
 
Looking good.

Earlier on in this thread you did a bit of a tutorial on changing the rear side armrests, had my exclusive ones for ages and never got round to fitting the rears, could you re upload the images in this post please to give me some help ?
 
looking good and i could be completely wrong mate but are the discs on the right way around...

The discs came with stickers on for left and right side, so I fitted right side to drivers side like as if you were in the driving seat? Or did it mean as if you were looking from the front?

IMG 1741


this is guidance with a left hand drive car

How to Determine Vehicle Side
So, how do drivers determine which side of the vehicle is which? It’s as easy as sitting inside the vehicle. While sitting in the driver’s seat, the right side of the vehicle is to the driver’s right, effectively the passenger’s side. The side a driver is sitting in is the left side of the vehicle. Simple and easy. So, the next time shoppers are looking online for car parts, they can just envision themselves sitting behind the wheel.

so should be the same for a right handed car?

the convention is "as you sit in the driver's seat". That's an internationally accepted convention, so a "right hand drive" car has the steering wheel on the right hand side (as you sit in the car) and a "left hand drive" has the steering wheel on the left.

Got me worried now!!
 
Last edited:
Looking good.

Earlier on in this thread you did a bit of a tutorial on changing the rear side armrests, had my exclusive ones for ages and never got round to fitting the rears, could you re upload the images in this post please to give me some help ?

You may have seen the front exclusive leather trims fitted earlier in the thread here are the rears. Thought I'd post the install cos its a 4-5 hour job and you may want to consider that before buying, which i didn't!

Here goes

Pic of the trims old and new


Now you need to take the rear side trims out to swap over the arm rests as they are held from behind with torx screws. That means removing these trims from both sides in this order:

A pillar lower trim
Sill trims, basically pull up the front four connectors then slide the trim forward to release the rest - this is a pain
Remove rear shelf from boot
Remove boot floor trim
Empty the boot, spare wheel and all foam bits, jack etc.


Remove rear seats including seat belts, theres one screw between the seats that holds a bracket - simple.


Nearly there!

Remove centre rear trim right at the back
Remove both boot side trims
Now the rear side trims can be removed - at last

Just go careful with the trim tabs so you don't break them

One empty car and a grage full of trims lol


Then swap over the trims, if you find a place to work.

Before


After


Then simply refit everything carefully! And you have some genuine exclusive leather trims which will largely go un-noticed but I know they are there. OCD.


Just received the final piece of the trim set - Centre Arm Rest, completes the look.


Just the sun visors and roof grabs to complete the look when I take out a second mortgage, Enjoy!
 
  • Like
Reactions: Krony
i could be wrong mate but i thought that the groves normally face in the direction of travel if that makes sense...

i'm kind of second guessing myself now though as i have seen diagrams facing both ways when i searched google. this is how i thought it was meant to be though...

 
i could be wrong mate but i thought that the groves normally face in the direction of travel if that makes sense...

i'm kind of second guessing myself now though as i have seen diagrams facing both ways when i searched google. this is how i thought it was meant to be though...


Been searching net and I've seen them fitted both ways?? Checked rear discs and they are as this pic

IMG 2494


so left side is passenger side?

really confused now
 
i'm really not sure if it matters mate put i prefer to fit mine with the grooves going in the direction of travel. it's just logic to me that any brake dust sitting in the groove will in theory be pushed out towards the outside diameter of the disc rather than forced in to the centre of the disc if that makes sense?

and i know these aren't grooves but if you have a look at standard ttrs disc the dimples are shaped towards the direction of travel...

http://www.mullerandmuller.com.au/uploads/9/8/4/0/9840741/670733_orig.jpg
 
i reckon its better to swap them over mate, the dimples will be the same direction as the ttrs discs then. it shouldn't be a big job to change them out...
 
  • Like
Reactions: mechanic69
Totally different setup but my RS3 drilled discs aren't sided so one side looks right and the other looks wrong!
Audi don't make them sided so it can't make much difference
 
  • Like
Reactions: TorqueTerrorist and mechanic69
It's the internal vents that matter, not grooves on the face of the disc, they need to be angled forward is that makes sense. So look at top of your disc and in between the brake surfaces and the vents inside.
 
  • Like
Reactions: TorqueTerrorist
It's the internal vents that matter, not grooves on the face of the disc, they need to be angled forward is that makes sense. So look at top of your disc and in between the brake surfaces and the vents inside.

Cheers, just checked rear discs and the internal vents are straight so I guess it doesn't matter
 
I've checked both fronts and rears and the vent slots are straight so can't see it matters?
No it will be fine.
A quick google of brake disc vent orientation gives some good diagrams of the different types of venting and the rotation direction.

I'm surprised they aren't directional tho, my mk4 R32 discs are.
 
Contacted both supplier and manufacturer and both don't recommend fitting the other way round, surprise surprise. Not sure they work as well either so gonna swap them back friday to give me piece of mind. Paranoia!
 
Contacted both supplier and manufacturer and both don't recommend fitting the other way round, surprise surprise. Not sure they work as well either so gonna swap them back friday to give me piece of mind. Paranoia!
Not paranoia, just people thinking they know best when they don't. You did it right first time. Then someone put doubts in your mind. At least it's sorted now.
 
  • Like
Reactions: mechanic69 and Marshy
Well here goes on the Wagner intercooler and xenon RS3 grille fit..

First got all wheel arch linings out and bumper off

used this thread for the bumper

http://forums.fourtitude.com/showth...nt-bumper-removal-and-blackout-grille-install


Then took the headlights out, just three bolts each to get to the bumper bar


next for the bumper bar off, just four bolts


Bumper painting to satin black...may spray over with Matt Black if too shiny, will see tomorrow


Swapped over grilles


and rough fit, lights not so good but couldn't resist


Got a fair gap round the sides and top when the bonnets closed so not sure if its in right or whether its a bit smaller than stock??

May see if I can swap the centre grill section into the stock surround, not sure yet any ideas????

Edit - checking some old pics it looks pretty similar gap just hadn't noticed lol, my paranoia again

She's ready for the next stage tomorrow, fingers crossed........
 
Last edited:
  • Like
Reactions: grchmason and Mario8P
Intercooler fit Part 2

First bumper and lights off again then dropped the radiator fans off from below


Next after a bit of a struggle lifted the radiator out from the top


Then the stock intercooler drops down and out


An empty engine bay!


The Wagner ready to go in...


Intercooler, rad and fans back in. What a faff. Had to elongate the radiator fixing holes to make it fit and theres no way the aircon pipe brake to the rear can be fixed to the intercooler, what a job. This bit took a couple of hours of swearing and cut hands, never again lol


Satin black bumper bar back on

Bumper and lights back in


All rest of the arch trims fitted etc and one happy man


One slight issue to sort as the turbo to intercooler pipe is a bit kinked, think its a bit too long or its hitting the aircon pipes that can't be fixed to the intercooler, did a short run after and the mass air flow is a bit down on before so I need to sort it later.

Did this on my own so it can be done but a second pair of hands would have been ****** useful. Never again........
 
  • Like
Reactions: S3_Sanni
I quite fancied these when my oem ones wear out. What are the dimples like do they rust up? Read that they rust up when wet conditions plus noise.
 
Only had em a couple of weeks in the dry so no idea on rust yet, must say there is no noise unless you really brake hard and even then it's really quite. You wouldn't notice on day to day driving
 
Only thing with the RS3 grille is you can see the aircon rad and it could do with a paint job!!!! Was going to take bumper off for a respray so may do it then, will the jobs ever end??? Keeps me busy tho.
 
Enjoyed reading the thread, good work.
How are you finding the downpipe and sports cat? Noisewise and performance wise?
 
Enjoyed reading the thread, good work.
How are you finding the downpipe and sports cat? Noisewise and performance wise?

loving it, the noise increase is not much over stock but it does make pops and farts from the gear changes or the turbo not sure but does sound better than stock. Performance wise also not so easy to say as i remapped straight after fitting it. it does feel like the engine can breath easier tho and it seemed to rev up quicker, may be placebo effect but who cares I like it
 
  • Like
Reactions: mister.c.

Similar threads