Welcome to this thread that has been some time in the making. I didn't buy my car new, it was a 40th Birthday present to myself and the best my dealer had at the time was a 6 month old TDI S-Line that had 6k of extras but sadly no B&O or Audi Sound system.
The basic system always disappointed me, I even took it to the dealer who claimed it was fine but it has no real punch and anything above 20 usually distorted so badly that it became unplayable and I have to admit it started to annoy me so I decided to embark on this retrofit.
So where did I start, well I had a look online at various youtube videos and Audi documents that I could find, I suppose the above picture was the starter for ten as it showed what the B&O system has to offer which in my case was a significant uplift in Sound quality and volume.
If you look closely you will see all 14 of the speakers in their locations with the Amplifier (J525) in place fitted under the front passenger seat (RHD cars).
The basic system has only 8 speakers and the more research I did the more I realised it wasn't just the case of swapping them for B&O ones, for starters the impedance of the speakers are different as are the thickness of the wiring on some of the connections so that was a no go area for me.
So it's all or nothing and at this point I start to work my way through the Elsawin application to build up a picture of what is actually required -
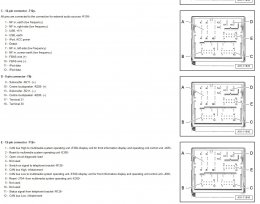
All 14 speakers and the Amplifier with their part numbers, Happy days now to find them! but first let's talk about the MOST Bus.
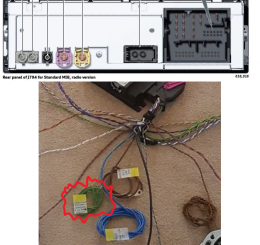
Now this is where you'll potentially hit a stumbling block very quickly in your upgrade, you need to take out your Head unit located in the glove box and check to see if it has connector number 4 shown in the picture above, if not then you cannot upgrade to B&O without upgrading your head unit. The MOST bus connector is a fibre-optic cable which transmits and receives data between the Head unit and the AMP including all of the digital audio so it is a must.
So we have checked and MOST is there, Bingo we are looking good for the upgrade, Next job is to go hunting for the parts. Now where you go is your own business me personally I didn't want to pay £1600 big ones from our own parts chap on the site here not when I was able to get all of the speakers and the amp for £600 from a vehicle dismantler. So that's the route I went, there are always sets on Ebay.de too so you should be able to get the full set for around the same price.
Next up was the B&O loom, now firstly I considered making the loom up myself but by the time I had added it all up for the wiring, terminal connectors, plastic connectors etc.. it was just easier to go onto Ebay again and search for a full interior loom from there. In the end I got the full loom for £155 and this had many other options with it too so I could make more use of it in future retrofits.
The loom came like this -
And after a day of extracting the B&O stuff it looked like this -
But I wasn't bothered about that, Here's the stuff you actually need from the Loom for the B&O -
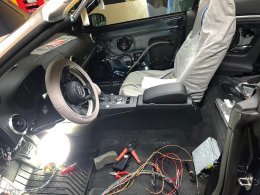
So next up I connected the speakers and amp up to make sure all the connections were correct -
So let me list them here for you clockwise from the Subwoofer at the 12 o'clock position -
Subwoofer R211 - fits into spare wheel well in Boot.
Left Effect speaker R209 - Fits to D pillar frame
Left Rear Treble - R14 - Fits into rear door card
Left Rear Bass - R15 - Fits into Rear Door frame
Left Front Bass - R21 - Fits into Front Door frame
Left Front Mid - R103 - Fits into Front Door frame
Left Front Treble - R20 - Fits into A-Pillar cover
R164 (R74) (Solid Black Rubber sheathed ) Microphone cable - Now the B&O system uses its own microphone to listen to the sound levels within the car so if you just have the one microphone in the front overhead interior light panel then you'll need this cable and also a new dual microphone from the parts guy -£40 with discount. Part number 8X2035711C which you will have to run up the left side A-pillar through to the overhead panel.
Thick Brown cable - Earth connector for the Amplifier - installed onto the front earthing point on the lower left hand A pillar.
Thick Blue Cable - Main Power cable to power the amplifier - This connects to Fuse Holder F27 on Fuse Panel C-SC. You will need a 30 amp fuse to add power to the amplifier but remember do not install the fuse until you have fitted everything and as the car is negatively earthed the Brown earth connector must be installed before the fuse.
Thin Green Cable - Open Circuit Diagnostic Lead - this wires back to the rear of the Head unit where it terminates in 12 pin connector E port 3 and allows the Head unit to carry out diagnostic tests on the Amplifier.
Centre Speaker - R208 - Installed under the grille in the front centre of the dash just ahead of the MMI screen.
Right Front Treble - R22 - Fits into the A-Pillar cover
Right Front Bass - R23 - Fits into Front Door frame
Right Front Mid - R104 - Fits into Front Door frame
Right Rear Bass - R17 - Fits into Rear Door frame
Right Rear Treble - R16 - Fits into rear door card
Right Rear Effect - R210 - Fits into D Pillar frame
Now there's no way you are going to break open your existing loom to add all these cables so what you will have to do next is order up some rolls of TESA tape, I used the 9mm thick stuff as it is close to OEM and bought 4 x 25 metre rolls for £10 off ebay. I also bought 2 x 25 metre rolls of Black insulation tape from tool station which was under £1.
To Be Continued .......