

superkarls overhaul
- Thread starter superkarl
- Start date
You are using an out of date browser. It may not display this or other websites correctly.
You should upgrade or use an alternative browser.
You should upgrade or use an alternative browser.
Amazingpyshique69
Woah, look at that physique!
- Joined
- May 13, 2011
- Messages
- 1
- Reaction score
- 0
- Points
- 1
Oh c'mon, there's nothing to dislike about that!
Anyway, been reading through your Car-Stuffles! Hoping to learn more about them before I start driving, so this is a good start... LMAO!
P.S. Look at my profile Karl, I'm sure you'll find it adequate... Check what car I have") ! Edit: Oh it's been removed... Nevermind!
! Edit: Oh it's been removed... Nevermind!
But seriously, I do want to learn more about cars! LOL
Anyway, been reading through your Car-Stuffles! Hoping to learn more about them before I start driving, so this is a good start... LMAO!
P.S. Look at my profile Karl, I'm sure you'll find it adequate... Check what car I have
! Edit: Oh it's been removed... Nevermind!But seriously, I do want to learn more about cars! LOL
Last edited:
- Joined
- Mar 28, 2010
- Messages
- 10,073
- Reaction score
- 2,697
- Points
- 113
- Location
- Liverpool/Southport. N west
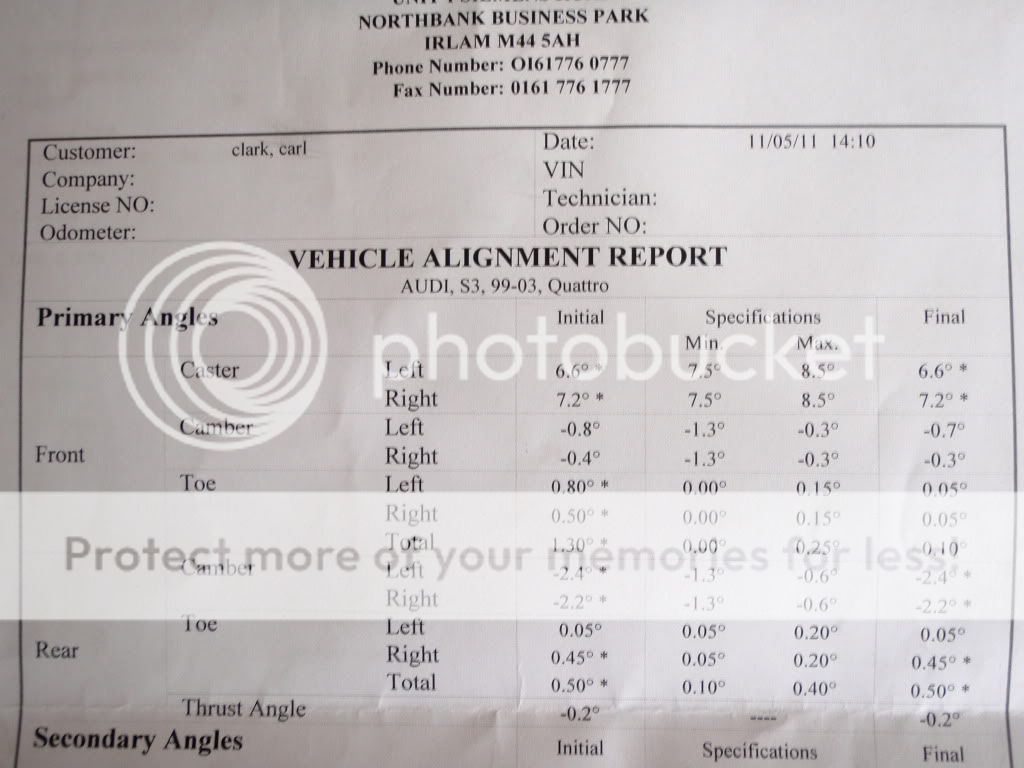
well here's my print out, whats strange is there is no adjustment been made on the rear toe, perhaps this can only be done with adjustable tie bars.
and here is my catch can install, with a couple of fresh ideas.
when installing at the rear of the bay, and getting rid of the fuse/relay box, i put the relay in a bag and zip tied it to protect it from and water damage, extreme, but careful.
i then had the trouble of mounting the can, about half an hour of head scratching and i came up with this......
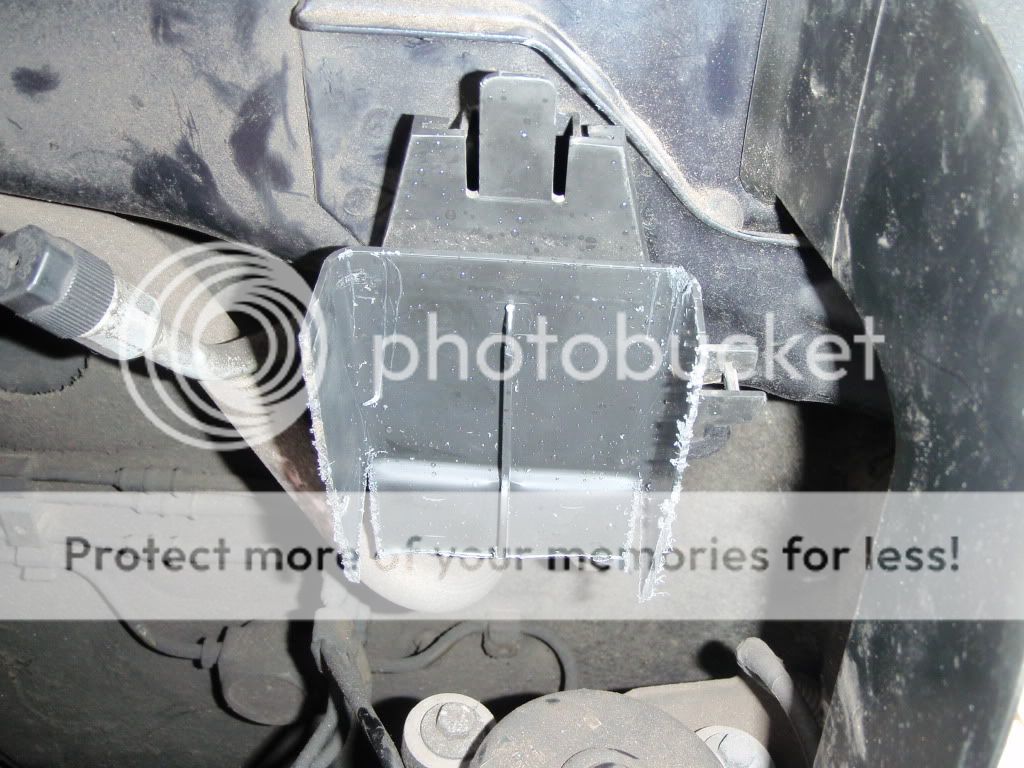
what used to be the relay box, i cut it up so i only had the back part that has its own clip and mount, i jubilee clipped it to the can and hey presto
its solid, sturdy, and so easy to remove, just push the tab and lift and its out
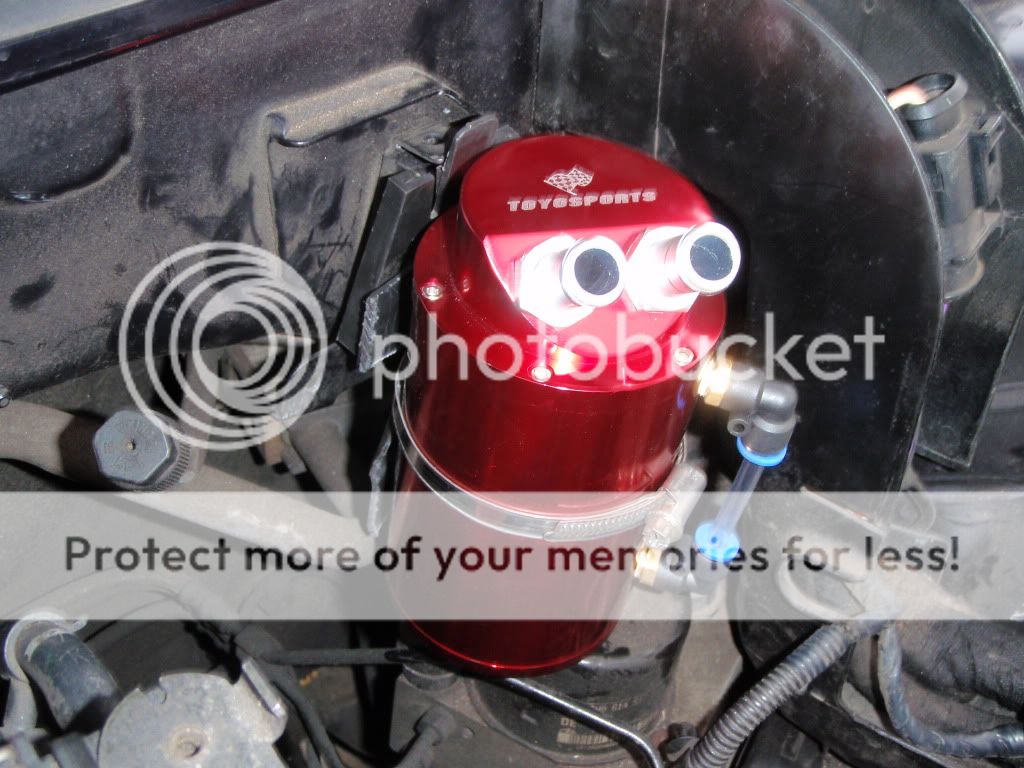
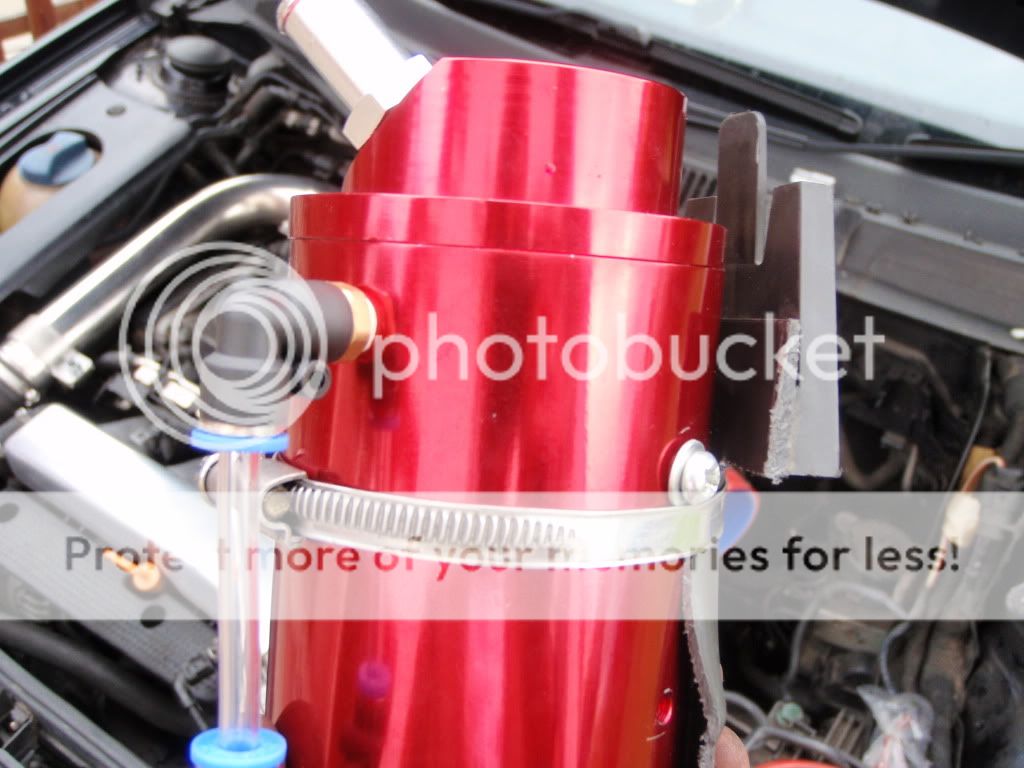
and this is how it looks


despite my genius mounting idea, its now blocked by the strut brace, but then thats not so difficult to remove so il just live with it.
i've not padded it out yet with wire wool, so there is slight smell in the car with the blowers on, so i think il try with wool, then perhaps relocate it lower down and further away.
And now the bad news, the pipe thats at the bottom on the oil filter housing, the hard 90 degree bend thats clipped to the engine, had a split in it and was very brittle, i've just checked it and its totally broken off the end, so now i reaaaaalllly am venting to atmosphere!
anyway phoned audi and as expected what a stitch up for a piece of pipe!
part no: 06A103213F price: £26.24
or in my case £32.24 to have it tomoro morning!
im not sure what to do, whether to bodge the existing one and try and get the rubber hose over the broken pipe, its a bigger diameter than 19mm. but then it really is falling apart.
gutted anyway, especially as i was going to surprise my girlfriend down in high wycombe tonight, now i cant really use it, its already made a mess
and here is my catch can install, with a couple of fresh ideas.
when installing at the rear of the bay, and getting rid of the fuse/relay box, i put the relay in a bag and zip tied it to protect it from and water damage, extreme, but careful.
i then had the trouble of mounting the can, about half an hour of head scratching and i came up with this......
what used to be the relay box, i cut it up so i only had the back part that has its own clip and mount, i jubilee clipped it to the can and hey presto
its solid, sturdy, and so easy to remove, just push the tab and lift and its out
and this is how it looks
despite my genius mounting idea, its now blocked by the strut brace, but then thats not so difficult to remove so il just live with it.
i've not padded it out yet with wire wool, so there is slight smell in the car with the blowers on, so i think il try with wool, then perhaps relocate it lower down and further away.
And now the bad news, the pipe thats at the bottom on the oil filter housing, the hard 90 degree bend thats clipped to the engine, had a split in it and was very brittle, i've just checked it and its totally broken off the end, so now i reaaaaalllly am venting to atmosphere!
anyway phoned audi and as expected what a stitch up for a piece of pipe!
part no: 06A103213F price: £26.24
or in my case £32.24 to have it tomoro morning!
im not sure what to do, whether to bodge the existing one and try and get the rubber hose over the broken pipe, its a bigger diameter than 19mm. but then it really is falling apart.
gutted anyway, especially as i was going to surprise my girlfriend down in high wycombe tonight, now i cant really use it, its already made a mess

- Joined
- Dec 2, 2008
- Messages
- 17,400
- Reaction score
- 1,104
- Points
- 113
Nice work mate. I can't wait to get mine 4 wheel aligned.
Catch can fitting was a good idea. If I was you id just buy a new 90 degree pipe. Mine was a bit worse for wear so I just got a new one.
Catch can fitting was a good idea. If I was you id just buy a new 90 degree pipe. Mine was a bit worse for wear so I just got a new one.
Bad news about the pipe mate
Here's mine from last year for comparison:

well here's my print out, whats strange is there is no adjustment been made on the rear toe, perhaps this can only be done with adjustable tie bars.
Here's mine from last year for comparison:
- Joined
- Nov 11, 2009
- Messages
- 10,099
- Reaction score
- 739
- Points
- 38
- Location
- west yorks
- Website
- www.stainless-engineering.co.uk
Genius on the catch can location/use
thrust angle should be zero but that will be because you cant adjust the rears
thrust angle should be zero but that will be because you cant adjust the rears
Looking at both your printouts they havent adjusted the rear toe or the front camber for some reason, i hope they only charged you both for doing the tracking cause thats all theyve done really, not a 4 wheel allignment.
Sam_
Down under
- Joined
- Mar 28, 2010
- Messages
- 10,073
- Reaction score
- 2,697
- Points
- 113
- Location
- Liverpool/Southport. N west

- Joined
- Mar 28, 2010
- Messages
- 10,073
- Reaction score
- 2,697
- Points
- 113
- Location
- Liverpool/Southport. N west
II was charged for 4 wheel alignment at 99 quid.
perhaps they can't adjust rea toe. and there's probably only so much adjustment on the front.
Dave what's the thrust angle?
perhaps they can't adjust rea toe. and there's probably only so much adjustment on the front.
Dave what's the thrust angle?
- Joined
- Nov 11, 2009
- Messages
- 10,099
- Reaction score
- 739
- Points
- 38
- Location
- west yorks
- Website
- www.stainless-engineering.co.uk
II was charged for 4 wheel alignment at 99 quid.
perhaps they can't adjust rea toe. and there's probably only so much adjustment on the front.
Dave what's the thrust angle?
Thrust angle is the direction that the rear wheels are pointing in relation to the center line of the vehicle. If the thrust angle is not zero, then the vehicle will "dog track" and the steering wheel will not be centered. The best solution is to first adjust the rear toe to the center line and then adjust the front toe. This is normally done during a 4-wheel alignment as long as the rear toe is adjustable. If the rear is not adjustable, then the front toe must be set to compensate for the thrust angle, allowing the steering to be centered.....

- Joined
- Mar 28, 2010
- Messages
- 10,073
- Reaction score
- 2,697
- Points
- 113
- Location
- Liverpool/Southport. N west
Did a lot of driving this weekend, did 425 miles, 400 of which on one tank! It can be done guys and I was doin 70-80 average there and back.
On the down side its my mot this week, and my dad just broke my headlight/adjuster all I asked for was a sidelight bulb which he proceeded to fit. I'm not sure what's broken exactly, I can't be ***** knowing and stressing about it. Does anyone know much about them, bad experiences??
Going to do some forum searching on it anyway, really want it to pass this mot
On the down side its my mot this week, and my dad just broke my headlight/adjuster
all I asked for was a sidelight bulb which he proceeded to fit. I'm not sure what's broken exactly, I can't be ***** knowing and stressing about it. Does anyone know much about them, bad experiences?? Going to do some forum searching on it anyway, really want it to pass this mot
- Joined
- Dec 2, 2008
- Messages
- 17,400
- Reaction score
- 1,104
- Points
- 113
Mine failed it's MOT for the passenger headlight being too high but they managed to adjust it down and passed it. Apart from that the car was sweet as a nut.
Is it the actual adjuster wheel by the headlight or the arm that sits on the passenger side front suspension arm?
Is it the actual adjuster wheel by the headlight or the arm that sits on the passenger side front suspension arm?
- Joined
- Mar 28, 2010
- Messages
- 10,073
- Reaction score
- 2,697
- Points
- 113
- Location
- Liverpool/Southport. N west
It's the motor in the headlight that pushes the headlight to whatever angle it needs, aparently the little white rod on the end of the motor plugs into somewhere in the back of the light and my old man cant put it back in. So upon starting the car and the levelling motors get it to where it needs to be, its not moving the light at all, just buzzes its tits off and the light is aimed down still. He said he's taking headlight out to sort it. I'm leaving him to it, I've had that bumper off about 247 times and each time it becomes more difficult to refit lol.
I noticed you mentioned removing the bonnet seal and smelling the oil breather more, this is the reason I've refitted mine Haha, stinky isn't it. Sounds so much better though
I noticed you mentioned removing the bonnet seal and smelling the oil breather more, this is the reason I've refitted mine Haha, stinky isn't it. Sounds so much better though
- Joined
- Dec 2, 2008
- Messages
- 17,400
- Reaction score
- 1,104
- Points
- 113
I noticed you mentioned removing the bonnet seal and smelling the oil breather more, this is the reason I've refitted mine Haha, stinky isn't it. Sounds so much better though
Yeah it sounds ridiculous. I've removed my engine cover too because it's slightly rubbing on my new PCV hosing and the turbo is so loud without that and the rubber strip. I thought my turbo was broken and started panicking slightly. It'll be just my luck for the thing to blow up 2 days before it goes off for a refurb!
- Joined
- Mar 28, 2010
- Messages
- 10,073
- Reaction score
- 2,697
- Points
- 113
- Location
- Liverpool/Southport. N west
It's a great sound,.makes you think theres a bt under there. Only thing that's annoying is the sound of thw actual engine, unless your revving the nuts off it.
- Joined
- Mar 28, 2010
- Messages
- 10,073
- Reaction score
- 2,697
- Points
- 113
- Location
- Liverpool/Southport. N west
hopefully someone can help me regarding my headlights, heres some pics to help visualise the problem....
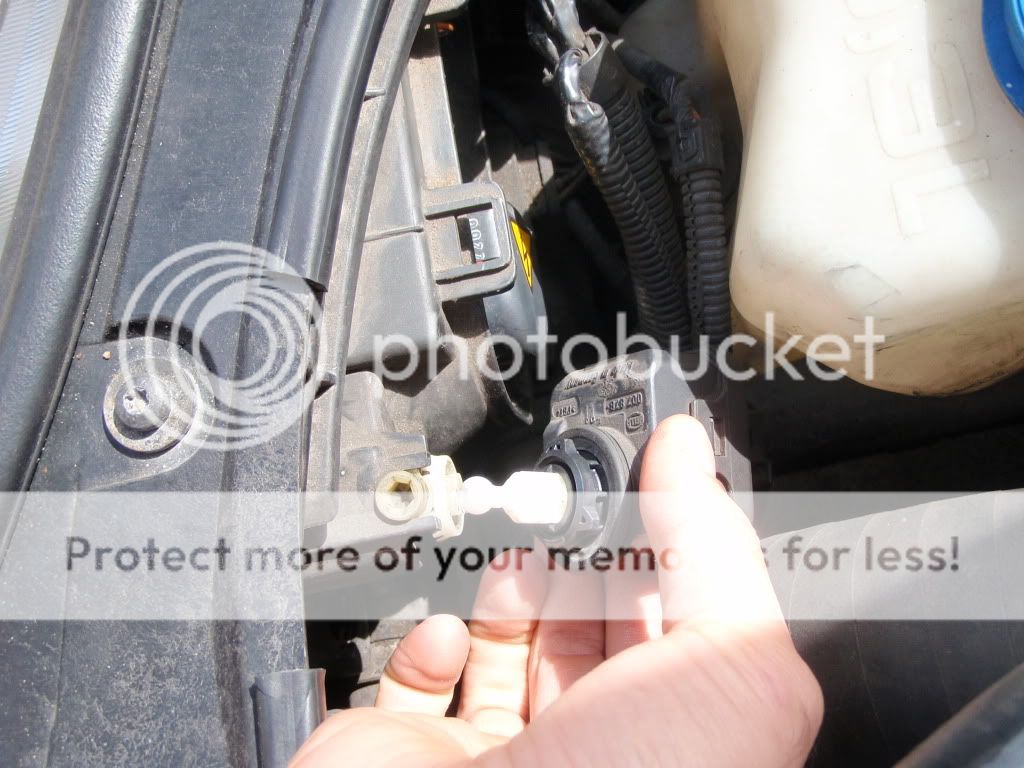
above shows the headlight adjuster, the white plastic probe pushes or retracts to set the headlight height up, whats wrong is that this doesnt seem to plug into anything, at least i cant feel anywhere.
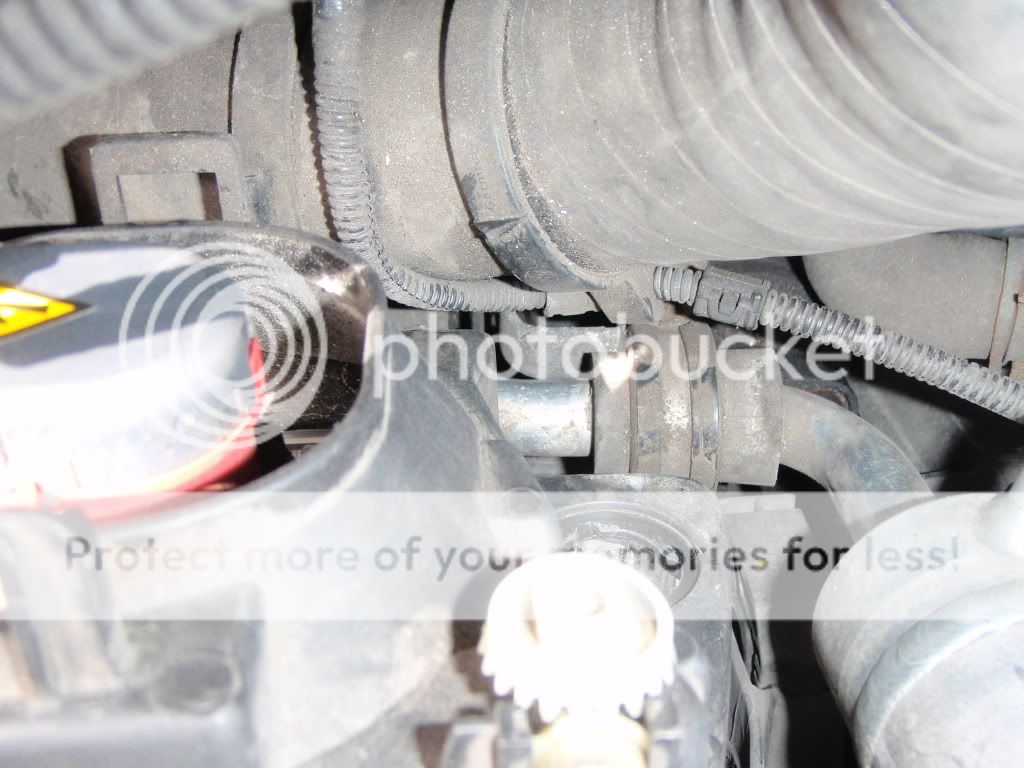
it sits in the hole below the small white wheel here.
does anybody know what it attaches to?? the headlight is just free to swing back and forward, im assuming it should attatch to the white adjuster somewhere.
above shows the headlight adjuster, the white plastic probe pushes or retracts to set the headlight height up, whats wrong is that this doesnt seem to plug into anything, at least i cant feel anywhere.
it sits in the hole below the small white wheel here.
does anybody know what it attaches to?? the headlight is just free to swing back and forward, im assuming it should attatch to the white adjuster somewhere.
- Joined
- Dec 2, 2008
- Messages
- 17,400
- Reaction score
- 1,104
- Points
- 113
- Joined
- Mar 28, 2010
- Messages
- 10,073
- Reaction score
- 2,697
- Points
- 113
- Location
- Liverpool/Southport. N west
no has he hell, he just txt me asking if I'VE done it. pffft, i said no. and just thought id take a couple of pics and post them up.
bit of reading tells me there is a socket they plug into which is VERY prone to breaking.
i really really cant be bothered to take the bumper off
bit of reading tells me there is a socket they plug into which is VERY prone to breaking.
i really really cant be bothered to take the bumper off
- Joined
- Dec 2, 2008
- Messages
- 17,400
- Reaction score
- 1,104
- Points
- 113
lol so he basically broke it and legged it
I hate to say it mate but I think you'll need the headlight out. If you leave the annoying bolt out (the one that's a PITA to get to with the bumper on) you'll be able to get the headlight out in future without removing the bumper.
Mine has to come out soon to fix the clips on it. At the moment it's flapping around like a **** in a bucket!
AUDI A3 S3 Headlight Tab Repair Kit for Standard & HID on eBay (end time 07-Jun-11 16:11:53 BST)
- Joined
- Mar 28, 2010
- Messages
- 10,073
- Reaction score
- 2,697
- Points
- 113
- Location
- Liverpool/Southport. N west
basically yeh, he will fix it! no doubt about that.
welly just told me a brilliant idea in another thread though, to put a piece of silicone pipe on the end of that white adjuster so it pushes the headlight into position. i love bodging.
welly just told me a brilliant idea in another thread though, to put a piece of silicone pipe on the end of that white adjuster so it pushes the headlight into position. i love bodging.
- Joined
- Dec 2, 2008
- Messages
- 17,400
- Reaction score
- 1,104
- Points
- 113
basically yeh, he will fix it! no doubt about that.
welly just told me a brilliant idea in another thread though, to put a piece of silicone pipe on the end of that white adjuster so it pushes the headlight into position. i love bodging.
Haha, hit 1 pothole and it'll probably all fall apart but worth a go.
- Joined
- Mar 28, 2010
- Messages
- 10,073
- Reaction score
- 2,697
- Points
- 113
- Location
- Liverpool/Southport. N west
as long as it passes the mot im happy for now.
from what ive read though its virtually impossible to fix without buying a new headlight unit anyway. so it'l have to do.
from what ive read though its virtually impossible to fix without buying a new headlight unit anyway. so it'l have to do.
Haha, hit 1 pothole and it'll probably all fall apart but worth a go.
So far so good with mine dude, it literally pushes the bottom of the headlight out, just like the motor would.
I have to fit some new bulbs tomorrow so shall photograph for all to see....
- Joined
- Dec 2, 2008
- Messages
- 17,400
- Reaction score
- 1,104
- Points
- 113
as long as it passes the mot im happy for now.
from what ive read though its virtually impossible to fix without buying a new headlight unit anyway. so it'l have to do.
That's a sh!tter! I can believe that!
Anyway let us know how you get on and get some pics of the bodge
- Joined
- Mar 28, 2010
- Messages
- 10,073
- Reaction score
- 2,697
- Points
- 113
- Location
- Liverpool/Southport. N west
just checked the garage and i dont have silicone pipe small enough
i will now have to bodge the original bodge job. double bodge on the way
oh and one of my manual adjuster wheels is shagged too, just spins on the metal pin its supposed to turn
i will now have to bodge the original bodge job. double bodge on the way
oh and one of my manual adjuster wheels is shagged too, just spins on the metal pin its supposed to turn
- Joined
- Dec 2, 2008
- Messages
- 17,400
- Reaction score
- 1,104
- Points
- 113
just checked the garage and i dont have silicone pipe small enough
i will now have to bodge the original bodge job. double bodge on the way
oh and one of my manual adjuster wheels is shagged too, just spins on the metal pin its supposed to turn
Get the light out mate and have a good look at it, you never know you might be able to fix it.

This is a bit hard to describe so il did a quick pic lol. The "blue" things in the pic are actually white but coloured them to single out what I mean.
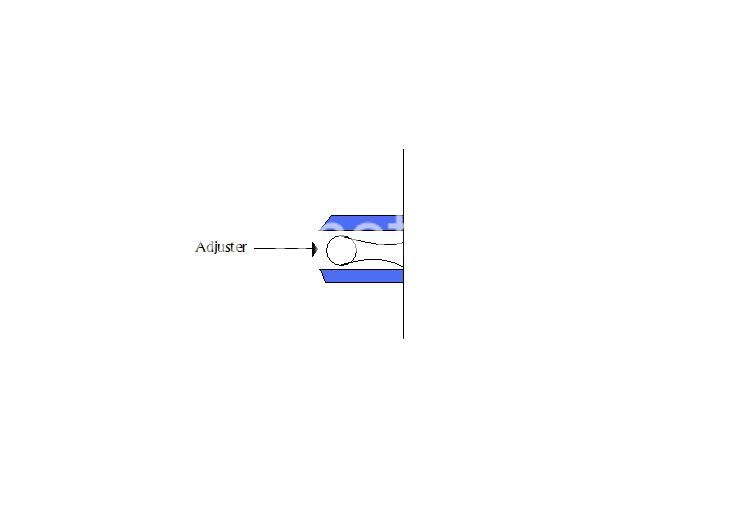
Hope it makes sense to you know. In the pic the two "blue" things are attached to the actual headlight and the adjuster pushes them up and down to get the correct light level. What has probably happened is one of the "blue" things in the pic have snapped so it wont adjust.
I cant remember 100% as I had my headlights apart a long time ago but to fix this the headlights will have to be opened up and you may be able to super glue one of the "blue" things back together. You can manually adjust the headlights though. Sorry if ive confused you more but I can describe what I mean lol.
Last edited:
- Joined
- Mar 28, 2010
- Messages
- 10,073
- Reaction score
- 2,697
- Points
- 113
- Location
- Liverpool/Southport. N west
update..
il start with the headlights, bodged for the mot welly style (silicone pipe on the adjuster cut to the right length to push the light up)
great success.
for a perminant and more professional fix, i have 'aquired' the plastic clips that the adjuster rod plugs into in order to push the headlight, the clips are out of mk2 phase 2 renault megane headlights, and are pretty much identical to the audi ones in our headlights. i currently have 2, but my old man can get hold of more. if anybody would like 1 or 2, send me a pm and il see what i can do. i believe this is the part no-one can get hold of, so i've struck gold really, and will be a proper fix rather than a bodge. pics of the clips to follow.
today i changed my rocker cover gasket and cam chain tensioner gasket as they wer leaking a fair amount. i just want to highlight a problem i encountered in case anyone else encounters the same. its otherwise an easy job, just time consuming and fiddly.
so having undone the 3 torx bolts on top of the cam chain tensioner, i expected to be able to lift it the couple of mm required to slide the gasket out and new one in. wrong. i could just lift it perhaps half a mm max. so if anyone else encounters the same, i slackened this bolt off........
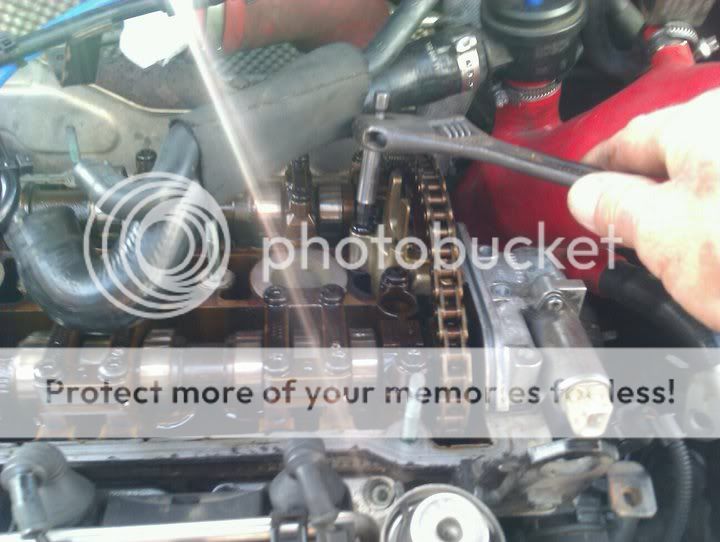
this gave me the extra bit of slack to lift it enough and also twist ever so slightly to make it easy to change the gaskets and the classic 'half moon' piece as its known. this maybe the proper way of doing it, but i was only aware of undoing the 3 torx bolts on top of the tensioner (you can see the 3 have been removed) hope that helps anyone.
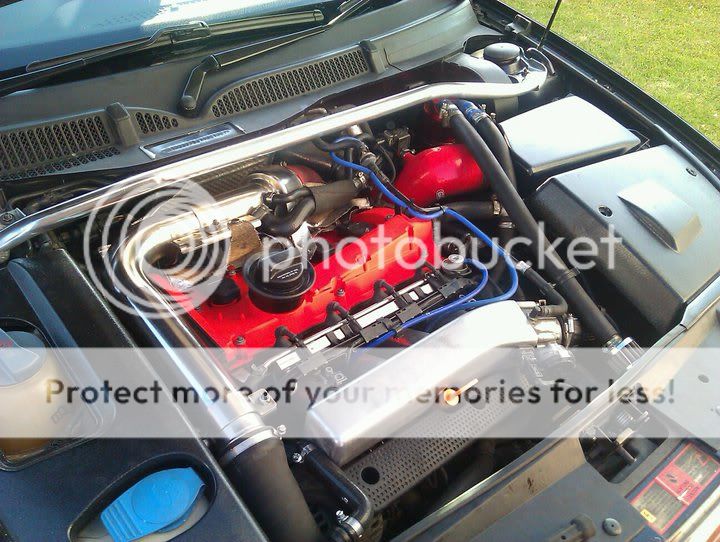
so gave the rocker cover a paint with halfords high temp paint in red. its a matte finish and quite an orangy red, but looks ok.

il start with the headlights, bodged for the mot welly style (silicone pipe on the adjuster cut to the right length to push the light up)
great success.
for a perminant and more professional fix, i have 'aquired' the plastic clips that the adjuster rod plugs into in order to push the headlight, the clips are out of mk2 phase 2 renault megane headlights, and are pretty much identical to the audi ones in our headlights. i currently have 2, but my old man can get hold of more. if anybody would like 1 or 2, send me a pm and il see what i can do. i believe this is the part no-one can get hold of, so i've struck gold really, and will be a proper fix rather than a bodge. pics of the clips to follow.
today i changed my rocker cover gasket and cam chain tensioner gasket as they wer leaking a fair amount. i just want to highlight a problem i encountered in case anyone else encounters the same. its otherwise an easy job, just time consuming and fiddly.
so having undone the 3 torx bolts on top of the cam chain tensioner, i expected to be able to lift it the couple of mm required to slide the gasket out and new one in. wrong. i could just lift it perhaps half a mm max. so if anyone else encounters the same, i slackened this bolt off........
this gave me the extra bit of slack to lift it enough and also twist ever so slightly to make it easy to change the gaskets and the classic 'half moon' piece as its known. this maybe the proper way of doing it, but i was only aware of undoing the 3 torx bolts on top of the tensioner (you can see the 3 have been removed) hope that helps anyone.
so gave the rocker cover a paint with halfords high temp paint in red. its a matte finish and quite an orangy red, but looks ok.
- Joined
- Mar 28, 2010
- Messages
- 10,073
- Reaction score
- 2,697
- Points
- 113
- Location
- Liverpool/Southport. N west
Well my tip and boost hoses shall be blue eventually, so should contrast well, and the pipes for my catch can will be hidden under the tip, hopefully itl be a tidy but well coloured bay. Inlet mani will be metallic grey soon. I like the little cheap jobs while im poor
- Joined
- Dec 2, 2008
- Messages
- 17,400
- Reaction score
- 1,104
- Points
- 113
- Joined
- Nov 11, 2009
- Messages
- 10,099
- Reaction score
- 739
- Points
- 38
- Location
- west yorks
- Website
- www.stainless-engineering.co.uk
- Joined
- Mar 28, 2010
- Messages
- 10,073
- Reaction score
- 2,697
- Points
- 113
- Location
- Liverpool/Southport. N west
I was going to pm you Dave but il ask here, do your tie bars come with polybushes in them? As if they do its pointless me buying rear tie arm bushes as they come in packs of 4, so would only need two once i buy your arms
- Joined
- Mar 28, 2010
- Messages
- 10,073
- Reaction score
- 2,697
- Points
- 113
- Location
- Liverpool/Southport. N west
Its improved smells alot, only the odd wiff when stood in traffic with Windows down, but i can live with that. As I've said above tho, id like to move those pipes undetneath the tip purely so it looks tidier.
- Joined
- Nov 11, 2009
- Messages
- 10,099
- Reaction score
- 739
- Points
- 38
- Location
- west yorks
- Website
- www.stainless-engineering.co.uk
yes they do mate, plus i have the extra poly bushes if requierdI was going to pm you Dave but il ask here, do your tie bars come with polybushes in them? As if they do its pointless me buying rear tie arm bushes as they come in packs of 4, so would only need two once i buy your arms
- Joined
- Mar 28, 2010
- Messages
- 10,073
- Reaction score
- 2,697
- Points
- 113
- Location
- Liverpool/Southport. N west
Thanks dave.
Nath, that's what I will do but I need two 90degree bends to point the pipes down first
Nath, that's what I will do but I need two 90degree bends to point the pipes down first
Trust me it doesnt nath, thats where mine is, cabin still gets quite baddish wiffs if blowers are on and sat in traffic, need to move it so it will poke out underneath the car and let the under current take the smell.