KrisKrk

A6 C6 4F 2010 LeMans Avant
Joined
Oct 11, 2016
Messages
2,946
Reaction score
2,596
Points
113
Age
41
Location
London
Hi all,

I've been meaning to take a look at the issue with my rear left inner/boot tail lamp cluster for some time but never get enough time.

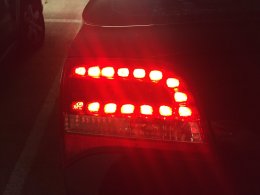
Few of the LEDs are not fully lit up compare to the rest of the tail lights.

I can seen in the rear view mirror how the tail lights look like in the reflection of the bus windscreen, when behind me stationery, and it looks ugly.
Like a mouth without a tooth. Well, few of them.

Seen YT video of the guy pulling apart A6 Saloon version of the tail light with same fault as it had cold solder (according to him).
He showed how the leds are not lighting up fully and how, after the re-solder they do work perfectly.

Question I have "is it easy to separate the light cluster cover without any damage/chip to it"?

The guy from the video was using flat screwdrivers only and managed to do it without any damage to the light.

Anyone had a chance to do similar type of operation?
 
  • Like
Reactions: dentsy
I've looked at the same video.

I'm pretty sure he would have heated up the cover before prising apart as the lens is glued to the light body to make it watertight.

Some people recommend putting in the (kitchen) oven (not microwave lol) to soften the glue, then prise apart.

Sane people buy a new rear light off eBay :racer:
 
  • Like
Reactions: Sandra
I thought so aswell, to heat it up but with heat gun. Scared if I put it in the oven it may het damaged or deformed.

Light is working (well, not 100% but still) and I wouldn't want to just dump it when purchased the new one or good condition second hand.
I'm a type of person that likes challenges and love diy+salvage.

Got the gear and idea of how/what to do, just lack of time.
Might pull some night shift and just give it a go.
 
  • Like
Reactions: RAF_S7
IMG 6119
First on the left at the bottom I managed to catch in the picture. There are few more alongside of the curve
 
Have you checked there's no corrosion on the connectors?
 
Yes, I did.
Had the cluster out the other day to check how to get to it.
Cleaned it just in case but still no joy:frown new:
 
Recently noticed in the reflection of another vehicle parked up rear end to me that, few other leds in the stop light do not light up.

Will try to take picture of the light when brake on to illuminate these leds but pretty much the same as on those pictures below

IMG 82571


IMG 82581


I don't know if there is a point in opening the lamp and re-solder the led connections on the circuit or not.

Have anyone encountered the same problem?
 
Cold solder is a term used to describe loose connection between electronic component (led in this case) and the connector on the circuit board. Connection is there but not strong enough to allow "full stream" of current. Hence led not fully lit up.


Sent from my iPhone using Tapatalk
 
I've had an intermittent fault with my passenger side boot light too. Give it a tap and it comes on. I guess the connector might have condensation in since the boot trim was wet on the inside from a leak from the washer

Sent from my Plus E using Tapatalk
 
I've had an intermittent fault with my passenger side boot light too. Give it a tap and it comes on. I guess the connector might have condensation in since the boot trim was wet on the inside from a leak from the washer

Sent from my Plus E using Tapatalk

I've tapped it so hard and so many times that my wife got jealous

I've cleaned and scraped the connectors and nothing. Took the whole lamp out and back in again and still nothing.

Think the only solution would be to split open the lamp and re-solder leds


Sent from my iPhone using Tapatalk
 
  • Like
Reactions: CJGREEN89
Finally, after months, I have decided to attempt fix on that lamp.

be03e2a8acdc731041b0046fff68380c.jpg


Used heat gun not to crack the lens and opened the lamp

71e73714d8aed3881effe467b7e38046.jpg


After hours of fiddling with smd leds on fragile tape, I’ve sorted the two bottom leds but ... f’d a row of top 5 ones.
It was 4 o clock at night and could not be asked to spend more time on it so put it all back together. Glued with EvoStick hard plastic glue and sealed it off with transparent silicone

5487628ad42bdf81f5e5e6a7316aa77b.jpg


New lamps on order

Should’ve done it long time ago

There’s a upside of it.
Both of the tailgate lamps had micro/hairline scratches or cracks and were dull.
Valeo parts turned out to easily give way and crack under UV rays and loos its shine.
New lamps will be tinted before install and their other halfs


Sent from my iPhone using Tapatalk