Andy C's S3

AndyC87

Registered User
Joined
Apr 12, 2014
Messages
29
Reaction score
10
Points
3
Location
Somerset
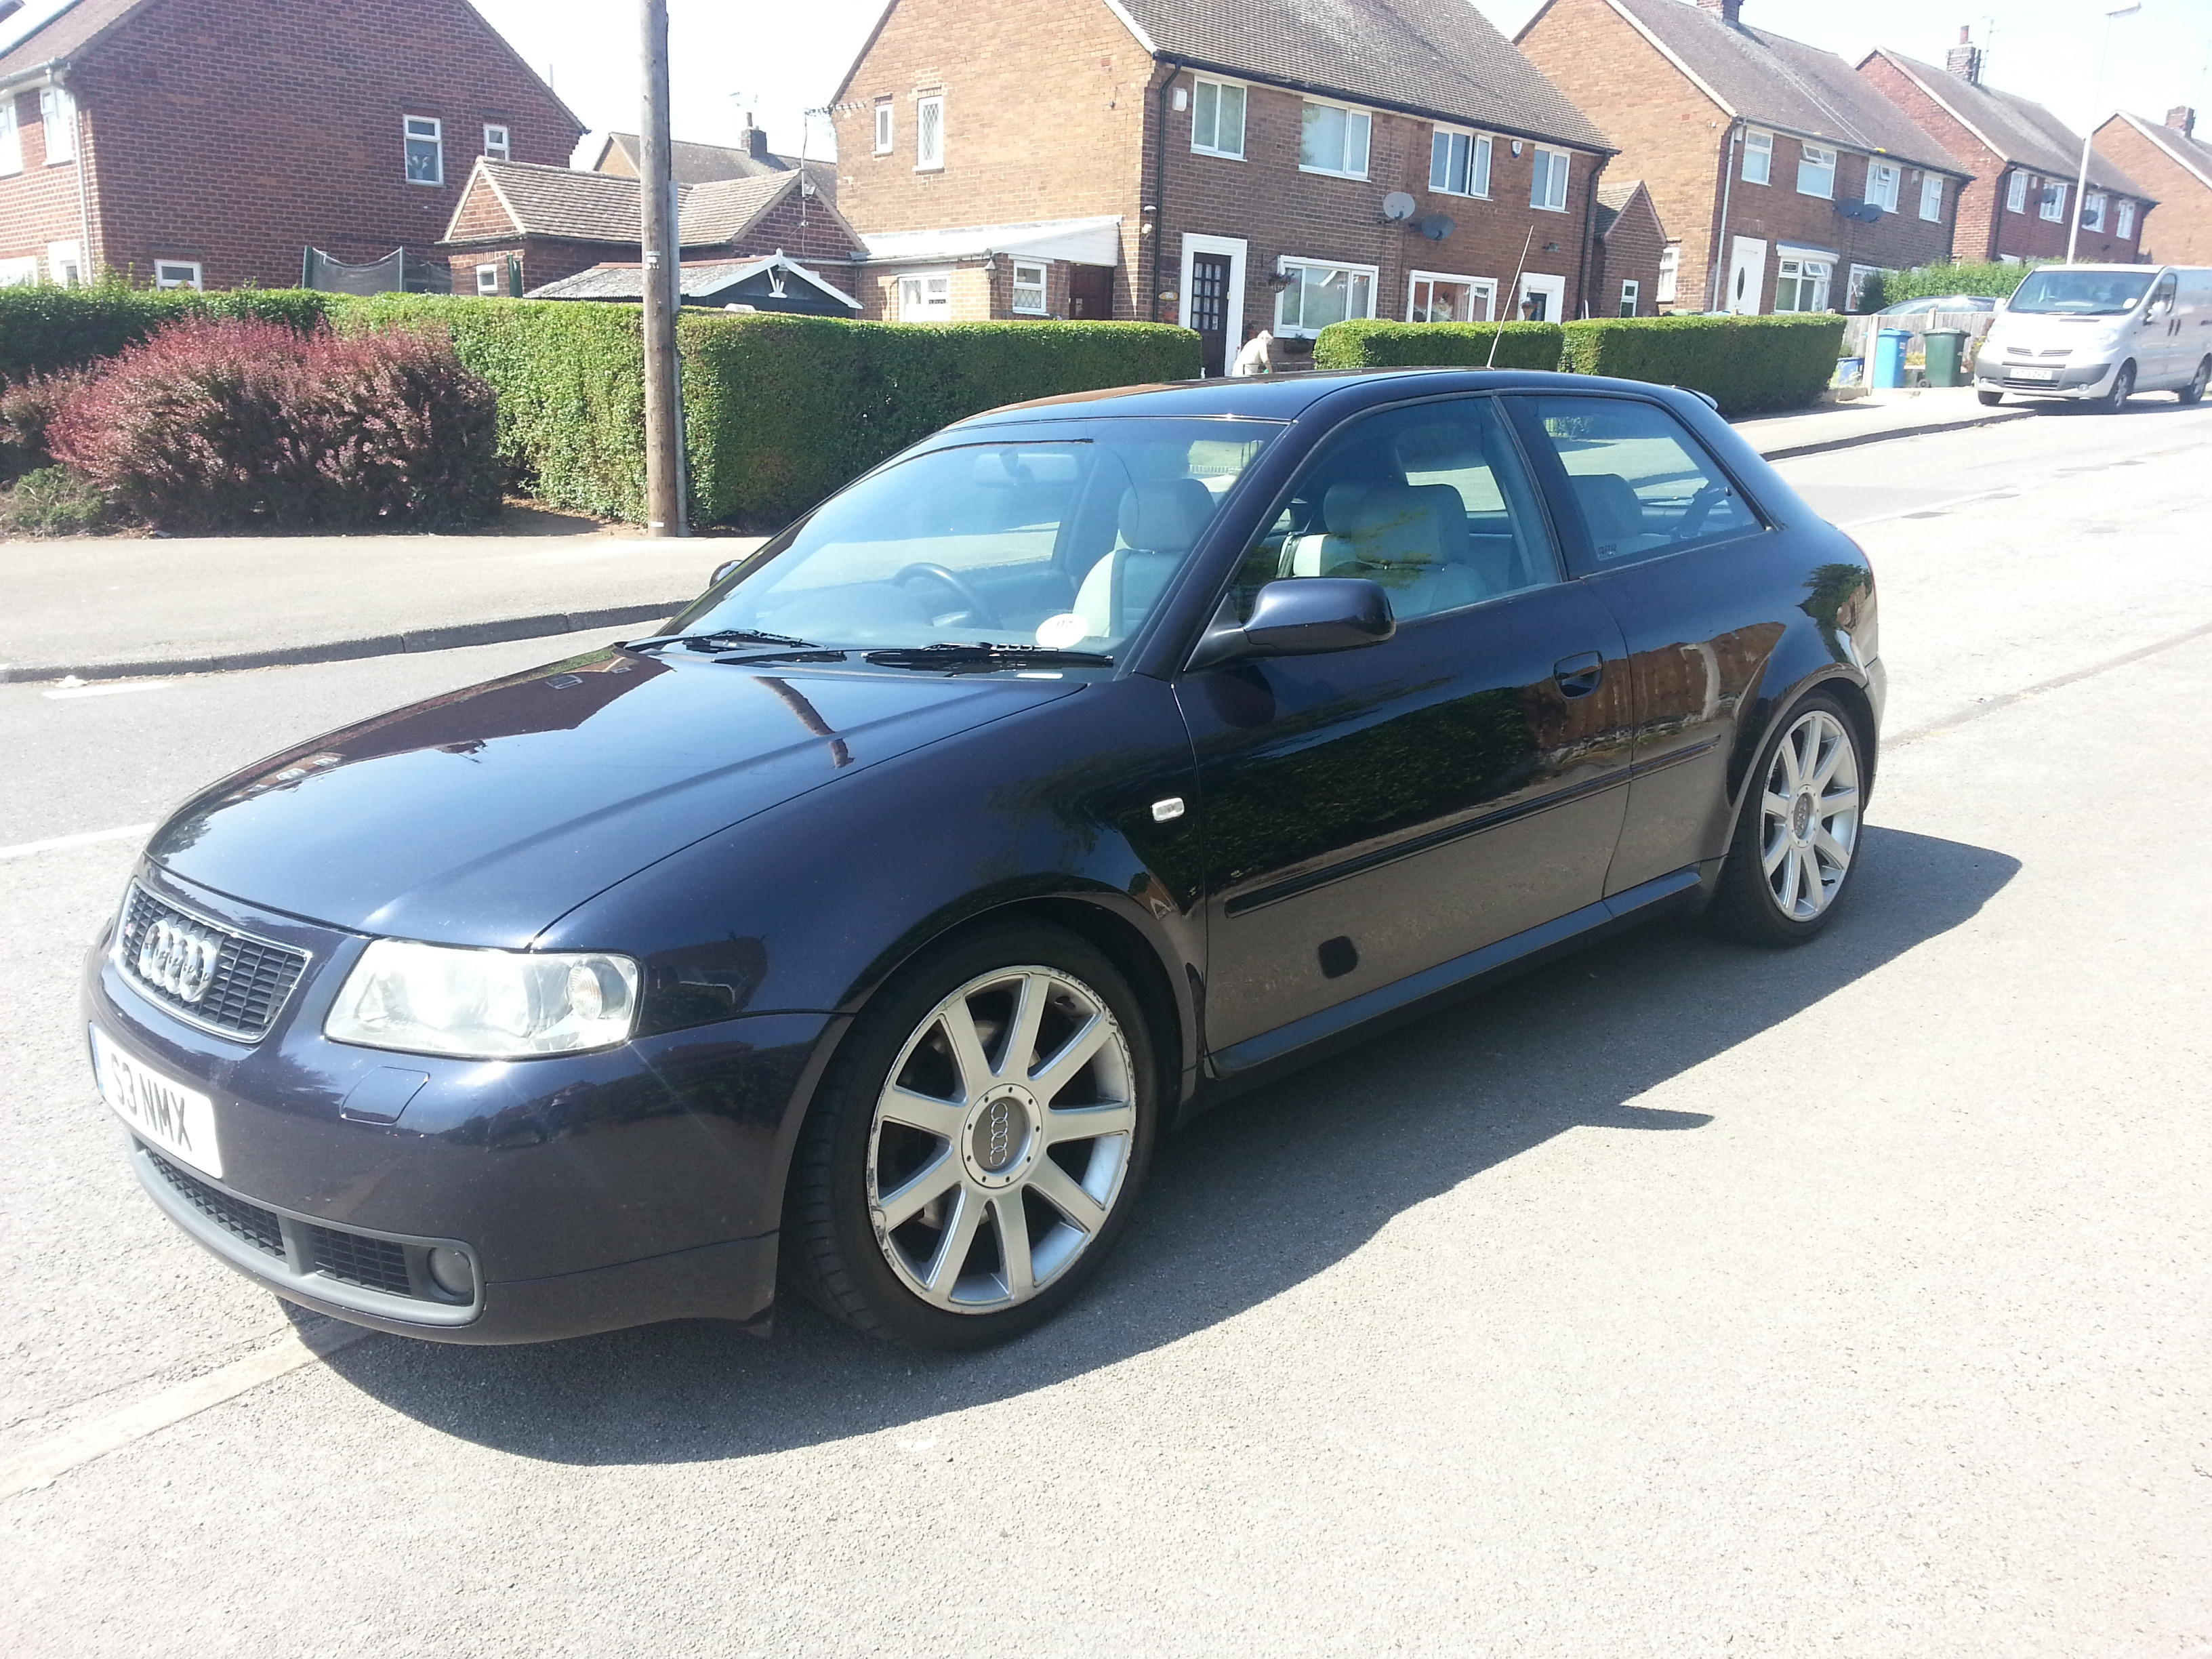
Hi, new to the forum, though I'd share the old bird.

Bought just after Christmas this year with 87,000 on the clock. Fairly well maintained service history. Pretty good condition, few chips and scratches but expected. Cambelt was done and haldex was serviced last year.

It's an APY 210hp pre face-lift


So this is it. Lovely condition with a few things that need to be changed.

1. Oil and filter service.
2. Spark plug change.
3. Doing away with the K&N and oil breather in favor of the OEM airbox.
4. N249 valve removal.
5. Forge 007p Diverter Valve.
6. 63mm FMIC medium sized.
7. Re-map.

Let me know your thoughts and any critisms welcome.

Ta, Andy
 
Last edited by a moderator:
Criticisms? yeah don't call it an old bird :yahoo:

Nice looking car. Welcome.
 
  • Like
Reactions: AndyC87
Welcome! Lovely car, nice colour. What colour is that exactly?

Suggestion: replace the rear light lenses with the facelift versions to freshen up the back end. You could also replace the aerial easily for a stubby version which I personally think looks much better for very little outlay.

I'd also move re-map to #6 on the list and FMIC to #7.
 
  • Like
Reactions: AndyC87
I'll have a look for some facelift rear sets.

I'd like to do the engine enhancements first then get it custom mapped. The cars getting on now so a custom would be ideal for the condition of the engine and the modifications made.

I'm pretty sure it's Ming blue.

Wheels need a refurb, any ideas anyone?
 
Looks like Santorin blue to me. Looks lovely
 
Last edited:
  • Like
Reactions: AndyC87
Welcome! Looks good! Interested to see what PCV delete set up its got! Can see a wee filter popping up there! Has it got a catch can too?
 
Looks a nice and clean example and the paints Santorin Blue LZ5K :)
 
  • Like
Reactions: AndyC87
That would be an option, but for the cost of 2 maps, I think I can wait. :)
 
  • Like
Reactions: Freeman_1986
Welcome! Looks good! Interested to see what PCV delete set up its got! Can see a wee filter popping up there! Has it got a catch can too?

It's not had a PVC delete but I have removed the K&N and reinstated te OEM air box. N429 will be removed and general boost hoses replaced with silicone substitutes :)
 
Hi mate! Welcome to the PREFACELIFT crew! Nice car you have! First thing I did was change the rear lights. Looks billion times better with facelift rears! Got from eBay for £80 a set brand new! I'd go for a badger 5 induction as that was wellllll worth it IMO! FMIC is good to have, I had mine on stg1 and it cooled things down for sure! The old IC's were ok but piping was split and leaking boost like ****!
 
  • Like
Reactions: AndyC87
The car is definitely not Ming Blue, well I think lol. Looks too light. Ming blue almost looks black in some lights and yours is a little bit lighter (I think??)
 
Ming blue does look dark in low light or overcast but in direct sunlight it can look as blue as this or purple even
 
3Go105B.jpg


Not as dark as this
 
Hi mate! Welcome to the PREFACELIFT crew! Nice car you have! First thing I did was change the rear lights. Looks billion times better with facelift rears! Got from eBay for £80 a set brand new! I'd go for a badger 5 induction as that was wellllll worth it IMO! FMIC is good to have, I had mine on stg1 and it cooled things down for sure! The old IC's were ok but piping was split and leaking boost like ****!

I shall scour the bay for the rear lights!

What results did you et from your stage one with the FMIC?

Andy
 
Yesterday I decided to sort out some bodywork issues. Instead of getting work done the car took my attention for a few hours!

Jobs:
Scratch Removal
Headlight Polishing

In this picture, although hard to see the O/S headlight is filthy, dulled and generally looked crap and discolored. The N/S headlight as in the pictures has had a bit of a cleaning.


This next picture shows the condition of the O/S light before clean and polish. As the mysterious sun was out, the light looked a lot cleaner than it actually was.


To start the process I gave the lights a good clean and scrubbed any crud away to leave as a clean as possible. As you can see I masked up the areas around the light to protect paint work etc from scratches and damage. As I am tight with money I do not have a power, orbital sander thing just my elbows and hands.
Started with 1200 grit wet and dry and evenly went of the whole light for a good 10 minutes, occasionally drying to see progress and evenness of the sanding. When I was happy, I took 2000 grit and repeated the process (when using wet and dry I made sure the paper was well lubed with water clears fine particles away well).
When I was happy with a nice even result, I took some standard rubbing compound and began polishing a small area at a time (2" square) with a damp lint free cloth. This process took some time but it worked really well.

The picture below shows the finished product.


I'll post a little write up of the scratch removal later :)
 
Last edited by a moderator:
  • Like
Reactions: The Doctor
I shall scour the bay for the rear lights!

What results did you et from your stage one with the FMIC?

Andy

I already had the map when I popped my fmic on, but it helped with cooling especially when it was a hot day, heat soak wasn't an issue anymore! Stage 2 is where it really matters and I achieved great results of 281bhp and 278 lb ft (pegged down from 291 to protect rods) of badger power :)
 
  • Like
Reactions: AndyC87
I already had the map when I popped my fmic on, but it helped with cooling especially when it was a hot day, heat soak wasn't an issue anymore! Stage 2 is where it really matters and I achieved great results of 281bhp and 278 lb ft (pegged down from 291 to protect rods) of badger power :)

That's a pretty good output! :D

I'm just getting things ordered now to get myself ready for a stage 2.

Deciding what size FMIC to go for. I'm looking OEM as possible, and something that is drive-able and vaguely reliable as it's my daily.

Andy
 
Yesterday I decided to sort out some bodywork issues. Instead of getting work done the car took my attention for a few hours!

Jobs:
Scratch Removal
Headlight Polishing

In this picture, although hard to see the O/S headlight is filthy, dulled and generally looked crap and discolored. The N/S headlight as in the pictures has had a bit of a cleaning.


This next picture shows the condition of the O/S light before clean and polish. As the mysterious sun was out, the light looked a lot cleaner than it actually was.


To start the process I gave the lights a good clean and scrubbed any crud away to leave as a clean as possible. As you can see I masked up the areas around the light to protect paint work etc from scratches and damage. As I am tight with money I do not have a power, orbital sander thing just my elbows and hands.
Started with 1200 grit wet and dry and evenly went of the whole light for a good 10 minutes, occasionally drying to see progress and evenness of the sanding. When I was happy, I took 2000 grit and repeated the process (when using wet and dry I made sure the paper was well lubed with water clears fine particles away well).
When I was happy with a nice even result, I took some standard rubbing compound and began polishing a small area at a time (2" square) with a damp lint free cloth. This process took some time but it worked really well.

The picture below shows the finished product.


I'll post a little write up of the scratch removal later :)

Looks good :) The drivers side on mine is proper ******. Needs this doing. Weird though, because the passenger one is crystal clear.
Looking forward to scratch repair, another thing I need to do. So any tips welcome ;)
 
Last edited by a moderator:
  • Like
Reactions: AndyC87
Freeman.

Not many tips really, just don't lose patience with it. Be even wih your sanding. I found alternating between clockwise and anticlockwise worked well and gave a good clean result.

I used some Halfrauds rubbing compound to remove the fine scratches created by the sanding. Other products can be used but this was all I had in my garage and I'm happy with the results!

Andy
 
Spent a bit of time washing my car the other day, and it comes up really well. Definitely love the colour. The downside however were the amount of scratches the car has picked up, all the way around the car. Luckily the majority are not very long or very deep so they can be sorted.

This picture is of the O/S wind which had the worst scratches;


(Ignore the crotch shot)

These were ****** annoying to get out.

I gave the area a good wash and removed any crud that was lingering.
Soaked some 2000 grit wet and dry in warm water ready for sanding.

I began sanding very gingerly largely following the direction of the scratches and trying to not stray to far away. The sanding removed a small amount of lacquer as the scratches did not go as deep as the paint work (luckily)
From time to time I dried the area to see how much the scratch had faded. The sanding gave the area a dull effect but you can see clearly the gradual disappearance of the scratch...

This picture shows the faded areas after sanding where the scratches were.


After I was happy that the scratches were removed I took some Halfrauds rubbing compound and slowly rubbed it into the sanded areas with a damp lint free cloth. When It was rubbed in i polished it off with a clean cloth and re-applied rubbing compound until the dulled sanding marks were gone;


Andy
 
Last edited by a moderator:
  • Like
Reactions: Nilz, The Doctor and Freeman_1986
It's not had a PVC delete but I have removed the K&N and reinstated te OEM air box. N429 will be removed and general boost hoses replaced with silicone substitutes :)

What's the wee filter that's popping up in the engine shot then?
 
  • Like
Reactions: AndyC87
The little filter to the left of the battery is a small oil breather that was bunged in a breather pipe off the standard airbox. OEM box back on now all standard plumbing back in place. Not sure what to do about induction keeping it all OEM looking :/
Andy
 
Spent a bit of time washing my car the other day, and it comes up really well. Definitely love the colour. The downside however were the amount of scratches the car has picked up, all the way around the car. Luckily the majority are not very long or very deep so they can be sorted.

This picture is of the O/S wind which had the worst scratches;


(Ignore the crotch shot)

These were ****** annoying to get out.

I gave the area a good wash and removed any crud that was lingering.
Soaked some 2000 grit wet and dry in warm water ready for sanding.

I began sanding very gingerly largely following the direction of the scratches and trying to not stray to far away. The sanding removed a small amount of lacquer as the scratches did not go as deep as the paint work (luckily)
From time to time I dried the area to see how much the scratch had faded. The sanding gave the area a dull effect but you can see clearly the gradual disappearance of the scratch...

This picture shows the faded areas after sanding where the scratches were.


After I was happy that the scratches were removed I took some Halfrauds rubbing compound and slowly rubbed it into the sanded areas with a damp lint free cloth. When It was rubbed in i polished it off with a clean cloth and re-applied rubbing compound until the dulled sanding marks were gone;


Andy

Looks ace :)

Have ordered everything I need from the bay to have a go myself at the scratches and faded headlight. All the scratches are pretty light so should be easy enough. Have got one on the bumper though that is about the same as the larger one on your wing. But would be happy if it turned out like your one, can barely see it.
 
Last edited by a moderator:
  • Like
Reactions: AndyC87
When you do remove the scratches be careful not the sand too hard and go down to the paint layer!
:D
 
The S3 is looking a little sorry for itself currently.

Wake up, about to drive to school and this is what I'm met with...


and...


all four wheel centres have been pinched :mad:

Audi want £80, anyone got any for sale?

Andy
 
Last edited by a moderator:
Car looks good mate, some good work with the polishing as well.

Sorry to see that your centres have been nicked!!! ****** scrotes!!

Have a look in the classifieds on here as there maybe some up for sale.
 
  • Like
Reactions: AndyC87
A little update...

Last week I ordered 3m of 4mm internal diameter black silicone hose ready for n249 bypass.

I largely followed a great thread on here by Welly

http://www.audi-sport.net/vb/general-technical-how/84402-n249-bypass-how-2000-s3-but-same-many.html

This guide was vary straight forward and I had it done within an hour...

First picture, before the removal of the n249 valve.

The three pipes that need to be kept are the two running up the middle of the rocker cover, and the hose running from the center of the DV (top right of picture)


This picture shows the two hoses which run from the n112 valve and from the inlet.


This picture shows the hose running from the DV which is needed (I say needed, it will be replaced with silicone)


To keep everything looking neat and tidy I decided to run all hoses to a fixed to the front right of the engine, just south of silver SAI valve. I pulled the Inlet and N112 valve hoses back down through and ran them under the inlet across to the right hand side.


At this point I forgot to take a picture of the plate at the front of the inlet manifold, but this will need to be removed if you want to replace the SAI feed pipe with silicone. Welly's guide shows the procedure really well.
This photo shows both the DV and SAI hoses which have been replaced with silicone, and fixed using spare clips from the n249 removal to try and keep the OEM look.


I decided to T the three hoses together out of the way to keep the mess to a minimum. Again the three hoses 1- from the inlet 2-from the n112 valve and 3- from the DV.
This location is to the right of the throttle body just below the silver SAI valve, apologies for the picture, it's not great...


DV response is better, generally a smoother drive and less stuttery.

So that's it, thank you Welly for your guide, helped me loads.
 
Last edited by a moderator:

Similar threads

Replies
4
Views
1K
Replies
1
Views
888