What have you done today?

Took my S3 out for a run yesterday, it having sat in a garage since end of October last year.

I have been tinkering with it over winter, stripped and serviced all the brakes and done a few other little jobs such as cleaning WMI nozzle, system checks etc.

Fitted a set of Team Dynamics Pro Race 1.2’s (18x8). 15.2kg weight saving.

Lightweight Odyssey PC680 battery. 8kg saving.

Removed spare wheel and jack set. 22kg saving.

Car felt much lighter on its feet probably due to the wheels and I had an enjoyable run out doing 100miles with no issues, surprising as its sat for 5 months.
 
  • Like
Reactions: hydro s3, ADs3 and S3JACKSON
Noticed one of my number plate lights was not working, the plastic around the screw had split so i replaced both lamps with new oe items.

Scanned my car and got fault code,

17608 BOOST PRESSURE CONTROL VALVE

P1200-35-00 N249 MECHANICAL MALFUNCTION

Cleared code and went for a drive but the code is back. standard S3 BAM 80000 miles

DV was changed two years/4000 miles a go with oe one only because the original one had been on the car for 14 years.

No eml on or any symptoms while driving, going to try a new n249 valve to see if this cures it.
 
My S3 passed its MOT with no advisories.

Chuffed.
 
  • Like
Reactions: Carllos3, hydro s3, S3JACKSON and 3 others
Not S3 related but I sold my Leon FR an bought a B7 A4 Avant S-Line as my new daily.


Sent from my iPhone using Tapatalk
 
Spent the last week refurbing my blades and door bottoms, fitted today and really happy.

N249 delete

Pipercross panel filter

Fitted a 2nd hand b5 tip onto the OEM filter , suspect it was attached to a cone prior, bit of a faf but got there. You really feel the difference with this tip fitted, great product.

A good day, cars running well
DCH
 

Attachments

  • DA647E6A-52A1-427D-B744-0E4EC4F49CE4.jpeg
    DA647E6A-52A1-427D-B744-0E4EC4F49CE4.jpeg
    1.8 MB · Views: 281
  • 301EA85D-74DB-4F14-8C0B-58127D8D89B8.jpeg
    301EA85D-74DB-4F14-8C0B-58127D8D89B8.jpeg
    1.5 MB · Views: 324
Spent the last week refurbing my blades and door bottoms, fitted today and really happy.

N249 delete

Pipercross panel filter

Fitted a 2nd hand b5 tip onto the OEM filter , suspect it was attached to a cone prior, bit of a faf but got there. You really feel the difference with this tip fitted, great product.

A good day, cars running well
DCH

Door blades look really good! I need to sort mine out again soon.


Sent from my iPhone using Tapatalk
 
  • Like
Reactions: DCH
Really happy how they turned out, bought the paint kit off eBay, primer paint and laquer. Also new stainless steel screws. There was a few bits on the drivers door bottom coming through but Dremel, Krust prime and paint touch up and it’s sorted.
 
  • Like
Reactions: S3AMJ
Have you a link for the paint kit someone posted it up for me before but I can’t find it
 

Attachments

  • F25F550C-87E5-412A-A16A-35505F04B902.png
    F25F550C-87E5-412A-A16A-35505F04B902.png
    469.1 KB · Views: 252
Have you a link for the paint kit someone posted it up for me before but I can’t find it

That was me mate, it was in a thread you started on the door blades I think.

Good to see what the results were from that kit! :)


Sent from my iPhone using Tapatalk
 
  • Like
Reactions: DCH
Spent the last week refurbing my blades and door bottoms, fitted today and really happy.

N249 delete

Pipercross panel filter

Fitted a 2nd hand b5 tip onto the OEM filter , suspect it was attached to a cone prior, bit of a faf but got there. You really feel the difference with this tip fitted, great product.

A good day, cars running well
DCH

They look great! I need to do mine but suspect I need clips for the blades as they slightly come away from the door where the door opens.

Another thing to add to the list.


Sent from my iPhone using Tapatalk
 
  • Like
Reactions: DCH
M4 button head SS screws for the door blades x 8

6mm ....pack of 20 ... £1.50

Ps..... cos you will lose a couple

DCH
 

Attachments

  • C5E8456B-C82D-4395-A96B-3EB28307EA2F.png
    C5E8456B-C82D-4395-A96B-3EB28307EA2F.png
    622.2 KB · Views: 320
Last edited:
  • Like
Reactions: Daniel M
M4 button head SS screws for the door blades x 8

6mm ....pack of 20 ... £1.50

Ps..... cos you will lose a couple

DCH

Will these be all that’s needed to refit them?


Sent from my iPhone using Tapatalk
 
Will these be all that’s needed to refit them?


Sent from my iPhone using Tapatalk

Yes, unless the white plastic blade back inserts that hooks onto the door pegs are fubared. Then you need to get inventive.
DCH
 
  • Like
Reactions: Daniel M
That was me mate, it was in a thread you started on the door blades I think.

Good to see what the results were from that kit! :)


Sent from my iPhone using Tapatalk
Yes found it ordered it today it’s getting delivered tomorrow
 
  • Like
Reactions: S3AMJ
Fitted the OEM gloss black badges front and rear. It now all blends nicely with the black pack and black mirrors.
Sorry was on my phone didn't realise this was a specific A3 section. Hopefully it's ok, if not can it be moved?
d283280f1fdabfcfde8e5356b222bbb6.jpg
5a73ec49cf7354d8a9e98986da504fe9.jpg
afefc32d3f42122f73fd508cfcf7e1ac.jpg
02b1594bdc5f8957765552222d7a1d8f.jpg
5b7d862cf8a0e5d3a8c8ef20e26d6505.jpg
82982c8f5787db50b3cf1e27c0cb528e.jpg


Sent from my Pixel 2 XL using Tapatalk
 
  • Like
Reactions: Alex C and hydro s3
Was disappointed with my Dyno Results. 183whp at 4700rpm and 255 Ft-Lb at 3150rpm (Measured at Wheels, with 20% drive train loss = 230hp at engine).
Can see that the power doesn't climb after 4700rpm, torque drops fast too.

dsf41.jpg


Replaced TIP with 80mm Creation Motorsports one (Crappy product, metal piece was a nightmare to fit, had to trim 3.5inches off the pipe to get it to fit).
I also installed one of those RamAir filter kits, not sure how good they are, but I like the turbo sounds.

14tpr9t.jpg


Installed colder heat range plugs, took off front bumper and tightened loose inter cooler pipe (Had been dripping oil at that Join now and then, but was no drain able oil in the intercooler).

Fixed exhaust leak from when I installed 3 inch down pipe (was leaking at slip join).

Connected up OBDeleven and took the car for a good drive and measured a maf reading of 208g, which should work out to around 260hp at the flywheel.
Car running a lot better than it has in a long time, being a combination of fixing the items.
Previously I had never seen over 192g as a MAF reading and usually it was around 183g.
 
replaced the top mounts on thursday, they were shot

Top mount


and my reverse camera finally arrived after 3 others went missing in the post and the one that i initially received didnt work. i immediately went forth hacking it up to make my own OEM style 8l reverse cam

i chose the tiguan camera as it is close dimensionally to the 8l licence plate light cover, i then chopped up one of the light covers i received with the replacement tailgate i bought last year.

R1


bonded it with qbond and reinforcement powders cause trying to plastic weld it would not be a good idea

R2


then sanded it down

R3


did a crappy job painting it

R4s

the finished product

R5s


then i installed it, only downside is the led is is a slightly warmer colour than then one that it replaces

R7s


R8


R9
 

Attachments

  • r2.jpg
    r2.jpg
    188 KB · Views: 222
  • Like
Reactions: jojo, Alex C, hydro s3 and 3 others
While I am waiting to re-mod my car that has rather annoyingly un-modified itself recently I had a go at modding my Vega 56 graphics card...

I did some benchmarks back in Feb when the weather was a little cooler... 3d Mark Firestrike stress test had the GPU running at a warm 79 degrees... thats ok but the fan was noisy as heck and dropping the speed just lead to temp increases which when the warmer weather arrives doesn't give me much overhead...
2019 02 15


The card is undervolted with a power limit increase and overclocked on the memory so the poor old reference cooler is running flat out... this also makes it very noisy so decided to do something about that...

Started with the standard card...
Vega56001


...pulled it apart....
Vega56000


Cut the heatsink in two as the one piece will fit without mods but to make the GPU side fit properly I would need to mod it...

Vega56003


I used a Nzxt x62 AIO water cooler setup which is a twin 140mm fan set u... tbh if I was doing it again I would use a Corsair or similar for the smaller head as the Nzxt ones are massive...

I did try to look at using the Nzxt G12 GPU bracket but this was not only naff looking I would still have to mod it quite a bit and felt that I could mod the OE one for my traditional OEM++ approach ;)

I used the Intel CPU bracket (ironically) and modded it slightly to fit the Vega 56 card...
Vega56004


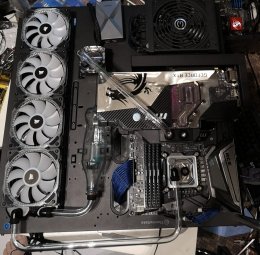
...and test fitted the AIO head...
Vega56005


The cover now needed a few mods...
Vega56006


Used a hole cutter the get the hole close to size (was a little smaller) and filed the rest...
Vega56007


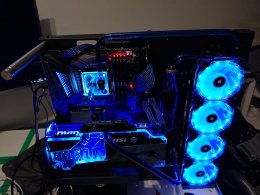
Came out ok... so them refitted it back on the card...
Vega56008


Looks very OEM when fitted :)
Vega56009


So obviously needed to check the results of the mods... fired up 3D Mark and ran the same test but in slightly warmer ambient temps...
2019 03 24 2


37 degrees with the ambient in the 12's or higher (was sunny and my office heats up quick on sunny days) is pretty awesome... I think the ambient was around 5 degrees when I did the original stress test...

CPU is a little warmer too but that now on a single 140mm AIO (Nzxt x42) and clocked to 4ghz all cores so is going to run a little warmer anyway

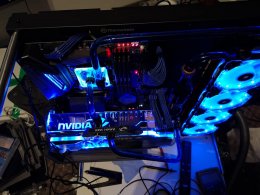
In conclusion... I am a serial moddist and will mod anything... plus watercooling your GPU is actual cool ;)

As a real world test I played BF for a round of conquest and the GPU temps sat at 34 degrees

<tuffty/>
 
  • Like
Reactions: ToughlilT, Rainbird, Alex C and 1 other person
Had a mare on Sunday. S3 8l. Valve cover gasket replace. All going well, new gasket on, cover back on tightening nuts 10nm with torque wrench and a couple stud snap. I then remove all the nuts again to remove the cover, but one nut seems to now be missthreaded and stuck on and it’s lifting the threaded stud. Its still in situ preventing cover removal. I then walked away.

I’m off next week and am in 2 minds whether to attempt to redeem the situation myself as I’m determined it won’t beat me, or call a mobile mechanic in. The advice I’m looking for is, are my thoughts now on the right track ...

1. ordered a new set of threaded pins for the head in case more give ( 2 different sizes - central studs (3) and outer (6) off of Audi.7zap.con) no’s 3 & 4 in the exploded diagram ... is this correct
2. Plus gas the sheared studs in lead up to having a go at removing
3. Remove the last nut still holding the cover down by using the 2 nut method so I can then see how much of the broken studs I’ve to play with
4. Hopefully enough purchase on the broken studs to remove and replace with new threaded pins .... do you replace immediately?
5. do you just fit these threaded studs by same 2 stud method until seated ?
6. Purchased one of those Chuck style stud removers ... are these any good?
7. Do I now need to order another gasket ?


Lost confidence in the torque wrench now,and I’m a little apprehensive of doing more damage by having a go. Also an exposed head and dropping something in gives me the fear. if I get to the stage of tightening up the cover again it’ll be done hand tight by feel . Simple job that just got harder

Really appreciate any experienced guidance

DCH
 

Attachments

  • D08F410F-7D24-482C-914C-AB255295E625.png
    D08F410F-7D24-482C-914C-AB255295E625.png
    347.9 KB · Views: 228
  • Like
Reactions: MPH
wired up the backup camera

Rear view
 
  • Like
Reactions: ToughlilT, Alex C, hydro s3 and 1 other person
Decided to upgrade my i7-4770k setup bit:
i9-9900k @5.1Ghz all cores
MSI MEG Z390 ACE motherboard
64Gt Corsair Vengeance 3000Mhz PLX
MSI RTX2080 Seahawk EK X +118Mhz core/+1000Mhz memory the card is not 100% perfect condition as you can see. It leaked so I had to pull it apart. I had to send it to warranty. Do not buy this! They are poorly made!
EVGA Supernova 750W
480mm Alphacool rad+300LPH waterpump+Coca Cola glass bottle DIY water reservoir+EK-waterblock Velocity RGB for CPU+DIY 10/14mm pipes
Thermaltake Core P5 case which I will hang on wall when ready
Lots and lots of RGB+UV lighting
Fans are Corsair RGB magnet levitation
Alphacool RGB/Fan bluetooth control
Nvidia plex cut support plate for GPU
Riser x16
Blue/black cables
2X Samsung 970Pro 1Tb m.2
Adata XPG SX6000 1Tb m.2
240Gt SUV400
8Tb WD Red

Took me bit more than day but now its together!
165550-dfc329341d84e892a359732e445e502e.jpg
 

Attachments

  • 52029279_10210798191229680_3384950437072338944_o.jpg
    52029279_10210798191229680_3384950437072338944_o.jpg
    255 KB · Views: 283
  • 52005826_10210801848321105_7516177061304598528_n.jpg
    52005826_10210801848321105_7516177061304598528_n.jpg
    78.7 KB · Views: 274
  • 52681162_10210801848121100_6756554366351572992_n.jpg
    52681162_10210801848121100_6756554366351572992_n.jpg
    75.3 KB · Views: 222
  • 52426185_10210802023685489_8709574874579861504_o.jpg
    52426185_10210802023685489_8709574874579861504_o.jpg
    71.5 KB · Views: 267
  • 52527113_10210785921522945_4466857848600526848_n.jpg
    52527113_10210785921522945_4466857848600526848_n.jpg
    65.9 KB · Views: 256
  • 52327090_10210792522207958_3605782154895687680_n.jpg
    52327090_10210792522207958_3605782154895687680_n.jpg
    54.4 KB · Views: 259
  • 51304385_10210739473481773_5702906568320745472_n.jpg
    51304385_10210739473481773_5702906568320745472_n.jpg
    98.3 KB · Views: 259
  • 51338580_10210739613645277_2431639238354141184_n.jpg
    51338580_10210739613645277_2431639238354141184_n.jpg
    74.7 KB · Views: 205
  • 51449296_10210739433000761_5814335874158034944_n.jpg
    51449296_10210739433000761_5814335874158034944_n.jpg
    92.5 KB · Views: 231
  • 51556260_10210739439720929_317865779343130624_o.jpg
    51556260_10210739439720929_317865779343130624_o.jpg
    115.5 KB · Views: 258
  • 51985905_10210739433240767_7619214907283603456_o.jpg
    51985905_10210739433240767_7619214907283603456_o.jpg
    129.8 KB · Views: 221
  • Like
Reactions: Rainbird
Nice bit of kit that. Perfect for browsing ASN and ordering parts off.
 
or let it idle or play tetris :D
Mostly its overkill but I tend to play 4k graphics games and enjoy ultra settings :)
Also Im going to edit 4k videos hopefully soon :)
 
Had a mare on Sunday. S3 8l. Valve cover gasket replace. All going well, new gasket on, cover back on tightening nuts 10nm with torque wrench and a couple stud snap. I then remove all the nuts again to remove the cover, but one nut seems to now be missthreaded and stuck on and it’s lifting the threaded stud. Its still in situ preventing cover removal. I then walked away.

I’m off next week and am in 2 minds whether to attempt to redeem the situation myself as I’m determined it won’t beat me, or call a mobile mechanic in. The advice I’m looking for is, are my thoughts now on the right track ...

1. ordered a new set of threaded pins for the head in case more give ( 2 different sizes - central studs (3) and outer (6) off of Audi.7zap.con) no’s 3 & 4 in the exploded diagram ... is this correct
2. Plus gas the sheared studs in lead up to having a go at removing
3. Remove the last nut still holding the cover down by using the 2 nut method so I can then see how much of the broken studs I’ve to play with
4. Hopefully enough purchase on the broken studs to remove and replace with new threaded pins .... do you replace immediately?
5. do you just fit these threaded studs by same 2 stud method until seated ?
6. Purchased one of those Chuck style stud removers ... are these any good?
7. Do I now need to order another gasket ?


Lost confidence in the torque wrench now,and I’m a little apprehensive of doing more damage by having a go. Also an exposed head and dropping something in gives me the fear. if I get to the stage of tightening up the cover again it’ll be done hand tight by feel . Simple job that just got harder

Really appreciate any experienced guidance

DCH

New threaded studs in, valve cover gasket fitted, replaced split breather hoses, detail polish and wax .... life is good again

DCH
 
  • Like
Reactions: S3JACKSON and hydro s3
The journey of my custom front bumper that started 6 year ago

This is probably not to everyone's taste and i know a few people will moan and complain about 8p bits on an 8l but its my car and as much as i love my 8l i've never really liked the plain detail free look of the front bumper.

It started 6 years ago when i was still rocking the PFL headlights, the car was 100% stock back then, i wanted a more modern looking bumper but not the single grill monstrocities that some folk ended up putting on their 8l's. i decided on an 8p1 bumper since i consider it an evolution of the 8l design.

6 years ago a


6 years ago


picked up working on it again 3 years later, as i couldnt find a 2nd hand donor 8l bumper anywhere and i didnt want to start chopping the original one, i resorted to buying and chopping a new patent copy.

I have a dream


results after its been screwed, plastic welded and fibre filled
Merger


Merger complete


it still needs alot more filler and sanding but i just threw some colour on there to see how its going to look cause 6 years is a damn long time and i really want to finish it now

Almost there


bottom will be finished off with a cupra lip
Almost there 1


still a fair amount of work ahead

to be continued
 
Looks nice and aggressive to me mate,lurking in the shadows,especially with the DLR's...looking forward to the finished article :thumbs up:
 
In prep for taking the s3 on the North Coast 500 camping and fishing in July, I was lucky enough to get on a spare ramp at a friends garage today and got a fair bit done, with his help at times around his own customer work.

Good opportunity to get a good look underneath the car for the first time and thankfully no surprises. Dropped the sump to clean along with oil pick up. The sump was not too bad, but the crud I removed from the pipe strainer was actually shocking.

I should have took a photo at the time but didn’t. For anyone who hasn’t yet done this, or can confirm the pipe has been replaced in previous ownership, do it soon. I had a mound the size of about the palm of my hand of carbon build up, bits of dipstick tube and god knows what else.

So glad I’ve done this. The car has a FSH on 89k. Gave it a full service today with all filters and oils, gearbox diffs and haldex. Spent another 2 hours wire brushing areas underneath and giving a good coat with the old engine oil.

Done the service light reset, spread cardboard on the garage floor and parked up hopefully no leaks tomorrow when I go out to check oil levels. A really good day. Love this car.

DCH
 
  • Like
Reactions: hydro s3, S3JACKSON and S3AMJ
Got VCDS-lite cable jobber off ebay. :readit:
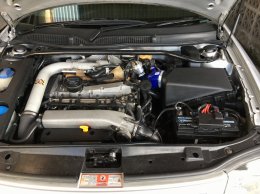
Plugged it in for a scan for faults. I take it you cant run an auto scan in Lite as it wouldnt let me go past the ABS module? went through all the modules manually ok but some didnt respond?, new to this so forgive me. Few faults, but reading up on here i guess nothing major or ill not even bother with as the world is still turning.

01367 - Central Locking Pump Run Time Exceeded (Likely Leak)
01134 - Alarm Horn (H12) - No Communications
01539 - Headlights Not Adjusted

Oh...and I only found out the S3 had headlight washers the other day :haha: .

They didnt work :sadlike:........

.......but hello Mr Fuse :thumbs up:

Small wins

DCH
 
Replaced the original fuel pump at 149k miles. Fairly straightforward DIY job thanks to the available guides.

VDO 4.0 bar fuel feed unit: Part number 228-233-005-009Z. Audi wanted close to £380 but the part I picked up from AUTODOC was £220.

Worth replacing if you have high miles as the one in my car was filthy.
 
Completed another chinafold for someone as well as porting/polishing the turbine housing & opening up the hotside of there turbo dynamics stage 3 hybrid to match the chinafold........you'd think it'd already come with the hotside ported but obviously doesn't as was still a standard hot side:blink:
20190524 152641 resized 2
20190414 194028 resized
 
  • Like
Reactions: hydro s3
Gave the interior a good clean an finally got around to treating the leather. Then took it for a good blast around.


Sent from my iPhone using Tapatalk
 
  • Like
Reactions: S3JACKSON
Car wash, 6 inch gear stick fitted looking good and a one way check valve fitted to the combi valve, made a lot of difference on boost and running perfectly preboost I recommend doing it while doing the n249 bypass valve and car wash after that.. it's a pain keeping a black car clean..
 
Today I picked up a bargain second hand forge intercooler and hoses, the bars taken a slight hit but should be ok. Wirewooled primed and painted rustoleum satin black they’ve come up great. The hoses that came with it, I think I’m missing 2, an elbow ( seller delivering this later this week ) and a straight connector. Might come back and ask for some guidance and reassurance on what I need before tackling it. Few other hoses came in the box. Will have a go after I do the NC500 mid July. Noticed the temp needle been playing up and lately its cold started the rare occasion a little lumpy so genuine CTS in order, still on the original black one.

DCH
 

Attachments

  • 4E22EB1C-A384-4B49-B0D9-7FA303DED389.png
    4E22EB1C-A384-4B49-B0D9-7FA303DED389.png
    1.2 MB · Views: 209
Hey guys,

Over the last two days I replaced a corroded oil return pipe(140 quid for a new one!!), which as an absolute PITA cleaned up a lot of old oil in the process. And refitted my refurbed power steering rack which also gave me a few headaches.

Now I just need to put some fluids in and see if it all works....

Matt
(sorry for no pics and if needed here's the steering rack guide https://www.audiworld.com/forums/tt-mk1-discussion-9/power-steering-rack-replacement-how-1940640/)
 
Weather was nice’ish, so I decided to treat the POS some new pads, got my monies worth out of the old ones! Lol

Also found my mysterious steering wobble issue at 70+, wheel spacer failure!
 

Attachments

  • 5C63A4C4-61BD-4662-8DA9-AC84EC219508.jpeg
    5C63A4C4-61BD-4662-8DA9-AC84EC219508.jpeg
    197.5 KB · Views: 210
  • 70B398CB-389F-408E-8426-9AAFC93821B1.jpeg
    70B398CB-389F-408E-8426-9AAFC93821B1.jpeg
    103.2 KB · Views: 162
  • 28B15B6E-3EF3-4473-940D-C883F7A132CC.jpeg
    28B15B6E-3EF3-4473-940D-C883F7A132CC.jpeg
    251.1 KB · Views: 211
  • 85452F43-8DE0-437D-B874-5413C5F64E7A.jpeg
    85452F43-8DE0-437D-B874-5413C5F64E7A.jpeg
    167.7 KB · Views: 211

Similar threads

Replies
33
Views
2K
Replies
10
Views
3K
Replies
61
Views
6K
Replies
21
Views
2K