What have you done to your Audi A4 B7 today?

So if anyone is doing a 1.8t oil pump conversion I maybe able to help out with the gear
f96c992245f6ac3e0dd63ac1c8671681.jpg


Sent from my iPhone using Tapatalk
 
Found these dumped on my doorstep.

The troublesome Autodoc parts I ordered almost 2 months ago have appeared today.
The wife and i went out with the woofers for a lunchtime walk, came back and found the box just left on the doorstep, half a delivery label and half open box..
Despite there previous promises, no refund has ever been issued and my card issuers are still chasing a refund.

So I suppose I might as well us them, after all I've paid for them, well i paid for SKF ones not stark ones, anyway that's another rant for another day.

Ab99
Ab98
Ab97
 
Found these dumped on my doorstep.

The troublesome Autodoc parts I ordered almost 2 months ago have appeared today.
The wife and i went out with the woofers for a lunchtime walk, came back and found the box just left on the doorstep, half a delivery label and half open box..
Despite there previous promises, no refund has ever been issued and my card issuers are still chasing a refund.

So I suppose I might as well us them, after all I've paid for them, well i paid for SKF ones not stark ones, anyway that's another rant for another day.

View attachment 216115 View attachment 216116 View attachment 216117

Had mine mot’d today and both N/S boots are starting to split so maybe I best order some now so I can use them in may lol


Sent from my iPhone using Tapatalk
 
  • Like
Reactions: Charlie Farley
Changed my valve cover in the hope that it reduces my oil consumption.

It’s def slowed since the new turbo has been on but not stopped.

If I block the pipes from valve cover to turbo with my hands and blow through the other side lots of air comes out around the seal. Doesn’t do that on the new cover so hoping that resolves it.

My guess is that under boost the turbo is sucking oil straight out of the motor through the split in the valve cover which is right next to the breather connection, so would make sense.

Gonna take the front end off on Saturday to get to IC’s, empty them then keep an eye on it over the next month.

Fingers crossed that solves it. If not I have no idea how all the oil is getting into IC’s?
 
Ohh, and here’s some pics, cus we like pics
 

Attachments

  • 4F657672-148A-4E1B-A198-4389C937139A.jpeg
    4F657672-148A-4E1B-A198-4389C937139A.jpeg
    166.1 KB · Views: 63
  • CD7F8D4F-4809-4CDA-AEB0-CAA260254615.jpeg
    CD7F8D4F-4809-4CDA-AEB0-CAA260254615.jpeg
    138.9 KB · Views: 69
  • 99611CB4-0F79-413E-AD28-3175A589E704.jpeg
    99611CB4-0F79-413E-AD28-3175A589E704.jpeg
    108.7 KB · Views: 65
  • Like
Reactions: Dan_G
Service done today. Oil, filter, brakes and fluids topped off. Given a clean bill of health and is running really sweetly.

Two jobs left for this year.

Toothed belt and water pump next month and fit correct radio as and when they find the one I ordered....

Oh and a ruddy good clean and wax!
 
I think I have an issue with brake servo as when I disconnect it with oil cap off there the pulsing noise and it stops ??? Any ideas ???


Sent from my iPhone using Tapatalk
 
Took the front end off to get to the intercoolers. Quite a bit of oil in them. Hopefully changing the valve cover will help?
 

Attachments

  • 085B8023-C71E-4C6E-9B66-3F2FDBBAEE6E.jpeg
    085B8023-C71E-4C6E-9B66-3F2FDBBAEE6E.jpeg
    395 KB · Views: 59
  • Like
Reactions: Charlie Farley
Leaky valve covers are quite common dan, is yours the later revised black one or early silver item.
 
One that came off was black. New one is black too.

There was a very small split right next to where the breather pipe that connects to turbo is.

Hoping that solves it and it’s not something more sinister!
 
  • Like
Reactions: Charlie Farley
Hello folks, its around MOT time for the old bus - Last weekend I started working on it. Now follows the litany of disasters that occurred in the preperation......

First.
Checked the brakes. After inspection, decided to change both front Disks (Heavily ridged on inner faces) & fit new brake pads all round. Front rebuild went ok, caliper pistons retracted all the way in to allow for new disks & pads, assembly went Perfectly OK.
Moved to the rear - found drivers side was seized solid on the sliding pillars. After some persuasive (heavy metal) antics, managed to get Caliper off & Sliding Pins removed. Strangely, only the drivers side caused problems - Passenger side went relatively easily.
DSC 0164


They had been assembled sometime in the past with Coppaslip coated on them. THIS IS A VERY DEFINITE NO NO! Coppaslip is NOT a lubricant, its an anti-seize compound designed for Bolts & other NON MOVING parts. If used on moving parts, it will congeal & basically stick the parts together eventually like glue. After a careful cleaning of pins (& mounting holes), both were perfectly reusable so reassembly done with Lithium based waterproof grease.

Now got brakes done both ends, BUT before finishing, rear shock absorbers are now in line for replacement. Sounds easy? NOPE!

The bottom bolt on drivers side required an EXTREME amount of force to get the nut off. Like hanging full bodyweight on longest breaker bar type of force. However, finally got there (took a while) so now got shiny new shocks on too. Strangely, once again, the passenger side went much more easily as sliding pins were greased correctly.

Old n new


NOW, stick the wheels on, go for a drive to start bedding in new pads. Sounds easy? WRONG!!!

After fitting front wheels, found that, with the new disks/Pads they now foul the wheels!

Caliper  Wheel Contact
:wtf:

The wheels I fitted last year are off an Audi A5 - I assumed because they fitted OK (at the time) all was OK but WRONG - obviously the offset is different. Blood E Ell. Nothings ever easy.........

Only one thing to fix this.......... Wheel spacers. So, onto the interwebby thing & ordered up some 5mm spacers with extended bolts. That should do it.
All procedures now halted as ran out of weekend & have to continue earning a living.

Back this weekend to get on with it. WRONG AGAIN. Got 20 of the wrong type of bolt - tapered instead of radius. Blood E Ell again. Should have looked more closely at the fleabay page.
SO, fit the spacers then. Problem. Being universal ones, there is nothing to hold them in place whilst fitting the wheels. Time for some improvisation.

After a look about the garage, found a couple of thick plastic washers so drew up a shape, fabricated them from the plastic - hey presto, spacers now sit OK so wheels can be fitted easily.

Spacer alignment fix


SO, car back on wheels, everything hunky dory - temporary bolts fitted & correct bolts ordered up (fleabay again) .

NOW, whats next. I've been putting off fitting a new thermostat for a long time now - I'll do that as theres plenty daylight left.

AND the new litany of disaster commences. A story for another day as Its not over yet........ :confusion:
 
  • Like
Reactions: Charlie Farley and Dan_Avant
There’s always something with these cars mate.

Interestingly, I’ve changed my discs and pads recently and had the same problem. Passenger side went fine. Drivers side was a different story. Took me 3 hours to get one bolt out!

Ive just been out to the car and noticed a puddle of washer fluid under the passenger side. I must have split the reservoir when putting the intercooler back on yesterday. It needed a little gentle persuasion
 
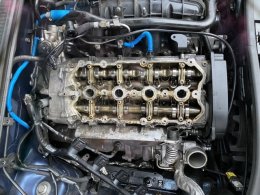
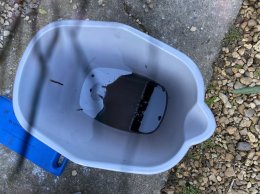
Cleaned this dirty ****** out
b665a38fbf223a54fb9f13fa5c34dea2.jpg


Sent from my iPhone using Tapatalk
 
  • Like
Reactions: Dan_Avant, Pie-eyedpiper, tr7 and 1 other person
Hello folks, its around MOT time for the old bus - Last weekend I started working on it. Now follows the litany of disasters that occurred in the preperation......

First.
Checked the brakes. After inspection, decided to change both front Disks (Heavily ridged on inner faces) & fit new brake pads all round. Front rebuild went ok, caliper pistons retracted all the way in to allow for new disks & pads, assembly went Perfectly OK.
Moved to the rear - found drivers side was seized solid on the sliding pillars. After some persuasive (heavy metal) antics, managed to get Caliper off & Sliding Pins removed. Strangely, only the drivers side caused problems - Passenger side went relatively easily.
View attachment 216260

They had been assembled sometime in the past with Coppaslip coated on them. THIS IS A VERY DEFINITE NO NO! Coppaslip is NOT a lubricant, its an anti-seize compound designed for Bolts & other NON MOVING parts. If used on moving parts, it will congeal & basically stick the parts together eventually like glue. After a careful cleaning of pins (& mounting holes), both were perfectly reusable so reassembly done with Lithium based waterproof grease.

Now got brakes done both ends, BUT before finishing, rear shock absorbers are now in line for replacement. Sounds easy? NOPE!

The bottom bolt on drivers side required an EXTREME amount of force to get the nut off. Like hanging full bodyweight on longest breaker bar type of force. However, finally got there (took a while) so now got shiny new shocks on too. Strangely, once again, the passenger side went much more easily as sliding pins were greased correctly.

View attachment 216264

NOW, stick the wheels on, go for a drive to start bedding in new pads. Sounds easy? WRONG!!!

After fitting front wheels, found that, with the new disks/Pads they now foul the wheels!

View attachment 216261 :wtf:

The wheels I fitted last year are off an Audi A5 - I assumed because they fitted OK (at the time) all was OK but WRONG - obviously the offset is different. Blood E Ell. Nothings ever easy.........

Only one thing to fix this.......... Wheel spacers. So, onto the interwebby thing & ordered up some 5mm spacers with extended bolts. That should do it.
All procedures now halted as ran out of weekend & have to continue earning a living.

Back this weekend to get on with it. WRONG AGAIN. Got 20 of the wrong type of bolt - tapered instead of radius. Blood E Ell again. Should have looked more closely at the fleabay page.
SO, fit the spacers then. Problem. Being universal ones, there is nothing to hold them in place whilst fitting the wheels. Time for some improvisation.

After a look about the garage, found a couple of thick plastic washers so drew up a shape, fabricated them from the plastic - hey presto, spacers now sit OK so wheels can be fitted easily.

View attachment 216262

SO, car back on wheels, everything hunky dory - temporary bolts fitted & correct bolts ordered up (fleabay again) .

NOW, whats next. I've been putting off fitting a new thermostat for a long time now - I'll do that as theres plenty daylight left.

AND the new litany of disaster commences. A story for another day as Its not over yet........ :confusion:

Life owning and running a B7 is not always sunshine and roses, well for most of us its a ongoing struggle against age plus wear & tear , but hey we always get it sorted in the end.
Good work chap.
onto your next job now then.:icon thumright:
 
SO. Thermostat change. Shouldn't be too hard? WRONG!! this is a very frustrating job to do - you keep finding more bits need to come off just to get the thermostat out. Most difficult part is getting the three hoses off the housing - all of them had never been touched before (pretty sure) & all of them were well & truly stuck in place like they were glued there! Add to that the discovery that Audi, in their infinite wisdom, have used a mix of Torx & spline drive screws. No problem with the Torx screws BUT Couldn't find a correct size spline drive (M5) anywhere! Had to make an emergency purchase of a driver bit set (ToolStation to the rescue) & go & collect it before any progress could be made.
Now, after a couple of wasted hours, I was able to continue removing bits. Eventually, after a lot of swearing & barked knuckles I managed to get the thermostat off! YAY!
Reassembly went much more easily & I didn't have any bits or screws left over so YAY! again. Ran engine up to temperature & all seems OK, needle rock steady on 90 degrees & no apparent leaks anywhere - Jobs a good un!
Also decided to fit the new engine & gearbox undertrays (originals damaged in the snow - gearbox cover ripped off & disappeared on some back road near Aberdeen - Also the entire drivers side floor cover. Winter can be a bit harsh in Scotland......) This was quite easy as a fitting kit came with it so all new fasteners used. This Jobs also a good un!
SO! - finally got to go for a test drive - all seems OK. Brakes feel a bit spongy but that is par for the course with VAG group vehicles - they will suddenly come OK (in my experience) after driving for a few days. Still stop the car nicely. Temperature now staying at 90 degrees whilst driving about too so another win!
NOW. Tomorrow I have to change the Rear disks/pads on my brothers A1. Happy days. :crying:
 
Well chaps, heres an extra - might be of interest?
A while back, I found the wheel bolts were becoming really stiff to undo when working on the car. Decided to clean up the threads in the hubs.
BUT. Can't find a tap the right size. After rummaging around a bit, picked up an old trackrod end & found that the thread on this is the same as the wheel bolts! YAY! After sawing 4 slots into the threaded end, this can now be used to clean out the hub bolt holes & it works pretty well. Its a bit more forgiving than a Tap would be as its not hardened steel but it does the job fine. Cost zero. Thats probably the best bit!

Wheel Bolt Hole Reamer


ALSO - I used another old trackrod end to make a Wheel fitting tool. After removing the ball joint part of it (a lot of sawing and cold cut chiseling) you end up with a long rod, threaded at one end. I filed a 10mm hex into the round end of it and hey presto, a wheel fitting tool. Again, cost zero.

Wheel fitting tool
 
Last edited:
  • Like
Reactions: Dan_Avant
Had the old bus MOTd today, passed again with no issues.
One advisory, that both inner edges of my front tyres are wearing, possibly related to my lowering her.
 
  • Like
Reactions: Jamsmoo and Dan_Avant
Had an email from Awesome saying they are replacing my faulty boost gauge free of change......happy days!

Just have to wait 2-3 weeks for it to be shipped from America :sign unfair:
 
Had the old bus MOTd today, passed again with no issues.
One advisory, that both inner edges of my front tyres are wearing, possibly related to my lowering her.

You have dpf ?
Wanna do the egr delete myself but don’t wanna block my dpf


Sent from my iPhone using Tapatalk
 
I’ll have to knock a few of those stickers out . Has anyone got a png of it ??? Also I had a delivery today . My rs4 colour dash a low mileage s3 turbo and a box of goodies from Bar trek in Germany


Sent from my iPhone using Tapatalk
 
SO, Spent the day renewing the Disks & pads on my brothers A1 - the original disks were pretty shot & the actual brake pads required to be hammered out of the carriers! The sliding pillars, however, were perfectly free - pulled the boots back to inspect & these have been assembled with some correct grease so thats why! After cleaning everything up, all went back together with no problems & now a step closer to an MOT (due next week) at the same time as my own A4. :happy:
 
Have you kept to the same manifold it changed to one without swirl flaps?

Anyone know which manifold I require without flaps ?bkd? I’m guessing yours is flapless pie
Where from ? Anyone got one to sell?
Sorry for all the questions


Sent from my iPhone using Tapatalk
 
  • Like
Reactions: tr7 and Jamsmoo
Cheeky remap!

Dialled it in to 340bhp as the car is high mileage (141k and rising!!), worry about bending a rod if we pushed it to its limit.

Im really happy with it. Nice power delivery and pulls well through the gears.

The traction control kicked in for the first time since I’ve owned the car when coming out of a round about this afternoon ha ha!

Didn’t get a print out of the dyno results (thank you Covid!) but they are emailing it over so will post it once received.

Overall I’m really pleased. Need to put it against some scoobies and stock S3’s now, see how she gets on
 
  • Like
Reactions: Ricky Burrows, WOMBLERULZ, Dan_G and 2 others
Also, Hopefully going to take my stock and hybrid k03’s apart this weekend.

I’m interested to see the difference in compressors and want to take a look at the seals as both failed!
 
Cheeky remap!

Dialled it in to 340bhp as the car is high mileage (141k and rising!!), worry about bending a rod if we pushed it to its limit.

Im really happy with it. Nice power delivery and pulls well through the gears.

The traction control kicked in for the first time since I’ve owned the car when coming out of a round about this afternoon ha ha!

Didn’t get a print out of the dyno results (thank you Covid!) but they are emailing it over so will post it once received.

Overall I’m really pleased. Need to put it against some scoobies and stock S3’s now, see how she gets on

340! Very nice indeed! Quicker than the V8 S4 of that era and will handle much better due to lighter weight. Sounds like an excellent project.

As someone who had 2 8V S3s in a row, one pre FL, one FL, they are deceptively quick, way quicker than on paper.

It’s the gearshift that will hurt you. That DSG box is lightening quick.

Sort of regret changing my S3 but in the end it was the shockingly firm ride.

But if I could get a reliable B7 Avant with that power.....!
 
  • Like
Reactions: Dan_Avant
Also, Hopefully going to take my stock and hybrid k03’s apart this weekend.

I’m interested to see the difference in compressors and want to take a look at the seals as both failed!

Maybe check oil feeds and oil pressure and return pipes to make sure not blocked


Sent from my iPhone using Tapatalk
 
  • Like
Reactions: Dan_Avant
They look a out as good as my ones did.
I put shorter ones on the rear though, so she doesn't bottom out on the stops.

Mine we’re causing the dust guard to hang wonky and rub on the damper. I got like for like ,where were yours from


Sent from my iPhone using Tapatalk