What have you done to your A3 (8p) this week

nice mate
Just doing the same myself but went for the rts paddle and smf conversion kit, and as car is going to Rick soon again, thought I’d chuck an uprated turbo & rear main seal in there… was literally about to post pics and see you are doing same jobs too.

off with the old and on with the new ay
Woyoyy!

I'm currently bleeding my clutch, and I'm having a mare... Let me know how you get on with that! I've been at it for 3 weekends now, now trying to bleed it using brake caliper bleed connected to the clutch bleed...

Good luck with everything!
 
  • Like
Reactions: Davill9
Woyoyy!

I'm currently bleeding my clutch, and I'm having a mare... Let me know how you get on with that! I've been at it for 3 weekends now, now trying to bleed it using brake caliper bleed connected to the clutch bleed...

Good luck with everything!
I assume it’s a new slave … as the o ring can let air in if re used
On the top of csc that comes through the box

I have done a few of these before over the years now and only way is to -
push release bearing right in, dip in brake fluid.

Let go slowly to suck up as much as you can.

fit to box and put the transport seal cap bit the new one comes with back on to stop anything going in.

when back together, I found the only way to stop pedal slamming to the floor is to pressure bleeed from the brake fluid resivoir and release through the nipple as normal but not under too much pressure

sealey one I use but they do a few different ones … they have a cap to seal onto the vwag brake resivoir And a 1L magnetic base bottle so you don’t run low.
I remember the first time round I almost had pedal back then lost it and so on and realised that it needed the level above the max line and then removed to max line once pedal is right with a serynge or something as it seems on golfs especially to pull air in on bleeding if not above max line.
I can look at Audi manual if you want and screenshot the procedure as I haven’t got that far yet matey so haven’t looked how they say to do.
I can’t pm people as i haven’t posted enough apparently after nearly 2 years on here I’m afraid so posting is the only way to get information to people that need it.
 
Gearbox and transfer box all rebuilt and re sealed ready to fit at last now the rain has stopped
 

Attachments

  • 717E1C12-66A6-4C25-A57D-5A499566EB4C.jpeg
    717E1C12-66A6-4C25-A57D-5A499566EB4C.jpeg
    1.9 MB · Views: 145
  • 072D6AB5-AD3A-4228-B818-D2E9D1EF6F96.jpeg
    072D6AB5-AD3A-4228-B818-D2E9D1EF6F96.jpeg
    2.1 MB · Views: 127
  • AF82E5B1-9BFE-45C2-A82C-4A08B8451F26.jpeg
    AF82E5B1-9BFE-45C2-A82C-4A08B8451F26.jpeg
    2.3 MB · Views: 126
  • 00AD8497-8198-40D0-8FC6-F57A90F10962.jpeg
    00AD8497-8198-40D0-8FC6-F57A90F10962.jpeg
    2.5 MB · Views: 118
  • Like
Reactions: Troubs12
Just brought a S3 8p after having a modified V5 MK4 for 5yrs. Absolutely love it so far. Already has a turbo back 3" non res cobra stainless exhaust with sport cat, R8 coil's, pretty sure it's mapped aswell with how it boosts. Cambelt, water pump and coolant less than 2k ago. Gotta a few little things to sort out but nothing serious.
12b7f57e6392e88ac9576756a3209b8d.jpg
24c9945ea2b64020c4715180fe15a195.jpg
87e679931a60ac96bbb0a6e71420072a.jpg
08e23de65843dda3a6df37c23930614d.jpg
b6c4d8d546cb44bbdb969b33e7208774.jpg


Sent from my IN2013 using Tapatalk
 
  • Like
Reactions: phateuk, tcardio and Davill9
Iabed uprated rear main oil seal fitting this evening

I just added a how to on here for the ea113 full platform if anyone needs

link is…
 

Attachments

  • DAEBFBA4-89D6-4380-823D-6A19C8738774.jpeg
    DAEBFBA4-89D6-4380-823D-6A19C8738774.jpeg
    2.4 MB · Views: 120
  • E504E32C-85EB-4049-9FA1-F8128E2AE041.jpeg
    E504E32C-85EB-4049-9FA1-F8128E2AE041.jpeg
    2.2 MB · Views: 127
  • Like
Reactions: GTz and Troubs12
Went behind the front wheel arches and got the dirt out while doing the dropped hinges
 

Attachments

  • 0D7C4CA2-BCAF-4A75-A693-268AF25999A5.jpeg
    0D7C4CA2-BCAF-4A75-A693-268AF25999A5.jpeg
    4.6 MB · Views: 145
  • Like
Reactions: tcardio
Well the bag didn’t blow up and I am thankful for static discharge. Bit of a pain but worth it. Now onto the hvac and rnse
9aebeb49c27e0c586ce6197db1e4daea.jpg


Sent from my iPhone using Tapatalk
 
  • Like
Reactions: Davill9
Well the bag didn’t blow up and I am thankful for static discharge. Bit of a pain but worth it. Now onto the hvac and rnse
9aebeb49c27e0c586ce6197db1e4daea.jpg


Sent from my iPhone using Tapatalk

Looking good bud have you got the smaller smd’s for the rnse? they’re a lot smaller (size 0805 I think) still cheap enough but thought I’d give you a heads up incase you strip it and have to order some. But the good news is once you’ve done the 30 or 40 or so in the rnse the dash switches are the same size. Though just to make things more complicated if you’re doing the interior light they’re normal 2mm leds with an in line resistor. I was able to reuse mine so didn’t take a note of the value which to be fair I should have done .


Sent from my iPhone using Tapatalk
 
  • Like
Reactions: Davill9 and tcardio
yes i did get 0805. I will probably leave the interior alone as I never open up the screen. I figured a little green would be nice so I post up pics as I make progress. After a 100 or so LED's, I think my skills will be pretty good. Its pretty Zen TBH.Thanks for your help and inspirational pics
 
Nearly there… trouble is finding the time to do work on your own car I find !
 

Attachments

  • EBF844A8-1C94-4C5E-A4AB-5BC7D7E3B7C5.jpeg
    EBF844A8-1C94-4C5E-A4AB-5BC7D7E3B7C5.jpeg
    1.4 MB · Views: 108
  • 8B20442A-1B9C-42E4-B44E-D4CF4FFC740F.jpeg
    8B20442A-1B9C-42E4-B44E-D4CF4FFC740F.jpeg
    2.4 MB · Views: 123
  • CAFB255F-DF10-4C47-B9F9-E747A060AAB9.jpeg
    CAFB255F-DF10-4C47-B9F9-E747A060AAB9.jpeg
    3.4 MB · Views: 100
  • DC088B1D-B087-4FA9-A7CD-FB7A27314EB0.jpeg
    DC088B1D-B087-4FA9-A7CD-FB7A27314EB0.jpeg
    1.9 MB · Views: 107
  • 1C4A2E4F-168C-492D-96A9-8B1C0A54D0A7.jpeg
    1C4A2E4F-168C-492D-96A9-8B1C0A54D0A7.jpeg
    4.2 MB · Views: 114
  • Like
Reactions: palmgrooves and GTz
I haven’t opened up the rnse but the Tpms and the esp pads were a little longer than 0805. I didn’t measure the pads but I suspect 1206 would be the fit. When I open the rnse I’ll measure the pad distance to make sure. Anyways , rnse next
fdcb395ef181c7a34cf0863baaf368d3.jpg


Sent from my iPhone using Tapatalk
 
  • Like
Reactions: MT-V6
Managed to get our 12 Sept 2011 registered A3 (8p) RS to 15k miles earlier this week :thumbs up:

RS3 15000miles 22 May 2022


BLUEY

Lots of 'heath' reasons as to why the miles are so low - like in the hospital car park above - but Bluey's now back in regular use... :racer:
 
Last edited:
  • Like
Reactions: curtis92
Managed to get our 12 Sept 2011 registered A3 (8p) RS to 15k miles earlier this week :thumbs up:

Lots of 'heath' reasons as to why the miles are so low - like in the hospital car park above - but Bluey's now back in regular use... :racer:
I love the cornflower blue! I’m planning a full respray on my 2006 A3 since I want to keep the car but fancy a change from phantom black, I was thinking of going Nogaro blue, but I have to say I now think Cornflower blue suits the 8p better.
 
  • Love
Reactions: 45bvtc
I love the cornflower blue! I’m planning a full respray on my 2006 A3 since I want to keep the car but fancy a change from phantom black, I was thinking of going Nogaro blue, but I have to say I now think Cornflower blue suits the 8p better.
Thank you, JeffY, needless to say we think so too... :thumbs up:

BLUEY ADD CROP


With a few mods since but still very much an A3 (8P) :friends:

Note: Cornflower blue - and OLD audi quattro 20v colour - is not a metallic or pearlescent but it don't half change colour is varying light

SEE:
 
Last edited:
  • Like
Reactions: Davill9
I love the cornflower blue! I’m planning a full respray on my 2006 A3 since I want to keep the car but fancy a change from phantom black, I was thinking of going Nogaro blue, but I have to say I now think Cornflower blue suits the 8p better.

I think this colour too on the larger length cars myself and the sprint blue on the hatchbacks (or the grey also possibly)

Looking good though mate thumbs up


Sent from my iPhone using Tapatalk
 
  • Love
Reactions: 45bvtc
loving the green i might try doing this im assuming it involves a solder iron,

had my door cable snap the other day, got a temporary fix door pull bites a little earlier the locking button wont lock drivers door as its short i can adjust it but im just waiting for a new cable
2c4ffb3599b4c5a000ba64c505f81fb9.jpg


Sent from my iPhone using Tapatalk
 
I love the cornflower blue! I’m planning a full respray on my 2006 A3 since I want to keep the car but fancy a change from phantom black, I was thinking of going Nogaro blue, but I have to say I now think Cornflower blue suits the 8p better.
Here's Cornflower and Sepang together:

Cornflower and Sepang
 
  • Like
Reactions: JeffY
I love the cornflower blue! I’m planning a full respray on my 2006 A3 since I want to keep the car but fancy a change from phantom black, I was thinking of going Nogaro blue, but I have to say I now think Cornflower blue suits the 8p better.

And here's Cornflower and Daytona (SQ5 ion Sepang has since replaced the AUDI A1 Black Edition 1.4 TFSi 185ps S-tronic)

BLUEY and SUZY


Like I say, Cornflower blue does change on lighting...
 
  • Like
Reactions: JeffY and Davill9
I haven’t opened up the rnse but the Tpms and the esp pads were a little longer than 0805. I didn’t measure the pads but I suspect 1206 would be the fit. When I open the rnse I’ll measure the pad distance to make sure. Anyways , rnse next
fdcb395ef181c7a34cf0863baaf368d3.jpg


Sent from my iPhone using Tapatalk
Oh man, you sure do be itching me to jump on this LED swap train. Only wish if you had shown it in a bit more detail, especially the disassembly part, getting to leds :D
 
Oh man, you sure do be itching me to jump on this LED swap train. Only wish if you had shown it in a bit more detail, especially the disassembly part, getting to leds :D

Perhaps do one if you can mate with the lists of what led’s go where
Would be really handy for me when I make a start


Sent from my iPhone using Tapatalk
 
Ok I’m late to the party for sure. The genius is troubs12. His wiring of the control module change made me faint. Truly epic.
In terms of doing the mods.
All pieces open up easily. If you struggle your not doing it right.
All require an eyeglass flat screw driver and just unclip the access points.
Once you take them out, you will see
In terms of specifics, headlight switch is just unclipping
Paddle shifters: you will see a pin that needs to be removed to access LEDs. Access is on back of unit. With flat edge screwdriver push out pin and then grab it with a plier on the other side
HVAC: easy. T8 screws only. Lift off done
Headlights,paddle shifters and hvac all plcc 2.
Take picture prior to starting. Orient new LEDs in same pattern with notch in same direction.

Middle strip under rnse: I used 0805 but will measure pad distance as I think 1206 would fit better. Card holder plcc 2.
Others can comment on rnse as I haven’t been in that pig yet. 0805 is likely as others have said but I need to measure pad distance.

Don’t need much heat. Look at some YouTube videos and practice on a circuit board first. It’s not hard really. It’s actually enjoyable. Your fine motor skills will improve.

LEDs are cheap so order about 20% more than needed.

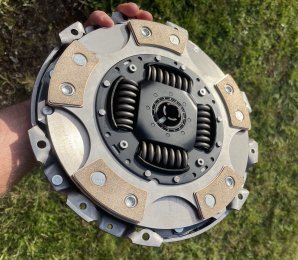
Here are some pics of components
41d7e6b3a8543b0c79ece86b3aed476e.jpg

74b73f4af4fae2e2bec9348d49bc9409.jpg

ac9b08b6e307d92baaad27e1d37e818b.jpg

db361cbc4ecffedf4055025ff71fbf80.jpg

ae6a31356d96f77e09faba1423388e8e.jpg

9f28f4c559231deb5115c8c27e6b5bed.jpg

And remember to disconn ct battery before removing airbag please. Your dealing with a potential bomb there. Safety first peeps


Sent from my iPhone using Tapatalk
 
  • Like
Reactions: Troubs12, theViTALiTY, Davill9 and 1 other person
To bluey ^^^. My favorite car ever. Glad you are back in it driving and hopefully healthy.


Sent from my iPhone using Tapatalk
 
Easy one today…
Fitting Heko’s !
car is filthy I know, it’s been off road for about a month or so again till last night for the transmission &4wd rebuild this time.
may clean later, tbh it needs it.
BE00B14F B0CF 4D52 8BEF 536F6296AF7F
5014BF89 631F 4D45 9DC6 CF39D993BF4B
28D3FDB1 F6C4 41F0 8E07 F85ED0F7FFD7
38355E9E 6C4B 4721 A785 9B44984895C3
 
Polished and fit black edition trim to my S3, bored of the silver and must say I do prefer how the black edition trim looks when all polished up.

95CA75B4 9F50 4175 B9CB 35805D343D6C
IMG 8541
 
EMTuning Full Interior kit & Reverse LED & License Plate LED + RocketWires Front Red Puddles & 4 Door OEM 0000 Puddles and Warning Lights. Installation was a breeze. The hardest part is cutting the holes. Recommend using a pick and scribing the outline then cut exactly that size.
IMG 1064
IMG 1065
IMG 1066
 
  • Like
Reactions: tcardio
Polished and fit black edition trim to my S3, bored of the silver and must say I do prefer how the black edition trim looks when all polished up.
Looks amazing. Im sure you noticed the airvents are matt. the polished black are cheap enough now
 
  • Like
Reactions: Kayobong
Looks amazing. Im sure you noticed the airvents are matt. the polished black are cheap enough now

Cheers mate. Yes, not sure if it's worth the time and cost of getting the gloss black as it's very subtle
 
ec8ee8c999703284f3bc48f4d4e2c001.jpg

515dab0b745abce772a236864da4d192.jpg

3726aa34f576271cfd11d793396f4887.jpg

7 plcc2 to knob
2 0805 to coming home switch
2 pin LEDs to brightness

I marked the anode for ya

Best to buy an smd tester. Makes the changeout much easier.

Freaking 0805 are tiny

Took more time opening up the 3 switch ports than soldering


Sent from my iPhone using Tapatalk
 
  • Like
Reactions: Troubs12
1: Found a better way to stop AudioPilot from changing volume and not having the 3 beeps...Poor a bunch of hot glue over the Mic then reattach.
2nd: Cubby LED install. Should be the last bit of interior LED retrofits. For any US owners looking to do this, the lighter connector to plug the optical LED into is on the left of the shift knob under the cubby. Just need to pop off the kneebar triangles and shift trim to access and move it to the back of HVAC.
IMG 1119
 
  • Like
Reactions: tcardio
What a week, changed the cam follower, did the haldex service and then literally within 24hrs the ****** engine has gone bang after 7wks and less than 1000 mile's. Thank god I bought it from a dealer 
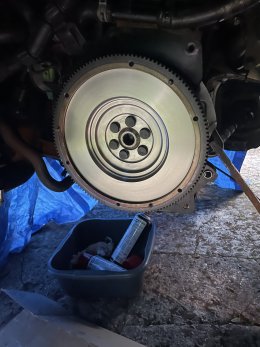
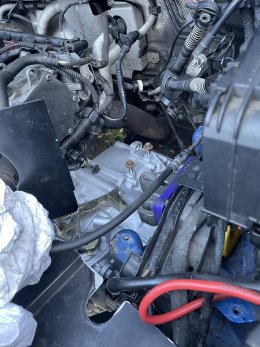
all being covered under warranty I think the oil pump seized or chain gone barely runs and smokes more than I do
ceb5cc648a378f1101dc5790e6241fa3.jpg
1a744fc32cf1d10da80e576428b42df5.jpg
e7fea5fcd8ea6b6d5685293896ff3064.jpg


Sent from my NE2213 using Tapatalk
 
  • Like
Reactions: tcardio and curtis92
Polished and fit black edition trim to my S3, bored of the silver and must say I do prefer how the black edition trim looks when all polished up.

View attachment 255955View attachment 255956

Hey bud I’ve not been on here for awhile but was wondering where you got the white stitched trims from? Or were they on the motor already?


Sent from my iPhone using Tapatalk
 
  • Like
Reactions: Kayobong and curtis92
ec8ee8c999703284f3bc48f4d4e2c001.jpg

515dab0b745abce772a236864da4d192.jpg

3726aa34f576271cfd11d793396f4887.jpg

7 plcc2 to knob
2 0805 to coming home switch
2 pin LEDs to brightness

I marked the anode for ya

Best to buy an smd tester. Makes the changeout much easier.

Freaking 0805 are tiny

Took more time opening up the 3 switch ports than soldering


Sent from my iPhone using Tapatalk

Absolute pain in the D1&k isn’t it


Sent from my iPhone using Tapatalk
 
  • Like
Reactions: tcardio
i tagged you in another post i saw recently mate


Sent from my iPhone using Tapatalk
 
Hey bud I’ve not been on here for awhile but was wondering where you got the white stitched trims from? Or were they on the motor already?


Sent from my iPhone using Tapatalk
They're genuine from an RS3, they pop up on eBay from time to time, not cheap though. I think you can buy non-genuine ones off eBay which also look pretty good.
 
  • Like
Reactions: curtis92
Yeah Neil it is micro work and now onto the RNSE. It looks the pants but damn it's a ballache

I’ve gotta redo mine as the ones I ordered two types of smd a warm white and cool white so guess which one I fitted lol. I’ve gotta do my new q3 ac controls anyway so I’ll smash it out at the same time but times really tight lately and it’s sunny haha


Sent from my iPhone using Tapatalk
 
I’ve gotta redo mine as the ones I ordered two types of smd a warm white and cool white so guess which one I fitted lol. I’ve gotta do my new q3 ac controls anyway so I’ll smash it out at the same time but times really tight lately and it’s sunny haha


Sent from my iPhone using Tapatalk
yeah I bet your time is limited with your new addition. Congrats
 
Finally had time to install fire extinguisher

Seats out
Door trim removed
Carpet pulled back
Carrier base aligned and marked
Step drill to 7mm
Rivnut installed
Base installed
Carpet and trim replaced
Extinguisher installed
a81fd4b008e475dac28d809eca664592.jpg

4f3a0ca7251279f1dfbd9b5fe04c5e49.jpg

584d3b273f73650af3fe26bfde683212.jpg

d2bc8d0cb0b62e37c788235818f415e5.jpg

00a91adbe924ece8450ae58752dda6f0.jpg


Sent from my iPhone using Tapatalk
 
  • Like
Reactions: S3 Rav
Oil change (Millers CFS 5w40)
Xina special 3" downpipe (sounds like half of a V8 now!), interestingly no CEL yet (haven't scanned with VCDS yet)
Breather pipe replacement (anyone wants to see the og one?)
GFB DV+