Was busying myself with a small styling project. I color matched star shaped center caps of my new S3 replicas to the rim color. Some may say I doesn't matter, but I really don't like when the center caps of this design are lighter than the gun metal alloys. It seems unnatural to me as I think that if something is fitted deeper, it should look darker or at least the same shade of grey. Initially I considered darker color, not black though, but then I found spray paint that was an exact match, so bought it. I covered the centre caps with gloss clear coat, so they are protected and look like a part of the wheel now ") Also, I de-chromed the cap "nuts" making them satin black. It took some time and it was my first experience with a spray can, not saying that materials wasn't cheap as well, but I liked the result at the end and that was what it was all about
Also, I de-chromed the cap "nuts" making them satin black. It took some time and it was my first experience with a spray can, not saying that materials wasn't cheap as well, but I liked the result at the end and that was what it was all about


Also, I de-chromed the cap "nuts" making them satin black. It took some time and it was my first experience with a spray can, not saying that materials wasn't cheap as well, but I liked the result at the end and that was what it was all about 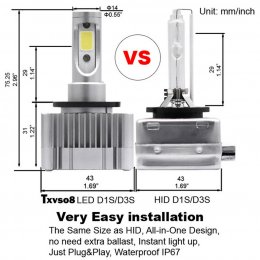

 Seen this kit around for so long but someone actually installing it LMAO But it's pretty nut seeing it in person lol