Audi A4 Cabriolet (B6) 2.5di tiptronic.
My Airbag has been coming on, being re-set (by me using my vag-com) but then comes back on again very soon after ……. So, after reading various answers to this problem, I decided to look into it and get it sorted once & for all. According to my vag-com, it’s the passenger side that is causing the problem, so that’s the one that has been ´altered´ now – PERMANENTLY !
Firstly, disconnect both terminals of the battery and go have a 30-minute rest (with a nice hot cup of tea perhaps) while the residual voltage dissipates.
Next you´ll need to remove the Seat by removing the 4 splined bolts at each corner of the seat (the front ones are easier to access with a socket set if you lift up the front of the seat – if you have that option fitted that is).
Now, remove the black plastic cover (in the floor of the car) which just slides forward to remove.
Pinch the black retaining clip together to loosen the wiring loom from the bottom of the car and remove the 2 multi-plugs by lifting the sides with a small screwdriver – they come out very easily.
Next, unclip the YELLOW multiplug from its yellow base (has a black & blue wire going to it).
Now unclip the yellow base by moving a small clip on the top from one side to the other and lifting the plug out. It probably wont have much slack wiring at all, so be careful not to waste anything here.
……………….
Now go into the wiring under the seat itself > you need to locate another of the yellow multiplugs similar to the one you found in the floor of the car. It will have 2 wires (black & blue) going into both sides of the plug > follow the pair of wires that goes towards the seat back-support and cut these 2 wires leaving enough to be able to join the new wiring to it safely and easily. Then all of the (blue & black) wires between the cut and the yellow plug by the floor can be totally removed (or left in place if your not to bothered about neatness)…… however remove the black & blue wires that go through the large black conduit below the seat (which gives enough room to thread the new wires into place).
Now, I used a thin 240v wire from a discarded house lamp (has a blue & brown wire within) as a direct replacement for the original wiring and the 2 yellow multiplugs.
At the seat-back end, I soldered together the 2 blues and then the black to the brown …… then wrapped both connections in electrical tape and secured it safely using nylon cable-ties.
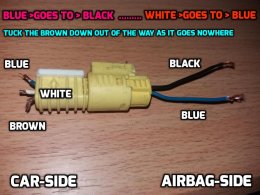
The floor end is a bit harder as the colour-coding isn’t the same. The incoming wires from under the car have 3 wires ? (brown, blue and white).
Firstly, the brown can be safely tucked back underneath as it does nothing and goes nowhere (& no one seems to know why its there at all).
The white wire must be connected to the blue wire from the airbag.
The blue wire must be connected to the black wire from the airbag (which is brown in my own wiring lead).
It seems a bit ridiculous, but that’s the way to do it – for some unknown reason, Audi seem to think reversing the wire colour code was a good idea ???
You wont have much room at all to join these wires (in the floor), but I managed to solder them together OK and then covered them both with electrical tape for safety.
Now, replace all the underfloor wiring, and the multi-plugs, then the black conduit-clip, then the black plastic cover.
Re-fit the seat in the same way it was removed and tighten the splined bolts securely.
Now, you either take the car along to a garage and hand them lots of money for a 5-minute job, or you buy yourself one of the cheap vag-com leads (& disc) from one of the many suppliers on e-bay etc (I bought my own for €5). Now you have to connect the car (via the OBD11 lead under the steering wheel) to a laptop via the USB connection. Open the vag-com program, select TEST and first set the port (usb inlet) to the correct number (I,2,3 or 4 normally) and then try to remember what usb you plugged into for the future or you´ll have to keep repeating this bit.
Now open vag-com (top left option) and click on the AIRBAG box > at this point follow the onscreen instructions fully > once you have done as told by the laptop, you will see a box for fault codes – open that, and then click on CLEAR CODES. The light on the dashboard should go out at this stage but if not, you’ve either made a bad connection in the new wiring or the airbag unit itself is defective and will need replacing). If all is now OK, you should be able to click GO BACK on the vag-com and then exit vag-com >>> and if lucky, you´ll not see the airbag light again – until the other seat goes wrong that is, as this seems to be a common fault on Audis and one which Audi manage to make heaps of money from.
Basically, one of the 2 yellow multiplugs will have broken – but I feel its easier to remove both at the same time rather than try and figure out which one and by doing it this way, your also averting having to repeat the process at some future time.
Hope its all of help and the enclosed picture is of the yellow multiplug in the floor, which clearly shows the wiring colours you need to follow.