Facelift Unitronic Inlet elbow

8YARWY

Electric Avenue
Joined
Oct 10, 2019
Messages
7,224
Reaction score
9,402
Points
113
Location
away
Finally got around to fitting the Unitronic turbo inlet elbow.
Thanks to Simon Sharp @TTE For the Elbow.

Fairly straight forward install......

Unitronic official instructions say it can all be done from the top, unlike I.E and Forge which require the lower cast pipe to be removed to access the inner elbow bolt.

I opted to do it all from the top.


First up remove the engine cover to expose the coil packs etc.
Then remove your intake pipe
56c42f29eb27d230ec47895b1cf2e3c1.jpg

Undo the coil pack connections to number 1 & 2
941014cdd11a1fc506e04b6498deb0a6.jpg

Then unclip the cam solenoids on 1 & 2 by pulling back on the red lock tabs then pressing down the black tab.
12a2195b43b027fd4ded97d85c57acb1.jpg


Undo the cam sensor

7ac771fbb1f651444e1b4114e3b23e1f.jpg


Undo the 3 nuts and move the coil wiring bar out of the way.
84939e225c802af8d3d2adcc3b71f69a.jpg

Then remove coil packs 1&2
09559e4a6016b2a30dfc9471d6c313b2.jpg

Next turn your attention to the boost vacuum line.
Undo the support bracket on the side of the oem elbow, a Torx 30 bolt
5390414c902cacdfa702e2f5b44ef45a.jpg

Pull the vacuum line off the actuator and at the point near number 2 coil pack where it connects to the silicone line.
3775e5d93c777ed964861c519b6baec5.jpg


Next undo the Actuator off it’s mounting point and pivot arm, 2 x 10 mm nuts and a circlip on the wastegate arm
e73d70d6df9d678b970148e049476090.jpg

5d061abee0197569c4dc768f38ac68f2.jpg

Then let the actuator go through the mounting hole so it’s out of your way
0a12ba03cfddc7ec2bc927f321ef21fd.jpg


Next you’ll need to undo the 2 off Torx bolts that hold the oem elbow in place.
The inside one is a tricky one to remove but with patience it can be done, you’ve just got to get a ‘feel’ for where it exactly is and how to get the ratchet/Torx bit onto it, I found 2 hands for locating the bit easier, once you are in the bolt head it’s just a matter of loosening it enough to remove it by hand, carefully so you don’t drop it.
Once you have removed it then you can undo the easier outer one that you can actually see.

I’ve arrowed the one you can’t see, it’s directly opposite the circled top one.
c3ec74e01259e9c89ef6406b7f9538d7.jpg


Once you’ve undone those 2 Torx bolts then you need to undo the breather pipe from the engine PCV system.
3 Torx screws to be removed here
ee3b48842b6c683ddec189b1a9a7c81c.jpg


Now you can withdraw the old elbow
870e25a8bb3a8b54bacbcf99243f8284.jpg

Next you’ll need to remove the breather pipe from the old elbow.
It’s locked into place with a security fastener
1a3fd69e8b4d54ea8479a9c9d1f835ae.jpg

Use a Dremel with a grinding disc to cut a groove into the head and remove with a flat blade screwdriver.

Once the bolt is removed pull out the breather pipe and insert into the unitronic pipe, using the Allen bolt supplied to secure.
aaca42e6fe58322884ba25e7e2213692.jpg


Transfer the flange seal ring from the old pipe to the Unitronic pipe.
a64a57086027bdf519bf632d3c3692f2.jpg


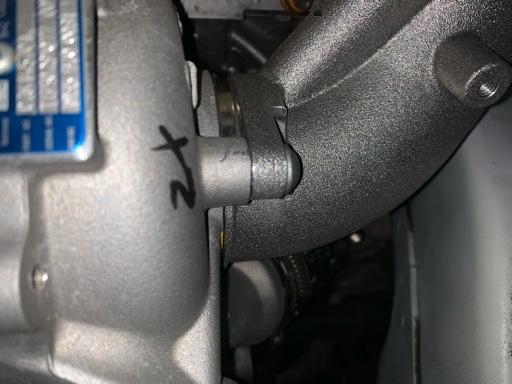
A shot here of the area you are putting the new elbow into.
97902371e959233d3513c956a62bda5a.jpg

The above gives you an idea of exactly where that inner Torx bolt needs to go.

Take the Unitronic elbow and insert carefully into the turbo opening, keeping an eye on the seal (don’t let it fall off).
Once it’s in place you can insert a Torx bolt to hold it in place, just do it up by hand for now, next insert the rear Torx bolt, I started mine by hand carefully and screwed it in as far as I could by hand before finishing with the ratchet.
Then tighten the one you can see, ensuring the flanges are seating together squarely.
7642a08f3d37bf9b40dfeaae36174fb9.jpg

Refit the actuator and reconnect the wastegate rod with the clip.

Refit the actuator vacuum line, I connected it to the actuator 1st and to the connection near the coil 2nd ensuring it was seated correctly around the new elbow then tightened up the bracket bolt.

Reconnect the breather pipe to the PCV system making sure the pipe sits in its place at the back under coils 1&2
864a75e60e5253168524981338377471.jpg

Once done it’s just a matter of inserting the coil packs you removed earlier, bolting them down, refitting the coil wiring bar bolting that down, then reconnect the coils/Cam solenoids/cam sensor.
You’ll then have your new elbow ready to put your hard pipe back into.
1cbae57fe8d69b51b5a726ea40b0fa23.jpg

Hard pipe fitted.
d856105eda5fe3f579598ba4efd7cbed.jpg


Sent from my iPhone using Tapatalk
 
  • Like
Reactions: Beebee-one, FBF01, hawesy25 and 6 others
Great walk through! what a f****** pig of a job:blink:
 
  • Like
Reactions: FBF01, Bristle Hound and 8YARWY
So you used a 3.5” to 3” coupler to make it work with forge hardpipe?

Or Is that coupler that comes with the hardpipe?
 
Last edited:
So you used a 3.5” to 3” coupler to make it work with forge hardpipe?

Or Is that coupler that comes with the hardpipe?

It’s the coupler that I was already using with the Forge Hard pipe so yes 3-3.5”.


Sent from my iPhone using Tapatalk
 
Great walk through! what a f****** pig of a job:blink:

The worst part is removing that inner torx bolt, however once you get the knack its not that bad, like most of these jobs once you've done it you are familiar with it.

I suppose another option would have been to go underneath and remove the lower cast pipe, which some people may find the easier route, however i wasn't going to let one bolt stop me :thumbs up:
 
For anyone who wants to go from underneath.

Some pictures from another install guide.

ba831d0fca8b92fc6f2c884d5248b5c1.jpg

f2fd60f589d82fbe251aff1344e630b0.jpg

0c687debe8de39a9e3052d62502172de.jpg

499b3dc280b87bbf41c7e1697347e908.jpg

a4a13485bf6c55c2ae82c31dbc568f6f.jpg


Sent from my iPhone using Tapatalk
 
  • Like
Reactions: Beebee-one
I’ve found out yesterday there’s an issue.
RHD cars can suffer from the inlet touching the tip of the brake servo.
Under hard acceleration 3.5-4K you can feel the engine through the pedal.

There is only 8mm clearance even with the black shield removed.

It’s not enough because the engine movement must be more under Sudden loads.

DO NOT BUY THIS UNITRONIC INLET.
I HAVE REMOVED MINE AFTER DISCUSSIONS WITH THE SELLER.


Sent from my iPhone using Tapatalk
 
  • Like
Reactions: FBF01 and domino_z
Thanks for the heads up

Best to stick with forge, designed on a rhd car

Tbh even without the fitment issue, I’d choose the forge inlet for their hardpipe just to avoid the step down
 
Last edited:
  • Like
Reactions: 8YARWY
I’ve found out yesterday there’s an issue.
RHD cars can suffer from the inlet touching the tip of the brake servo.
Under hard acceleration 3.5-4K you can feel the engine through the pedal.

There is only 8mm clearance even with the black shield removed.

It’s not enough because the engine movement must be more under Sudden loads.

DO NOT BUY THIS UNITRONIC INLET.
I HAVE REMOVED MINE AFTER DISCUSSIONS WITH THE SELLER.


Sent from my iPhone using Tapatalk
Thats not good.. what as Simon's response ?
 
Thats not good.. what as Simon's response ?

Very helpful.

Advise given about a potential further issue If it was left on and full refund issued.

Forge ordered, however I must say the supplier of the forge (Awesome) wasn’t very accommodating in that they are local to me and wouldn’t let me pay over the phone then go down to collect it (told them to leave it outside the door)
They also wouldn’t even entertain a Saturday delivery when I offered to pay !


Sent from my iPhone using Tapatalk
 
Further update.

I was advised to Re-clock the Uni inlet by undoing the Torx screws and rotating it backwards to the engine.

It did move a little bit but not enough in my eyes.

Since doing this I had a phone call from Simon saying that Unitronic had shipped the wrong elbows and of the 5 he had in stock 1 was the revised part.

Simon has arranged for this to be at my house tomorrow before 12.

This is what I’d call great customer service.

I’ll update again with pictures for the revision fitting etc.

Below is how close it is now.
9f824fb72cee7f9698051434fed251ce.jpg


Sent from my iPhone using Tapatalk
 
I have head good things about Simon so its great to see it is actually true. Pain in the backside we have one of the most necessary things in the ****** way!
 
That sucks, I'm a bit surprised the wrong ones got sent - here's one I got, the revised part should basically have a machined indent that gives additional clearance to the brake reservoir during engine movement.

IMG 5802

Seeing how much the engine can move at Stage 2 it's not a total surprise, I've wondered about BFI stage 1 mounts to keep things a bit tighter, just concerned they are a bit more NVH than I'd be happy with.

Mine is not fitted yet, Forge unfortunately butchered my stock PCV hose when then removed and I only found out whilst swapping it over to the UNI inlet.

I'm glad you to got it sorted - would have offered to send mine across otherwise!
 
  • Like
Reactions: 8YARWY
I have head good things about Simon so its great to see it is actually true. Pain in the backside we have one of the most necessary things in the ****** way!

Same here, he’s been superb over this whole matter.
Simon is an example to other businesses on how to sort a problem out.


Sent from my iPhone using Tapatalk
 
Update.

Replacement Elbow came today.

Spot the difference.
IMG 9349


You can see here the elongated holes that allow you to fine tune the fitting.
IMG 9350

Much better clearance now
IMG 9351


Here’s a tip.
Fit the elbow but don’t tighten the Torx bolts fully, fit your coupler and adjust to suit, this is a picture with my coupler fitted before I had to move it forwards, you can see the slight ‘flat’ in the circumference, this is where the coupler is touching the Cam solenoid connector, move the elbow slightly forward then tighten up the bolt you can see on the elbow.
You can then remove the coupler and tighten up the hard to get to Torx bolt.
View attachment 203412

After road testing I can say everything is now fine, there is no servo and elbow contact under hard acceleration.


Sent from my iPhone using Tapatalk
 
Last edited:
  • Like
Reactions: 1664Hatter, savo and Ross_T_Boss
As someone who knows nothing about these things, does the fact there is now an indent mean less or not as good air flow?
 
As someone who knows nothing about these things, does the fact there is now an indent mean less or not as good air flow?

No it’s just machined out of the casting.

Inside is same as the other inlet.
So still smooth.
IMG 9323


Sent from my iPhone using Tapatalk
 
Next question...why don’t they machine more of it out? Less weight etc or would the structural integrity be compromised?

Anyway, looks good and glad it’s sorted!
 
Next question...why don’t they machine more of it out? Less weight etc or would the structural integrity be compromised?

Anyway, looks good and glad it’s sorted!

Don’t forget this was designed to fit LHD cars where the servo is on the opposite side.
The scallop cut is just for RHD cars.

I’d imagine there’s no reason to make it lighter really as it weighs very little anyway.


Sent from my iPhone using Tapatalk
 
The coupler image didn’t upload for some reason.
IMG 9352


Sent from my iPhone using Tapatalk
 
A video showing the range of adjustment you have once it’s on.

As I’ve said above leave it loose then put your coupler on, then you can make sure you aren’t resting on the cam solenoid connector.
Once happy you can tighten up the bolts.


Sent from my iPhone using Tapatalk
 
  • Like
Reactions: IDontLikeSpeedCameras and 1664Hatter
Finally got around to fitting the Unitronic turbo inlet elbow.


Next you’ll need to undo the 2 off Torx bolts that hold the oem elbow in place.
The inside one is a tricky one to remove but with patience it can be done, you’ve just got to get a ‘feel’ for where it exactly is and how to get the ratchet/Torx bit onto it, I found 2 hands for locating the bit easier, once you are in the bolt head it’s just a matter of loosening it enough to remove it by hand, carefully so you don’t drop it.
Once you have removed it then you can undo the easier outer one that you can actually see.

I’ve arrowed the one you can’t see, it’s directly opposite the circled top one.
c3ec74e01259e9c89ef6406b7f9538d7.jpg


Sent from my iPhone using Tapatalk

Great post again thank you.

Just had a quick feel for the above torx bolts, the outta looks no problem at all but the inner I can't even feel with the intake in place (obviously I'll remove this when I come to do the job).

Do you attack the inner bolt from above or below the inlet based on your picture above?

Cheers.

From the engine bay so above.

If you can’t then you’ll need to strip out the boost pipe etc from underneath.

The Torx bolt you can’t see is 180 deg so opposite the one you can see.

I was lay across the engine (use a towel to cover the it) I located the Torx bolt with my left hand then once I had my finger on it I could use that as my guide to locate the Torx bit into it, you can tell it’s the bolt because it’s got a rounded head.

Once you get the Torx bit / small ratchet (1/4” drive) onto it then you use your left fingers to hold it into the bolt and your right hand to operate the ratchet.

It takes a while to remove because of the limited space to operate the ratchet in, something like a quarter turn at a time.

Do the back one first because I found that it’s easier when the elbow is still locked in place rather than it flapping about like if you undid the one at the front first.

Failing that as I said there are extra steps above to remove the engine undertray etc to get to it.

Picture below gives you a reference for the inner bolt location and you can see the lower cast pipe you’d need to remove if you went from underneath.
1d208ccca3df2d52fbd30c365022c01e.jpg


Sent from my iPhone using Tapatalk
 
  • Like
Reactions: 1664Hatter
That last picture is a great help thank you. The intake I want to use is on back order so have a while before I can give this a proper go.
 
Great walk-through install guide that. Nice work!

That being said, it's left me a little worried now as I have been running the same inlet for 5 months now :blink: I haven't noticed any signs of vibration/noise etc in the car though. It do run upper and lower dogbone mounts though, so not sure if that helps?

You need to check you have the correct one fitted.
I was warned if it touched long enough under hard acceleration that it could lever against the turbo housing and that would be disastrous considering how close the blades are inside.


Sent from my iPhone using Tapatalk
 
You need to check you have the correct one fitted.
I was warned if it touched long enough under hard acceleration that it could lever against the turbo housing and that would be disastrous considering how close the blades are inside.


Sent from my iPhone using Tapatalk

Is it an easy (visible) check from popping the bonnet mate? Or do I need to start dismantling the engine bay and kitted out with the correct torx bits? :blink:
 
Is it an easy (visible) check from popping the bonnet mate? Or do I need to start dismantling the engine bay and kitted out with the correct torx bits? :blink:

Look at the back of it.

7682d315e14c63f0c5db5d8eb390a48b.jpg


Sent from my iPhone using Tapatalk
 
Seems the Forge isn’t great.
d9b7702bfe959446186e52a2ed299477.plist


Sent from my iPhone using Tapatalk
 
I have my Unitronic inlet and silicone reducer ready to install, just waiting for my new intake to arrive then I'll be taking this on...

Looking at the above, glad I went down this route.
 
That seems odd that the forge part fouls on a few things seems to be the most widely used and no one seems to complain? Because of my intake system it seems i'm limited to the unitronic one just need to work out if i can justify over £400 for it..
 
That seems odd that the forge part fouls on a few things seems to be the most widely used and no one seems to complain? Because of my intake system it seems i'm limited to the unitronic one just need to work out if i can justify over £400 for it..

Don’t forget that not everyone might notice the vibration through the pedals.

Or even are aware the pipe is making contact with the body / Brake servo.


Sent from my iPhone using Tapatalk
 
  • Like
Reactions: TTE Si
Today I finally gave my car the full beans since installing the Unitronic inlet and noticed vibration through the pedal for a fraction of a second @ circa 4500/5000 RPM.

Needless to say it's coming apart again, having already adjusted it once.

Fingers crossed there is room for further adjustment.
 
Today I finally gave my car the full beans since installing the Unitronic inlet and noticed vibration through the pedal for a fraction of a second @ circa 4500/5000 RPM.

Needless to say it's coming apart again, having already adjusted it once.

Fingers crossed there is room for further adjustment.

Get ya dremel out
 
No my black bracket went back on.

I’d say looking at that your elbow wants adjusting forwards a little.


Sent from my iPhone using Tapatalk
 
No my black bracket went back on.

I’d say looking at that your elbow wants adjusting forwards a little.


Sent from my iPhone using Tapatalk

How strange. Removed the bracket and now it just kisses what now must be the inlet in second gear only for a fraction of a second - all other gears fine.

When you say adjust forwards, you mean towards the front of the car (away from the bulk head)?

Cheers.
 
How strange. Removed the bracket and now it just kisses what now must be the inlet in second gear only for a fraction of a second - all other gears fine.

When you say adjust forwards, you mean towards the front of the car (away from the bulk head)?

Cheers.

Yes away from the Brake servo.

Took me a couple of attempts before I was happy it was well enough away from the servo tip and wouldn’t rub the silicone coupler on the Cam solenoid.


Sent from my iPhone using Tapatalk
 
  • Like
Reactions: 1664Hatter
Yes away from the Brake servo.

Took me a couple of attempts before I was happy it was well enough away from the servo tip and wouldn’t rub the silicone coupler on the Cam solenoid.


Sent from my iPhone using Tapatalk

So I had it all apart again over the weekend. There was next to no further adjustment to pull the inlet further away from the brake servo.

I've resulted to two solutions which I hope does the trick:

1. Install a solid dogbone insert to reduce engine/gearbox movement
2. I've shaved a tiny amount around the end of the servo to give a fraction more clearance.

Hopefully the combination will ensure I have the required clearance (fingers crossed).

As it stands, bolted back up to the maximum point away from the servo. Better than it was but only a fraction.
Servogap
 

Similar threads