The Definitive Bang & Olufsen Retrofit guide for the 8V Sportback

airbus319

Well-Known Member
VCDS Map User
Joined
Jun 10, 2007
Messages
231
Reaction score
270
Points
63
Location
Glasgow
Speakers in the car


Welcome to this thread that has been some time in the making. I didn't buy my car new, it was a 40th Birthday present to myself and the best my dealer had at the time was a 6 month old TDI S-Line that had 6k of extras but sadly no B&O or Audi Sound system.
The basic system always disappointed me, I even took it to the dealer who claimed it was fine but it has no real punch and anything above 20 usually distorted so badly that it became unplayable and I have to admit it started to annoy me so I decided to embark on this retrofit.

So where did I start, well I had a look online at various youtube videos and Audi documents that I could find, I suppose the above picture was the starter for ten as it showed what the B&O system has to offer which in my case was a significant uplift in Sound quality and volume.
If you look closely you will see all 14 of the speakers in their locations with the Amplifier (J525) in place fitted under the front passenger seat (RHD cars).

The basic system has only 8 speakers and the more research I did the more I realised it wasn't just the case of swapping them for B&O ones, for starters the impedance of the speakers are different as are the thickness of the wiring on some of the connections so that was a no go area for me.

So it's all or nothing and at this point I start to work my way through the Elsawin application to build up a picture of what is actually required -
2016 08 12 234011


All 14 speakers and the Amplifier with their part numbers, Happy days now to find them! but first let's talk about the MOST Bus.

MOST Bus


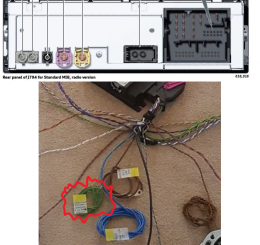
Now this is where you'll potentially hit a stumbling block very quickly in your upgrade, you need to take out your Head unit located in the glove box and check to see if it has connector number 4 shown in the picture above, if not then you cannot upgrade to B&O without upgrading your head unit. The MOST bus connector is a fibre-optic cable which transmits and receives data between the Head unit and the AMP including all of the digital audio so it is a must.

So we have checked and MOST is there, Bingo we are looking good for the upgrade, Next job is to go hunting for the parts. Now where you go is your own business me personally I didn't want to pay £1600 big ones from our own parts chap on the site here not when I was able to get all of the speakers and the amp for £600 from a vehicle dismantler. So that's the route I went, there are always sets on Ebay.de too so you should be able to get the full set for around the same price.
2016 08 24 224840


Next up was the B&O loom, now firstly I considered making the loom up myself but by the time I had added it all up for the wiring, terminal connectors, plastic connectors etc.. it was just easier to go onto Ebay again and search for a full interior loom from there. In the end I got the full loom for £155 and this had many other options with it too so I could make more use of it in future retrofits.

The loom came like this -
2016 09 28 214742


And after a day of extracting the B&O stuff it looked like this -
2016 10 10 214208


But I wasn't bothered about that, Here's the stuff you actually need from the Loom for the B&O -
2016 10 10 214556


So next up I connected the speakers and amp up to make sure all the connections were correct -
2016 10 11 121602


So let me list them here for you clockwise from the Subwoofer at the 12 o'clock position -

Subwoofer R211 - fits into spare wheel well in Boot.
Left Effect speaker R209 - Fits to D pillar frame
Left Rear Treble - R14 - Fits into rear door card
Left Rear Bass - R15 - Fits into Rear Door frame
Left Front Bass - R21 - Fits into Front Door frame
Left Front Mid - R103 - Fits into Front Door frame
Left Front Treble - R20 - Fits into A-Pillar cover

R164 (R74) (Solid Black Rubber sheathed ) Microphone cable - Now the B&O system uses its own microphone to listen to the sound levels within the car so if you just have the one microphone in the front overhead interior light panel then you'll need this cable and also a new dual microphone from the parts guy -£40 with discount. Part number 8X2035711C which you will have to run up the left side A-pillar through to the overhead panel.

Thick Brown cable - Earth connector for the Amplifier - installed onto the front earthing point on the lower left hand A pillar.

Thick Blue Cable - Main Power cable to power the amplifier - This connects to Fuse Holder F27 on Fuse Panel C-SC. You will need a 30 amp fuse to add power to the amplifier but remember do not install the fuse until you have fitted everything and as the car is negatively earthed the Brown earth connector must be installed before the fuse.

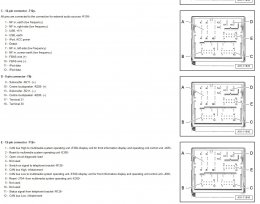
Thin Green Cable - Open Circuit Diagnostic Lead - this wires back to the rear of the Head unit where it terminates in 12 pin connector E port 3 and allows the Head unit to carry out diagnostic tests on the Amplifier.

Centre Speaker - R208 - Installed under the grille in the front centre of the dash just ahead of the MMI screen.
Right Front Treble - R22 - Fits into the A-Pillar cover
Right Front Bass - R23 - Fits into Front Door frame
Right Front Mid - R104 - Fits into Front Door frame
Right Rear Bass - R17 - Fits into Rear Door frame
Right Rear Treble - R16 - Fits into rear door card
Right Rear Effect - R210 - Fits into D Pillar frame

Now there's no way you are going to break open your existing loom to add all these cables so what you will have to do next is order up some rolls of TESA tape, I used the 9mm thick stuff as it is close to OEM and bought 4 x 25 metre rolls for £10 off ebay. I also bought 2 x 25 metre rolls of Black insulation tape from tool station which was under £1.

To Be Continued .......
 
  • Like
Reactions: MiTTXx, dantdi, mfl and 19 others
Seems like good work, but do you have someone to remove the component protection on the amplifier? as it won't work when you plug it in it needs to be coded to your vin. Although the headunit comes with the most connector i think you need to get the unit flashed with the B&O software for it to work, as I tried this on my old A3 and even on vcds when i coded it to have bang and olufsen the headunit would not give me any subwoofer controls etc.
 
  • Like
Reactions: airbus319
Nice in depth read, I love it when people go all out to get the details right on a retrofit.
 
  • Like
Reactions: S3 Turbo, Rob2k68 and airbus319
Seems like good work, but do you have someone to remove the component protection on the amplifier? as it won't work when you plug it in it needs to be coded to your vin. Although the headunit comes with the most connector i think you need to get the unit flashed with the B&O software for it to work, as I tried this on my old A3 and even on vcds when i coded it to have bang and olufsen the headunit would not give me any subwoofer controls etc.

As I said to Be Continued... Coding worked fine on my headunit, the CP comes up and is removable
 
  • Like
Reactions: richinsoton and Rob2k68
You are going to be very brave to remove all of these panels, I'm having second thoughts haha.

When will we see photographs of the install?

By the way, looks great and thanks for putting together such an informative thread. Consider it watched ;)
 
  • Like
Reactions: S3 Turbo, Simon L and airbus319
Epic work mate. :friends:

You're Celine Dion albums will sound amazing !!!! ;o)
 
  • Like
Reactions: ACWKGYTO, richinsoton, Joe4842 and 6 others
Absolutely amazing the dedication you are going to for B&O. Love to see great threads like this :respekt:
 
  • Like
Reactions: airbus319, S3 Turbo, AudiNutta and 2 others
Here the B&O was only about 550 pounds extra as option and glad I took it...
But most impressed!!
 
  • Like
Reactions: airbus319 and Rob2k68
thanks for your time posting this thread.

I have B & O, but this guides are fantastic.

thanks againg.
 
  • Like
Reactions: airbus319 and Rob2k68
Jesus! Thank god mine came with it.
 
  • Like
Reactions: Nikon and airbus319
Ok it's time for Part 2, had a busy week with work and the baby so not had a chance up until now..

Where to start, well as Rajeevx5 said when you enable B&O using VCDS it limits the sound to only go through certain speakers, for me this was all the fronts working but the rears were disabled. A quick scan showed the Head unit module now being enabled and component protection active. So how do you get round this? Simple speak it to DJAlix if you're based down South or ask about if you are anywhere else, Worse case is take it to the dealer and get them to disable it but I'd rather not give them my money if I can help it so for me it's a trip over to Edinburgh.

Now that's cleared up it's time to go back to Parts, lots of them :) if you are going to do the job right you need all of these -
Audi Parts continued


So what are they all for? I'll use their last 3 digits below for each in reference to the pic above -

942 - Connectors for the front mid speakers (R103 & R104) This is to properly connect the wiring to the speakers.
401 - Bolts to secure the Effect speakers (R209 & R210) 2 for each speaker to secure it to the D-Pillar
201 - Bolts to secure the front centre speaker (R208) 2 to secure it to the dash insert.
899 - Sub Screw - a lengthened plastic screw with head to secure the subwoofer (R211) into the spare tyre well.
390A - The base for the Amplifier (J525) to sit onto under the front passenger foot well
051 - The plastic cover for the Amplifier (J525) to protect it from damage and allow cooling
245 - This is a new D-Pillar lining that has a speaker grille in it for the effect speaker (R209), make sure you get the right colour for your car i.e. Soul Black or Grey etc..
246 - This is the other side D-Pillar lining that has a speaker grille in it for the effect speaker (R210)
901 - Bolts to secure the front left and right Mid speakers (R103 & R104) to the door
711 - This is the twin head microphone mentioned in my first post (R164 incorporating R74 microphone)
003 - Amp mounting bolts (J525)
210 - Amp bracket Nut
501 - Amp bracket Rivet x2
901 - Hex collared Bolt M6x20 for the Amp Bracket
210 - Hex collared nut M6 for the Amp bracket
577 - Insert nut for the Effect speakers (R209 & R210) these pop in and allow the securing of the 401 bolt listed above.

So before ordering anything else you need to know that that small lot there was just under £200. Not cheap but essential for doing the job properly, the expensive parts were the new rear linings, the microphone and the amp covers otherwise all the others were a couple of quid here and there.

So if you've now got all these bits you now need to make a decision about whither you are going to go down the road of replacing all your door cards for ones with the B&O grilles (with front illumination)? I was lucky and got a set of 4 very cheaply from a very nice chap on this site, there are others to be found on eBay and they can cost as much as you're wanting to pay but consider this first - you don't really need them unless you're a perfectionist like me all you really need is 2 x Front mid speaker grilles as the ones in your current door cards are blanks and not actuals perforated grilles to allow sound to travel but the decision is up to you and Mike our friendly parts guy can help you out with part numbers etc.. if you just want to swap them over and perhaps leave the door card replacement for a rainy day when you've topped up your funds.
Now a few pics, Firstly here's a pic of the Amp cover and all the bits to mount it in just for clarity -

Amp mounting parts

Disregard items 2 and 16 though, they are for the TV tuner.

And here's a pic of the Amp cover mounted in location under the front passenger seat (Credit Rob2K68 - Cheers pal)
MediaSAS4TN28


Cutting the carpet for this one takes a bit of bravery and a bit of measuring so measure twice and cut once using the amp cover as your template.

Finally here's a pic of its location showing the AMP connector and the MOST bus cable positions along with the Seat connectors (1-5) that you will have to remove to gain access to the area.
A97 12251


So that's pretty much it for the pre install, next up I'll take you through the installation of the loom through the car but that'll probably have to wait a week or two as I'm travelling a lot with work.

I hope you are enjoying the read and please ask if you have any questions :)
 
  • Like
Reactions: mr gee, SJ43, Rob2k68 and 3 others
Awesome write up! Love following threads like yours!
 
  • Like
Reactions: airbus319
I am thinking on upgrading the sub if I ever get one... do you know if the OEM B&O amp could support DVC 4OHM sub?
 
  • Like
Reactions: SJ43
Ok it's time for Part 2, had a busy week with work and the baby so not had a chance up until now..

Where to start, well as Rajeevx5 said when you enable B&O using VCDS it limits the sound to only go through certain speakers, for me this was all the fronts working but the rears were disabled. A quick scan showed the Head unit module now being enabled and component protection active. So how do you get round this? Simple speak it to DJAlix if you're based down South or ask about if you are anywhere else, Worse case is take it to the dealer and get them to disable it but I'd rather not give them my money if I can help it so for me it's a trip over to Edinburgh.

Now that's cleared up it's time to go back to Parts, lots of them :) if you are going to do the job right you need all of these -
View attachment 109051

So what are they all for? I'll use their last 3 digits below for each in reference to the pic above -

942 - Connectors for the front mid speakers (R103 & R104) This is to properly connect the wiring to the speakers.
401 - Bolts to secure the Effect speakers (R209 & R210) 2 for each speaker to secure it to the D-Pillar
201 - Bolts to secure the front centre speaker (R208) 2 to secure it to the dash insert.
899 - Sub Screw - a lengthened plastic screw with head to secure the subwoofer (R211) into the spare tyre well.
390A - The base for the Amplifier (J525) to sit onto under the front passenger foot well
051 - The plastic cover for the Amplifier (J525) to protect it from damage and allow cooling
245 - This is a new D-Pillar lining that has a speaker grille in it for the effect speaker (R209), make sure you get the right colour for your car i.e. Soul Black or Grey etc..
246 - This is the other side D-Pillar lining that has a speaker grille in it for the effect speaker (R210)
901 - Bolts to secure the front left and right Mid speakers (R103 & R104) to the door
711 - This is the twin head microphone mentioned in my first post (R164 incorporating R74 microphone)
003 - Amp mounting bolts (J525)
210 - Amp bracket Nut
501 - Amp bracket Rivet x2
901 - Hex collared Bolt M6x20 for the Amp Bracket
210 - Hex collared nut M6 for the Amp bracket
577 - Insert nut for the Effect speakers (R209 & R210) these pop in and allow the securing of the 401 bolt listed above.

So before ordering anything else you need to know that that small lot there was just under £200. Not cheap but essential for doing the job properly, the expensive parts were the new rear linings, the microphone and the amp covers otherwise all the others were a couple of quid here and there.

So if you've now got all these bits you now need to make a decision about whither you are going to go down the road of replacing all your door cards for ones with the B&O grilles (with front illumination)? I was lucky and got a set of 4 very cheaply from a very nice chap on this site, there are others to be found on eBay and they can cost as much as you're wanting to pay but consider this first - you don't really need them unless you're a perfectionist like me all you really need is 2 x Front mid speaker grilles as the ones in your current door cards are blanks and not actuals perforated grilles to allow sound to travel but the decision is up to you and Mike our friendly parts guy can help you out with part numbers etc.. if you just want to swap them over and perhaps leave the door card replacement for a rainy day when you've topped up your funds.
Now a few pics, Firstly here's a pic of the Amp cover and all the bits to mount it in just for clarity -

View attachment 109053
Disregard items 2 and 16 though, they are for the TV tuner.

And here's a pic of the Amp cover mounted in location under the front passenger seat (Credit Rob2K68 - Cheers pal)
View attachment 109054

Cutting the carpet for this one takes a bit of bravery and a bit of measuring so measure twice and cut once using the amp cover as your template.

Finally here's a pic of its location showing the AMP connector and the MOST bus cable positions along with the Seat connectors (1-5) that you will have to remove to gain access to the area.
View attachment 109055

So that's pretty much it for the pre install, next up I'll take you through the installation of the loom through the car but that'll probably have to wait a week or two as I'm travelling a lot with work.

I hope you are enjoying the read and please ask if you have any questions :)
This is an amazing help great to see it being done, the connectors under the seat you say for the amp are they just main battery power supply's? I'm adding a full aftermarket system, amp, new Speakers and sub in mine just wondered if I could get my amp power from here instead of routing all the way to the battery?
 
Ok it's time for Part 2, had a busy week with work and the baby so not had a chance up until now..

Where to start, well as Rajeevx5 said when you enable B&O using VCDS it limits the sound to only go through certain speakers, for me this was all the fronts working but the rears were disabled. A quick scan showed the Head unit module now being enabled and component protection active. So how do you get round this? Simple speak it to DJAlix if you're based down South or ask about if you are anywhere else, Worse case is take it to the dealer and get them to disable it but I'd rather not give them my money if I can help it so for me it's a trip over to Edinburgh.

Now that's cleared up it's time to go back to Parts, lots of them :) if you are going to do the job right you need all of these -
View attachment 109051

So what are they all for? I'll use their last 3 digits below for each in reference to the pic above -

942 - Connectors for the front mid speakers (R103 & R104) This is to properly connect the wiring to the speakers.
401 - Bolts to secure the Effect speakers (R209 & R210) 2 for each speaker to secure it to the D-Pillar
201 - Bolts to secure the front centre speaker (R208) 2 to secure it to the dash insert.
899 - Sub Screw - a lengthened plastic screw with head to secure the subwoofer (R211) into the spare tyre well.
390A - The base for the Amplifier (J525) to sit onto under the front passenger foot well
051 - The plastic cover for the Amplifier (J525) to protect it from damage and allow cooling
245 - This is a new D-Pillar lining that has a speaker grille in it for the effect speaker (R209), make sure you get the right colour for your car i.e. Soul Black or Grey etc..
246 - This is the other side D-Pillar lining that has a speaker grille in it for the effect speaker (R210)
901 - Bolts to secure the front left and right Mid speakers (R103 & R104) to the door
711 - This is the twin head microphone mentioned in my first post (R164 incorporating R74 microphone)
003 - Amp mounting bolts (J525)
210 - Amp bracket Nut
501 - Amp bracket Rivet x2
901 - Hex collared Bolt M6x20 for the Amp Bracket
210 - Hex collared nut M6 for the Amp bracket
577 - Insert nut for the Effect speakers (R209 & R210) these pop in and allow the securing of the 401 bolt listed above.

So before ordering anything else you need to know that that small lot there was just under £200. Not cheap but essential for doing the job properly, the expensive parts were the new rear linings, the microphone and the amp covers otherwise all the others were a couple of quid here and there.

So if you've now got all these bits you now need to make a decision about whither you are going to go down the road of replacing all your door cards for ones with the B&O grilles (with front illumination)? I was lucky and got a set of 4 very cheaply from a very nice chap on this site, there are others to be found on eBay and they can cost as much as you're wanting to pay but consider this first - you don't really need them unless you're a perfectionist like me all you really need is 2 x Front mid speaker grilles as the ones in your current door cards are blanks and not actuals perforated grilles to allow sound to travel but the decision is up to you and Mike our friendly parts guy can help you out with part numbers etc.. if you just want to swap them over and perhaps leave the door card replacement for a rainy day when you've topped up your funds.
Now a few pics, Firstly here's a pic of the Amp cover and all the bits to mount it in just for clarity -

View attachment 109053
Disregard items 2 and 16 though, they are for the TV tuner.

And here's a pic of the Amp cover mounted in location under the front passenger seat (Credit Rob2K68 - Cheers pal)
View attachment 109054

Cutting the carpet for this one takes a bit of bravery and a bit of measuring so measure twice and cut once using the amp cover as your template.

Finally here's a pic of its location showing the AMP connector and the MOST bus cable positions along with the Seat connectors (1-5) that you will have to remove to gain access to the area.
View attachment 109055

So that's pretty much it for the pre install, next up I'll take you through the installation of the loom through the car but that'll probably have to wait a week or two as I'm travelling a lot with work.

I hope you are enjoying the read and please ask if you have any questions :)

Monster retrofit - my hats well and truly off to you mate !! :friends:
 
  • Like
Reactions: airbus319 and SJ43
I am thinking on upgrading the sub if I ever get one... do you know if the OEM B&O amp could support DVC 4OHM sub?

I'm interested in this too, I have B&O and considering upgrading just my sub. Similar to what the guys over on the A5 forum where doing to their B&O systems.
 
  • Like
Reactions: Rob2k68
@airbus319 Fantastic thread you have here, did you consider lining your doors with dynamat? This is meant to make an huge improvement too even on top of the B&O system.
 
  • Like
Reactions: airbus319 and Rob2k68
And there I was all chuffed with myself because I did my first ever oil change...

Hats off for some seriously impressive work!!

:salute:
 
  • Like
Reactions: airbus319 and Rob2k68
The one option I don't have that I'd really like. No way however I could justify that amount of time and effort for it given the factory price.

Serious :respekt: to you for embarking on this bonkers retrofit!
 
  • Like
Reactions: Rob2k68 and airbus319
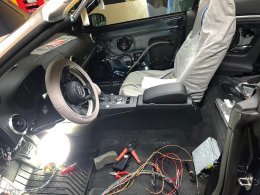
The install was completed successfully, it was a bit off a pig to do and took around a week, I decided not to advise on the removal of the seats, lower panels etc.. as I believe if you are doing this install you should be competent enough to do that piece yourself as it is really running cables around the car and through the door connectors.
Would I do it again? unlikely, however, I know better know that any car I buy in the future will be specified accordingly.

If there's something specific you need advice on please ask?

David.
 
  • Like
Reactions: Potterswheel and Schizophonic
No worries fella, i am really interested in doing it, im more of a comfort driver so sound system is priority for me over wheels and coilovers lol, im doing some search for kit that i need on ebay likes of speakers that fetch arounf £500 or so from the crooked breakers, i am competent in doing the work myself, so all in all did it put a smile on your face afterwards
 
Ok it's time for Part 2, had a busy week with work and the baby so not had a chance up until now..

Where to start, well as Rajeevx5 said when you enable B&O using VCDS it limits the sound to only go through certain speakers, for me this was all the fronts working but the rears were disabled. A quick scan showed the Head unit module now being enabled and component protection active. So how do you get round this? Simple speak it to DJAlix if you're based down South or ask about if you are anywhere else, Worse case is take it to the dealer and get them to disable it but I'd rather not give them my money if I can help it so for me it's a trip over to Edinburgh.

Now that's cleared up it's time to go back to Parts, lots of them :) if you are going to do the job right you need all of these -
View attachment 109051

So what are they all for? I'll use their last 3 digits below for each in reference to the pic above -

942 - Connectors for the front mid speakers (R103 & R104) This is to properly connect the wiring to the speakers.
401 - Bolts to secure the Effect speakers (R209 & R210) 2 for each speaker to secure it to the D-Pillar
201 - Bolts to secure the front centre speaker (R208) 2 to secure it to the dash insert.
899 - Sub Screw - a lengthened plastic screw with head to secure the subwoofer (R211) into the spare tyre well.
390A - The base for the Amplifier (J525) to sit onto under the front passenger foot well
051 - The plastic cover for the Amplifier (J525) to protect it from damage and allow cooling
245 - This is a new D-Pillar lining that has a speaker grille in it for the effect speaker (R209), make sure you get the right colour for your car i.e. Soul Black or Grey etc..
246 - This is the other side D-Pillar lining that has a speaker grille in it for the effect speaker (R210)
901 - Bolts to secure the front left and right Mid speakers (R103 & R104) to the door
711 - This is the twin head microphone mentioned in my first post (R164 incorporating R74 microphone)
003 - Amp mounting bolts (J525)
210 - Amp bracket Nut
501 - Amp bracket Rivet x2
901 - Hex collared Bolt M6x20 for the Amp Bracket
210 - Hex collared nut M6 for the Amp bracket
577 - Insert nut for the Effect speakers (R209 & R210) these pop in and allow the securing of the 401 bolt listed above.

So before ordering anything else you need to know that that small lot there was just under £200. Not cheap but essential for doing the job properly, the expensive parts were the new rear linings, the microphone and the amp covers otherwise all the others were a couple of quid here and there.

So if you've now got all these bits you now need to make a decision about whither you are going to go down the road of replacing all your door cards for ones with the B&O grilles (with front illumination)? I was lucky and got a set of 4 very cheaply from a very nice chap on this site, there are others to be found on eBay and they can cost as much as you're wanting to pay but consider this first - you don't really need them unless you're a perfectionist like me all you really need is 2 x Front mid speaker grilles as the ones in your current door cards are blanks and not actuals perforated grilles to allow sound to travel but the decision is up to you and Mike our friendly parts guy can help you out with part numbers etc.. if you just want to swap them over and perhaps leave the door card replacement for a rainy day when you've topped up your funds.
Now a few pics, Firstly here's a pic of the Amp cover and all the bits to mount it in just for clarity -

View attachment 109053
Disregard items 2 and 16 though, they are for the TV tuner.

And here's a pic of the Amp cover mounted in location under the front passenger seat (Credit Rob2K68 - Cheers pal)
View attachment 109054

Cutting the carpet for this one takes a bit of bravery and a bit of measuring so measure twice and cut once using the amp cover as your template.

Finally here's a pic of its location showing the AMP connector and the MOST bus cable positions along with the Seat connectors (1-5) that you will have to remove to gain access to the area.
View attachment 109055

So that's pretty much it for the pre install, next up I'll take you through the installation of the loom through the car but that'll probably have to wait a week or two as I'm travelling a lot with work.

I hope you are enjoying the read and please ask if you have any questions :)
MOST Cable connection from MIB to Amp not understood.Could you please explain.Many Thanks
 
MOST Cable connection from MIB to Amp not understood.Could you please explain.Many Thanks

The MOST bus connector is a fibre-optic cable which transmits and receives data between the Head unit and the AMP including all of the digital audio so it is a must.
 
Ok it's time for Part 2, had a busy week with work and the baby so not had a chance up until now..

Where to start, well as Rajeevx5 said when you enable B&O using VCDS it limits the sound to only go through certain speakers, for me this was all the fronts working but the rears were disabled. A quick scan showed the Head unit module now being enabled and component protection active. So how do you get round this? Simple speak it to DJAlix if you're based down South or ask about if you are anywhere else, Worse case is take it to the dealer and get them to disable it but I'd rather not give them my money if I can help it so for me it's a trip over to Edinburgh.

Now that's cleared up it's time to go back to Parts, lots of them :) if you are going to do the job right you need all of these -
View attachment 109051

So what are they all for? I'll use their last 3 digits below for each in reference to the pic above -

942 - Connectors for the front mid speakers (R103 & R104) This is to properly connect the wiring to the speakers.
401 - Bolts to secure the Effect speakers (R209 & R210) 2 for each speaker to secure it to the D-Pillar
201 - Bolts to secure the front centre speaker (R208) 2 to secure it to the dash insert.
899 - Sub Screw - a lengthened plastic screw with head to secure the subwoofer (R211) into the spare tyre well.
390A - The base for the Amplifier (J525) to sit onto under the front passenger foot well
051 - The plastic cover for the Amplifier (J525) to protect it from damage and allow cooling
245 - This is a new D-Pillar lining that has a speaker grille in it for the effect speaker (R209), make sure you get the right colour for your car i.e. Soul Black or Grey etc..
246 - This is the other side D-Pillar lining that has a speaker grille in it for the effect speaker (R210)
901 - Bolts to secure the front left and right Mid speakers (R103 & R104) to the door
711 - This is the twin head microphone mentioned in my first post (R164 incorporating R74 microphone)
003 - Amp mounting bolts (J525)
210 - Amp bracket Nut
501 - Amp bracket Rivet x2
901 - Hex collared Bolt M6x20 for the Amp Bracket
210 - Hex collared nut M6 for the Amp bracket
577 - Insert nut for the Effect speakers (R209 & R210) these pop in and allow the securing of the 401 bolt listed above.

So before ordering anything else you need to know that that small lot there was just under £200. Not cheap but essential for doing the job properly, the expensive parts were the new rear linings, the microphone and the amp covers otherwise all the others were a couple of quid here and there.

So if you've now got all these bits you now need to make a decision about whither you are going to go down the road of replacing all your door cards for ones with the B&O grilles (with front illumination)? I was lucky and got a set of 4 very cheaply from a very nice chap on this site, there are others to be found on eBay and they can cost as much as you're wanting to pay but consider this first - you don't really need them unless you're a perfectionist like me all you really need is 2 x Front mid speaker grilles as the ones in your current door cards are blanks and not actuals perforated grilles to allow sound to travel but the decision is up to you and Mike our friendly parts guy can help you out with part numbers etc.. if you just want to swap them over and perhaps leave the door card replacement for a rainy day when you've topped up your funds.
Now a few pics, Firstly here's a pic of the Amp cover and all the bits to mount it in just for clarity -

View attachment 109053
Disregard items 2 and 16 though, they are for the TV tuner.

And here's a pic of the Amp cover mounted in location under the front passenger seat (Credit Rob2K68 - Cheers pal)
View attachment 109054

Cutting the carpet for this one takes a bit of bravery and a bit of measuring so measure twice and cut once using the amp cover as your template.

Finally here's a pic of its location showing the AMP connector and the MOST bus cable positions along with the Seat connectors (1-5) that you will have to remove to gain access to the area.
View attachment 109055

So that's pretty much it for the pre install, next up I'll take you through the installation of the loom through the car but that'll probably have to wait a week or two as I'm travelling a lot with work.

I hope you are enjoying the read and please ask if you have any questions :)
Do you have the installation details of the loom through the car?
 
I have B&O in my saloon, IMO it’s good but not that good.. certainly not that good to be fiddling with all those wires and the removing of the panels?!

You must have some weighty balls for that one mate as it looks absolutely head peck central!!

Hope you get the results your want though!
 
I have B&O in my saloon, IMO it’s good but not that good.. certainly not that good to be fiddling with all those wires and the removing of the panels?!

You must have some weighty balls for that one mate as it looks absolutely head peck central!!

Hope you get the results your want though!

Bet the sub control is missing from your MMI menu, otherwise, B&O on 8V is pretty damn good...
 
The MOST bus connector is a fibre-optic cable which transmits and receives data between the Head unit and the AMP including all of the digital audio so it is a must.

Thin Green Cable - Open Circuit Diagnostic Lead - this wires back to the rear of the Head unit where it terminates in 12 pin connector E port 3

Can you tell specifically in which pin 0.35mm green Diagnostic cable has to connect in MIB ?
 

Attachments

  • 0.35mm diagnosis.png
    0.35mm diagnosis.png
    397.4 KB · Views: 3,187
Thin Green Cable - Open Circuit Diagnostic Lead - this wires back to the rear of the Head unit where it terminates in 12 pin connector E port 3

Can you tell specifically in which pin 0.35mm green Diagnostic cable has to connect in MIB ?
 

Attachments

  • Radio Headunit wiring.JPG
    Radio Headunit wiring.JPG
    148.9 KB · Views: 2,618
Its been observed that ,the particular pin(E.3) is engaged with a wire.
So Do we need to unplug the existing wire fromE.3 and insert new diagonosing cable
Or
Need to tap new diagnosing cable into existing .

Sent from my LG-H815 using Tapatalk
 
342a9f1eeb73b7b3f358ca43fc180daf.jpg


Audi A3 8V Bang & Olufsen wiring diagram


Sent from my iPhone using Tapatalk
 
1st thanks for the info it is a great work. i am starting to do it for my car next week
and i want to ask some questions to u
my car is 2018 a3 cabriolet
i have no sub in my set
and i have mic in my car i can able to talk with it
do i have to buy one more mic for the B&O or do i have to replace it?
and what is the part number of the mic?
 
Hi in my A3 I have 2 mic one frim MMI secound from B&O amp
double 8X1035711C or single 8X1035711B, I bought double.
 
I finished my project it's a big job but worth it the only problem left is component protection.
 

Attachments

  • 38 pin.jpg
    38 pin.jpg
    456.2 KB · Views: 2,551
mine is also completed. I will do my best if you need any support about this
 

Attachments

  • 8a24ebbe-69e2-45cf-9013-17c625992d62.JPG
    8a24ebbe-69e2-45cf-9013-17c625992d62.JPG
    412.2 KB · Views: 2,145
  • 0ce0f4df-46cf-4836-81ae-60e0c86abb97.JPG
    0ce0f4df-46cf-4836-81ae-60e0c86abb97.JPG
    363.9 KB · Views: 2,027
  • d9258b2d-4522-4c29-a402-f08ddd3c2940.JPG
    d9258b2d-4522-4c29-a402-f08ddd3c2940.JPG
    310.5 KB · Views: 2,093