Hey all,
So my first post after spending a couple of months scouring through these forums to work out my own retrofit. I recently got myself a very nice little 2010 B8 which had a Symphony radio unit in it with bluetooth phone prep (no A2DP) and an aux input (I have to say I have always been a big fan of aux input as it really retains the sound quality unlike A2DP but ofcourse it doesnt give you any control!)
So I started looking at options to do a bit of A2DP and may be even screen mirroring but the options were really clunky and if I would say so 'not pleasing to the eye' such as Dynavin and the Alpine option. So I went on my journey to look to do a OEM retrofit, starting with the 3G unit since 3G+ was going to be too expensive but I somehow convinced myself to go for the 3G+ anyway.
So long story short I managed to gather all the parts together which I have listed below and I luckily managed to find a 2013 B8.5 that was being broken so I got a lot of the parts a bit of wiring from it.
As I had only ever done some minor retrofits on my previous car (Civic hatchback) in terms of fitting an A2DP module from Xcarlink and a couple of other plug n play modules, this was a huge undertaking for me and breaking apart a german instead of Japanese car was overwhelming in itself!
Also before I get into the details, big shout out to @Stonefish as he helped me a lot in working out what I needed and how to do it all, I'll list out the links that were particularly useful to me from other forums and on the web.
So here are the parts I got:
MMI Main Unit | 8R2 035 666 F | £250
Gateway | 8R0 907 468 N | £20
Dab Radio | 4G0 035 061 D | £100
7 Inch Display | 8R0 919 604 | £60
DAB Antenna Amplifier | 8K5 035 225 AC | £10
FM/AM Antenna Amplifier | 8K5 035 225 AA | £10
MMI Control Panel | 8T0 919 611 K | £90
Climate control panel | 8K2820043AH | £20
Main Unit Mount (Dash) | 8K0 858 969 | £30
Radio Mount (Boot) | 8T0 907 368 A | £20
Screen Trim | 8K2 857 185 F | £30
Microphones | 4L1 035 711 C | £10
Fibre optic, Fakra cables, quadlock connectors and some other connectors from Audi
LVDS Cable (MMI to Display)
GPS Receiver from Ebay - £5
As I had some of the cables that I ripped out from the original car I just ordered a new set of fibre optics from ebay for a 5m length, but I found out I only need 4m so a meter is just rolled up in the side of the boot. Now if you have the active sound system with the amp in the left hand side pocket of your boot then I suggest you dont need to lay down any additional cables except for fibre optics as you can use the existing cables for all connections needed. I will go in more detail for the cabling later on below. If you are not so confident in the wiring, then just order the wiring harness from Kufatec (£300) and lay it down, it does reduce the headache by quite a bit since they supply the LVDS cable too and I was lucky enough to get that from the previous car.
So started off with the first picture as my set up, and then started pulling it all apart as you can see from some of the following photos, now interestingly as I progressed with the work I forgot to take more detailed photos since I was busy swearing my life on the car. But I will try and highlight the process in some steps below:

1 - Start with removing the screen trim with the trim removal tool, start popping it out from the steering wheel side and work your way round to the left and then the top, it only has 4 poppers that come off quite easily
2 - Using pry tool pop out the air vents, quite easy to do starting from the left or the right side of the vent.
3 - Using pry tool pop out the AC controls, again start from the left side and it pops out quite easy with a pry tool.
4 - Using a 8 mm bolt driver, get rid of the 4 bolts holding the symphony radio in, once removed just slide out the radio and unplug the quadlock and fakra cables at the back.
(A lot of the trim removal is given in the manuals on the link here - http://www.a5oc.com/forums/audi-a5-s5-tech/25999-trim-removal-routing-wires.html )
5 - Remove the 4 torx screws holding the screen in using a t20 torx driver

6 - Remove the glove box, there should be 3 8mm bolts on the inside as you open it right above, then 2 more in the footwell right at the back and then the last one is on the left side to reach this you have to open the fuse box area which is quite straight forward, stick a screw driver in the groove and pop out.

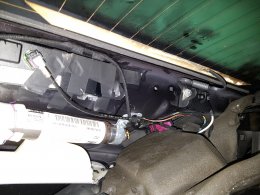
7 - Lay down the fibre optic from front dash to the boot - I couldn't remove the door sills from the middle and the back seats bit so just used a steel hanger to pull the fibre optic from the front passenger door to the back door all towards the mid of the seat. I also couldn't get the side trim off in the boot so found a wee lil gap between the chassis behind the back seat and the boot lining so pulled the cable through there.


8 - Now had to sort out all the cabling:
9 - head to the front again and pop out the leather bit around the gear stick, easy to pop out from the right or left side if you push something slim between the chrome bit and the leather and push in towards the leather side, once this is removed put your hand inside and pull upwards, this releases the 2 clips at the bottom of the gear surround and then pull out
10 - Ash tray is held in with 2 8mm bolts too, once undone the ash tray slides out towards you

11 - lay down the cables from the quadlock to the MMI controls behind the ash tray and lay an extension cable for the ESP and the Auto start stop switch, I just cut the existing plugs and added in some extra cable length with a normal 7 core 0.7mm cable.
12 - Now connect up the controls, the ESP and Auto start/stop switches....or whatever configuration you have.
Start plugging in all the other bits too - Radio, MMI head unit, New gateway, AMI, screen
13 - Connect up the battery again and the car will go into Component Protection mode, so you will see a very dull MMI screen, not climate controls work - one light flashes on them, the DIS doesn't display anything but 'Safe' and the non of the dials work except the speedo
So long as you are seeing all of the above - things are going well, as at one point I hadn't connected up the radio and the MMI wont turn on so I was worried if it wasn't a dead unit
14 - Get the CP removed and @Ash187 did this for me, great guy and will help you out on other bits too, he coded the unit for me and also coded the Climate control panel (So effectively I have no idea what he did )
)
15 - Once the CP is removed, the car is back to normal state and everything works as per plan
Now I hadn't connected up the fakra cables at this point from the radio to the antenna amplifiers but surprisingly I was getting great DAB reception although no FM/AM, no idea how that was happening!! Since then I have so its now all working and I have TMC and TP too
Since then I have also done a bit of the VCDS coding to enable the following:
- Passenger side mirror tilt upon reverse gear
- Semi - Cornering lights via the fog lights upon turning wheel and turn signals
- Chirp at lock/unlock (I have disabled it now cuz it sounds too aftermarket and its not through the horn)
- Disabled seat belt warning
- Enabled adaptive brake ligths and hazards under hard braking
- Guage test/ needle sweep
- Enabled Video in Motion
- Enabled Audi Drive Select - I can only have Engine and Steering altered with this, but its still fun
Lastly I have updated the maps to the latest 2016 version too now so all new streets have been added.
Next would be to add in a rear view camera and still debating on whether to do the google maps via tethering option.
Any questions on the above let me know and I will be more than happy to help!
Ps This is the result

So my first post after spending a couple of months scouring through these forums to work out my own retrofit. I recently got myself a very nice little 2010 B8 which had a Symphony radio unit in it with bluetooth phone prep (no A2DP) and an aux input (I have to say I have always been a big fan of aux input as it really retains the sound quality unlike A2DP but ofcourse it doesnt give you any control!)
So I started looking at options to do a bit of A2DP and may be even screen mirroring but the options were really clunky and if I would say so 'not pleasing to the eye' such as Dynavin and the Alpine option. So I went on my journey to look to do a OEM retrofit, starting with the 3G unit since 3G+ was going to be too expensive but I somehow convinced myself to go for the 3G+ anyway.
So long story short I managed to gather all the parts together which I have listed below and I luckily managed to find a 2013 B8.5 that was being broken so I got a lot of the parts a bit of wiring from it.
As I had only ever done some minor retrofits on my previous car (Civic hatchback) in terms of fitting an A2DP module from Xcarlink and a couple of other plug n play modules, this was a huge undertaking for me and breaking apart a german instead of Japanese car was overwhelming in itself!
Also before I get into the details, big shout out to @Stonefish as he helped me a lot in working out what I needed and how to do it all, I'll list out the links that were particularly useful to me from other forums and on the web.
So here are the parts I got:
MMI Main Unit | 8R2 035 666 F | £250
Gateway | 8R0 907 468 N | £20
Dab Radio | 4G0 035 061 D | £100
7 Inch Display | 8R0 919 604 | £60
DAB Antenna Amplifier | 8K5 035 225 AC | £10
FM/AM Antenna Amplifier | 8K5 035 225 AA | £10
MMI Control Panel | 8T0 919 611 K | £90
Climate control panel | 8K2820043AH | £20
Main Unit Mount (Dash) | 8K0 858 969 | £30
Radio Mount (Boot) | 8T0 907 368 A | £20
Screen Trim | 8K2 857 185 F | £30
Microphones | 4L1 035 711 C | £10
Fibre optic, Fakra cables, quadlock connectors and some other connectors from Audi
LVDS Cable (MMI to Display)
GPS Receiver from Ebay - £5
As I had some of the cables that I ripped out from the original car I just ordered a new set of fibre optics from ebay for a 5m length, but I found out I only need 4m so a meter is just rolled up in the side of the boot. Now if you have the active sound system with the amp in the left hand side pocket of your boot then I suggest you dont need to lay down any additional cables except for fibre optics as you can use the existing cables for all connections needed. I will go in more detail for the cabling later on below. If you are not so confident in the wiring, then just order the wiring harness from Kufatec (£300) and lay it down, it does reduce the headache by quite a bit since they supply the LVDS cable too and I was lucky enough to get that from the previous car.
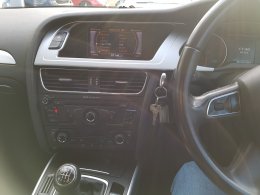
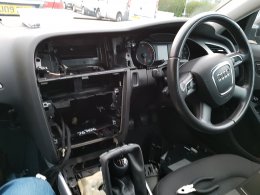
So started off with the first picture as my set up, and then started pulling it all apart as you can see from some of the following photos, now interestingly as I progressed with the work I forgot to take more detailed photos since I was busy swearing my life on the car. But I will try and highlight the process in some steps below:
1 - Start with removing the screen trim with the trim removal tool, start popping it out from the steering wheel side and work your way round to the left and then the top, it only has 4 poppers that come off quite easily
2 - Using pry tool pop out the air vents, quite easy to do starting from the left or the right side of the vent.
3 - Using pry tool pop out the AC controls, again start from the left side and it pops out quite easy with a pry tool.
4 - Using a 8 mm bolt driver, get rid of the 4 bolts holding the symphony radio in, once removed just slide out the radio and unplug the quadlock and fakra cables at the back.
(A lot of the trim removal is given in the manuals on the link here - http://www.a5oc.com/forums/audi-a5-s5-tech/25999-trim-removal-routing-wires.html )
5 - Remove the 4 torx screws holding the screen in using a t20 torx driver
6 - Remove the glove box, there should be 3 8mm bolts on the inside as you open it right above, then 2 more in the footwell right at the back and then the last one is on the left side to reach this you have to open the fuse box area which is quite straight forward, stick a screw driver in the groove and pop out.
7 - Lay down the fibre optic from front dash to the boot - I couldn't remove the door sills from the middle and the back seats bit so just used a steel hanger to pull the fibre optic from the front passenger door to the back door all towards the mid of the seat. I also couldn't get the side trim off in the boot so found a wee lil gap between the chassis behind the back seat and the boot lining so pulled the cable through there.
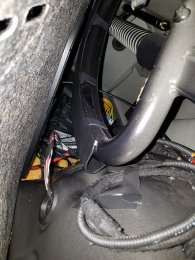
8 - Now had to sort out all the cabling:
a) Disconnect battery
b) At the dash, in the quad lock for the main head unit, I connected the previous quadlock's Terminal 30 to the new one, connected terminal 31 to a nearby bolt touching directly with the chassis to ground
c) Used the existing terminal 30 and 31 from the quadlock to connect the terminal 30 and 31 for the screen, the existing terminal 30 was connected to the fuse box with a 5amp fuse which is what you need for the new head unit and the screen (maybe I should switch it to a 7.5 or a 10 amp one as I have both connected on the same terminal 30.
d) There is an existing CAN bus high and low cable in the existing quadlock connector, I used one of these (orange/brown) cables to act as the Open loop diagnostic connection wire, this connects the head unit, the radio and the gateway together, use the pin out diagrams from the links below to see which position this cable is in.
Display pin outs: http://workshop-manuals.com/audi/a4...rs_for_mmi_display_(from_week_45/08_onwards)/
Radio pin outs: http://workshop-manuals.com/audi/a4...tors_on_radior_mmi_(from_week_45/08_onwards)/
Symphony Pin outs: http://workshop-manuals.com/audi/a4..._quot;concertquot;/quot;symphonyquot;_radios/
Old Amp pin outs: http://www.audi-portal.com/en/diagnostic/ecu_12479.html#1
Old Gateway pin outs: I cant find the link for this but will post when I find this later
e) Use a 4 core cable to connect the mics into the quad lock connector, the existing mic doesnt plug straight into the old radio as it goes to the bluetooth module somewhere under the centre console and that then connects to the old radio, the 4 core cable connects in the blue connector within the quadlock
To get this done you have to get the A pillar off from the passenger side which is easy once you know what yo're doing, basically use a screw driver to pull out the tab that says air bag, there is a torx screw behind it, un do that that then pull, it should come off. http://www.audiworld.com/forums/q5-sq5-discussion-129/pillar-trim-removal-2854535/
f) you may want to have the AMI cable - I had this from the previous car too, if not you can continue to have the AUX cable instead, note you cannot use both at the same time
g) I used a standard GPS receiver that I ordered off ebay and I have stuck it up under the dashboard just behind the screen, there was a nice boxy type space right behind the screen on the top side of the dash, using double sided tape provided with it...job done.
g) head to the back now and re wire the amp wires to the quadlock for the new radio - this re wiring is given in the link below http://www.audizine.com/forum/showt...ild-Thread?p=10711667&viewfull=1#post10711667
h) As again, I used the existing terminal 30 and 31 into the new quadlock connector, I haven't yet checked if the fuse is the correct size on this loop or not, I will do it this weekend
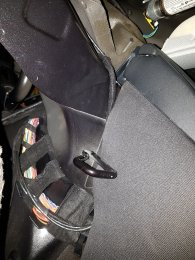
i) lay the fakra cables from the back to the back pillars, the cables can go up through a gap just under the seat belt for the rear left seat (Some pictures below), now if you have the DAB radio like I did, you will need the extra fakra cable to go across the rear parcel shelf and onto the other pillar where you would need to install the new aerial amplifier, the aerial should already be built into the rear windscreen and there should be. You can see that I have had to tape up the amplifier for now since i dont have the screws or anything to hold the amplifier in place, have to figure that one out yet!


To get this done you have to get the A pillar off from the passenger side which is easy once you know what yo're doing, basically use a screw driver to pull out the tab that says air bag, there is a torx screw behind it, un do that that then pull, it should come off. http://www.audiworld.com/forums/q5-sq5-discussion-129/pillar-trim-removal-2854535/
f) you may want to have the AMI cable - I had this from the previous car too, if not you can continue to have the AUX cable instead, note you cannot use both at the same time
g) I used a standard GPS receiver that I ordered off ebay and I have stuck it up under the dashboard just behind the screen, there was a nice boxy type space right behind the screen on the top side of the dash, using double sided tape provided with it...job done.
g) head to the back now and re wire the amp wires to the quadlock for the new radio - this re wiring is given in the link below http://www.audizine.com/forum/showt...ild-Thread?p=10711667&viewfull=1#post10711667
h) As again, I used the existing terminal 30 and 31 into the new quadlock connector, I haven't yet checked if the fuse is the correct size on this loop or not, I will do it this weekend
i) lay the fakra cables from the back to the back pillars, the cables can go up through a gap just under the seat belt for the rear left seat (Some pictures below), now if you have the DAB radio like I did, you will need the extra fakra cable to go across the rear parcel shelf and onto the other pillar where you would need to install the new aerial amplifier, the aerial should already be built into the rear windscreen and there should be. You can see that I have had to tape up the amplifier for now since i dont have the screws or anything to hold the amplifier in place, have to figure that one out yet!
9 - head to the front again and pop out the leather bit around the gear stick, easy to pop out from the right or left side if you push something slim between the chrome bit and the leather and push in towards the leather side, once this is removed put your hand inside and pull upwards, this releases the 2 clips at the bottom of the gear surround and then pull out
10 - Ash tray is held in with 2 8mm bolts too, once undone the ash tray slides out towards you
11 - lay down the cables from the quadlock to the MMI controls behind the ash tray and lay an extension cable for the ESP and the Auto start stop switch, I just cut the existing plugs and added in some extra cable length with a normal 7 core 0.7mm cable.
12 - Now connect up the controls, the ESP and Auto start/stop switches....or whatever configuration you have.
Start plugging in all the other bits too - Radio, MMI head unit, New gateway, AMI, screen
13 - Connect up the battery again and the car will go into Component Protection mode, so you will see a very dull MMI screen, not climate controls work - one light flashes on them, the DIS doesn't display anything but 'Safe' and the non of the dials work except the speedo
So long as you are seeing all of the above - things are going well, as at one point I hadn't connected up the radio and the MMI wont turn on so I was worried if it wasn't a dead unit
14 - Get the CP removed and @Ash187 did this for me, great guy and will help you out on other bits too, he coded the unit for me and also coded the Climate control panel (So effectively I have no idea what he did
)15 - Once the CP is removed, the car is back to normal state and everything works as per plan
Now I hadn't connected up the fakra cables at this point from the radio to the antenna amplifiers but surprisingly I was getting great DAB reception although no FM/AM, no idea how that was happening!! Since then I have so its now all working and I have TMC and TP too
Since then I have also done a bit of the VCDS coding to enable the following:
- Passenger side mirror tilt upon reverse gear
- Semi - Cornering lights via the fog lights upon turning wheel and turn signals
- Chirp at lock/unlock (I have disabled it now cuz it sounds too aftermarket and its not through the horn)
- Disabled seat belt warning
- Enabled adaptive brake ligths and hazards under hard braking
- Guage test/ needle sweep
- Enabled Video in Motion
- Enabled Audi Drive Select - I can only have Engine and Steering altered with this, but its still fun
Lastly I have updated the maps to the latest 2016 version too now so all new streets have been added.
Next would be to add in a rear view camera and still debating on whether to do the google maps via tethering option.
Any questions on the above let me know and I will be more than happy to help!
Ps This is the result