I thought I'd post this up to show how I've just installed my Mobius dashcam to make it all but invisible (I hate things stuck on the screen or on show, OEM look all the way!). Inpired by this Techmoan video and having taken off the plastic cowl around the rain sensor to find it mostly empty, it gave me an idea to mount the Mobius lens remotely inside the cowl with the camera body itself hidden up inside the sunglasses holder in front of the interior lights (much neater than his effort  ).
).

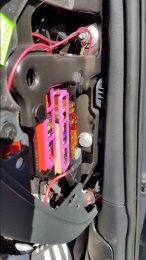
First I got power using a piggyback fuse splitter plugged into the fusebox on the side of the dash which I ran up the drivers side A Pillar and along the roof lining to the mirror area. The feed I've used here (bottom 5A small fuse) is an ignition feed just for testing, I need to see if there's a permanent live in there so the camera can run with the ignition off as well.

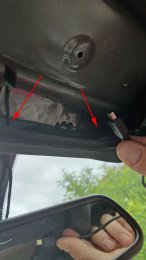
Next step is to take the mirror / rain sensor cowling off. It comes apart in two pieces, first angle the mirror down and to one side as far out the way as possible then pull the narrow plastic section downwards from the top where it meets the headlining, it will just pop out. To get the main plastic cowl off the rain sensor, pull the top corners outwards slightly to unclip them, then pull the cowl off downwards. This video for an A5 shows roughly how to do it although the top section doesnt need the sharp tool inserting as he decribes.
Next take out the central interior light cluster unit (one torx screw inside the sunglasses flap) and from the back drill holes into the front of the sunglasses area to take the USB power and 26 way lens extension cable.


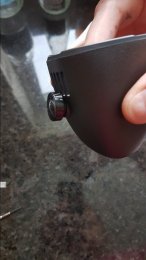
Next, the tricky bit, getting the lens mounted into the cowl. The techmoan video shows how to take the lens out of the camera body but you then need to go a stage further. First you need to unscrew the lens glass from the sensor to pass it through the hole you're about to make, if you don't dismantle the lens the hole required in the cowl would need to be ~20mm in diameter (the size of the glass lens), not ~14mm which is the size of the narrower lens body. To unscrew the lens glass you need to first undo the little hex grub screw using the hex key Mobius supply. I suggest making a mark on the lens body and the lens glass edge with a marker pen before undoing and then counting the number of turns to undo the lens, because screwing it in/out will de-focus the image just like turning the focus ring on a camera. When complete its best to then fire the camera back up and check video image sharpness and adjusting accordingly before installing it in the car.
Once you have the lens apart I'd suggest putting the lens glass somewhere safe and putting something soft (e.g. cotton wool) inside the lens sensor to protect it whilst you're fitting it to the cowl. Now drill a ~14mm hole in the cowl under the slotted grille area, I actually drilled a 12mm hole then opened it out further with a Dremel grinding wheel to get a good fit as you actually want the hole slightly oval (top to bottom) so the lens can sit at an angle, if you drill a straight hole and mount the lens flush you'll just get a nice dashcam shot of your bonnet and not much else (sorry didnt get a good shot of the hole I made).


Pass the lens sensor through the hole then screw the lens glass back and secure it with the grub screw (after checking the focus is OK). To hold the lens inside the cowl I used hot glue as it's firm enough to hold it but can be picked off and removed if necessary, but you could use Araldite or even a dab of superglue if you were really careful and didn't mind a totally permanent fix.
Next its basically just connecting up the lens to the Mobius camera body using the 2 extension cables. Unfortunately Mobius don't sell a ~12" cable which would be ideal for this, so I had to find something off the shelf to extend it a little more (the Wurth cable you can get from Farnell or RS as well as Ebay). There may be longer 26 way cables available elsewhere but I couldnt find one and fitting a single flat cable up inside the cowl upper section might be a bit tricky.
For now I've just used the sticky velcro to mount the Mobius body in the middle of the sunglasses opening as this is the only place it will go where the flap can still open/close.

Thats about it really, I only installed it yesterday so haven't tested properly yet but all seems good from a couple of test recordings.
Any questions please fire away
Here's what I used:
Mobius Action Cam with wide angle lens (plus a suitable 32Gb+ micro SD obviously)
Mobius 8" extension cable
Additional 4" 26 way ribbon cable (Wurth Elektronik 687626100002)
Hard Wire USB Power Supply - This one should monitor car battery voltage and allow the camera to run whilst the ignition is off all the time there's sufficient battery voltage (so it won't drain the car battery if you left it for a couple of weeks going on holiday etc)
Fusebox piggyback power feed - plus a 2A fuse
Mobius Super Capacitor - Not strictly needed but significantly cuts down on heat output from the Mobius which is a real benefit when mounted in a closed space, plus I found the Li ion battery circuitry caused bad DAB interference which the capacitor fixed.
All in, the above cost less than £100
First I got power using a piggyback fuse splitter plugged into the fusebox on the side of the dash which I ran up the drivers side A Pillar and along the roof lining to the mirror area. The feed I've used here (bottom 5A small fuse) is an ignition feed just for testing, I need to see if there's a permanent live in there so the camera can run with the ignition off as well.

Next step is to take the mirror / rain sensor cowling off. It comes apart in two pieces, first angle the mirror down and to one side as far out the way as possible then pull the narrow plastic section downwards from the top where it meets the headlining, it will just pop out. To get the main plastic cowl off the rain sensor, pull the top corners outwards slightly to unclip them, then pull the cowl off downwards. This video for an A5 shows roughly how to do it although the top section doesnt need the sharp tool inserting as he decribes.
Next take out the central interior light cluster unit (one torx screw inside the sunglasses flap) and from the back drill holes into the front of the sunglasses area to take the USB power and 26 way lens extension cable.


Next, the tricky bit, getting the lens mounted into the cowl. The techmoan video shows how to take the lens out of the camera body but you then need to go a stage further. First you need to unscrew the lens glass from the sensor to pass it through the hole you're about to make, if you don't dismantle the lens the hole required in the cowl would need to be ~20mm in diameter (the size of the glass lens), not ~14mm which is the size of the narrower lens body. To unscrew the lens glass you need to first undo the little hex grub screw using the hex key Mobius supply. I suggest making a mark on the lens body and the lens glass edge with a marker pen before undoing and then counting the number of turns to undo the lens, because screwing it in/out will de-focus the image just like turning the focus ring on a camera. When complete its best to then fire the camera back up and check video image sharpness and adjusting accordingly before installing it in the car.
Once you have the lens apart I'd suggest putting the lens glass somewhere safe and putting something soft (e.g. cotton wool) inside the lens sensor to protect it whilst you're fitting it to the cowl. Now drill a ~14mm hole in the cowl under the slotted grille area, I actually drilled a 12mm hole then opened it out further with a Dremel grinding wheel to get a good fit as you actually want the hole slightly oval (top to bottom) so the lens can sit at an angle, if you drill a straight hole and mount the lens flush you'll just get a nice dashcam shot of your bonnet and not much else (sorry didnt get a good shot of the hole I made).


Pass the lens sensor through the hole then screw the lens glass back and secure it with the grub screw (after checking the focus is OK). To hold the lens inside the cowl I used hot glue as it's firm enough to hold it but can be picked off and removed if necessary, but you could use Araldite or even a dab of superglue if you were really careful and didn't mind a totally permanent fix.
Next its basically just connecting up the lens to the Mobius camera body using the 2 extension cables. Unfortunately Mobius don't sell a ~12" cable which would be ideal for this, so I had to find something off the shelf to extend it a little more (the Wurth cable you can get from Farnell or RS as well as Ebay). There may be longer 26 way cables available elsewhere but I couldnt find one and fitting a single flat cable up inside the cowl upper section might be a bit tricky.
For now I've just used the sticky velcro to mount the Mobius body in the middle of the sunglasses opening as this is the only place it will go where the flap can still open/close.

Thats about it really, I only installed it yesterday so haven't tested properly yet but all seems good from a couple of test recordings.
Any questions please fire away
Here's what I used:
Mobius Action Cam with wide angle lens (plus a suitable 32Gb+ micro SD obviously)
Mobius 8" extension cable
Additional 4" 26 way ribbon cable (Wurth Elektronik 687626100002)
Hard Wire USB Power Supply - This one should monitor car battery voltage and allow the camera to run whilst the ignition is off all the time there's sufficient battery voltage (so it won't drain the car battery if you left it for a couple of weeks going on holiday etc)
Fusebox piggyback power feed - plus a 2A fuse
Mobius Super Capacitor - Not strictly needed but significantly cuts down on heat output from the Mobius which is a real benefit when mounted in a closed space, plus I found the Li ion battery circuitry caused bad DAB interference which the capacitor fixed.
All in, the above cost less than £100
Last edited:


 i'll let you have that one. Got all the bits. didn't realise its the same as the other lead. Might post a pic of it when its done.