Slimline HID Ballasts -now fitted in Headlight

For all you lazy bods out there who do not posses a ruler here are the plate dimensions I have measured that should fit the OEM recess.
haha. thanks mate. I'm not lazy, I promise. I just need to do the install quite quickly since there's a snowstorm outside and it's about -5
 
For all you lazy bods out there who do not posses a ruler here are the plate dimensions I have measured that should fit the OEM recess. Note that the actual recess is 136mm x 93mm, so the plate should fit if cut to 135mm x 95mm. I have also measured the position of the holes which should also line up - but may need a little fine tuning!

I have taken these measurements from a broken headlight I have lying around my garage - these are not from the plates I made myself previously but probably not far off.


We already grateful you measured it for us but you said: ''so the plate should fit if cut to 135mm x 95mm'' , but your drawing shows 92 mm
So is it 92 or 95mm? my guess is 92mm. Can you confirm pls
 
Last edited:
actually could you just make 2 for me, pre-drill them and drop round to fit them too? ;)
 
haha. thanks mate. I'm not lazy, I promise. I just need to do the install quite quickly since there's a snowstorm outside and it's about -5

You can do the work on the headlight inside in the nice warmth of your home! Easy to remove - just the electrical plug is a real pain thou to unplug.
:cold:

We already grateful you measured it for us but you said: ''so the plate should fit if cut to 135mm x 95mm'' , but your drawing shows 92 mm
So is it 92 or 95mm? my guess is 92mm. Can you confirm pls

Ooops typo yes it's 92mm - have corrected original post.

actually could you just make 2 for me, pre-drill them and drop round to fit them too? ;)

I'll get them Gold plated also so you do not need to paint them - should be with you by Christmas.
:laugh:
 
Last edited:
I pulled my lights out today and finally got a chance to finish installing the HIDs tonight after the kids were in bed. what a difference! If my hands weren't so frozen after handling a ratchett and sockets in -5 I would have hung about longer to admire them
 
I pulled my lights out today and finally got a chance to finish installing the HIDs tonight after the kids were in bed. what a difference! If my hands weren't so frozen after handling a ratchett and sockets in -5 I would have hung about longer to admire them

S**T That's dedication.
 
If the temp droped to -30 here in Wales i would just lock the door's and hibernate

0511-0907-1220-3959_Cartoon_of_a_Guy_Sleeping_Under_His_Desk_clipart_image.jpg
 
haha. thankfully it's expected here for a brief spell and people are equipped for it. Not a lot of people go outside unless they have to though. Even with an engine heater a car will take a bit of warming up. Roll on building a house with a big heated garage!! No more tools stuck to my hands when attempting mods in the winter :)

edit** Sorry. Way off topic. I'll stop now.
 
Last edited:
Regardless of DIS or not, buy the ones with the error modules, all B6's have CANBUS wiring and you will get error codes if you don't have the blocks...

I am finishing building my new headlight units with the slim ballasts this week and will have them fitted by Thursday.....
 
Just got mine today and fitted the drivers passenger side. At a push i could fit the ignitor inside the headlight just like woorlord did but would have to cut off the old gromits. Question is has anyone found a place to mount the code prevention module as its quite large. Would really like to make it all self contained in the headlight if possible.
 
Its amazing how much smaller they are, mine are a couple of years old now so I expect they're even smaller these days:

Ballasts002.jpg
 
Avant4me,

I fitted my error code cancellers to the top of the top of the headlight unit on the inside, there is a flat section just above the reflector unit that they will fit into, secured the same way as the HV unit, with double sided pads, keeps everything contained as per Woorlords guide, you just need a bit of trial and error as to where the cables go as it is a tight fit....

Steve
 
I feel some trial and error, swearing and sore fingers coming on. Was considering making a plate like woorlord did, but cutting out the original headlight base where he cut the 40mm whole, that would give a lot more room. Definitely want it all inside the headlight as its a lot easier to remove if my MOT guy spots the conversion.
 
the MOT should be fine mine has just passed it and they did not evan notice them ;-)
 
................ but cutting out the original headlight base where he cut the 40mm whole, that would give a lot more room.

For A4/B6 headlights that take the OEM Ballasts and use D1S bulbs there is a large opening - found this picture the other day on the web when researching the OEM Valeo Ballasts I recently fitted:

Left side: Factory HID headlight / Right side: H7 headlight

Audi%20A4-B6%20D1SvsH7.jpg


There is an outline of where to cut this hole on the headlight if you look carefully (on mine there is anyway.)
 
All done, cut a bigger whole so i could get the ignitor inside the unit. Code module fitted to roof of headlight with sticky pads, ignitor put in endways alongside bulb holder, and ballast underneath. Just waiting on my steel plates to act as a heat sink and seal it all up underneath.
 
From time to time my amber brake light warning light comes on. The light doesn't work. However, when the warning light goes out, the brake light works. It can happen at any time with the lights on or off.

I thought it might be down to the position of the HID ballast so, I've repositioned it. Would you guys take a look and see if it's ok to leave it here please.

Thanks

PS the radio is still poor with the lights on.

 
Last edited by a moderator:
Poor radio signal with the lights on would suggest an earthing problem to me.
 
Ah ok guys thanks for that. It made no difference to the warning light. Guess I'll look elsewhere.

Poor earthing of the ballast or radio?
 
What size thread screws/bolts did you use to mount the plates to the headlight?

Trying to buy and prepare everything before I take the headlights out.
 
To stop ABS lights coming on...
Re-wire the earth off the near side headlight plug.
The headlight ground shares ground with a few other grounds, ABS being one if them.

No. 10 wire on the plug, near side headlight you need to re ground.
 
Last edited:
For anyone that doesn't have random bit of ally or perpex laying around for the bottom cover I ordered 2 pieces of 135mmx92mm 1.5mm ally from this ebay seller.

I had looked at plenty of online shops but all wanted stupid delivery prices, cost this company £1.20 to send and others were charging up to a tenner! for a few quids worth of ally.

But anyways this seller charged me £5 for the 2 sheets delivered.
 
hi guys im thinking of upgrading my poor headlights but why are people fitting slimline and some the bigger ones, is it to tidy things up and have everything inside the headlight on slimmer ones?
 
ah right cool, so if i get a set do i have to do all this cutting away at the headlight or can i just fit the ballasts and put the units down the back somewhere?
 
Some cram all the wires in by the lamp/bulb, some let it all hang out ;)
You will need to cut/drill hole somewhere (usually the lid) to feed wires from ballast to etc.
Easy enough.
 
Sorry but no. Ballasts are certainly smaller but the "Slim" models you can cram everything inside the headlights which is was the DIY guide on the first page is for. If you get standard ones then they have to sit outside the headlight somewhere.

I have bought a slim set for mine which were delivered today and there the size of say 2-3 place mats stacked. Although they do have separate blocks on the wiring which is a decoder and igniter I think. I helped fit standard HID's to my mates car at the weekend and the ballast was the size of rowntrees jelly blocks!
 
Well I didn't even know they still sell the fat ones??
Thought it was just slim line all the way these days..
 
Immitation is the greatest form of flattery....

Prepped the lights with silicon the day before, just the 1 bead did the trick for me. Aquarium silison was just what I happened to have in the tool box..


As mentioned there was a line where the standard HID hole would be, although watch where your cutting as if I followed it in some places I would of cut to the outside.


Cut out, bought a knife tip for the soldering iron, although used a hacksaw blade to cut the straights faster.


Thankyou James for the diagrams, your measurements were spot on, my drilling skills were not..... couple of holes slightly out.


There was nothing pretty about how I stuffed them inside as I had the igniter and a decoded block to fit in.

So ta..dahhhhh sprayed with Hammerite Hammered! (it's what I want to use on the brake calipers eventually)


Also did Kris's earth mod to solve the ABS issue.

Thankyou to everyone input on the guide.

Oh and M4 bolts for the holes.
 
I wish I had found this forum before I bought the Nightbreakers, as the only reason I didn't fit hids straight away was because I didn't want to cut holes into the headlight covers.

A great guide and thanks for the drawing of the plate dimensions as I can just pass it onto my old man who is a steel engineer.
 
Anybody wanting to fit HID's may want to consider the newer Digital Slimline Ballasts that "quattroJames" put me onto in his thread - quattrojames thread

The Slimline HID kit used was off Ebay - LINK

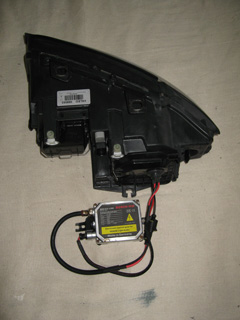
Before with standard size Ballasts I had.....
00-Original_HID_small.jpg


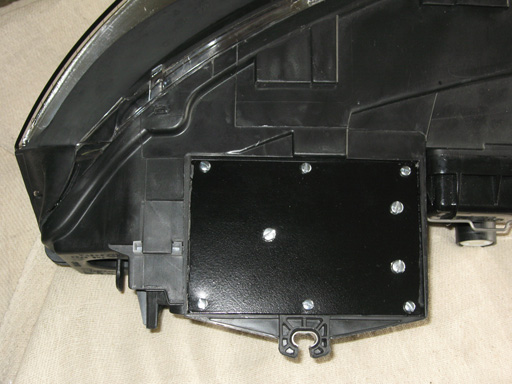
And now I have everything self-contained within the Headlight assembly - with nothing hanging out!

What I did...........

1. New Slimline Ballast on a custom mounting plate I made - primed and painted:

01-New%20Ballast.jpg


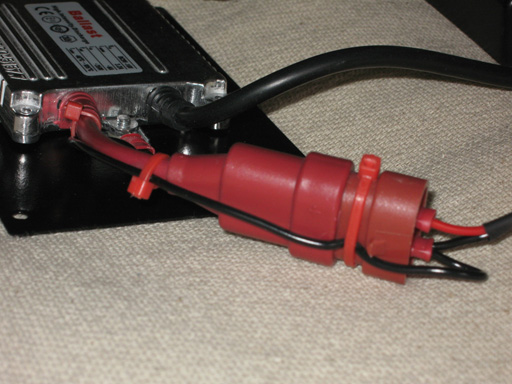
2. Did not use the waterproof connector for 12v connection as this will be in the headlight assembly - made up a custom connection using standard mini-crimp connectors. Also earthed the Ballast casing with an additional earth wire as it seems to be floating.
02-Wires.jpg


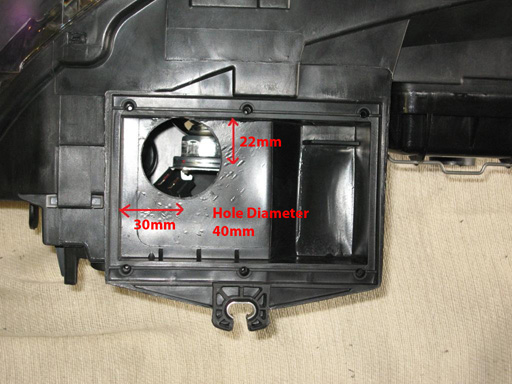
3. This was the hardest part - getting the cables from the Ballast into the light assembly. I assume this part is normally cut out for factory fit OEM Ballasts. Anyway decided on a 40mm hole cutter located as shown. (Be careful as drill center will hit the back of the light reflector - but disconnect the motor actuator under the other access panel and this gives more internal clearance for the drill with the reflectors moved out the way.
Also place a plastic bag inside the headlight assembly to catch any plastic swarf from hole cutting. Have a vacuum cleaner hose to hand to remove any stray swarf as you cut the 40mm hole - it's a pain to remove if it falls into the headlight assembly owing to static from the various internal plastic parts!!
03-Drilled%20Hole.jpg


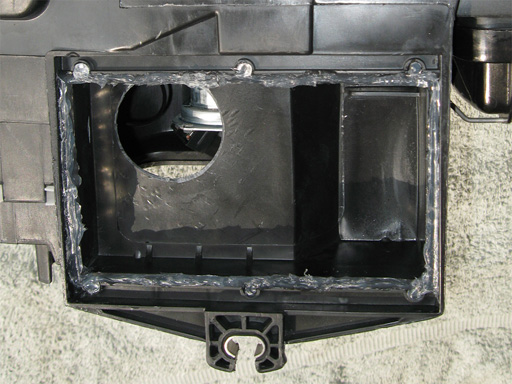
4. Hole from inside.....
04-Drilled%20Hole.jpg


5. Put two layers of bathroom silicon sealant around the rim of the plate recess and let it set for 24 hours. This acts as a waterproof seal between the plate and the light assembly.
05-Silicone%20Sealant.jpg


6. Passed the HV unit and 12v connector through the 40 mm hole and mounted the Ballast plate with self tapping screws.
06-Mounted%20Plate.jpg


7. Stuck the HV unit down with a couple of double sided sticky pads and made 12v connections with standard male flat spade connectors into Audi connector. HID bulb mounted and HT connections made.
07-New%20Insidet.jpg


Repeated for other light and remounted to car - That's It All Done :moa:


Hello I been looking for this all over.. most people make them, themselves. now I'm not much of a constructer or know carpentry. so I was wondering if you can make a pair for me and I pay you for it, through paypal.. I have the same audi A4 b6. you can email me J2md13@gmail.com please the is great for my car im tired of seeing my bulky ballats in the way and my headlight don't fit right anyway with them. thank you
 
For all you lazy bods out there who do not posses a ruler here are the plate dimensions I have measured that should fit the OEM recess. Note that the actual recess is 136mm x 93mm, so the plate should fit if cut to 135mm x 92mm. I have also measured the position of the holes which should also line up - but may need a little fine tuning!

I have taken these measurements from a broken headlight I have lying around my garage - these are not from the plates I made myself previously but probably not far off.

HID%20Plate.jpg

:thumbsup:
im not an arquiteture. how about if you can you build a pair for me and I pay you for it. email me J2md13@gmail.com