

Thought I'd write up the steps I took last weekend to replace the crankcase breather filter on my 1999 A6's V6 2.5 TDI engine.
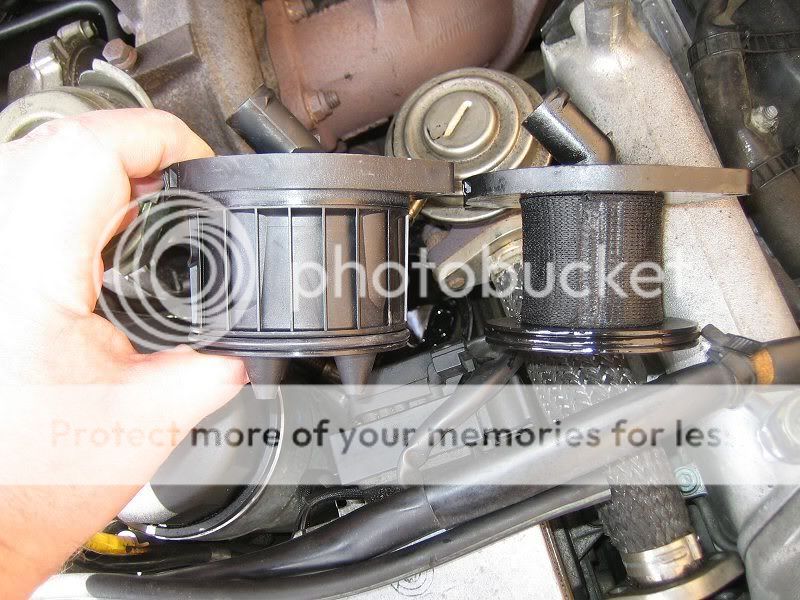
The car has had an oil leak for months now and I've replaced the cam cover gasket to try and cure it. At the last service the mechanic told me it's now the offside camshaft front seal that's leaking but I'm not paying £££ to replace it. It can carry on leaking for the money it'd cost to sort out. Recently I've noticed that there's a hiss from the oil filler cap when I remove it, which indicates that the crank case is under pressure and that the filter could be blocked. That might explain why oil is coming out of the engine. On the advice of several forum posters, I didn't buy the replacement filter for my AFB-code engine; I bought the later-model type. Photos below show the difference. The part number for the one I used is 059103464B and it's described as a "set of seals". None of the three dealerships I called had it in stock.
In summary, this wasn't a particularly hard job but it was fiddly and there's a huge risk of dropping tools, bolts etc. into the V of the engine and losing them forever. I only lost one tool (a 5mm allen bit) which was better than I was expecting. I couldn't have done the job without a magnetic pick-up tool to hold things in place while I positioned tools and bolts, particularly during reassembly.
To do the job you'll be disturbing some fairly important components (fuel pipes, turbo oil feed pipes) and working with limited access, which might be daunting. Having the opportunity to clean out the intake manifolds while you're there is good though, and it makes the job worth doing yourself IMHO.")
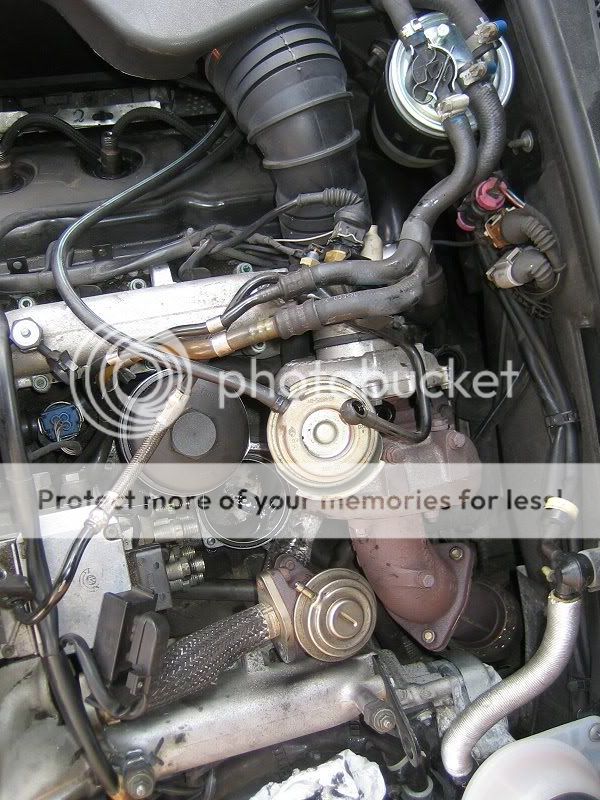
Having removed the cover from the engine it looked like this:

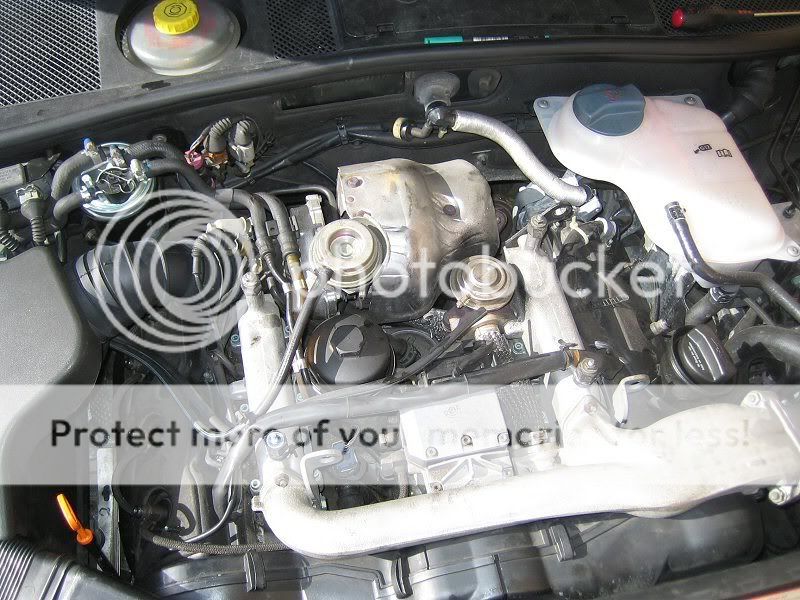
You'll need a 10mm socket to get the engine cover off. The filter was hidden in the V of the engine between the turbo and the fuel pump, under a metal cover plate:

First step was to remove the fuel pipes between the fuel pump and the injectors. I marked the fittings at the pump with a permanent marker in the order I removed them. You can't get a spanner onto the bottom ones with the top ones in place so you'll have to re-fit them in the correct order. Spanner size is 17mm.
Having removed all the pipes I next took the turbocharger heat shield off. There are just three 10mm bolts easily accessible on the top of the shield. For good measure I also removed the bolt holding the EGR valve to the nearside intake manifold. This is a 6mm allen key but access is fiddly and I used a flexible extension drive to get to it.

The pipes attaching to the EGR valve are stiff though, and removing that bolt didn't give me much extra room to manoeuver.
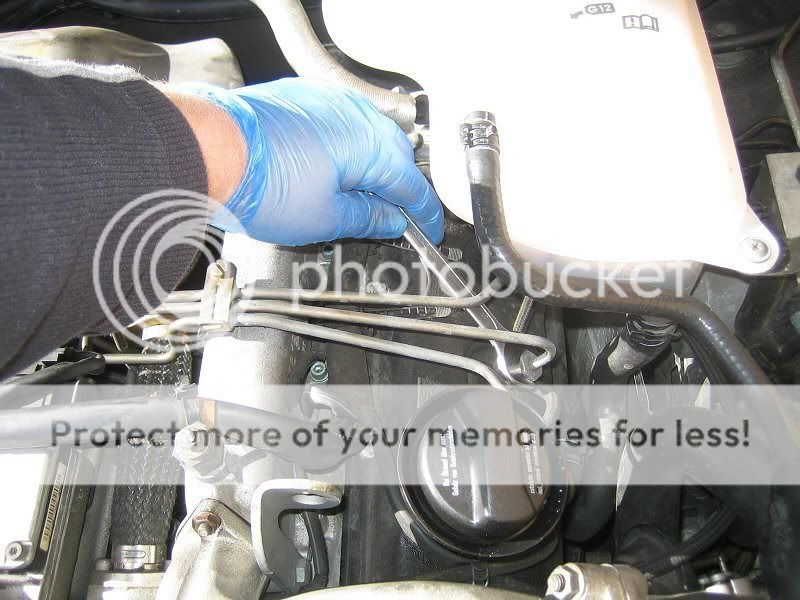
Next, I removed the large vacuum pipe from the top of the crankcase breather by squeezing the tabs of the clip together with some adjustable pliers. The rubber hose slid off fairly easily.

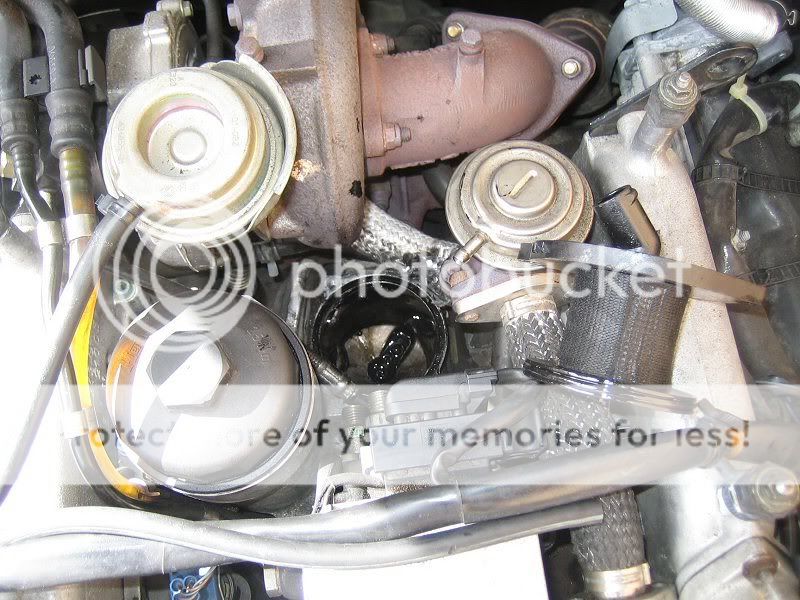
With the hose out of the way I was able to access the two 30H torx bolts holding the filter cover down and remove it. The filter was now loose and quick wiggle showed that it still wasn't going to come out of the space between the fuel pump and the turbo. ****** thing. So I removed the two 5mm allen bolts holding the EGR pipe to the intake manifold, hoping this would give me more flexibility in the EGR's pipes:

Finally, the filter came out.
The recess in which the filter sits has only small holes at the bottom, so there's minimal chance of losing something into the bowels of the engine. There's an O-ring sitting in a groove around the filter recess and a new one in the replacement kit so don't forget to use it.
The new filter and the old one are very different but fit within the same recess. The new one is larger and there was no way it was going to fit past the other components and reach its hole without me creating more space somehow.
I disconnected the electrical feed to the fuel pump first. Next, there's a hard oil pipe feeding the turbo that cuts the corner of the space above the filter recess, so I decided to move it. More combinations of extensions down to a 5mm allen bit did the job, but you'll be wise to have a magnetic pick-up tool handy to bring out the long bolt once it's loose.


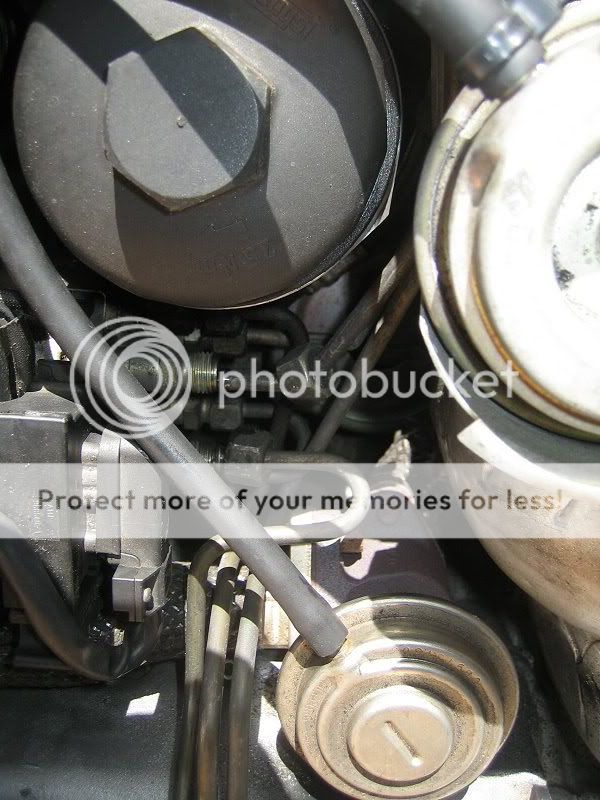
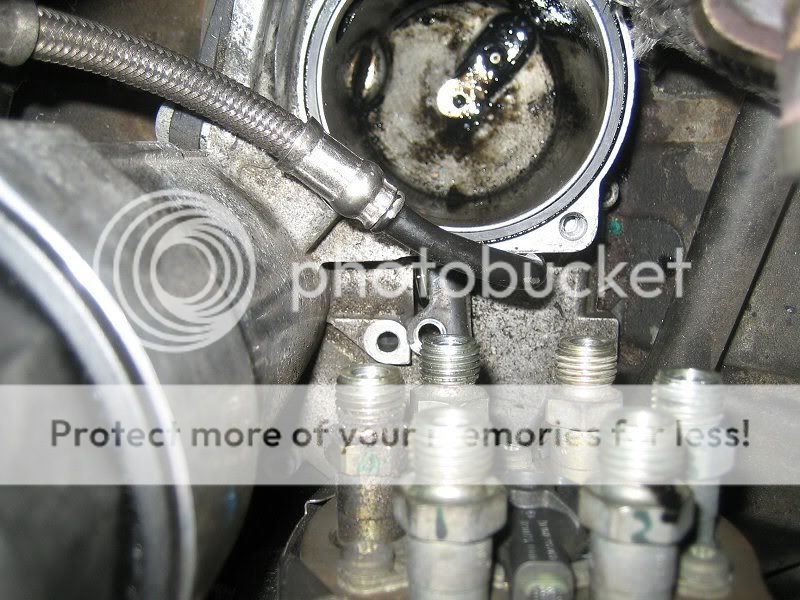
I could now use a screwdriver blade to bring the end fitting of the oil pipe out of the aluminium casting into which it fits. The fitting pushes in with an O-ring to seal it as the pic below might illustrate:
The pipe was still fairly rigid though - I had to remove the oil feed fitting from the turbo (9mm allen head) and the bracket from the rear of the offside intake manifold (13mm spanner) in order to move the pipe enough to get decent access.
The new filter dropped in relatively easily now so I installed the O-ring then the filter, cover and Torx-head bolts (which all came in the kit).
Job done. I could have stopped there and reassembled everything but a couple of comments in the forums made me decide to investigate the condition of the intake manifold sections. With everything exposed it was easy to take them off for inspection. I'm glad I did.

There was significant build-up of oily carbon deposit inside the pipes:
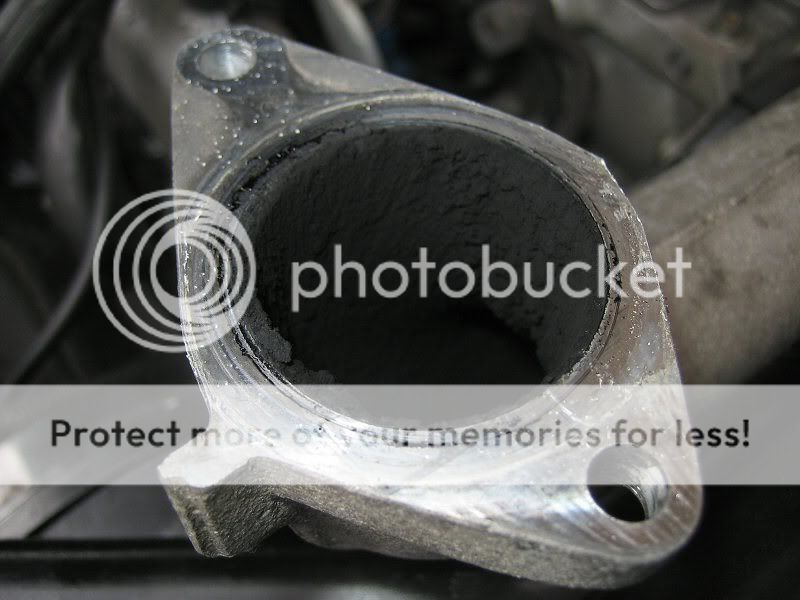


 This is on a 125k mile '99 A6.
I cleaned out the sections and refitted them. Cleaning was easiest with mechanical intervention. Chemicals didn't really seem too effective and sandblasting only reached the bits that were visible. I soaked the parts in Jizer first and then used a stiff bottlebrush and a wire rod to get the worst of it off. I used the Hoover to collect the bits from the intake runners on the heads as I scraped off the build-up. I hope it was worth the effort...
Having reinstalled everything I had to bleed the injector pipes before the engine would start. I got my wife to crank the engine while I loosened an injector pipes at the cylinder head until fuel spurted out. I tightened the fitting again and moved to the next pipe. After three pipes the engine was trying to start and after four it was running, but I did all six for good measure.
Has it fixed the oil leak? Not sure yet. The oil that's dripping off the car now might just be left over and will gradually stop. We'll see.
Hope those photos are useful for anybody else contemplating the job. I'm glad I did it, but it was fiddly.
The car has had an oil leak for months now and I've replaced the cam cover gasket to try and cure it. At the last service the mechanic told me it's now the offside camshaft front seal that's leaking but I'm not paying £££ to replace it. It can carry on leaking for the money it'd cost to sort out. Recently I've noticed that there's a hiss from the oil filler cap when I remove it, which indicates that the crank case is under pressure and that the filter could be blocked. That might explain why oil is coming out of the engine. On the advice of several forum posters, I didn't buy the replacement filter for my AFB-code engine; I bought the later-model type. Photos below show the difference. The part number for the one I used is 059103464B and it's described as a "set of seals". None of the three dealerships I called had it in stock.
In summary, this wasn't a particularly hard job but it was fiddly and there's a huge risk of dropping tools, bolts etc. into the V of the engine and losing them forever. I only lost one tool (a 5mm allen bit) which was better than I was expecting. I couldn't have done the job without a magnetic pick-up tool to hold things in place while I positioned tools and bolts, particularly during reassembly.
To do the job you'll be disturbing some fairly important components (fuel pipes, turbo oil feed pipes) and working with limited access, which might be daunting. Having the opportunity to clean out the intake manifolds while you're there is good though, and it makes the job worth doing yourself IMHO.
Having removed the cover from the engine it looked like this:
You'll need a 10mm socket to get the engine cover off. The filter was hidden in the V of the engine between the turbo and the fuel pump, under a metal cover plate:
First step was to remove the fuel pipes between the fuel pump and the injectors. I marked the fittings at the pump with a permanent marker in the order I removed them. You can't get a spanner onto the bottom ones with the top ones in place so you'll have to re-fit them in the correct order. Spanner size is 17mm.
Having removed all the pipes I next took the turbocharger heat shield off. There are just three 10mm bolts easily accessible on the top of the shield. For good measure I also removed the bolt holding the EGR valve to the nearside intake manifold. This is a 6mm allen key but access is fiddly and I used a flexible extension drive to get to it.
The pipes attaching to the EGR valve are stiff though, and removing that bolt didn't give me much extra room to manoeuver.
Next, I removed the large vacuum pipe from the top of the crankcase breather by squeezing the tabs of the clip together with some adjustable pliers. The rubber hose slid off fairly easily.
With the hose out of the way I was able to access the two 30H torx bolts holding the filter cover down and remove it. The filter was now loose and quick wiggle showed that it still wasn't going to come out of the space between the fuel pump and the turbo. ****** thing. So I removed the two 5mm allen bolts holding the EGR pipe to the intake manifold, hoping this would give me more flexibility in the EGR's pipes:
Finally, the filter came out.
The recess in which the filter sits has only small holes at the bottom, so there's minimal chance of losing something into the bowels of the engine. There's an O-ring sitting in a groove around the filter recess and a new one in the replacement kit so don't forget to use it.
The new filter and the old one are very different but fit within the same recess. The new one is larger and there was no way it was going to fit past the other components and reach its hole without me creating more space somehow.
I disconnected the electrical feed to the fuel pump first. Next, there's a hard oil pipe feeding the turbo that cuts the corner of the space above the filter recess, so I decided to move it. More combinations of extensions down to a 5mm allen bit did the job, but you'll be wise to have a magnetic pick-up tool handy to bring out the long bolt once it's loose.
I could now use a screwdriver blade to bring the end fitting of the oil pipe out of the aluminium casting into which it fits. The fitting pushes in with an O-ring to seal it as the pic below might illustrate:
The pipe was still fairly rigid though - I had to remove the oil feed fitting from the turbo (9mm allen head) and the bracket from the rear of the offside intake manifold (13mm spanner) in order to move the pipe enough to get decent access.
The new filter dropped in relatively easily now so I installed the O-ring then the filter, cover and Torx-head bolts (which all came in the kit).
Job done. I could have stopped there and reassembled everything but a couple of comments in the forums made me decide to investigate the condition of the intake manifold sections. With everything exposed it was easy to take them off for inspection. I'm glad I did.
There was significant build-up of oily carbon deposit inside the pipes:
This is on a 125k mile '99 A6.I cleaned out the sections and refitted them. Cleaning was easiest with mechanical intervention. Chemicals didn't really seem too effective and sandblasting only reached the bits that were visible. I soaked the parts in Jizer first and then used a stiff bottlebrush and a wire rod to get the worst of it off. I used the Hoover to collect the bits from the intake runners on the heads as I scraped off the build-up. I hope it was worth the effort...
Having reinstalled everything I had to bleed the injector pipes before the engine would start. I got my wife to crank the engine while I loosened an injector pipes at the cylinder head until fuel spurted out. I tightened the fitting again and moved to the next pipe. After three pipes the engine was trying to start and after four it was running, but I did all six for good measure.
Has it fixed the oil leak? Not sure yet. The oil that's dripping off the car now might just be left over and will gradually stop. We'll see.
Hope those photos are useful for anybody else contemplating the job. I'm glad I did it, but it was fiddly.


