Thought I'd write a guide on replacing the clutch pedal (which regularly fails) as I haven't found a complete guide on this forum. I have also discovered by accident a way that makes the job much easier ")
I've found you can lock the pedal right back and then slot the spring into place without the need for cable ties etc. which makes the whole job pretty straightforward.
Have done this twice now and so far no swearing and no busted knuckles!
Hope this helps someone if you end up having to do the same......
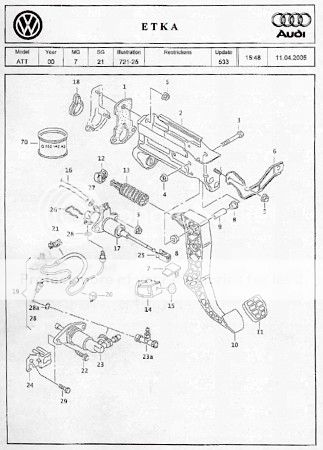
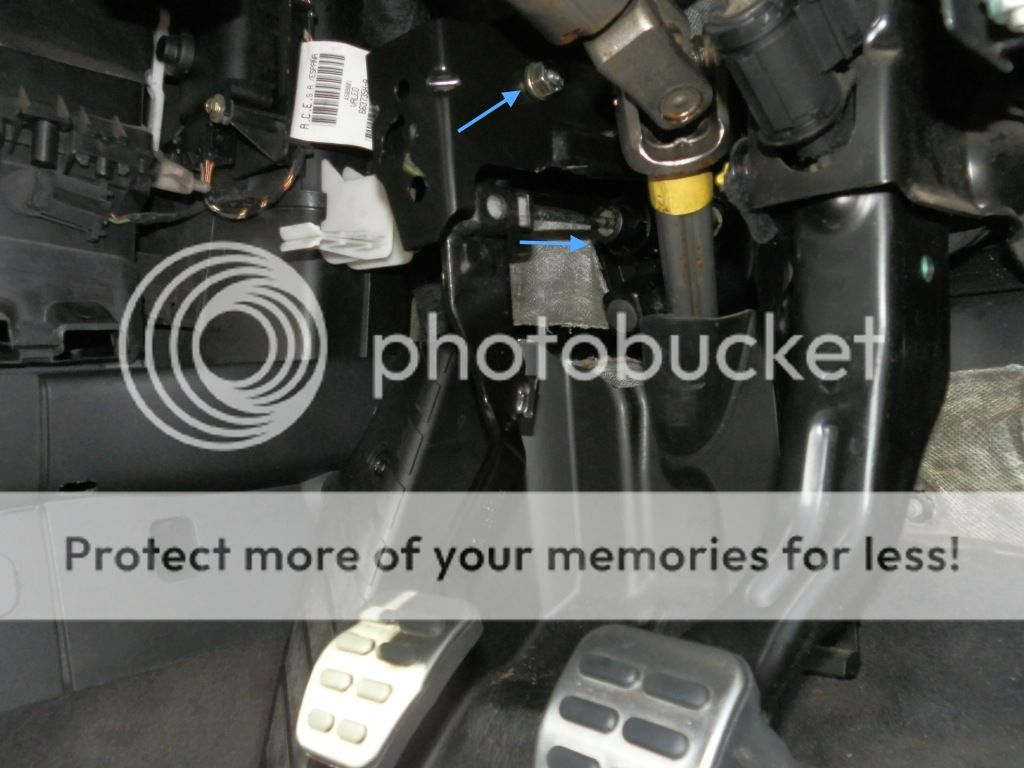
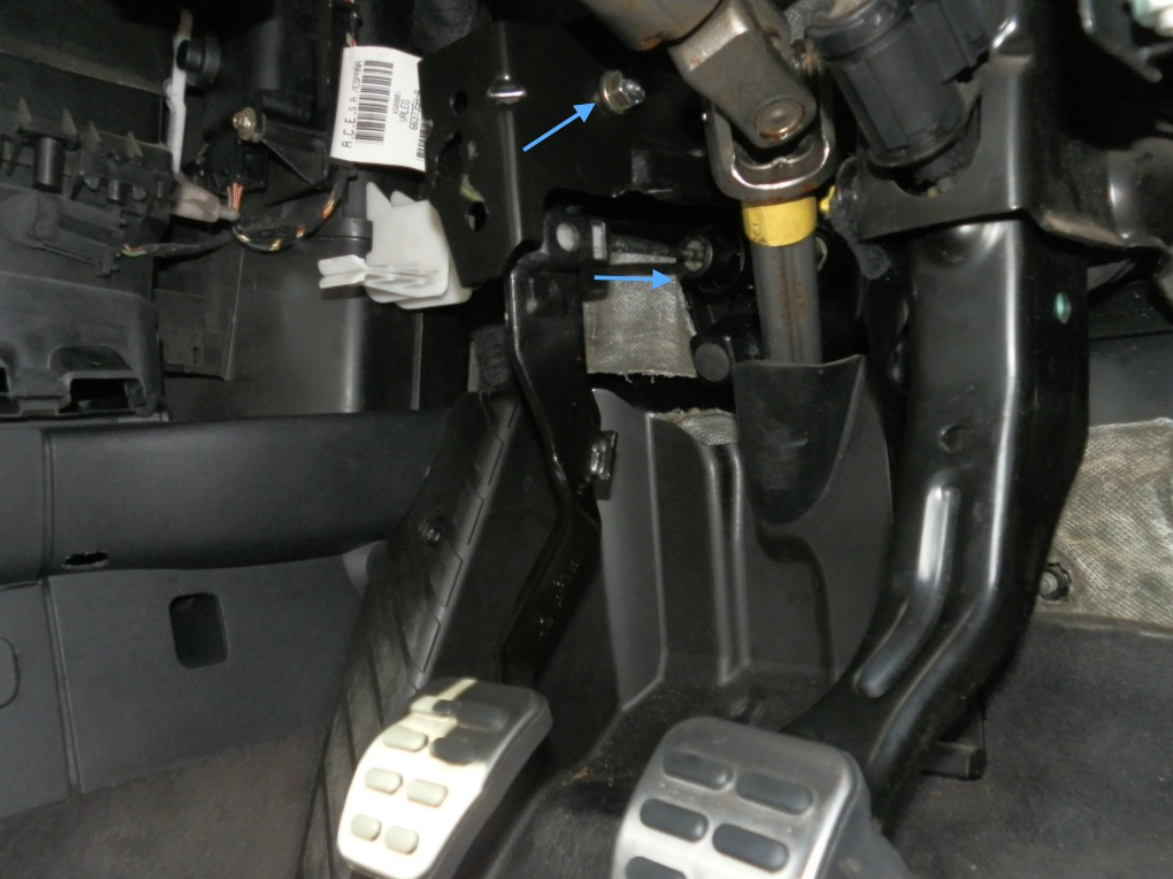
For starters here's a pic of the entire clutch pedal assembly for reference.
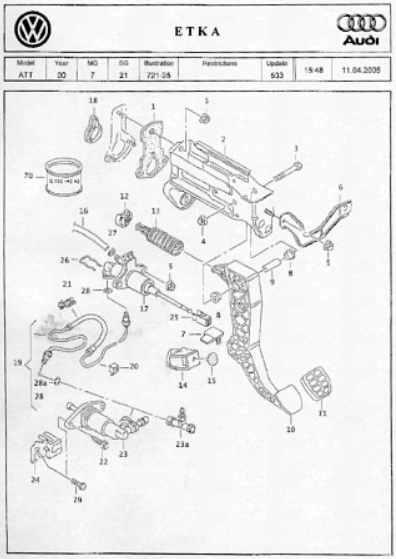
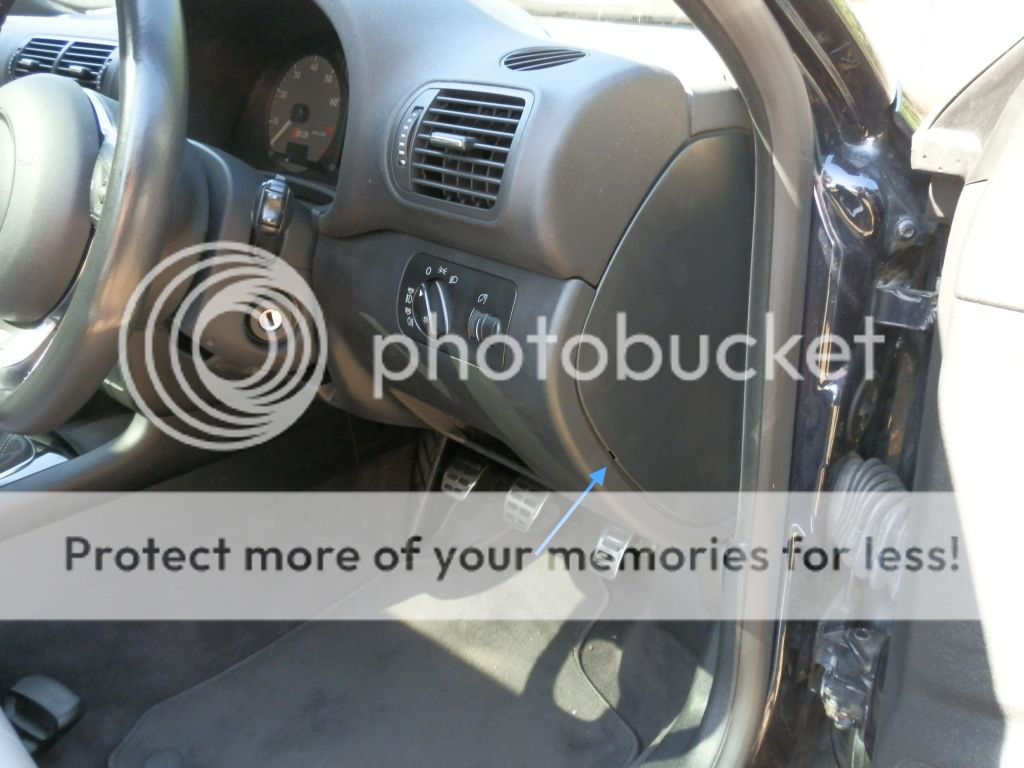
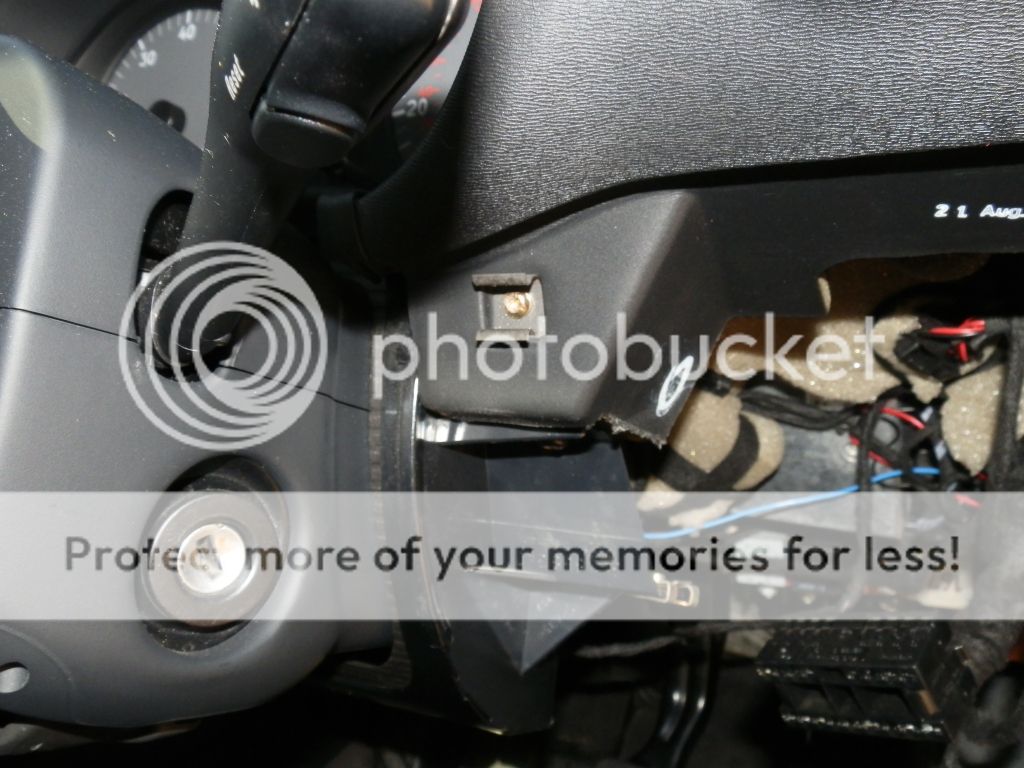
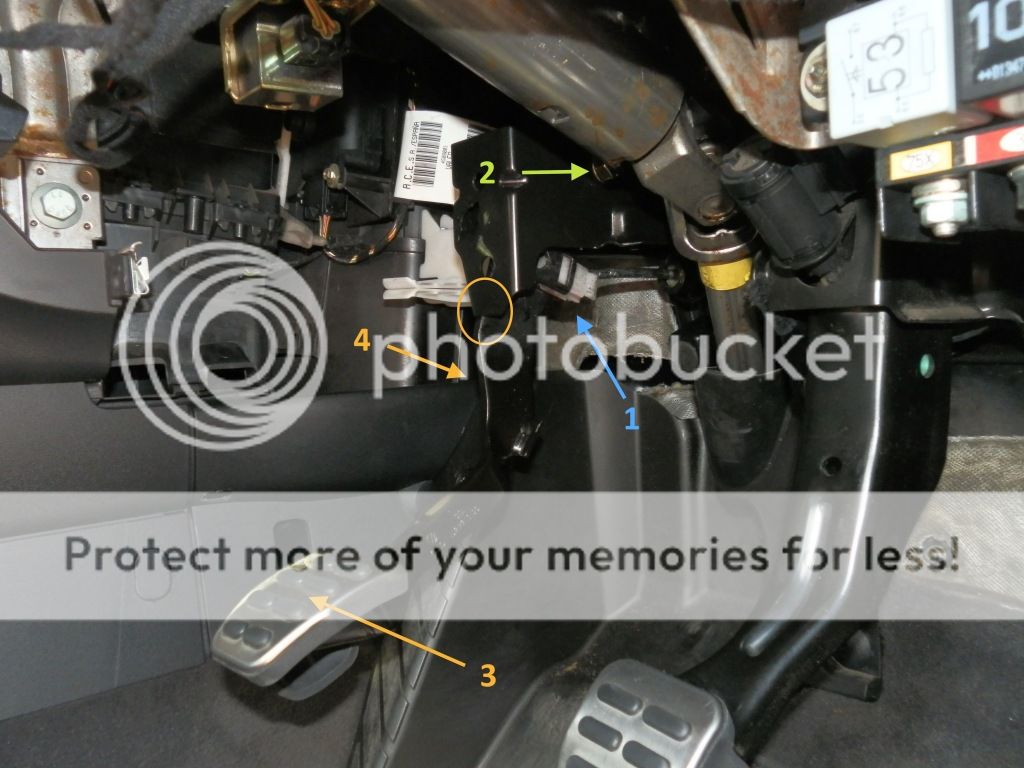
1. First job is to remove the lower dash surround to gain access to the clutch pedal. If you haven't done this before you start by removing the side fuse cover by placing a small bladed screwdriver in this gap (blue arrow). The cover is held in by three spring clips and hides most of the fuses for the car.

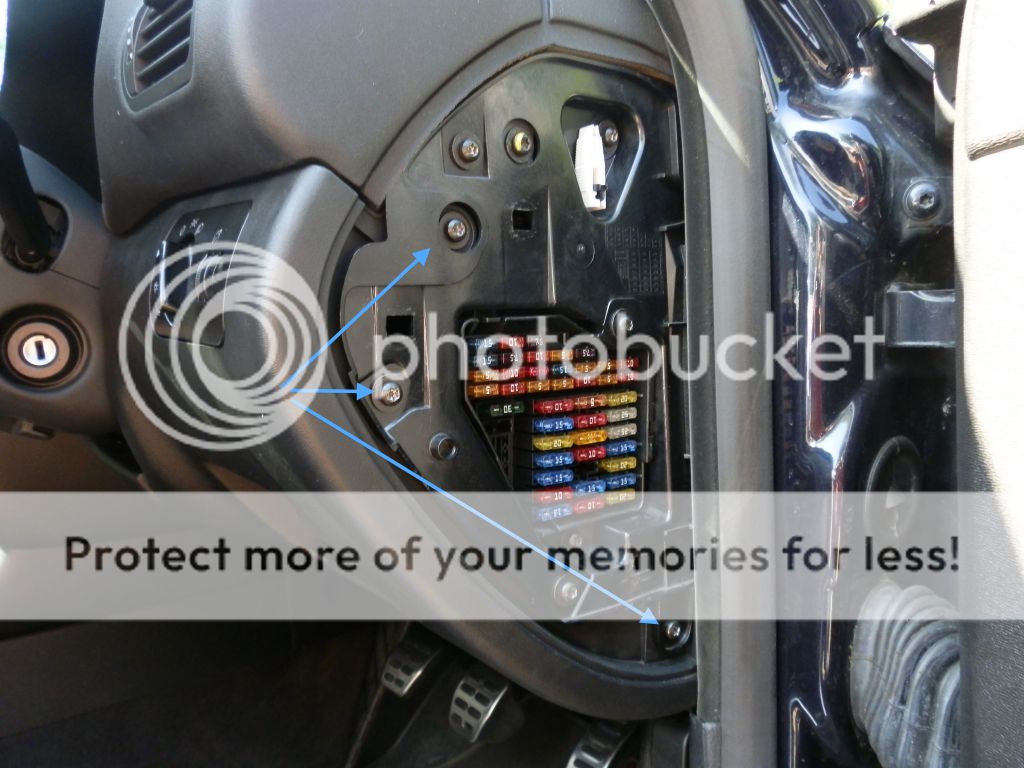
2. Now remove these 3 torx screws.

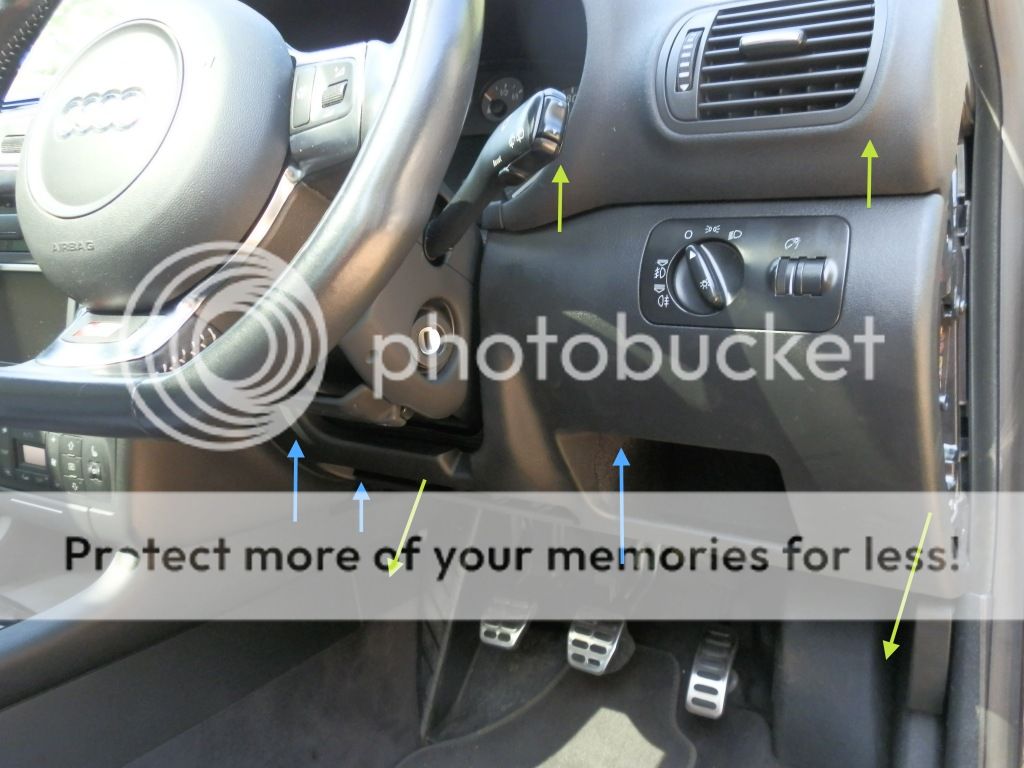
3. You now have a further 3 screws to remove (blue arrows). With these out the way you can gently prise the lower dash surround away from the car. Start by gently pulling the lower part of the surround away from the pedals, you may find that it's quite stiff around the fuse panel end but it will come away. At the same time start to pull the surround up and away from the top. It is held in by two spring clips, one either side of the steering wheel and you simply need to pull the surround away from the dash to remove. The clips can be seen in the next two pics.

4. One here.......
5. ......and one here.

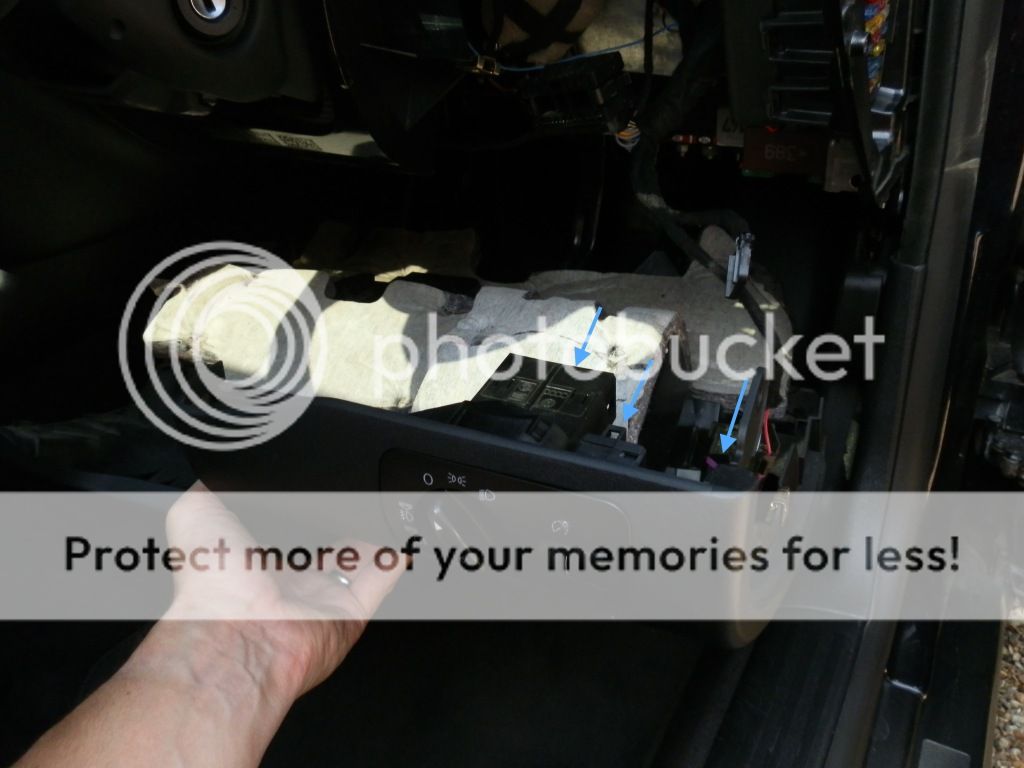
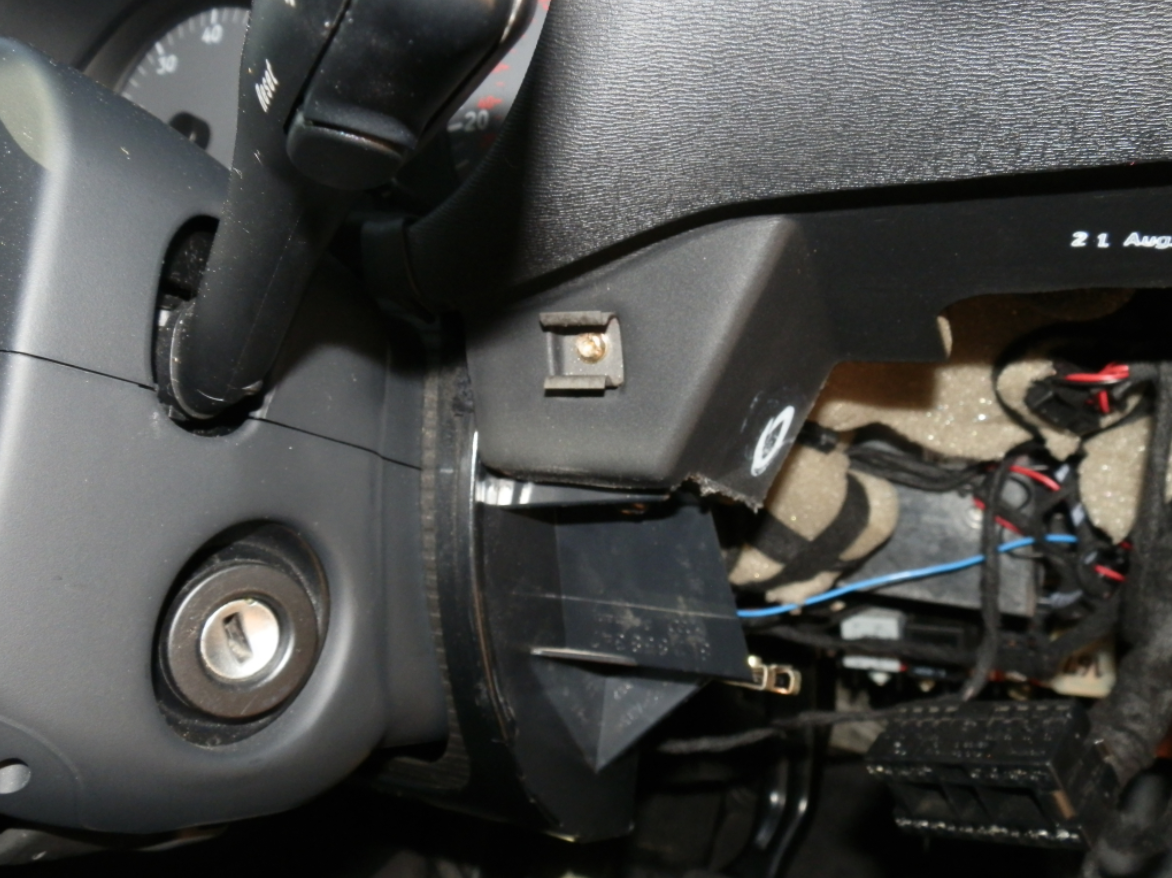
6. The lower surround should now fall away and look something like this. 3 wiring connectors to remove which simply unplug, the headlight switch, dimmer control and VAG COM port (blue arrows). The surround can now be removed from the car.
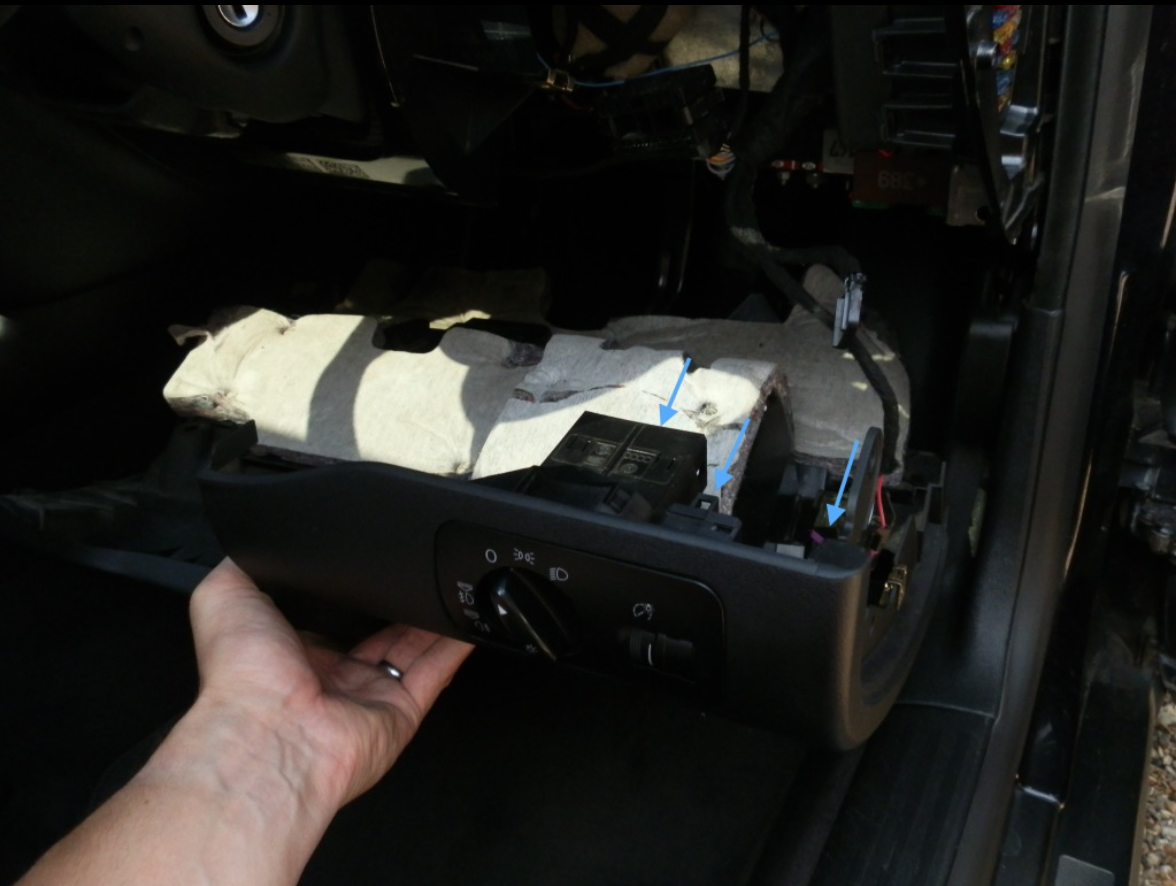
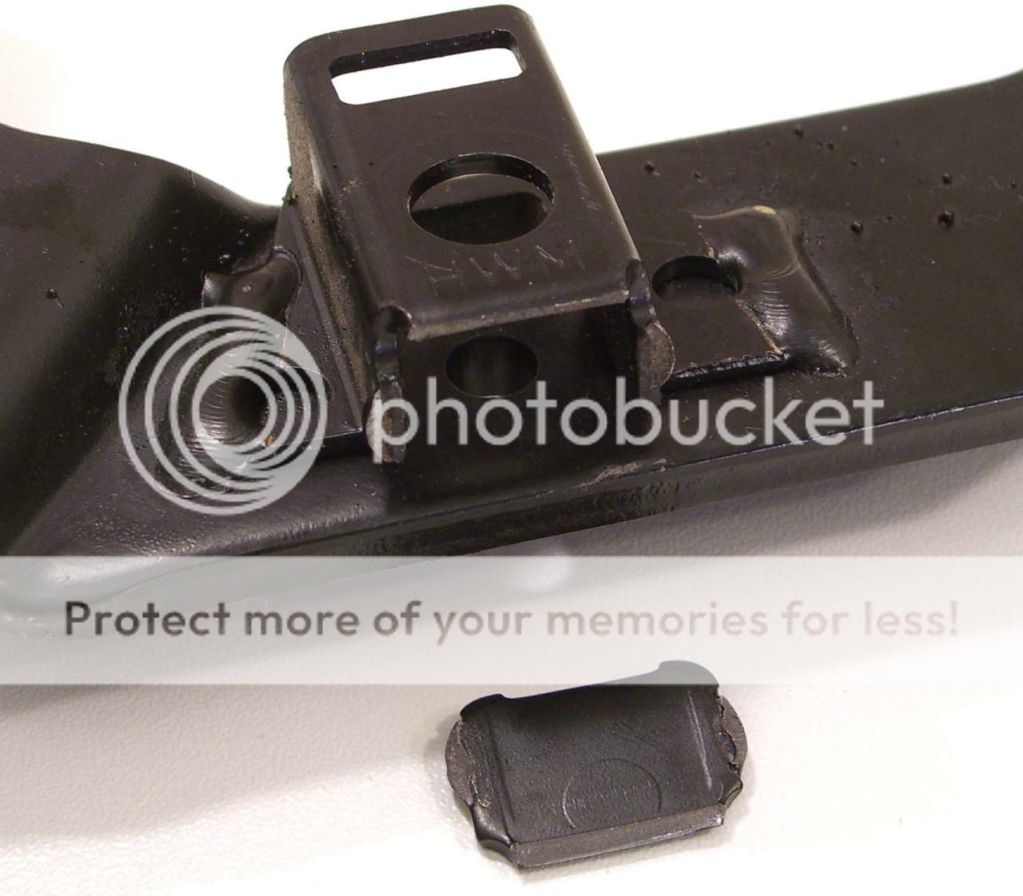
7. Before tackling the clutch pedal it's worth removing this switch. You'll need this out of the way when we come to replacing the pedal. Simply unplug the wiring connector and then remove the switch by turning it 45 degrees anti-clockwise. On my car there was a bit of yellow paint to indicate the position of the switch correctly fitted.
8. If the switch has been removed before it may be quite loose. If damaged new ones can be ordered separately from the dealers. Make sure you take the part number with you as my local dealer couldn't find it on ETKA! Here's what mine looks like. Notice the lugs at the top that hold the switch in place, break these off and it's new switch or plenty of Araldite.

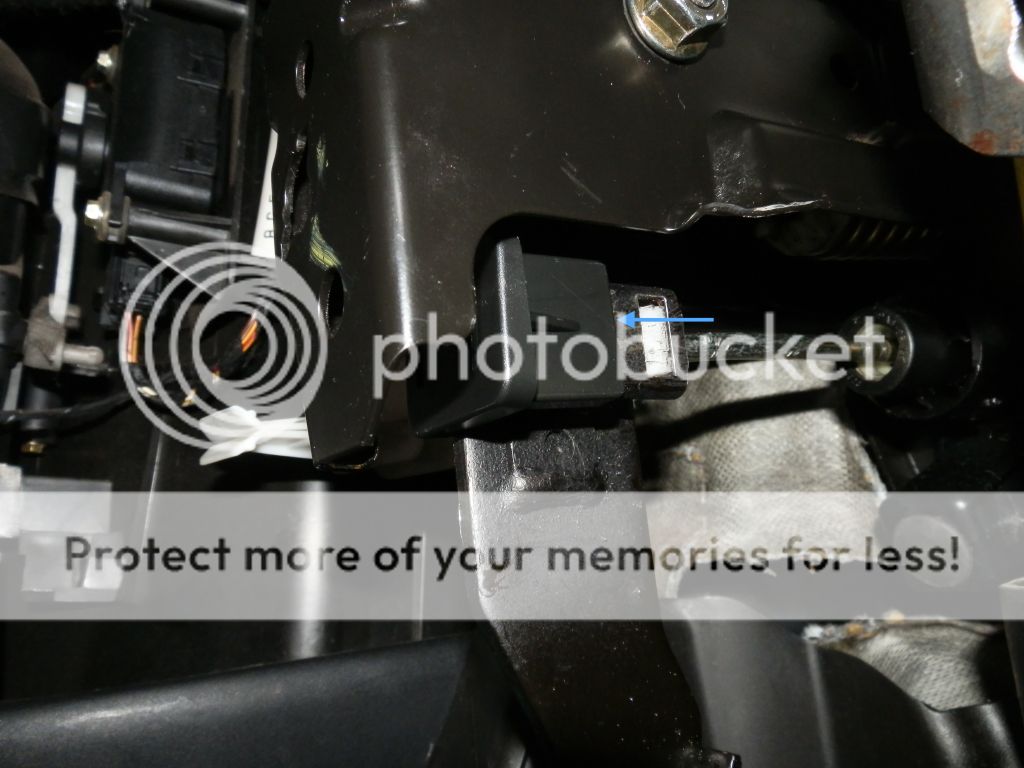
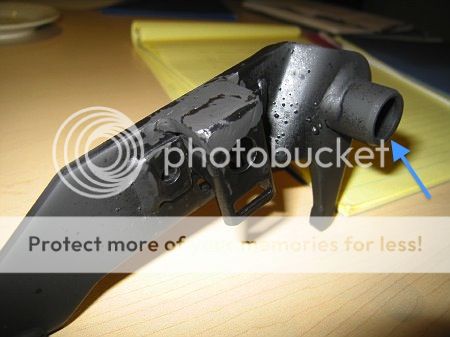
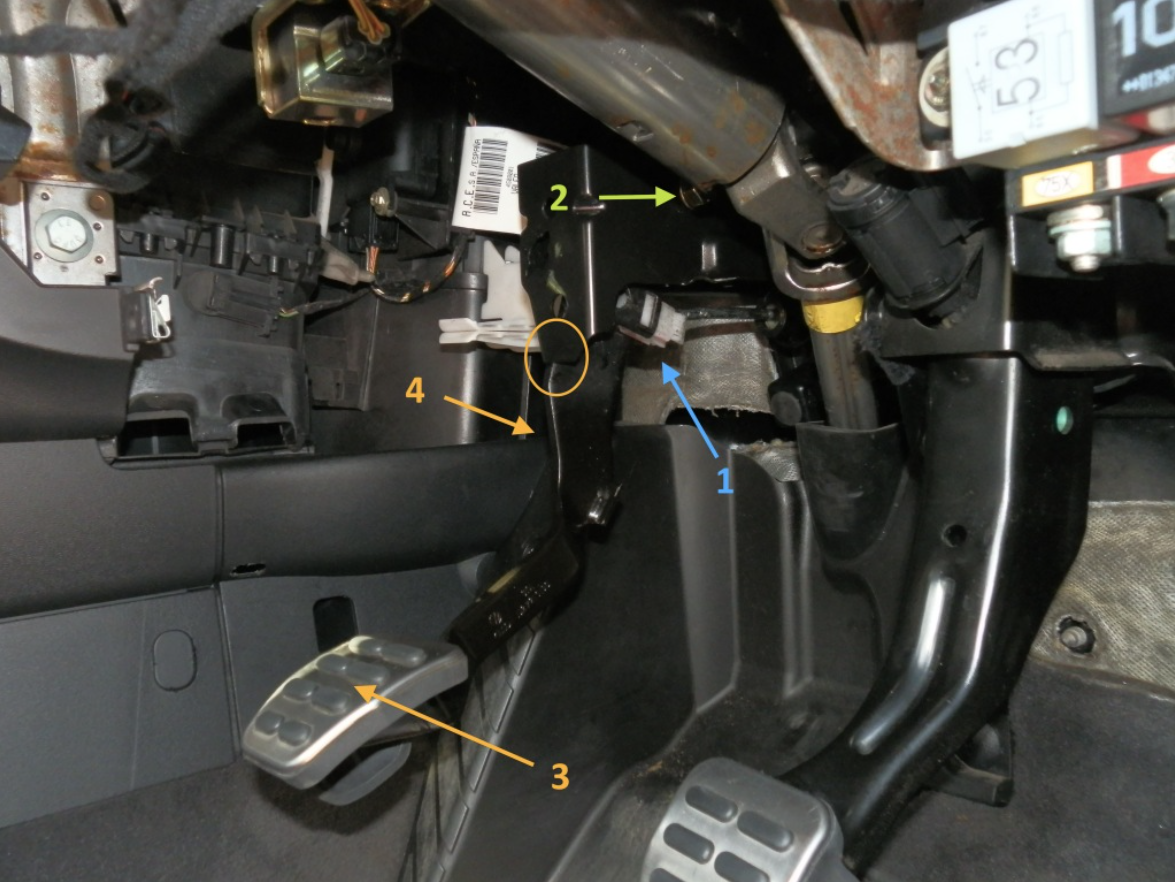
9. If you're pedal is still intact you'll see something like this. Go ahead and remove the nut at the top (13mm) and withdraw the bolt that secures the pedal to the bracket. There is a metal cylindrical shaft that may fall out too once the pedal is clear of the bracket. If the nut is on the other side of the pedal you'll find it tricky to withdraw the bolt as the brake pedal and steering column gets in the way so you may end up cursing for the first time here. Once the bolt has been removed the pedal should still be hanging loose by the master cylinder rod and white clip assembly (blue arrow). The main spring will also have fallen down and needs to be retained.
10. To remove the white clip from the pedal you'll first need to remove this black plastic cover. SImply insert a small flat screwdriver in here (arrow) on both sides to prise it off the pedal. You now need to remove the white clip that holds the master cylinder rod to the pedal. This can be tricky (especially once the pedal is loose) but you need to insert something into the recesses on both sides and allow the clip to be prised away from the pedal. Once out the white clip can be prised off the rod (again tricky but brute force works) and if planning to purchase a new pedal then this white clip is supplied as part of the pedal kit and can be discarded. You've now finished removing the old pedal, replacing a new one is quick and easy.

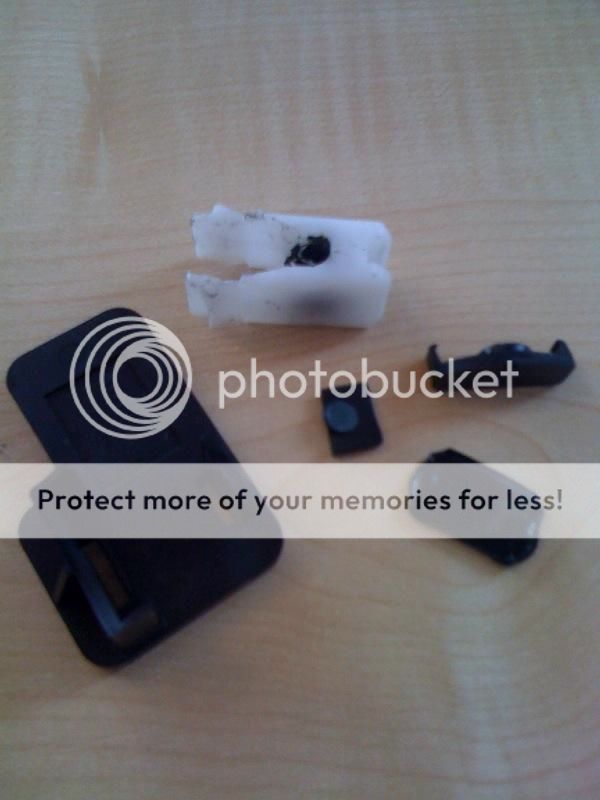
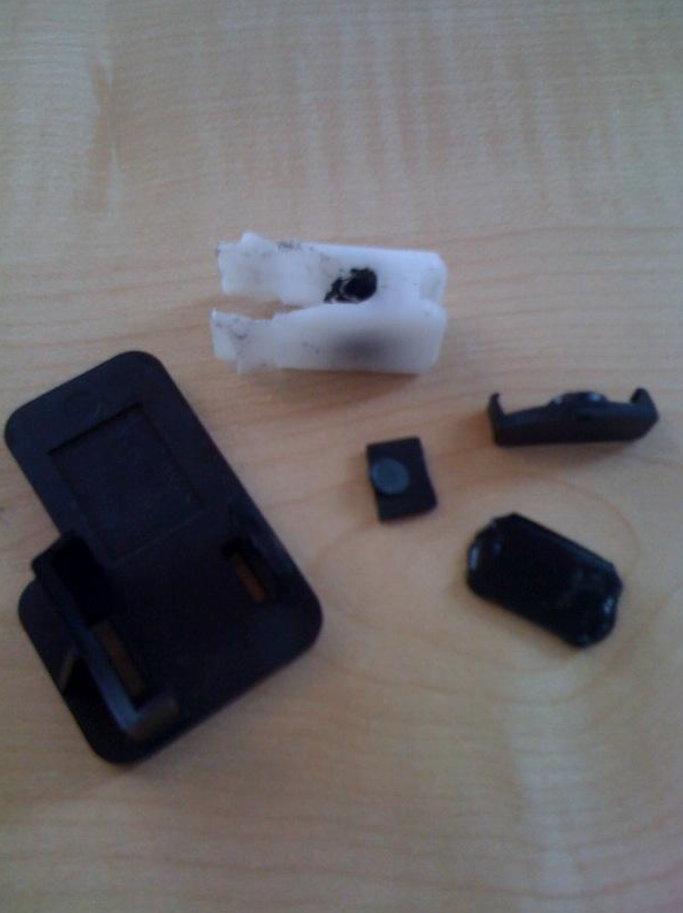
11. If your pedal has snapped you've probably got a selection of these parts on your floor. The only thing you need to hang on to is the large spring. The white clip and black plastic cover are supplied with a new pedal so don't worry if you can't find them.

Your pedal may look something like this. This is the main cause of the pedal failing. The welds simply aren't strong enough and over time this will eventually happen. You could weld this up if you wish but a new pedal kit is only around £25 from the dealers.

13. Although mine hadn't sheared I opted to buy a new pedal and had it welded for extra strength. This is not my pedal but you can see what's required. Before replacing the pedal in the car make sure you insert new metal bushes here (arrow) on both sides. These bushes are not routinely supplied with the pedal so be sure to order them. You could try and remove the original ones from the old pedal but I just bought new ones. They are part number 8 on the ETKA pic at the start of this guide and cost around £0.70 for the pair but without them the pedal will wobble from side to side once fitted. In this picture the bushes and metal cylinder have yet to be fitted.
This is important, if you have welded the bracket you must make sure that the white clip will fit into the recess. If it doesn't remove some of the weld from the inside of the recess using a dremmel or drill bit or simply file some of the plastic away from the white clip. It is essential that the clip slides perfectly into the recess and locks into place so take your time to get it right.

14. With all the fabrication complete we can now refit the pedal to the car.
1) Start by refitting the white clip onto the master cylinder rod. Again this is tricky but you can either use brute force and a pair of pliers or try putting the clip in some boiling water for a while and then snap it onto the end of the rod. Once fitted to the rod, position it into the recess of the pedal but DO NOT push it firmly home.
2) Now refit the bolt securing the pedal to the bracket. It's a good idea to apply some grease to the metal cylinder to ensure it rotates freely within the pedal especially if your pedal has been squeaking. Remember to push the bolt in from the left side as there's much more room. Only tighten the nut finger tight at this stage.
3) Now the clever bit. First pull the pedal back all the way until it rests against the back of the bracket (circle). You can do this as the white clip has not been fully engaged.
4) Whilst holding the pedal back you now push firmly to the right so that the pedal can sit behind the left lip of the bracket. This lip will hold the pedal in place and you can let go and the pedal should stay put (as in the picture). I'm sure this has been designed this way as it holds the pedal perfectly.
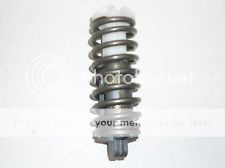
15. With the pedal locked safely back we can easily fit the clutch spring without having to compress and tie wrap it. Before fitting check to make sure the spring is still greased (to prevent possible squeaks) and using your fingers simply slide it up and past the rod and ensure the back of the spring sits perfectly into the recess at the very back of the bracket (circled). The spring will either sit right or be 90 degrees out because of the design of the spring and the recess. You'll know when you've got this right as the spring is held fairly secure and you'll find resistance if you try to twist it. Then just let the front end fall down and rest against the arm of the pedal as in the pic. Notice how the spring rests perfectly in place and how the arm of the clutch pedal fits into the recess on the top of the spring. Now pull gently down on the top of the spring and it will follow the arm of the pedal (arrow) and eventually 'pop' into it's final position with the end of the pedal arm pushed securely into the recess on the end of the spring. You only need to pull down gently on the spring enough to get it moving and there is no risk of the spring firing off into your face as it's not under any tension. The pedal will stay firmly put during all of this process.

16. With the spring securely in place we can now put the clutch pedal back into its usual position. Hold the end of the pedal and push it back down towards it's normal position. You may need to push it firmly as it's wedged against the lip of the bracket but it will move back into place comfortably. As you move it forward you'll hear a 'click' as the white clip locks into place. If it doesn't click and lock into place you have either not trial fitted it beforehand or you have inserted it upside down. As mentioned before if you have welded the pedal you must check that this clip will fit perfectly and this is much easier to do with the pedal off the car and not hanging upside down in your footwell! I had filed some of the plastic away on mine and consequently it was unsymmetrical and only fitted one way round. To make sure I fitted it correctly I marked the bottom of the clip with a red marker.
Remember that once this white clip has locked into place you will not be able to put the pedal back into the locked position. If for whatever reason you need to do this then you will first have to disengage the clip before attempting to pull the pedal back.

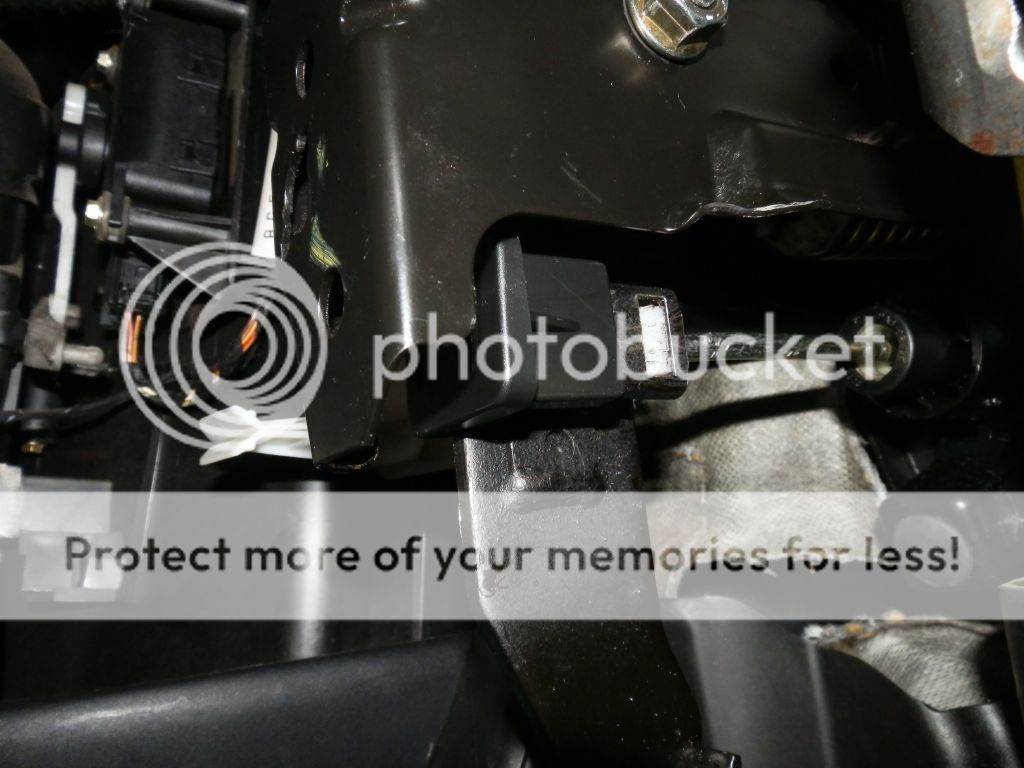
17. With the pedal fitted and the spring in place you can now fully tighten the 13mm nut and bolt. Then refit the black plastic cover which acts as the backing plate for the clutch switch to press against. You can see the mark the switch has made on my clip.....

18. ........and then refit the clutch switch. Be careful here as the lugs aren't that strong and can snap off easily.
19. Refitting the lower dash surround is the opposite of removal.
20. That's it job done! With a replacement new pedal welded and ready to go, this whole job took me about an hour.
Again hope this helps anyone that is faced with doing this. Before I realised you could lock the pedal back it was a right PITA trying to work out how to get the spring in place. Don't know if this is the Audi approved way of doing it but it seems to work well!!
Cheers
Andy
I've found you can lock the pedal right back and then slot the spring into place without the need for cable ties etc. which makes the whole job pretty straightforward.
Have done this twice now and so far no swearing and no busted knuckles!
Hope this helps someone if you end up having to do the same......
For starters here's a pic of the entire clutch pedal assembly for reference.
1. First job is to remove the lower dash surround to gain access to the clutch pedal. If you haven't done this before you start by removing the side fuse cover by placing a small bladed screwdriver in this gap (blue arrow). The cover is held in by three spring clips and hides most of the fuses for the car.
2. Now remove these 3 torx screws.
3. You now have a further 3 screws to remove (blue arrows). With these out the way you can gently prise the lower dash surround away from the car. Start by gently pulling the lower part of the surround away from the pedals, you may find that it's quite stiff around the fuse panel end but it will come away. At the same time start to pull the surround up and away from the top. It is held in by two spring clips, one either side of the steering wheel and you simply need to pull the surround away from the dash to remove. The clips can be seen in the next two pics.
4. One here.......
5. ......and one here.
6. The lower surround should now fall away and look something like this. 3 wiring connectors to remove which simply unplug, the headlight switch, dimmer control and VAG COM port (blue arrows). The surround can now be removed from the car.
7. Before tackling the clutch pedal it's worth removing this switch. You'll need this out of the way when we come to replacing the pedal. Simply unplug the wiring connector and then remove the switch by turning it 45 degrees anti-clockwise. On my car there was a bit of yellow paint to indicate the position of the switch correctly fitted.
8. If the switch has been removed before it may be quite loose. If damaged new ones can be ordered separately from the dealers. Make sure you take the part number with you as my local dealer couldn't find it on ETKA! Here's what mine looks like. Notice the lugs at the top that hold the switch in place, break these off and it's new switch or plenty of Araldite.
9. If you're pedal is still intact you'll see something like this. Go ahead and remove the nut at the top (13mm) and withdraw the bolt that secures the pedal to the bracket. There is a metal cylindrical shaft that may fall out too once the pedal is clear of the bracket. If the nut is on the other side of the pedal you'll find it tricky to withdraw the bolt as the brake pedal and steering column gets in the way so you may end up cursing for the first time here. Once the bolt has been removed the pedal should still be hanging loose by the master cylinder rod and white clip assembly (blue arrow). The main spring will also have fallen down and needs to be retained.
10. To remove the white clip from the pedal you'll first need to remove this black plastic cover. SImply insert a small flat screwdriver in here (arrow) on both sides to prise it off the pedal. You now need to remove the white clip that holds the master cylinder rod to the pedal. This can be tricky (especially once the pedal is loose) but you need to insert something into the recesses on both sides and allow the clip to be prised away from the pedal. Once out the white clip can be prised off the rod (again tricky but brute force works) and if planning to purchase a new pedal then this white clip is supplied as part of the pedal kit and can be discarded. You've now finished removing the old pedal, replacing a new one is quick and easy.
11. If your pedal has snapped you've probably got a selection of these parts on your floor. The only thing you need to hang on to is the large spring. The white clip and black plastic cover are supplied with a new pedal so don't worry if you can't find them.
Your pedal may look something like this. This is the main cause of the pedal failing. The welds simply aren't strong enough and over time this will eventually happen. You could weld this up if you wish but a new pedal kit is only around £25 from the dealers.
13. Although mine hadn't sheared I opted to buy a new pedal and had it welded for extra strength. This is not my pedal but you can see what's required. Before replacing the pedal in the car make sure you insert new metal bushes here (arrow) on both sides. These bushes are not routinely supplied with the pedal so be sure to order them. You could try and remove the original ones from the old pedal but I just bought new ones. They are part number 8 on the ETKA pic at the start of this guide and cost around £0.70 for the pair but without them the pedal will wobble from side to side once fitted. In this picture the bushes and metal cylinder have yet to be fitted.
This is important, if you have welded the bracket you must make sure that the white clip will fit into the recess. If it doesn't remove some of the weld from the inside of the recess using a dremmel or drill bit or simply file some of the plastic away from the white clip. It is essential that the clip slides perfectly into the recess and locks into place so take your time to get it right.
14. With all the fabrication complete we can now refit the pedal to the car.
1) Start by refitting the white clip onto the master cylinder rod. Again this is tricky but you can either use brute force and a pair of pliers or try putting the clip in some boiling water for a while and then snap it onto the end of the rod. Once fitted to the rod, position it into the recess of the pedal but DO NOT push it firmly home.
2) Now refit the bolt securing the pedal to the bracket. It's a good idea to apply some grease to the metal cylinder to ensure it rotates freely within the pedal especially if your pedal has been squeaking. Remember to push the bolt in from the left side as there's much more room. Only tighten the nut finger tight at this stage.
3) Now the clever bit. First pull the pedal back all the way until it rests against the back of the bracket (circle). You can do this as the white clip has not been fully engaged.
4) Whilst holding the pedal back you now push firmly to the right so that the pedal can sit behind the left lip of the bracket. This lip will hold the pedal in place and you can let go and the pedal should stay put (as in the picture). I'm sure this has been designed this way as it holds the pedal perfectly.
15. With the pedal locked safely back we can easily fit the clutch spring without having to compress and tie wrap it. Before fitting check to make sure the spring is still greased (to prevent possible squeaks) and using your fingers simply slide it up and past the rod and ensure the back of the spring sits perfectly into the recess at the very back of the bracket (circled). The spring will either sit right or be 90 degrees out because of the design of the spring and the recess. You'll know when you've got this right as the spring is held fairly secure and you'll find resistance if you try to twist it. Then just let the front end fall down and rest against the arm of the pedal as in the pic. Notice how the spring rests perfectly in place and how the arm of the clutch pedal fits into the recess on the top of the spring. Now pull gently down on the top of the spring and it will follow the arm of the pedal (arrow) and eventually 'pop' into it's final position with the end of the pedal arm pushed securely into the recess on the end of the spring. You only need to pull down gently on the spring enough to get it moving and there is no risk of the spring firing off into your face as it's not under any tension. The pedal will stay firmly put during all of this process.
16. With the spring securely in place we can now put the clutch pedal back into its usual position. Hold the end of the pedal and push it back down towards it's normal position. You may need to push it firmly as it's wedged against the lip of the bracket but it will move back into place comfortably. As you move it forward you'll hear a 'click' as the white clip locks into place. If it doesn't click and lock into place you have either not trial fitted it beforehand or you have inserted it upside down. As mentioned before if you have welded the pedal you must check that this clip will fit perfectly and this is much easier to do with the pedal off the car and not hanging upside down in your footwell! I had filed some of the plastic away on mine and consequently it was unsymmetrical and only fitted one way round. To make sure I fitted it correctly I marked the bottom of the clip with a red marker.
Remember that once this white clip has locked into place you will not be able to put the pedal back into the locked position. If for whatever reason you need to do this then you will first have to disengage the clip before attempting to pull the pedal back.
17. With the pedal fitted and the spring in place you can now fully tighten the 13mm nut and bolt. Then refit the black plastic cover which acts as the backing plate for the clutch switch to press against. You can see the mark the switch has made on my clip.....
18. ........and then refit the clutch switch. Be careful here as the lugs aren't that strong and can snap off easily.
19. Refitting the lower dash surround is the opposite of removal.
20. That's it job done! With a replacement new pedal welded and ready to go, this whole job took me about an hour.
Again hope this helps anyone that is faced with doing this. Before I realised you could lock the pedal back it was a right PITA trying to work out how to get the spring in place. Don't know if this is the Audi approved way of doing it but it seems to work well!!
Cheers
Andy
Last edited: