Removing storage tray / triangle grab handles - which comes first?

s3_trev

Northern Ireland
Joined
Nov 29, 2013
Messages
1,907
Reaction score
659
Points
113
Location
Northern Ireland
Guys I need to remove my HVAC unit and first need to get the storage tray and grab handles out of the way. Problem is, one seems to be blocking the other!

Which one of these is supposed to come out first? Im fairly sure my storage tray is blocking access to two screws near the front, holding on the triangles. And then the storage tray won't pull out because its being blocked by the triangles!

Why is nothing ever straight forward lol.

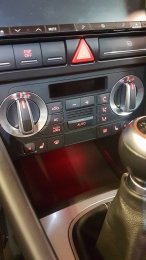
20180929 161353
 
Here we go , under CC there is 2 x 8mm bolts 1 each side holding in knee pads , unscrew them then slide finger along inside triangle u will feel a hole up in there is a long allan key stud , remove that , then remove the other 8mm bolt at the tapered end off triangle do that to both sides then remove ashtray delete .
 
Here we go , under CC there is 2 x 8mm bolts 1 each side holding in knee pads , unscrew them then slide finger along inside triangle u will feel a hole up in there is a long allan key stud , remove that , then remove the other 8mm bolt at the tapered end off triangle do that to both sides then remove ashtray delete .

It's the ones under the CC that I cant access mate as the ashtray delete is covering them. I have the other ones all out.
 
Forget that, I have it out now. Got the HVAC unit out also. I thought the inner screws holding on the triangles would have been in the same orientation as the ones near the gear stick, but they weren't. They were facing straight back. So got nipped in with an extension socket and off. HVAC unit came off easier than I thought. NOW, to add the LED light bar!!
 
Forget that, I have it out now. Got the HVAC unit out also. I thought the inner screws holding on the triangles would have been in the same orientation as the ones near the gear stick, but they weren't. They were facing straight back. So got nipped in with an extension socket and off. HVAC unit came off easier than I thought. NOW, to add the LED light bar!!

Don’t you just love audi?


Sent from my iPad using Tapatalk
 
  • Like
Reactions: s3_trev
Forget that, I have it out now. Got the HVAC unit out also. I thought the inner screws holding on the triangles would have been in the same orientation as the ones near the gear stick, but they weren't. They were facing straight back. So got nipped in with an extension socket and off. HVAC unit came off easier than I thought. NOW, to add the LED light bar!!
Now your fun and games begin putting that little light bar to start with its a hit or a miss and the 2x8mm bolts when putting back in a tip which i think @mechanic69 mentioned somewhere in the post fill the socket with BLUE TACK and push bolt into it cause if it falls off it could be lost in your consoul.
Now that you know how to do that bit just look for a Q3 CC ( part number in post get the G ) and fit it then just get a member to do the Vcds bit and your laughing and it will look nicer as long as you have heated seats .
 
  • Like
Reactions: s3_trev
Now your fun and games begin putting that little light bar to start with its a hit or a miss and the 2x8mm bolts when putting back in a tip which i think @mechanic69 mentioned somewhere in the post fill the socket with BLUE TACK and push bolt into it cause if it falls off it could be lost in your consoul.
Now that you know how to do that bit just look for a Q3 CC ( part number in post get the G ) and fit it then just get a member to do the Vcds bit and your laughing and it will look nicer as long as you have heated seats .

Yeah I lost an 8mm socket into the centre console, still haven’t found it


Sent from my iPad using Tapatalk
 
Yeah I lost an 8mm socket into the centre console, still haven’t found it


Sent from my iPad using Tapatalk
I lost a CC bottom right spring clip down there glad i found a spare on the Q3 CC back , now fitted correctly pita it was
 
Have we now fitted the LED bar and put all back together
 
  • Like
Reactions: s3_trev
Yeah them inner nuts were a right PITA! I actually used some rolled up tissue paper lol done the same thing as the blue tack would have.

Anyway, that's everything back together and working. Thanks for the help guys. I took a ton of photos if anyone needs any for reference.

20180929 190504
20180929 194129
 
Did you take a picture of where the light bar sits under the CC? As I mentioned, this is probably the most elusive pic of all mods on the forum.
 
You done well getting the Red light shining through from underneath but you will need to take it back out and give us one off where the light bar clips goes as @samuelh_888 says :thumbs up::thumbs up::thumbs up:
 
Did you take a picture of where the light bar sits under the CC? As I mentioned, this is probably the most elusive pic of all mods on the forum.

I did mate.

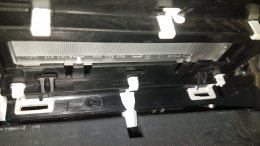
View under HVAC without LED bar:

20180929 184632

View under HVAC with LED bar:

20180929 185455

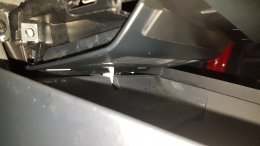
Side view

20180929 185409

View with plastic trim clipped in underneath HVAC

20180929 190431
 
  • Like
Reactions: ch1z64, dk1234 and samuelh_888
Also couple of important things to anyone not in the know. The LED light bar slides into the frame under the HVAC. It slides in FROM the bulkhead side, towards the back of the car. The frame is not part of the HVAC, it's simply located below it.

The piece of plastic trim with the window in it however, actually clips onto the bottom of the HVAC. This piece can be clipped in at the very end. It's actually not essential to even have it to be totally honest, it just looks neater if you looked up in.

And one final thing - I needed to cut the connector (the one that WAS connected to my ashtray but that also is the exact same connection as the LED light bar) and lengthen the lead a bit, to allow me to route it up to its new location. I simply could not get access to strip back the original wire and reroute it. Just needed about a foot extra, which I soldered in on both ends. Done the job perfectly.
 
You done well there :thumbs up::thumbs up::thumbs up:

Thank you mate. I do have more pics but I think there are just duplicates of what I posted.

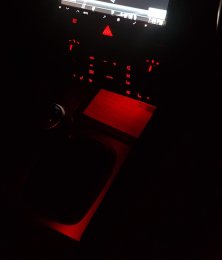
This is a pic with it all in at night in the dark. I think the little piece of paper I had sitting makes the light look brighter than it actually is.

20180929 195023b
 
  • Like
Reactions: samuelh_888
Is it possible to fit lightbar withour removing hvac ?

Sent from my SM-A520F using Tapatalk
 
Thank you mate. I do have more pics but I think there are just duplicates of what I posted.

This is a pic with it all in at night in the dark. I think the little piece of paper I had sitting makes the light look brighter than it actually is.

View attachment 166572
Like Blackpool in September .:yahoo::yahoo::yahoo:
 
  • Like
Reactions: s3_trev
If you have an ashtray, the wires that run the ashtray LED are just long enough to tuck up the back, connecting to the lightbar.

You can't reuse the ashtray light bar.
 
sorry but my question was in error. Thanks for the reply. I never had an ashtray so I am looking for a source for the lightbar retrofit.
 
Does anybody have anymore info on the lightbar part numbers as i tried ordering from TPS and they can't locate it on their system,saying the numbers too short.
 
Does anybody have anymore info on the lightbar part numbers as i tried ordering from TPS and they can't locate it on their system,saying the numbers too short.
Here we go ( The trim piece is 8p0864138a4pk
The LED and light guide is 8p0857355 )
 
Last edited:
omg what a ball ache this has turned out to be.....after stripping my out all the car and trying to fit this i've managed to skin my hands to bits in the process trying to route the original feed to the new led strip. Then going back and re reading @s3_trev post i've now realised i missed the bit about lengthening the feed to the new light. so now have to find my soldering iron and try again. BTW @s3_trev thanks for the write up.
 
omg what a ball ache this has turned out to be.....after stripping my out all the car and trying to fit this i've managed to skin my hands to bits in the process trying to route the original feed to the new led strip. Then going back and re reading @s3_trev post i've now realised i missed the bit about lengthening the feed to the new light. so now have to find my soldering iron and try again. BTW @s3_trev thanks for the write up.
You must have a very short lead cause i thought mine wouldn't fit either but for some reason it did without adding to it. Bummer :thumbs up::thumbs up::thumbs up:
 
omg what a ball ache this has turned out to be.....after stripping my out all the car and trying to fit this i've managed to skin my hands to bits in the process trying to route the original feed to the new led strip. Then going back and re reading @s3_trev post i've now realised i missed the bit about lengthening the feed to the new light. so now have to find my soldering iron and try again. BTW @s3_trev thanks for the write up.

Sorry just seeing this now mate. Oh you are welcome, it wasnt much of a write up! Did you get it all sorted and back together?
 
Just doing this LED and cubby rejig... just to confirm... connector on LED strip on the right towards driver's side? Just making sure I get the diffusion the right way up... Cheers!
 
couple of observations after performing the modification

take some ibuprofen. my back and neck hurt from looking up that cubby.
have a beer handy and drink during the mod as it lessens the frustration
this is an everything out mod. hvac must come out period
as above, the lightbar is inserted by placing it through the hvac hole and then slipping it in the slot from the rear and pushing it towards the back of the car. The connector faces right and the smooth side of the lightbar faces downward. That is the absolute easiest part.
I put in the leather knee grab handles so they lined up somewhat and as expected the two 8mm bolts in the back are a ball ache for sure
To avoid scratching the leather, I placed a piece of thin plastic next to the leather and avoided any marring when pushing in the hvac.
I polished the piano black trim around the gear assembly and treated the leather gaitor
I vacuumed the car and sprayed new car smell and tomorrow will be installing the rear gloss door triangles
Thanks to all for the info prior to my install
 
  • Like
Reactions: samuelh_888
Hello guys! I'm currently on the ashtray delete project and all screws are gone easily EXCEPT for the inner ones of the triangles. After huge efforts I found (I think) the right allen key but again after unscrewing 4-5 times, I can't find them . For confirmation, which is the right allen key size and is there any other tool/technique that I can use to get this over!! Thanks in advance!!!
IMG 20200927 123605
 
Pretty sure it's an 8mm Allen key, what size are you using ?

Don't really know what size it is!! In another DIY post a guy who did this said it's 5mm. Anyways, the problem is I can't end the job cuz I unscrew half-time and then I'm trying to find the screw in the hole again!!


Do you guys to the partnumbers for the LED and storageplate?

LED strip; 8P0857355
Storage Cubby; 8P0863301A4PK
 
  • Like
Reactions: henkkeumus
Don't really know what size it is!! In another DIY post a guy who did this said it's 5mm. Anyways, the problem is I can't end the job cuz I unscrew half-time and then I'm trying to find the screw in the hole again!!


LED strip; 8P0857355
Storage Cubby; 8P0863301A4PK

Thanks bud!
 
  • Like
Reactions: Audream
omg what a ball ache this has turned out to be.....after stripping my out all the car and trying to fit this i've managed to skin my hands to bits in the process trying to route the original feed to the new led strip. Then going back and re reading @s3_trev post i've now realised i missed the bit about lengthening the feed to the new light. so now have to find my soldering iron and try again. BTW @s3_trev thanks for the write up.
Just finished doing this mod... rerouting the cable from the original ashtray LED was by far the hardest part! The cable is on the short side, and getting your hands in to access the space and pull it through is pretty much impossible! I ended up using one of these grabber hook tools (link below) to grab the cable and just feed it through to the back of the din cage... took seconds with this tool and I definitely couldn’t have done it without it as I would have dropped the cable!!!
I definitely recommend spending a couple of quid on one of these tools if you’re rerouting that cable! Also... before you fit the new light bar, it’s worth covering the top side (the frosted side is the top & the clear/glossy side faces down into the storage tray) and back face of the light bar with self adhesive foil as there’s a lot of light leakage into the abyss behind the dashboard from those areas if you don’t... it’s a tip I saw on another feed somewhere and definitely helps make sure you get ALL the light focussed into the nice new storage tray, it’s worth spending the extra 10 minutes doing that.
Flexible grabber tool link