Prawn and BigAls A3 Track Car

Thanks Rich :laugh: nice to see you on here again mate :)

Thanks for the oil gauges as well :) (more on those later!)

Just for the record, am I correct in that VE changes to the engine build are

Anti surge compressor
Small port head
Small port manifold
Stock camshafts (sorry if I missed a post about AGN cams swapped over).

Looking foward tto mapping resuts!

Almost correct Ant :) slightly fewer changes though.

The old engine had the anti surge core too. And a pair of ADR cams.

VE Changes are:

Small port head
Small port inlet manifold
Turbo exhaust cam (I've still got the ADR inlet)

Possibly valve springs. These technically shouldn't effect VE at all, but depending on whether I'd been suffering from valve float previously they could well alter things at the top end. We shall see!
 
So incredibly stoked for you to have it back together again dude. Top work from all the lads chipping in to help too, that's what it's all about :)
 
  • Like
Reactions: Prawn
Now with added bumper :racer:


A few more small jobs this evening. Just taking my time now, as I need a rest :laugh:

Front Lights are now all functional, bumper is on. I've fixed the oil pressure switch and extended the wiring so it's not tight any more.

Just the seats to fit, and swap to road wheels again, then it's drive time!

In other news, Rich started chatting to me today about oil pressure gauges.

He sent me a pic of this:


Which looked very nice indeed. But at over £200, we'll out of my price range.

A few more exchanges, and suddenly I realise how slow I was being to catch on....

....he was offering it for me to buy!

I was keen!


It came with both senders, 1/8th npt for the pressure sender, which I can easily adapt to m10, and an m14 x 1.5 sump plug replacement for the temp sender.


So, after a bit of back and forth, a price was agreed:


I've needed something like this for years, and this is about as good as it gets.

I think it's time to lose the radio, make a custom plate for the centre console, and move the AFR gauge down to the centre too.

In other news, I think my pc680 battery has died.

I've thought in the past that it could well be leaking, but never been able to confirm, and put it down to moisture ingress through the holes in the boot floor.

I've been charging it recently on a proper conditioner, as I've used regularly the whole time the car has been off the road, and despite the car not being outside at all, this evening there was fluid in the wheel well again below the battery, and the tell tale drip on the battery that I'd not found previously!


Excuse the FILTHY boot floor, that's 6 months worth of dust, mud, and grime from all the parts that have been stored in the boot!


I will be contacting Powervamp where it was purchased tomorrow morning.
 
I think we can consider the battery a eeeny teeny step back after about a bazillion steps forwards over the last week! Car is looking awesome and reading your progress again has inspired me to stop ******* about and start cracking on.

Be interested to see how the small changes you're making will affect how the car performs. Are the N/A cams really worth it, whilst my head will be off and in bits?
 
@Prawn id do yourself a reliability favour and check every connector on that engine loom. You've had 2 fail in quick succession so others may be past their best.
 
  • Like
Reactions: Prawn
I have the same gauge for mine (along with boost and fuel pressure, and a couple of other spares). Most of the cost is the sensors. They make some very accurate and good looking gauges IMO. I went with a T piece for the pressure sensor in the oil filter housing and using the spare M10x1.0 in the housing for temperature. The temperature sensor is 1/8" NPT (their pressure sensors are 1/8 BSP btw) but the difference between M10x1.0 and 1/8" NPT (other than the taper of course), is only 2 threads over 1" so it's fine with a bit of PTFE tape.

is the sump the best place to take the oil temp from?

It seems to be good enough for most manufacturers (including VAG). I guess the red hot oil from the turbo will be flowing back into it.
 
  • Like
Reactions: nightroamer
Good info Sam, cheers!

In terms of oil flow, I'm unsure where would be the better take off.

I THINK the pressure sensor take off is post filter, meaning it would also be post cooler also, meaning perhaps not ideal for temp.

In my eyes, sump temp seems like a fairly good place to take it from.

You'll never be able to get absolute peak temp at the bearings, as that naturally just drains down inside the block to the sump.

Sump temp is where the oil is drawing from, so it's as close as you can get to the returning oil temp from the engine, and also what's being sucked up before being filtered / cooled.

Any other suggestions for a good location gladly considered!

:racer:
 
  • Like
Reactions: superkarl
You're probably right - seems logical. I guess I should take the sump off for the third time and tap it for the 1/8 NPT sensor. Damn it.
 
Can anyone give any info in terms of oil flow path?

As my cooler is on a sandwich to the oil filter, I need to know if the stock pressure take off ports are plumbed pre or post filter, and this Pre or post cooler.

I'm told you want to be measuring the oil at the hottest point, which will definitely not be post cooler.

Currently still considering the sump placement as the best idea.
 
I'd have thought that the sump makes the most sense in terms of being a decent representative sample and accessible to boot.

Sump should give a good idea of the general oil temp returning from the block, of the fluid being pumped and let's you know when things are up to working temps. It'd be nice to get an idea of peak temps just as a ballpark so you know what's going on, of course, but you don't want too much going on that you can't simultaneously keep track of.
 
  • Like
Reactions: nightroamer
The sump is subject to highly variable cooling rates

My oil temp sensor came with sandwich plate for fitting with filter

Also port for pressure sensor
 
The downside with adding another sandwich plate is if you have an external oil cooler and keep the standard heat exchanger for faster oil warm up times and then you add one for the temp probe then you'll have 3 sandwich plates. I'm not even sure that would fit would it?
 
my take off read out of what was the blank on the filter housing.
real temps I see.

That's good enough for me. I'll go with that. That keeps the wiring together also.

Whilst 1/8npt COULD go as Sam said above, I've ordered the correct adapters to make sure it's all right.


In other news.......


First drive any minute now!
 
  • Like
Reactions: scotty_24 and Rainbird
Let me know how you go with an adapter for it? The sensor is pretty big so a regular M10x1.0 to 1/8 NPT adapter probably won't work :(
 
I have no interest in fixing the 'Hi officer, these are my details' light :laugh: it's been broken for 5 years :laugh: it's a feature. haha.

In all seriousness, I will do it one day, it's just one of those 'non essential' jobs that's been at the bottom of the list for so long


I'm keen to see if boost builds any quicker too @antwan64og . To be honest, I won't be making use of it if it does, as I'll reign it back with the N75, but I do expect it to be quite 'spritely' with regards to the transition from cruising to boost.

I've currently driven it about 2 miles around town, seen 15psi peak and much wheelspin in the cold and damp on A048's, seeing as I sold my decent wheels and tyres to @VAG-Slag, who promptly attempted to set fire to them!

This morning I loaded on the 'clean' map that was done at Bills last year. Whilst my current map was probably closer to what I'll end up with, I'd done all sorts of technically incorrect hacks to the map comp to alter fueling over the whole range whilst at Dony earlier in the year, so it seemed like a bad idea to start tweaking from an already hacked map.

I'll set the whole map to open loop, and work on the raw fueling table and see where we end up.

The map we ended with at B5 had 20-21 degrees of advance too, so much closer to where I expect to be on the small port. I've knocked an extra 2 degrees off everything on the bottom right quardant of the table too so I'll start at around 18 degrees on WOT and work from there, monitoring the knock light as I go :)
 
  • Like
Reactions: nightroamer
Thanks a lot man, i got motyvation to catch my dream by myself , will try to step by step learn how to get plans of the day how to rebuild my engine and get baby rollin as dream from chillhood
 
  • Like
Reactions: Prawn
So, Friday morning, first drive!

Having sat there for 7 months, I figured the first destination should probably be the petrol station! So I headed to shell for 40L of the finest V-power.

It's only a mile away, but initial impressions were good. It started, drove away from my garage, and when pressed the brake at the end of the road. It stopped too!


I was feeling positive!

I filled up, and jumped back on to complete by 1 mile journey to work. Hardly a huge test, but everyone has to start somewhere, and I was late for work already!


I turned the key, and it very slowly turned over....

It almost fired once, but it wasn't to be.

I called Andy, who popped over in the Amarok to jump start it.

Whilst waiting I took another photo :laugh:


I guess I shouldn't be too surprised, seeing as I found this battery under the sink at work!


Nobody knows where it came from, and apparently it's been there for over 3 years :laugh: I did charge it, but clearly it wasn't amazing!

I did head out briefly on Friday night, but that was cut short by a minor incident involving an oil cooler hose and a fan. The less said about that the better :laugh: I needed to change the oil anyway :racer:

So, 1 new oil cooler hose later, and some degreaser, and I was ready for a first proper test drive this morning.

Sam had volunteered to drive the laptop whilst I drove the car. Between us keeping an eye on absolutely everything we possibly could.

I'd loaded on the map from Bills, as it was a great known starting point. I removed 2 degrees of timing (down to 18) and took out all the boost to be safe, then headed out to warm it up.

The car was feeling good. Everything drove as it should, the gauges were telling me good safe things, I was feeling happy :)
 
  • Like
Reactions: nightroamer
En route to the chosen mapping location, we passed a spot I often used to stop at back in Summer. So I couldn't resist a few pics!


Already, it was SO good to be back!
 
  • Like
Reactions: A19quattro, desertstorm and <tuffty/>
Time for some time tuning!

More a baseline session to be honest, to work out where I am, how it's running, and what I need to do.

I was pleasantly surprised to find, it wasn't a million miles off already!

First run. Bills map from the AGU. -2 degrees timing. Zero boost duty:


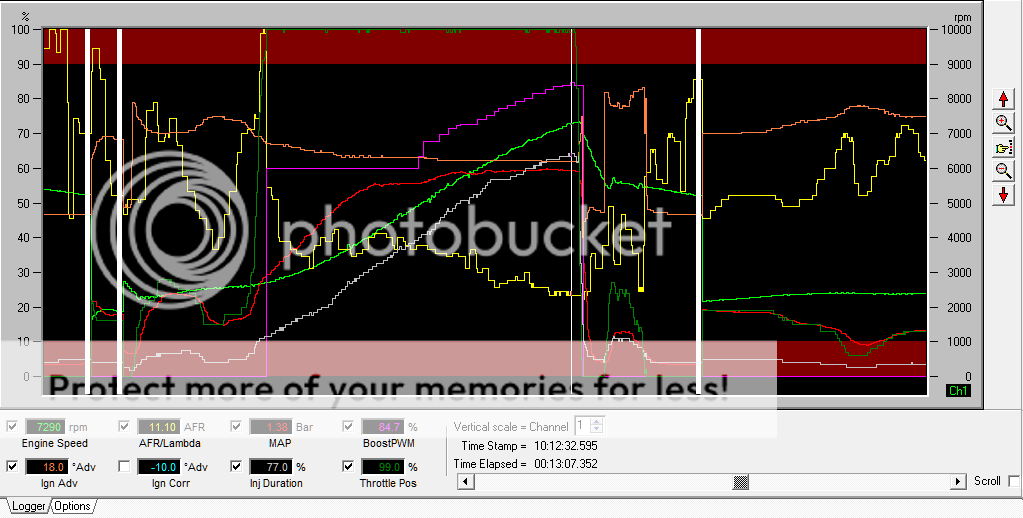
Actuator pressure appears to be a shade below 10psi. Very little boost, so the emerald doesn't pull mug timing out, so it ran around 24 degrees on this pull. No knock.

AFR was around 12.8 at spool, tapering down to 11.4 fairly smoothly. The graph may look a little up and down (yellow line) but the scale is pretty stretched, so the variations are only just over 1 AFR point.

Egt was low 600's. Sodd all.

Good start!

So, to get an idea of what it'll do with duty, I dialled in 40% across the range, and ran again:


Boost peaked at 0.9 bar, and held pretty flat. Obviously it felt a good bit quicker too :)

Ign correction pulled out a little more due to the higher boost, with around 23 degrees advance over this run. Still no knock. Egts high 600's

AFR got a tiny bit richer due to the increased boost, but still well within safe ranges.

Due to the way emerald works with map compensation, I find it easier to get to your desired boost levels, so long as the fuelling remains safe, and THEN start tweakig the fuelling tables, as you're then tweaking for the area it's actually going to use the most. Rather than tweaking it for perfect fuelling at actuator pressure, then allowing the compensations to sort it out higher up.

Everybody is different in their approach though, It's the end result that matters.

Next up 60%. This is where we really started to feel a difference :racer:


Boost came in mich faster as you'd expect, and peaked at 1.25 bar around 5k, before falling slightly to 1.17 bar at the top end. This is a pretty typical boost profile when running a single fixed duty cycle.

Timing with the higher boost was 20 degrees. AFRs were running well still, with 11.3:1 at the top end.
Still fairly rich, but I'd rather be rich than lean. Once I'm happy with the boost profile, I'll add some timing, before finally leaning the fuelling out to high 11's.

Egts still not broken 700.

I decided it was time to find out if the actuator we'd thrown together was going to be up to the job, so I started upping the duty cycle at the higher revs to see if it was capable of holding shut at higher boost and high rpm.

I could kind of see where this was heading, so for the first one I wasn't too shy and ramped it straight up to 76%:


1.3 bar top end. Getting there. It certainly felt like MY car again! this was exciting :racer:

AFR still tapering down to 11.2, so plenty of scope to lean it out. Timing at 18.5 degrees, which is about where I expected to be at this boost. Still no signs of knock, and feeling great! Egt 709. Still going well!

Next up, 85%


1.38 bar at the top end. Exactly 20psi, and feeling GREAT!
A few small wobbles on the fuel trace, none out of a safe range by a long way, but something to tweak when I'm ready.

EGT 711. These EGTs with the small port head are looking promising!

My dinner is ready now :laugh:

To be continued.......

:racer:
 
  • Like
Reactions: boost-addict and Alex C
Not surprised that Powersonic battery let you down. If it had been sitting around for 3 years it will have been well past it's best. And even at it's best a normal SLA battery is nowhere near the performance levels of a Hawker/ Odyssey battery.
I had a robot in robot wars for three years and started off with powersoncic SLA batteries and later switched to some Hawker Genesis PC535 batteries. Although they can be operated in any position they do have vents on the top of the battery that open if the batteries are charged/ discharged really quickly. Better if they are mounted upright.
Demon Tweeks / JJC look like they have a sale on as £80 is cheap for one of these.
http://www.ebay.co.uk/itm/Odyssey-E...Oval-Rally-Motorsport-Dry-Cell-/301213254470?
 
  • Like
Reactions: Prawn
Cheers Carl! I had bonuses you'd been on robot wars, that's pretty awesome!

I'm sending the pc680 back to Powervamp, as it really shouldn't be leaking at all. The guy I spoke to reckons it's highly likely they'll replace it.

Back to mapping, next up I tried 90%. I forgot to save an image of the log, but basically, a little more midrange, not no change top end. I suspected that the actuator was being blown open.

A final run at 95% confirmed this:


More midrange, 1.41 bar peak, but this resulted in the WG being blown open slightly earlier, and as a result top end boost slightly lower.

Fuelling wasn't too bad still, aside from one spike to 12.8 at 5800rpm, and it's going a bit TOO low at the very top, at 11.1.

Egts still remarkably good! Peaking at 712 degrees over the whole run.

I've not added any additional preload yet, so that could well be the answer. But if it isn't, I'll be getting a slightly stronger actuator via Dan/ BBT :)

Realising that ~1.4 bar was my lot, I made a minor effort to address the few lumps on the fuelling curve.

The lean spike at 5800 was easily fixed, adding +2 to the fuelling table at 5750. I think the lean spike was occurring at peak torque, where fuel requirement is highest.

I also removed a few digits from the fuel table above 6k to try and lean it out slightly.

I only did one pass after this, but this was the result:


The lean spike gone, and top end raised to 11.3. Still plenty more to lean out yet, but it's a start.

You can really see how injector duration changes after peak torque too, with the injector duration dropping right off after 6k, despite the fuelling still getting richer.

Injectors are currently at 74% DC, so plenty left in them, it was 81% dc currently for 370bhp, so I'd assume it's somewhere around 330-340 as it is. It certainly feels good :)

MOT tomorrow, and more driving. I'll update after I've tweaked the actuator and run again :)

It really is SO good to be back in it again!
 
I also need to start logging on 4th again, or up hill, as 3rd gear
Runs on the flat have become too short and the graph looks too squashed on the scale!
 
  • Like
Reactions: boost-addict
Glad to see it back on the road. Remember the first build well... Numbers look good. Not that im able to do any tuning like you. But from what your saying getting over 370 from previous set up looks like it'll go to plan... Excuse me as i havent read all of this thread. If any of the above was said already... But defo looks good

Sent from my LG-D802 using Tapatalk
 
  • Like
Reactions: Prawn
Happy days Nick great effort!

You know the oil filter flange take off for a oil temp gauge, what thread is it?

I have a oil temp sensor sump plug adaptor, and I hate it for obvious reasons.


Cheers
 
You know the oil filter flange take off for a oil temp gauge, what thread is it?

Both the pressure sensor port and the spare port are M10x1.0. The issue is most temp sensors are 1/8" NPT and getting a suitable adapter that accommodates the, often large, probe on the sensor can be hard. I've not found a suitable one. As 1/8" NPT is very close to M10x1.0, I'm probably going to have to run the sensor as-is in the housing with PTFE tape. Not ideal but quite a few have got away with it.
 
  • Like
Reactions: scotty_24
I see what you mean now about the adapters Sam, I hadn't understood that before.

I've got an adapter that's arrived on Friday. I'll see if the sensor will screw into it when I get home this evening.

it may be a case of drilling out the centre of the adapter slightly. I'll see what's possible and report back.

Just changed the plugs for a new set of BKR7eIX this morning, I'd left @Nathan Barnes old coppers in for the first start and drive, just incase it lunched itself and ate £35's worth of plugs :laugh: I was getting a very slight plug missfore when we reached 20psi, exactly as I used to when my coppers got too old, so that should be all sorted.

2x H7 main beam bulbs purchased, fitting those in a minute, then I'm off for the MOT!

Wish me luck :)
 
  • Like
Reactions: nightroamer and g60leigh
you feel more torque from the smallport?

I couldn't say at the moment Bill, I've not really ramped any boost in lower down at all, just focused on testing it at the top end to see if it's worth continuing with this actuator.

Once I work on the 100% DC area pre spool and get it going I won't really know. It definitely feels pretty responsive though :)
 
Both the pressure sensor port and the spare port are M10x1.0. The issue is most temp sensors are 1/8" NPT and getting a suitable adapter that accommodates the, often large, probe on the sensor can be hard. I've not found a suitable one. As 1/8" NPT is very close to M10x1.0, I'm probably going to have to run the sensor as-is in the housing with PTFE tape. Not ideal but quite a few have got away with it.
M10 x 1.0 temp senders available here:
http://www.dtafast.co.uk/dta_products/fluid-temperature-sensor/
M12 in the picture, but M10 x 1.0 also available.
 
  • Like
Reactions: scotty_24
Sorry, I should have said; This is for an SPA design gauge (both myself and Nick). I presume it'd just be a 0-5V sensor but even then, I'd have to faff around with connectors. I think I'll just use the 1/8" NPT, as I say many have been successful with it.
 
Passed :racer:

Had a really good little drive there and back too, although the roads were FILTHY!


Car feels good, t was absolutely flying this morning! Now having not had it for so long it could just be that I'm not used to the power, but it certainly FEELS very urgent!

From cold today (once warmed up fully of course) it was boosting slightly higher too, seeing 21psi at the very top end. I'm reasonably confident that a bit more preload on the actuator will do what I want.

I also saw this whilst the MOT was being done. Anyone recognise it?

 
  • Like
Reactions: <tuffty/> and snowy

Similar threads

Replies
26
Views
8K
Replies
6
Views
4K
Replies
10
Views
4K
Replies
166
Views
20K
Replies
40
Views
4K