Had a very busy weekend, Saturday was Modified Nationals which was awesome as usual, shame there’s no ASN club stand that would have been good to be a part of saw quite a few nice 8L’s along with some other modded Audi’s

Sunday I gave Sam @Grundy a hand getting his engine ready to pull out

9dac776ad053238c2f90e846594bc887.jpg


7a2841c95843d44f12fba3181811206a.jpg


it’s now ready to lift out and put on the stand ready for it’s transformation, also spotted a nasty crack on the transfer case. lucky escape there I think, it no doubt would have ended up like Tuffty’s before not too long

14d1de3aabda2f78f58908502f7e3b35.jpg
 
  • Like
Reactions: Grundy and ToughlilT
Replaced my engine mounts today with some Vibratechnics fast road mounts which was a surprisingly easy job took me around 1.5 hrs, not rushing and taking pics along the way

I started by removing the strut brace, air filter/MAF and cable trunking lid. Then on the other side I removed the plastic cover, charge pipe and removed the bolts for the expansion tank and Power steering reservoir so they can be moved out the way.

a7160778acb53fe4eab29c9e4098d216.jpg


2ffd1383d52f4b4d04779dd204ce91ff.jpg


d4bbc6744f81ddca6986be331e040942.jpg


2dd913f25a44b7b67b8f395725b5a9a0.jpg


I started on the gearbox side and placed a jack under the gearbox to support it. Then removed the two 16mm bolts to chassis and the 13mm smaller bolt at the top. Then removed the two 18mm mount to gearbox bolts and dropped the gearbox down slightly to allow the old mount to pull free.

251fb4c07a10e1c754808c433e63fd77.jpg


Then fitted the new VT mount in place and used the two 17mm bolts with a little threadlock to mount to chassis hand tight. Next I put the in the two new 18mm bolts with some copper grease around the sleeve and a little threadlock on the threads. Jacked the gearbox back in place and torqued the chassis bolts to 40nm plus 90 degree and the gearbox bolts to 100nm.

0b141adcb6f547e166b39d92752c721b.jpg


Refitted the trunking cover and air filter. That side’s now done.

Drivers side is basically the same with the exception of a small bracket which needs removing first and swapping over to the new mount. I moved the jack to the engine side but I didn’t need to lower the engine this side to get the mount out, just move the expansion tank and PS reservoir out the way and it came straight out.

56308e1de07e6e4cd486a4093e7cb979.jpg


9e58428e0ecbfb4c7690c78fee55deaf.jpg


09e66e0846cfe85d026b5fde4ddc7b31.jpg
 
Last edited:
  • Like
Reactions: Kuzini
6189ea10d6fc176cf2290c94c7395cd0.jpg


Bracket swapped over
2aa43e643a6ba3bab0449c558e40d3c2.jpg


f50d782c1ae037ecc6f2ffaffc56da08.jpg


Once torqued up, refit the 13mm top bolt on the bracket then bolt back the PS reservoir and expansion tank. Refit the charge pipe and covers and that’s it

6c51cacc63d9fd6375ab305731378d38.jpg


I was a little nervous on first start hoping there would be no vibration, and,,,,,,,,, Success nice and quiet next job road test

Bolts:
18mm mount to mount 100Nm, part number: N10209603
16mm mount to chassis part number: N10516701 (17mm VT bolts provided) 40Nm + 90 degrees
(N10516701 bolts are not needed when fitting VT mounts as they supply the correct size bolts)
 
Last edited:
  • Like
Reactions: Kuzini, warren9022, S3AMJ and 9 others
Next little job on the list, albeit a bit of a boaring one. I had the 4 beeps of death on the alarm siren literally as soon as I’d finished fitting the engine mounts last week lol. Ain’t it strange how that happens, you get one job done and guarantee something else pops up straight after, haha.


Anyway I couldn’t order the replacement batteries from Maplin now that they’ve closed their website so after a bit of looking round I went with a replacement from a seller on ebay. For anyone in the same position they’re Kinetic MH170B3AL3, NI-MH 3.6v 170mAh battery (x2)


I started digging around in the boot compartment expecting the alarm module to be in an obvious position lol, hell no that thing is buried deep. Even after removing the CD changer and sub it took me a while to find it, haha

7045E749 1C8B 417A BBFF 729CF51B7BD9


Thankfully ASN has some good guides :) the batteries I bought didn’t quite fit inside so after opening it up and soldering new wires on the terminals I mounted the batteries on the outside.


Some pics of the process:

The mess inside
FA3B3F6D DDBB 46CE A250 EF4714447308


Old prongs cut off, cleaned up and new wires soldered on
A804EC96 7250 4C43 8BE8 48C5BCCE6D9D


Soldered the two batteries together in series with a short piece of wire
20FBFD46 923F 4F05 9264 B984965CCD47


Soldered the +ve and -ve from the PCB
ACCA29DF AD0F 40BB 95A0 1B5826DD7879


Hot glued the batteries together and the terminals for protection
603961C8 FA78 43C7 B206 FAB57A942F14


Hot glued the alarm case back together and wrapped it with rubber self amalgamating tape along with the battery and mountd the battery to top
55A0B672 8741 45C3 9CC9 BCC6C75DA0A5


Then put it all back together with the exception of the sub and CD changer as I’ll be replacing the whole audio system soon


Loads of room in there now :)
CDC2A60F 1B5E 4BE1 9E65 6017E245BDD2


3105FD8A 93DC 4FF7 A803 46010387F5AD


Now waiting for the next job ;)


Steve
 
  • Like
Reactions: scotty_24, hydro s3, ToughlilT and 6 others
I had a delivery last week which I’ve been looking forward to fitting

25D8063C 2953 4C9F A049 436215EBFB0C


I’ve been wanting to buy one of these HPA controllers since they were released a few years back but never had the opportunity until now so I’m chuffed :)

I hope I’ve fitted it correctly as it doesn’t come with any installation instructions lol, it’s pretty straight forward really, plug and play. I also bought a 9” battery earth cable just in case the Haldex earth strap was broken, I’m glad I had now as the one on the car was indeed broken

1E627B35 A366 40D1 8025 B937DB4FE95E


New one fitted:

73076B44 A31D 4BFA 95BE B7648E1FCA2A


I cleared the boot and removed the grommet which the Haldex electrical cable runs through. There’s two 8mm bolts at the rear of the Haldex unit securing the electrical plugs which needs separating so the new loom can be connected in.

D200F2AE 8197 4EE7 B6E7 00649116A0B8


1FC9E244 1F3C 400A 83EA 7085CE37F4E9


Once connected I gave the connectors a few wraps with rubber self amalgamating tape for extra protection from moisture and routed the cable through the grommet into the boot.

1ABCA696 E19F 44C6 A043 40375B38914D


AB78A1C5 EB8F 4488 812C 3BF53616A858


I decided to mount the control unit in the drivers side compartment so it’s hidden out of the way and taped the cable to the boot floor.

FDA27B29 99D1 4AE7 9B77 ADB4E9F8C727


Now time to fit the tablet :) unfortunately due to it’s size there’s nowhere practical to mount it other than on the windscreen mount it comes with (or stick it in the glove box) A while ago I’d fitted a 12v 3 way extension under the dash on an ignition live which I have my dash cam and speed camera detector plugged in to so it just needed plugging in there and the cable routing up to the center of the dash.

D3FAB072 C5F3 4D8A 978F 32CDE9411FC4


All fitted and communicating as it should so just need to get out now and have a good play


I also added an alloy dipstick finisher to neaten up the engine bay

606A6D26 1F16 4BD1 8C6B 4CAF8B51BA1C


I’ve got a long list of jobs I wanted to get through today but tbh I cba and just want to go for a drive instead lol :racer:


Steve
 
Last edited:
  • Like
Reactions: SamHendry, Kuzini, Grundy and 3 others
Unfortunately my fun drive was not as fun as I’d hoped :( I’m pretty sure there is indeed a fault with the Haldex system somewhere. For the last few weeks I’ve been loosing traction on boost. I know my Haldex has been engaging or at least up until very recently because I could feel the back of the car recently started to twitch/fishtail a little when it engaged (I started a thread on here a few weeks ago) but after making some alignment adjustments as suggested it seemed to have been behaving (no fishtailing) although I was still loosing traction on boost. I’ve had no fault codes relating to the Haldex. I’d just assumed all four wheels had been spinning as the power delivery is quite aggressive and comes in early, although it had never done this before I suspect something on the Haldex system (probably the pump) had been starting to fail causing those issues and gradually getting worse to the point it’s now not working at all

Is there a way of testing the pre charge pump and factory Haldex controller with VCDS?

If the pump or controller failed would it not throw a code?


Steve
 
  • Like
Reactions: Grundy
When mine went I got the garage to lift mine on the lift a put in 1st only the fronts span fitted new haldex and all four were spinning
 
You can run pump tests in vcds

Thanks Karl I’ll have a play around today :)


When mine went I got the garage to lift mine on the lift a put in 1st only the fronts span fitted new haldex and all four were spinning

I’ll see how the pump tests go. Did the clutch pack go in yours TJ? I suspect I’ll end up having to replace it too


Does your HPA controller include any logs etc?

Na I don’t think so Stuart
 
I tried explaining BCD’s test to the garage but in the end just had to tell them to do it that way I just swapped the controller on mine, if yours was faulty anyway maybe the hpa just finished it off
 
I’ve done the output test on VCDS, the first time it worked but the pump sounded quite ropey to me, not a smooth consistent humming. I tried to connect again but kept getting “No Communication With Controller” error. After closing VCDS and switching the ignition off and back on again I tried again and it did connect this time


What do you guys think? To me that pump sounds a bit dodgy and it looks like the controller is playing up if it doesn’t always communicate


Steve
 
I fitted one too but dont know how to test it? I am concerned I used washers or bolts which are not good conductors? also did I remove enough paint etc?

https://physics.stackexchange.com/q...ainless-steel-a-poor-conductor-of-electricity

suppose a continuity test from the post to the haldex casing away from the cable is the test. but remember that the first TT / S3 haldex units didn't have an earth strap at all?

is it possible the connector is damaged / corroded? I want to check mine on my TT, it looks accessible.
 
Deffo doesn’t sound right.
Given the no comms error that might be the issue. Open, clean and close all the connections. Consider an oil and filter change. Before your last resort, a new controller
 
  • Like
Reactions: S3 Hilife
Deffo doesn’t sound right.
Given the no comms error that might be the issue. Open, clean and close all the connections. Consider an oil and filter change. Before your last resort, a new controller

Thanks SK :) I have bought a working replacement controller and pre charge pump (just in case) along with new gasket, oil and filter etc. Think it was last done around 20k miles ago so it’s not going to hurt. I’ll get it off and check or replace everything next weekend now and hopefully get it working properly again :icon thumright:
 
This little lot is going to keep me busy this weekend :)

2927E796 2BA2 48D1 962E 921A8ACFB006


I bought a used Haldex charge pump and Haldex controller to replace my faulty ones. They were still pretty manky looking and I wanted to make sure they were all good inside so I stripped them down and gave them a good clean including all the pieces to the fluid regulating valve, then reassembled with a splash of paint. It surprised me how filthy the mechanical parts get inside and definitely benefited from a thorough cleaning. Now they look like new inside and out :icon thumright:

I did do quite an in depth write up (with plenty of images) of how I stripped and cleaned both the controller internals and pump, if it’s of any interest to anyone I’ll make a post when I get a few minutes
 
Last edited:
  • Like
Reactions: tomjol, superkarl, hydro s3 and 4 others
It was MOT day yesterday so I thought I’d go early and try to get a couple of scenic pictures in King’s Lynn town before it got too busy. I took my Nikon D3400 as well as the Iphone 7, the difference in image quality is quite obvious, even after reducing image size to upload on here


King’s Lynn docks
00B99B6B 8A0D 47F3 9F89 79F535ED18FF


A128CB1E C04F 4BB5 B4A8 52BBB7B41DD0


81F8F772 C8F1 43A4 A659 F34EA854F4B0


C374DE13 F0A9 4E5C 9C30 2DBBE9C6DFBE


Arrived at the test center
65C435B1 7AC0 4C10 B959 EB4784E0DDB5


1A7BBAF7 9D44 48D9 BF32 DDA190EC1291


Passed with no faults or adviseries :yahoo:and It was nice to hear that my 16 year old car is in better shape and better maintained than most newer cars :)

The haldex has been working great too since the remedial work which I’m relieved about so no more front wheels spinning when boost kicks in. I’ve not put it through it’s paces yet to test the new HPA controller as I wanted to make sure everything was working as it should first.
 
  • Like
Reactions: voorhees, Maz, S3JACKSON and 5 others
Class, who supplied them?

I believe they were from this seller

https://rover.ebay.com/rover/0/0/0?mpre=https://www.ebay.co.uk/ulk/itm/263039250149

Unfortunately I can’t confirm that from the mobile app because they were purchased some time ago. They do require spigot rings to reduce from 73.1mm to 57.1mm and ideally need “Tuner” style taper bolts as the bolt holes are very narrow (M14 x 1.5 x 28mm without spacers or M14 x 1.5 x 40mm with 10mm spacers)

Just be aware that this flat Bronze is not a factory colour so if you do happen to need any touch up you will need to have it matched. I messaged the supplier who really didn't want to help identifying the actual colour

Steve
 
Last edited:
Fancied a change so swapped out the black Audi rings on the front grill for a nice new chrome one, the old chrome one was looking a little tatty. It’s amazing how different the car looks just by changing the colour of the rings. Not sure which I prefer tbh but I do like the all black grill look personally :)

C70C1C8F C2BD 47A3 881C 746EF648139A


There’s one thing that’s been bugging me
since I fitted the Zinram cat back. The only thing I think let’s it down is the tail pipes look a bit lost in the bumper recess. From a distance it doesn’t look like there’s an exhaust fitted lol

See what I mean
3F7B2D0D 1B8C 4283 83E7 AFF7CD315A09


I dropped the tail pipe off at the fabrication shop I use along with a pair of 3” polished stainless trims that I’d cut down to size and had them welded on

082F42B6 B6EF 415E B22E D83D0C4F1088


C3B1002D B576 4835 8DAD B16304E98165


I think it looks much better now and you can actually tell there’s something in the recess :)

26274AD6 5106 4F51 BC45 4ECCB77DB193


I need to put the chrome rings back on the tailgate aswell now as it looks a bit odd lol


Steve
 
Last edited:
  • Like
Reactions: hydro s3, ADs3, Gonzokew and 3 others
Hi Steve, really liking the exhaust tail tips. I’ve just bought the same Zinram system as you. Now seeing what you’ve done, I’m tempted to follow suit! Did you notice any change in exhaust note now the tips are rolled in, instead of straight cut?


Sent from my iPhone using Tapatalk
 
Hi Steve, really liking the exhaust tail tips. I’ve just bought the same Zinram system as you. Now seeing what you’ve done, I’m tempted to follow suit! Did you notice any change in exhaust note now the tips are rolled in, instead of straight cut?


Sent from my iPhone using Tapatalk

Hi Ash, I haven’t been out for a drive yet mate. I just put it back in place last night before all the bad weather rolled in so I’ll let you know later :)
 
  • Like
Reactions: S3AMJ
Hi Ash, I haven’t been out for a drive yet mate. I just put it back in place last night before all the bad weather rolled in so I’ll let you know later :)

Nice one cheers mate! Was some serious rain huh! I’m only just south of you.


Sent from my iPhone using Tapatalk
 
Yeah it was crazy, we had hail the size of marbles lol

There’s no difference in sound that I can tell with the rolled tips

Awesome, I was concerned that it’d make it sound deeper. I’m picking my Zinram exhaust up tomorrow


Sent from my iPhone using Tapatalk
 
  • Like
Reactions: S3 Hilife
Hi Steve

I saw your car at AITP today and it looks great:sunglasses:


I would have liked to have had a look under the bonnet but every time i came back to your car you weren't around:cry:


  • Like
Reactions: ToughlilT
Hi Steve

I saw your car at AITP today and it looks great:sunglasses:


I would have liked to have had a look under the bonnet but every time i came back to your car you weren't around:cry:


Ah, sorry mate :( I disappeared a few times to look around. Too many nice cars to see. Where were you parked up? I saw a few other 8L’s around
 
No worries mate, maybe next time

I was parked on the ASN stand
 
  • Like
Reactions: S3 Hilife
Sorry, a bit of a long post so I’ll do it two parts ;) 
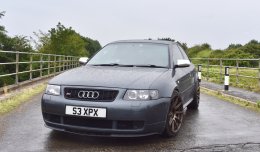
It’s been a busy couple of weeks. I spent most of last weekend flatting and polishing the paintwork in preparation for AITP. It’s still not perfect and could have done with another day on it really but the sun half killed me

AA39D240 F059 4A5C B37A 3FD4B110B0E0


1DFE3DA3 20CF 4080 AA32 E3F49BF55508


Looks great in the sun though :)


Then spent the evenings last week sealing and waxing, I mainly like to use the EZ Car Care products. Started with Fusion to seal, then a coat of Granite, followed by Lucid ceramic wax. Once that’s cured gave it a coat of EZ Glaze. Even employed an extra labourer to help out ;)

6C1E13DB 3290 4806 8077 EBA536B8A99F


Time to sort some annoying niggles so off with the front bumper and out with the Araldite epoxy :) These end trims are a little damaged and are a nightmare to fix if they get much worse

AF02E1AC 68FC 4D25 84D7 F1C48C297569


D2E4E326 F175 43BC A710 FD6BE8082432


Gave both sides a good clean and then ran a small bead down each side and clamped in place for around 8hrs until cured. Good as new :)

9D9C23EE 64F6 4209 A3ED EDBC349EBCE8

535ED369 F175 4F1E 9A97 87053CFF454F


The other little niggle needed the intercooler removing to give it a few coats of satin black. I think it looks much stealthier now and even prefer not having the fogs in too :)

B9C677BF 038D 4A10 B4B4 943AE69D8EDF


92DE6AB1 4B2B 4BD8 BD85 3D796491461D


CC4A3103 8038 46BE B5D0 AB3296DFDBED


I’ve been hunting for a boost leak/fault for weeks, it’s literally doing my head head in now. I’ve smoke tested it with a crude homemade smoke tester, traced and fixed one leak but couldn’t find anything else, Agrrr also replaced the N75 and carried out several tests to no avail. Can’t get more than 0.8bar boost :(

Sunday was Audis In The Park, love this event. This year I went on the S3 UK Owners group stand with some great people and amazing cars. Despite the short downpour of rain it was a great day :)

439A9147 5C85 40C6 B1D9 AAD8EA80F01C


These two pics were taken by @ToughlilT :thumbs up:
1E78F98F 94CC 4479 9C2B B12FCA91C362


C321AA7B 1927 4261 A3CF 4F6A7B7A684E


before leaving I thought I’d found the source of my boost problem

1DCA0ABD A47F 4FFF 83F3 7B86DE723B76


As you can see the vac line to the wastegate had split and dropped away due to heat from the manifold so we carried out a temporary fix, put it back together thinking this was the cause of the problem but still no boost, Nooooooooo :( In fact now there’s only 0.5bar of boost since that was fixed. How is this possible? So still no fun
 
Last edited:
  • Like
Reactions: Maz and ToughlilT
Now determined to find the actual cause I removed the TIP yesterday and swapped the vac port on the wastegate from the front to the back away from the manifold.

47349091 EEE9 4E47 AE4B 1C83794400C3


9BA60DE3 F1D6 4D6A 91B0 1618C6825A2C


I wanted to inspect the internals of the WG in to see if I could see anything obvious but I could not get the cap off without my Turbosmart spanner which went missing when it was fitted, so back to step one again :( Personally I think the WG could be faulty but I’m gunna get a smoke test done first to prove there’s no other leaks. Does anybody have any other suggestions?


Whilst the TIP was out of the way it seemed a good time to swap the crappy plastic coolant flange, distribution pipe and thermostat housing for the cast ally type which I shouldn’t have to worry about anymore

6E25E778 0B65 438F 9252 38662197D6CF


7081E0B2 DE95 4A28 8DF8 2030124C12FE


Topped up with G13 and bled the system. Unable to take the car out for a test drive now as I found the crankcase breather elbow broken (again) when fitting the thermostat housing :( lucky I did it really. Part now on order lol


Steve
 
  • Like
Reactions: ToughlilT
Really good work on the bodywork Steve! Very shinny... sucks about the vacuum leak. I’m sure you’ll sort it out ASAP. I saw those alloy coolant flanges and distributors the other night on AwesomeGTi, think I might be buying a set and swapping out my thermostat at the same time. Going to the effort of changing all the coolant hoses for silicones, may as well swap out the plastic rubbish to.
 
Really good work on the bodywork Steve! Very shinny... sucks about the vacuum leak. I’m sure you’ll sort it out ASAP. I saw those alloy coolant flanges and distributors the other night on AwesomeGTi, think I might be buying a set and swapping out my thermostat at the same time. Going to the effort of changing all the coolant hoses for silicones, may as well swap out the plastic rubbish to.

Thanks mate, I’ve got a couple of weeks off work now so I’ll get it sorted. It’s worth doing the plastic bits for piece of mind. I’ve had two coolant flanges crack in the past so should be good now :thumbs up: I wish I’d ordered some nice new silicone hoses now but it’s definitely on the “To do” list :)
 
  • Like
Reactions: S3AMJ
Yeah I had one of the flanges go on me when then car was on the road nearly 2 years ago now?! God time flies, be glad to get it back on the road. I snapped a couple when I was fitting the silicone hoses recently, bought replacements from TPS. But If I knew about these alloy replacements by ECS I would have gotten them. I need a holiday, two weeks to work on the car would be ideal.... but there misses wants to go to Spain, I’m sure we can work out a compromise haha
 
  • Like
Reactions: S3 Hilife
I’ve been helping @Grundy build his engine ready for a bit of power ;) We’ve got the crank in place fitted new oil squirters, thrust washers, ACL Race main bearings and ARP studs. Checked all the clearance’s are within spec with the plastigauge and checked for crank end play. Then gapped the piston rings, well most of them anyway as we messed up a top and a middle ring being a bit too heavy handed with the ring grinder, haha. It’s surprisingly easy to go too big with the ring gap when you’re talking 10ths and hundredths of a mm lol

(Bare block with studs, bearings, thrust washers and oil squirters in place)
8995B3D9 70F6 42A1 8E4D 779E0F19E11F


Crank torqued down with plastigauge inserted
E7340FF4 257D 4958 82C4 7B1FB11D2BE5


Checking clearances on main bearings
5D1A29EE B700 4D1B BF03 DB1D5593DF05


Checking end play
0DFBE63B 8B9B 4B9F 965E 5429E5169EA4


Measuring the ring gaps
AB7E7A35 DBE1 4D46 A08D 2A159C1359FA


B9526BF8 2523 486D 87C3 8E5E24FEDD4A


Grinding the piston rings down
A0F3AB3A 6DD2 4EA5 8370 D55375D86CE2


For some reason we had a set of ACL Race mains and a set of Calico coated rod bearings so Sam ordered a set of ACL rod bearings to keep them matching which we’re waiting on before we put the pistons in, oh and now we need another set of rings too haha. We’ve assembled the pistons and rods with tool steel wrist pins so should be plenty strong enough ;)

539725FC EDE2 41BF 9B00 D6F0C9CD8BD7


Before calling it a day we thought we’d get the rear main seal fitted which needed the block taking off the engine stand briefly to fit.
E48847DE 7C7F 40FF 9880 D45DDDDA0CE0


We’re happy with the progress so far although there’s still lots to do. It’s a very time consuming part of the build but also extremely enjoyable so I’m looking forward to the next step now :) plans have changed a little for this build after a deal came up for a v banded tubular top mount manifold with 1.5” runners, external WG and downpipe so should be interesting :) just a choice to make on the turbo and oil and water lines to purchase.

With that done we headed out for a bit of fun and try to get some pictures, unfortunately it was pi$$ing down so pics were terrible

5D873348 716F 470D AAD5 998441668A50


D195548E 538C 4B12 8699 93898B00A83D


Why not ;)


Some pics from the last couple of days

EC58C0CE EFE3 4DBE 9E1E 02C62A31CF78


BCF9D61F DDB0 4B24 A371 746A822B2A28


CEA635D3 681B 4A33 AE6B F44115AEB6B5


Steve
 

Attachments

  • 45F55026-C450-43A7-AF2E-E954CF813A75.jpeg
    45F55026-C450-43A7-AF2E-E954CF813A75.jpeg
    556.2 KB · Views: 205
  • AB429E26-81D6-419D-962A-DEF4493BA68F.jpeg
    AB429E26-81D6-419D-962A-DEF4493BA68F.jpeg
    1.1 MB · Views: 215
  • Like
Reactions: S3JACKSON, killfame, ToughlilT and 4 others

Similar threads

Replies
27
Views
3K
Replies
53
Views
6K
Replies
23
Views
11K
jcb