My a3 will go fast! (build thread)

coatesy

poking badgers with spoons
Joined
Oct 12, 2010
Messages
1,918
Reaction score
280
Points
83
Location
Middlesbrough, United Kingdom
Hello every one and welcome to my build thread.

it all started about two years ago when i got my 1997 a3 1.8t sport. here is the first pic I took of it when I got it.


best day ever considering my only other car was 1.4 rover 25 which to be fair i blew up :)


i paid 2k for it. when i bough the car it had 89000 miles on the clock, FSH, all the extras it could of got, it even came with the original receipt for 22.5k. the only thing that had been done to it was a milltek cat back, i decided i wasn't going to go crazy and start modding it straight away, especially when i was already paying £211 pounds a month insurance.

in the first winter i had in the car the clutch went so i replaced it with the ECS stage one clutch and flywheel kit. (sorry no picture of that)

then the next thing i did was my FMIC. which was a right chew on to get it to sit behind the bumper with out having the pipes sticking through the bumper but! i managed to get it on.

the core.


and then the box of random pipes i got it make it fit.
IMAG0162.jpg


after a great deal of annoying tries to get the bumper on with out trimming it down i finally done it !


i know its not straight but so what it does its job and if you get that close to see that its not straight iv either ran you over or your far to close to my car and are about to get ran over.


after the FMIC was fitted the next thing i did was fit a silicone TIP and a jetex filter.


next up will be the real reason why this thread was made!
 
Last edited by a moderator:
  • Like
Reactions: Sandra
so this is it after plenty of time of thinking what i was going to do with my car weather i was just going to get it mapped or stage 2 it with a k03s.


this happened! (all will be explained after the pictures)

cylinder head gasket set with bottom end gasket set.


new head bolts, cam belt kit, piston rings, water pump (plastic not metal) and an ecs magnetic sump plug.


new oil pump and LCR fuel pump.


new break lines

312mm discs also got some 312 carriers and refurbed calipers but every one knows what they look like.


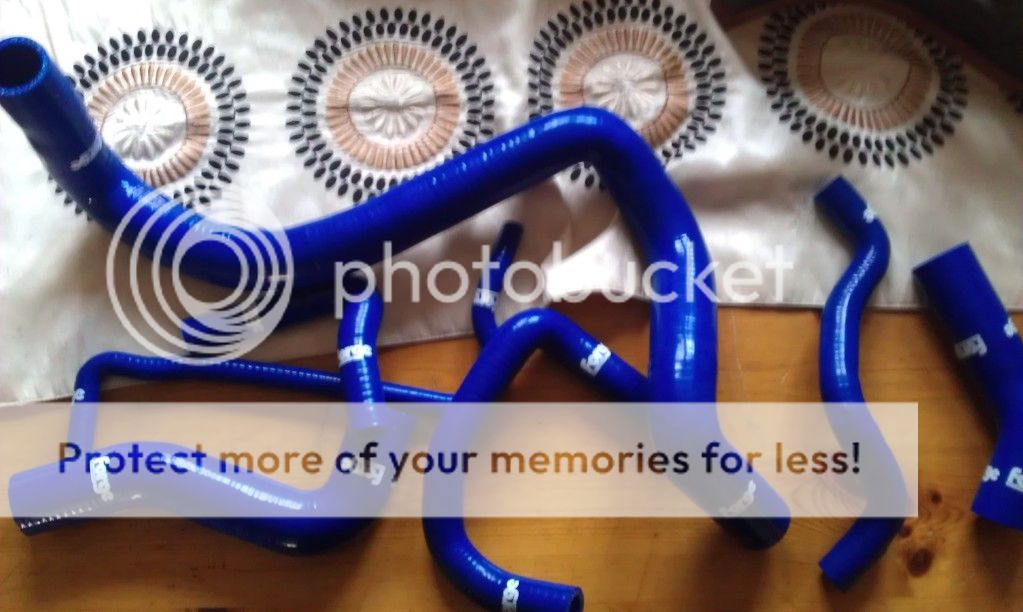
new forge coolant pipes

ACL big end bearings.

saab red injectors


Riffle drilled IE rods :p

3" TIP (SFS i know, sorry bill it should of been a b5 v2 but at 75 quid brand new i couldn't say no)

k04/k03s hybrid


so if you cant tell by now iv made my mind up to go hybrid in my a3.

more info on the turbo can be found here http://www.audi-sport.net/vb/a3-s3-forum-8l-chassis/151656-received-my-new-turbo.html or by talking to dan (beachbuggy) as he made the turbo for me and mass respect to the man he know what hes talking about and his work is awesome.
 
Last edited by a moderator:
  • Like
Reactions: deeman88
a couple of weeks ago my car died with low oil pressure, so i took this as a hey why not just start doing all the work now instead of waiting ....

last week i started to take the rocker cover off along with the inlet mani and the TIP and filter.


when i took the rocker off i couldn't believe how clean it was inside there were no marks or grooves on the cams, the cain was super tight looking all good so far!

also started to take the FMIC piping off to make room when stripping the engine down.


then got my wrinkle effect engine paint out to give the rocker and the inlet mani a paint after cleaning.


it just looks like shiny paint but once dried it looks awesome. (i do need to take some pics of it now its dried)


on Saturday just gone i straightened my FMIC for those who think it should be perfect also made a modification to the piping so the bumper will go on with super ease instead of a fight.


then on Sunday with the gazebo up and the mega heavy rain coming down me and my mate started to take the engine to bits.


head off first you can see the valves where the engine wasn't running right for ages it was running very rich for months.


next was the manifold off. (currently on its way down to bill, to have it ported.)


then we boshed the turbo off.


next job was to get the sump off and get the pistons and rods out as well as the oil pump.

all the pistons need are a good degrease there in perfect shape no dent scratches. the bores of the engine still have the original cross hatch honing marks after 103000 miles witch must prove iv got a pretty healthy engine apart from the oil pump that died a couple of weeks ago but it didn't get driven when it dies so all is good.


that's it for now, we got that done from 11 in the morning to 4 in the after noon. i think we did well considering we were soaked through.

next things to do this week are clean the pistons and the sump and strip the head down then get it sent off for a skim. once the head has been put back together, with all the valves lapped back in with new valve stem seals. it will be get the rods on the pistons then back in the car, hopefully by then ill have my mani back from bills then it will be operation get the turbo on! :racer:


ill say this now, sorry to anyone who thinks this guy is a fool look how bad his thread is... im big style dyslexic therefore im not very good with all this righting stuff down and spelling lol any input is also good guys. until next time when there's more updates, peace :icon_thumright:
 
Last edited by a moderator:
  • Like
Reactions: guzzy_431 and deeman88
About time you put up a build thread you lazy git haha. Shame it had to be a forced band that made you do it so earlier than expected.
 
no ones going to say a bad word with progress like this!
good on you dude. good to see people giving things a go themselves.

one question, you have a TIP for a ko4 turbo, whilst your new turbo is a ko3/4 hybrid, its still ko3 fitment, so how are you planning to get that on?
 
Haha cheers dani I know I'm lazy as feck lol


The cold side of the turbo is k04 so the tip will go on but I haven't quite figured out how to get it on the car lol but we will get it on
 
Haha cheers dani I know I'm lazy as feck lol


The cold side of the turbo is k04 so the tip will go on but I haven't quite figured out how to get it on the car lol but we will get it on

On Bill's Lupo we had to relocate the gear change cables so the TIP would fit in...

<tuffty/>
 
yea, but Bills TIP was a proper B5 TIP with a billet alloy adaptor, this is a ****ty silicon SFS (no offense Coatsey :p) silicon jobber so he can just mash teh crap out of it until it fits around the gear cables somehow !

Good work though mate :) Looking forward to seeing how this comes along.

What's the spec of the turbo? ko4 023 internals on a ko3 frame?

Haha none taken :D,

The turbo is a k03s hot side with a k04 cold side with k04 internals and the bit in the middle where the oil and coolant go in is off a k04
 
good luck mate, wish i was that courageous lol. keep us updated :)
 
whos best person to ask to get a hybrid built?

what power you hoping?

watching this thread as im reluctant to do a turbo build!
 
so essentially you have the same turbo/setup as bills lupo, which, i've heard from here is insane at 320hp
although you probably wont see that much power, it'l still be a good build. and if you can figure out a way of fitting the tip i think this will be a good option for you a3 guys
whos best person to ask to get a hybrid built?

what power you hoping?

watching this thread as im reluctant to do a turbo build!
beachbuggy has made this turbo for him.
 
so essentially you have the same turbo/setup as bills lupo, which, i've heard from here is insane at 320hp
although you probably wont see that much power, it'l still be a good build.

it is like bills turbo but not on as many steroids as his, bills turbo runs the 2283 wheel where as mine is only standard k04 internals. i think the power out of it will be small compared to bills.
 
whos best person to ask to get a hybrid built?

what power you hoping?

watching this thread as im reluctant to do a turbo build!

the turbo was made by beachbuggy (Dan) on here, his work is awesome, i think a couple of people on here have had there turbos done by him all i can say is hes an top bloke, super helpful he sorted me right out as i dont know what im talking about really.

the turbos have a name called Black widow turbo. the name dan came up with its pretty cool.

as for power iv been told 260 - 280 but any thing over 250 is a bonus.
 
here is a little bit about the turbo if any one would like a read:

The original K03s was dismantled. Only the Exhaust housing and Compressor was kept as the internals where upgraded.

The exhaust housing was cleaned and then sent to the machine shop, who bored the housing to accept the larger K04-02x turbine. This required both the inducer and exducer sections of the housing to increased to accomodate the larger wheel. The wastegate port was then ported slightly to remove a small ridge which is present from manufacture and to aid air flow.

The compressor housing isn't completely used as it can not be machine properly to allow the larger K04-02x compressor to fit safely inside. Whilst it can be done the metal becomes too thin and thus there is the possibilty of it bending and damaging the compressor, to solve this an original K04-02x compressor housing is used and so no modification is needed to the actual bore but this does mean the outlet is in the wrong place. So to overcome this, the K04 compressor housing is cut and mated with the outlet from the K03s. The internal diameters and ported to give smooth airflow over the join and the end result is that the compressor housing will fit on the original K03 manifold.

As for the internals. Well they are all replaced. A new bearing housing is used, bearing, seals, thrust ring, oil thrower and backplate. The rotating componants are balanced together to ensure they don't have excess movement and then the CHRA is built up before being installed in the housings. Once this is done, it is checked to ensure that the blades don't touch the sides and run with low airpressure to ensure there isn't any issues.

Actuator is slightly adjusted to ensure correct fitting on the K04 compressor housing.
 
Making progress with this. How the hell did you fit that cooler under the bumper without cutting the bumper paper thin lol
 
Making progress with this. How the hell did you fit that cooler under the bumper without cutting the bumper paper thin lol

Haha its not mounted like other people have mounted there's, usually people cut the crash bar and bolt it on.

iv made a mount that keeps the core against the radiators so is ad far back as it can be, people will say its not the proper way to do it but the core is solid doesn't rattle or move, really its the piping that stops the bumper going on but having the core as far back as possible also helps.
 
some more goodness.


JOM coilovers.


new pulley as the one on the car was knackered, new cam chain tensioner and a new piece of expensive plastic for the pcv system. (as i had to fish pieces of broken plastic out of the oil housing form the old one)
 
Last edited by a moderator:
a few pictures from last night.

i got the sump cleaned.


then give the pistons a clean.


here is a little picture of the paint i was going on about further up in the thread i dont know if you can see the effect the paint has once dried.


anyone got a tip for getting the brown stains off the pistons? or is it even important to have them all shiny.


tonight's plan of action is to get the head stripped down and get it off to the shop for a skim and a paraffin bath tomorrow.
 
Last edited by a moderator:
na, aslong as there clean from carbon deposits then it fine, think the brown staining is in the metal so doubt you would get it shiney.
but you could polish them shiney if you wish but then there be dull and brown/black in a few miles lol
 
Good progress. be nice to see it all come together. :)
 
bit more, its all happening so quickly. my mate who is helping me (by helping i mean doing the majority of the work) said the engine is super clean inside, way better than he thought it would be.


as i said earlier we were going to strip the head down so here is a couple of pics. excused the pants pictures my phone has a thing about take good pictures then bad ones.


head with no valves or springs in.


every thing all lined up and ready to go back in.


my friend said earlier if the garage can skim the head tomorrow he might bring it back around to mine so i can lap the valves back in and on Sunday possibly get it all back together, which would be pretty awesome, it will of only of took us two Sundays to take it to bits and put it all back together.

thanks every one for the positive comments, i thought this was a pretty lame thread compared to everybody else's lol
 
Last edited by a moderator:
update !

few more parts arrived.

two new wishbones with new drop links.


two cv boot kits with two LCR top mounts and my new brake pads.


yesterday we didn't get as much done as we wanted due to not having a manifold, but we did get the bottom end rebuilt and i got all the valves lapped in to the head (man what a boring job that is)

here is a picture of the IE rods fitted up to the pistons.

utf-8BSU1BRzAyMjIuanBn.jpg


i forgot to take a picture of the new oil pump in place and my mate had put the sump on before i remembered to take a picture.

ill get some more pictures today of the pistons in the block looking all clean, tonight i hope to get the head rebuilt to a point of been ready to go on.
 
Last edited by a moderator:
Are you getting the valve guides checked while having the head skimmed? typically the exhaust guides wear quite badly... worth getting them looked at and done if need be...

<tuffty/>
 
when we took the head off the garage looked over it and they said that the head is pretty much brand new still. i will take another look today.

with everything we have took off the car iv been given a pat on the back for because its all coming out in top shape and very clean. i guess it must be down to the 2 services a year and it never given death everywhere.
 
They can look new (would question why you are having a skim in that case as its not really needed unless the head has warped or suffered surface damage) but exhaust guides start wearing from as little as 60k miles... exhausts tend to be the ones that suffer... I had them done on my AEB head with over 150k miles but the inlets were fine...

<tuffty/>
 
got the head skimmed just to be 100% it was flat and why not get a nice shiny flat surface to work with. (it was a bit of a why not its off the car might as well not going to cause any harm)

ill take another look today and see if i can see any wear for my self.
 
UPDATE!

got the head rebuilt.


got my manifold back from bill porting it.


vr6 maf vs standard


missed a couple of pictures out as it was a right mission to get it all put together, but we did it. the catch can was last minute thrown together i still need to make some where for it to live with a bracket instead of a couple of cable ties lol [h=3][/h]


with everything in place we boshed the oil and coolant in it turned the car over by hand all was good then turned the car over with out the coil packs plugged in to get the oil around the engine. ( it does sound like its running lumpy but that's because there was a massive air leak from one of the catch can pipes.


[video][/video]


after half an hour of running to get it up to temperature the idle sorted its self out then just what every one needs clunk then the engine cut out, we then ran around like mad pi$$ed off angry people.

once the annoyance of a unexpected clunk followed by the engine stalling we set back to work to find out what went wrong. we took the rocker off and turned the engine over by hand, it stopped turning over when it got to cylinder 2.... we took the spark plug out to find what look to be a piece of metal sat on top of the piston, turn out to be the bottom of an exhaust valve.... boo bad times

we pulled the head off to get greeted by these.


the top of the valve was still in place in the head so the collets hadn't fallen off just the valve must of had a hair line crack in it that we couldn't see.

anyway it bent and bashed all 5 valves and ate the spark plug plus the piston as you can see.


basically sick as feck, going out today to buy a full new set of valves 250 quid... and a piston over 100 quid just what i wanted but life goes on sh!t happens, at least ill have new shiny valves im starting to think how long would it of lasted if it didn't go when it did, could of been a lot worse if i was doing 70 or the car was on a dyno, im just happy it didn't eat the head.
 
Last edited by a moderator:
Looking at the broken valve it looks like maybe the collet wasn't on properly or the spring not seated right so snapped off at the grooves dropping the whole valve in...

<tuffty/>
 
when we tried to get the top of the valve out of the cap, where the valve and collets go in to they didn't want to let go of the piece of valve.

i just don't understand how it ran for half an hour then dropped i would of thought if it wasn't seated properly it would of shagged its self straight away.


but in a way im glad it did on the drive rather than driving around causing more damage
 
lol, i was being serious, dremel or die grinder job, just make sure its smooth with no points or sharp edges.
 
when we tried to get the top of the valve out of the cap, where the valve and collets go in to they didn't want to let go of the piece of valve.

i just don't understand how it ran for half an hour then dropped i would of thought if it wasn't seated properly it would of shagged its self straight away.


but in a way im glad it did on the drive rather than driving around causing more damage

I am not surprised it didn't let go straight away... you have only really been running on idle than loading up and the valves are quite strong as a rule... its more a stress related fracture at a guess... you should see evidence of this on the top of the valve stem where it snapped

<tuffty/>
 

Similar threads

Replies
2
Views
1K
Replies
3
Views
2K
Replies
805
Views
89K
Replies
86
Views
9K
Replies
0
Views
609
Dani_B19
D