Mk1 TT 225 track day car, Officially a ten second car 10.8 seconds at 127 mph.

Looking at the internal shot the fins look more like the proper toyo sport variants that work but the difficult to see if its a glues core or not...

Karl, just keep an eye on intake temps... it will be evident if its the wrong core... they either work well or not at all... no middle ground on these luckily

<tuffty/>

Toyosports don't do a tube and fun core? They only do the bar and plate cores.
I'm pretty sure irrc the internal shot looks like the exact one that Niki G posted when comparing and testing the tube and fin interheater.

Just don't want Karl doing all of this then getting to mapping day and find the core isn't up to the job!

I see what you mean... I have seen tube and fin ones that work but its a lottery with the 'welly' cooler variants... only ones I know to work are the toyo sport ones from toyo sport themselves...

A certain well known brand did a 'race' fmic for the LCR that first highlighted issues with tube and fin glued cores... the Welly cooler copies have since used combinations of tube and fin as well as bar and plate to varying degrees of success (or failure mostly)...

The correct coolers are cheap enough and while the TT bumper is not the most fun job in the world to remove its easy enough to replace the cooler...

<tuffty/>
 
I am happy with the results I have seen so far. Did some logging the other day after I fitted the Badger Tip and Ramair foam filter.
Must say the TIP and filter make the car so much better at the top end. Over 4500 RPM there are noticeable improvements in MAF readings and the engine pulls much better at higher RPM.
Theses are two 3rd gear acceleration runs one after another. I had already done two shortly before this so the engine was well warm . The ambient was 21 degrees and I think the intercooler did quite well. You can see how the intercooler temps start off around 34 degrees as I had been sitting in the car stationary for a while but as soon as I get some airflow moving through the intercooler temps quickly drop and at the end of the first run intake temps are down to 28 degrees. First run was between 77 and 87 seconds.
The intake temps rise again to around 35 degrees as speed is down to 20mph. By the start of the next run around 106 seconds temps are down to 31 degrees as this was starting from 3K rpm the extra road speed had cooled the intake temps.
As soon as the car starts gaining speed intake temps drop again to around 29 degrees at 113 seconds.
I wouldn't class this intercooler as an interwarmer :) . The tube and fin intercoolers that don't cool have very poor design and probably very low pressure drop but the Air just passes straight through without actually being cooled. This is one of the delta fin cores off Fleabay. Very poor design.
Some bar and plate cores can be like this as well.

121569-deezums-cheap-1-6-tries-go-fast-img_20140820_003653_zps5a37115e.jpg
 

Attachments

  • Intercooler logs Ramair-TIP 3rd 4th accel run 21C-2.pdf
    506.4 KB · Views: 280
  • Like
Reactions: <tuffty/>
Yep... that looks like the bad boys I have seen that perform badly....

5-10 degrees above ambient is good...

<tuffty/>
 
I can see no signs of glue in the construction. I would of thought it was vacuum brazed like most intercoolers. They do offer a 5 year warranty in Germany which is pretty much unheard of for any normal Fleabay intercooler. They are also tested to 5 bar, way more than it's ever going to see.
If I had paid £4-500 pounds for a named intercooler I am fairly sure it wouldn't be that much better than this one which has cost around £235 pounds all in. If I had bought a bar and plate Toyo sport it would have cost around £175-£180 all in.
 
  • Like
Reactions: Golfyste
Current testing looks good
Hopefully it does you well!!
What's your current boost level?
 
The mapping on the car is currently standard. The logs show around 2 bar actual peak which is 1 bar of boost. I appreciate that when the car is mapped the IAT's will increase but they are pretty under control at the moment. I have done logging before I fitted the FMIC and the IAT's seemed to peak around 34 degrees with similar running when the ambient was 17. so the FMIC is a good step over the standard setup, which is what you would hope for.
 
  • Like
Reactions: Golfyste
Fitted the Badger 5 V2.2 TIP and a Ramair foam filter along with the Forge 008 I have had sitting around for a while.

The Badger TIP was bought second hand off Ebay, It was still in the bag and had never been fitted. Not my first choice being red but the saving over the new price was worth it and you can't see it anyway with the bonnet down.

DSC 2619


The TIP and alloy turbo adapter are a quality piece of work complete with all the bits and pieces you need to fit it.
I went for the Ramair filter as didn't want an oiled filter and this filter is about as big as you can fit easily in the space available.

Removal of the existing TIP is fairly straightforward apart from trying to remove the stupid OE clips .
You can see the difference between the Badger TIP and the original item.

DSC 2620


I used some of the Grey Elring Dirko sump sealer to fit the alloy intake on the turbo, It just smoothes the transition between the turbo and the adapter.

DSC 2621


Next comes the DIY bit where I try and save some money.
The Ramair filter was just over £40 off the Flebay shop that Ramair have. Should have been £45 but you can make offers so offered £40.60 and this was accepted. They do a kit that includes a nice metal shield to isolate the filter from the hot air off the engine.
Putting my Blue Peter badge on I got the scissors and some cardboard.

DSC 2624

using some of the barge board I had left over from doing the soffits and barge boards on the house I converted my cardboard model into a nice sturdy plastic version.

DSC 2623

And sprayed the completed item with some of the matt black I had from spraying the intercooler.

DSC 2626


DSC 2625


Car now makes all the chirpy sucky whistle noises that any self respecting 18 year old would love his Corsa to make.
The pictures above were taken before I fitted the dump valve , just fitted the standard green spring for now. Will alter it for a yellow one when the car is mapped. You may have spotted the MAF is inplugged. I didn't and found out when the EML popped on.
Car is definately much better for the addition of this. Pulls much better from around 4500 I can see improvements in the MAF readings and the car definitely has more go at the top end.
 
  • Like
Reactions: toooldforboyracing, Misikee and Golfyste
Whilst I had the headlights out fitting the intercooler I thought I would check the headlight bulbs as I wasn't too impressed with the performance.
The bulbs were both Osram Xenarc items and looking at the date codes I believe one was original and the other was from 2009.
The original one was definitely past it.

DSC 2581

Not wanting to buy some no name Chinese Ebay bulb that will probably have mediocre / poor performance but also not wanting to spend a fortune on genuine bulbs I hit the net.

Came across Yeaky bulbs . One of the better Chinese manufacturers, they aren't all bad. I believe the company that owns Yeaky also manufactures Hylux ballasts and some of the other better known names.
They get quite good reviews in tests comparing them to bulbs 5-6 times the price.
Bought them from Hids Direct for £22 for the pair. Very impressed with them compared to what was in. Went for the 5500K version and the light is very bright white.

DSC 2582
 
Hi Jojo, Hopefully the plan was to run the TT but I am not probably going to have the suspension sorted by then and the original is not at it's best.
I will probably run the A4 as it's going better than it ever has since I fitted the large bore downpipe. It sounds good too :) .
Next job with the TT is fit this. Chinas finest :) .
View attachment 131712
Cool, I might see you there, but I'm only going to be there in the morning due to work in the evening. If I get my mk2 ready, I will try take it for a few laps.

Regarding the downpipe, I'm running one in my S3 with no issue regarding clearance, but the metal support bar had to be heated up to line up with the bracket on my car. Mine was an early kit though, and the word on Facebook is the later batch had some fitment issues, so check the face is flat where it goes onto the turbo, use OEM gaskets, not the crappy ones supplied etc. I'm sure you know. Score.

Also scrolled down to see you've made yourself a heatshield, I have a metal Neuspeed(I think?) lying about in my garage you can have for free, but I'm not sure if it's any better than what you've built up? Let me know if you want it ok.
 
@jojo just signed up for Curby hopefully there will be enough people to run it. Thanks for the offer of the heatshield, I think my Heath Robinson affair works OK :) .
 
  • Like
Reactions: jojo
Well the exhaust is in and it only knocks a tiny bit. Every now and then when pulling away in first gear, sounds like the hanger bracket at the front hitting the subrame . It is fairly close. I am glad I changed the dogbone, there is no way you could fit one of these with the amount of movement that it would have had on the 15yr old original item.

I have Elsa Win and looking at that I did everything that it said to remove the exhaust front pipe. And it still wouldn't come out. I probably could of got it out in one piece by disconnecting the steering rack from the column and dropping that end of the rack down. But then I would have had all the hassle of sorting the steering out.
So it came out in a few pieces. good job it wasn't going back on the car. Finest Chinese engineered exhaust from Ebay. £145 I think from Turborevs.
DSC 2627


Didn't come with a gasket for the turbo and from what I have read the ones supplied with these are not very good anyway. Thus ordered an OE multi plate steel item.

Got the car jacked up nice and high, so high I had to go and get the steps so I could climb onto the top of the engine to get down the back of it.
DSC 2634


This was the kind of thing I had to get around, No way of undoing these bolts, some had disintegrated.

DSC 2635


Dropped the subframe after marking the position of the bolts. God they were tight especially the front ones.

DSC 2638


DSC 2639


Fortunately not to difficult to undo the nuts on the turbo they came off quite easily really. What didn't help was the braiding on the flexi section had split and this kept getting caught.
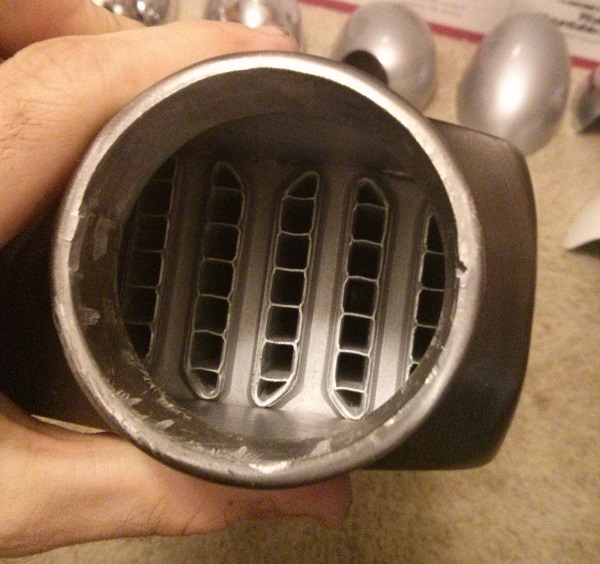
Had a look at the exhaust end of the turbo whilst I was there.

DSC 2645


Looks OK no obvious cracks or other issues and no turbine movement is what I would expect.

DSC 2648


A pile of bits. Took the heatshield off the firewall at the back of the engine and removed the rest of the pipes from the AC system .
The removal of the heatshield made it a lot easier refitting the Lambda sensor at the front and doing up the turbo bolts. Gives you a lot more room to swing a spanner.
Weighed the original and new exhaust with all the pipes I removed about 9Kg less weight.
One of the cats may be going back on the car come MOT time. I have a plan to recycle one.

Had an issue where the new exhaust joins the old one. The OE system is 65mm outside diameter. The tube on the new exhaust was 63.5mm . The OE clamp would not clamp down to 63.5mm. with the clamp as tight as it would go you could still spin it on the pipe.Even after I modified it a little it still didn't clamp. I found a solution with a piece of 63mm pipe I had that only had a 1mm wall. Cut a short piece and used it as a sleeve to wrap around the new pipe. Now upto 65.5mm diameter with a little exhaust putty it fits OK.
Going forward I will probably have a custom exhaust made 3 inch all the way through with a single silencer to reduce the weight. So this is a temporary measure.

DSC 2656


I had to remove the exhaust after initially fitting it as the flex was rubbing on the prop. You can see the balance weights at the front of the prop are just in the wrong place. Fortunately removal of this pipe is reasonably simple compared to the OE one. I modified the exhaust a little and there is a little more clearance. This is how it looks now. Doesn't appear to rub although I think the hanger bracket is touching the top of the bolt as it's quite close.

DSC 2659


DSC 2660

Bought an extender for the rear lambda to avoid any errors and this seems to work. Although it's going to be mapped this week so will ask Rick to remove the fault codes relevant to this.

Car pulls better at the top end . The butt dyno has definitely detected an increase up there. will do some logging and see how it compares to previous mods. A little more noisy as well, didn't think there would be that much difference especially at idle
 
Last edited:
Fitted this today as well as changing the injector seals and finding my leak in the PCV system.
Quite natty. Combines and oil temp , oil pressure and voltmeter along with a boost gauge.
The air vent in the TT was made for 60mm gauges like this. Really easy to fit and it looks quite good I think.
I didn't think that was enough so bought another 10 bar sensor and connected it in the fuel pressure rail.
I have a switch on the dash that switches between the oil pressure and fuel pressure, normally would just leave it on the oil pressure but good to check the fuel pressure every now and then.
In the picture it's displaying fuel pressure. Car has a 3 bar FPR with -0.7 bar of vacuum you get 2.3 bar of pressure so that proves the pressure reg is working OK. Will be interesting to see what it reads when I fit the 4 bar FPR. Hopefully the pump will be happy.
Not sure if I have a bit of a duff gauge or not but the voltage display is very difficult to read in bright sunlight, the pressure and temp can be read OK.
This picture was taken around 7pm when it was going a bit darker.

DSC 2703
 
  • Like
Reactions: AlexA4Avant and jojo
Changed the plugs in readiness for the remap tomorrow with Rick at Unicorn, went for the NGK iridium plugs on a 7 heat range which seem to be recommended.
Did a bit of logging today to see what the effect of the exhaust downpipe was. I know it feels quicker especially after 4K it seems to pick up better. This is seen in the increase in MAF readings . Did a few second and third gear runs and all had MAF reading of between 199 and 202 at 6000 RPM and there are noticeable increases throughout the RPM range from about 4K RPM up.
Lastly changed out the 3 bar FPR for the 4 bar item. Quite surprised how the car seemed to compensate really quickly for the change, Drove it around for a few miles and seemed to run fine . Checked the fuel trim and it had gone out to -5.5% from a previous -0.5% reading. I presume it will keep leaning it off on the trip up to Stockport tomorrow.
The fuel pump doesn't seem to have any issue delivering 5 bar of pressure when the boost is up at 1 bar.
Depo are going to send me another gauge to replace the one I have as they agree the display is dim, Good job it's fairly simple to replace the gauge.
 

Attachments

  • 09-08-17 2nd gear accell run.intercooler-downpipe-ramair-and exhaust-run 2 .pdf
    167.3 KB · Views: 503
  • Like
Reactions: jojo and Sandra
Well the car has been mapped this morning. The day didn't start off too well as just as I was driving past Manchester airport on the motorway there was a loud bang and a fault light popped up on the dash. I kind of worked out within about 10-20 seconds that it was boost pipe coming off or splitting :wtf:
Anyway carried onto Ricks at much reduced pace and fortunately I had take a few tools with me.
A quick inspection determined that a boost pipe on the drivers side just under the headlight had popped off. Fortunately able to get at it by just putting the car on full lock and pulling back the wheel arch liner. Seems I never put a big enough bead on that pipe or never tightened the clip enough.

DSC 2719


Will whip the front bumper off and make sure all the pipes have a nice lip on them and the clips are good and tight.
Car was loaded on the dyno

DSC 2721


And Rick set to work.
A while later after a few different maps to get it just right ended up with this.

BEFORE AND AFTER REMAP001

A good start with the various add on bits and straight through decat pipe giving 235bhp.

And after Rick had waved his wand, 274bhp and 295Lb/ft of torque, bang on where I was hoping it would be. Just around 300Lb/ft of torque with no peaks to bother the rods and 270 + bhp. This has pretty much maxed out the injectors even with a 4 bar FPR .
The car is making 260bhp or more between 4400 rpm and 6500rpm so it's very noticeably quicker.
Just need to get the suspension sorted now and lose some weight off the car and think it will be time to hit the track.
 
  • Like
Reactions: McTreacle, Golfyste, jojo and 2 others
Bought these the other day from the parts for sale page on the TT forum. Cookbot rear arms, very well made they don't really need painting as they are made from stainless.
DSC 2726
 
  • Like
Reactions: Golfyste and jojo
Some more bits arrived for the car today. camber and castor plates for the top mounts. All the way from Poland.
Might need some help from @Prawn to set them up :) .


DSC 2730
 
  • Like
Reactions: Golfyste
Awesome stuff dude! :).

When you hoping to get it on track??
 
Hopefully get it on track later this year .
Oil cooler arrived today, Don't think you strictly need one of these at this level of tune but it certainly can't hurt especially if it happens to be a hot day as it was this Bank Holiday Monday when I did a Club GTI event with the A4 at Curbrough.
Best price I could find for a full Mocal set up was £167 from Matt Lewis Racing, that was with the thermostatic option and a 19 row oil cooler. So hopefully got all the bases covered with this.
DSC 2761
 
Last edited:
Suspension finally arrived the other day. Problem with having a custom set up made is the wait. Around 5 weeks in total which to be fair was what they said when they were ordered, 4-6 weeks. Unfortunately they haven't included the helper springs for the front shocks, these are in the post now.

DSC 2764

DSC 2766

DSC 2773

DSC 2774
Bought some new Meyle strut top bearings
DSC 2777
The Silver Project caster/camber plates seem to fit well .
DSC 2778

Ordered some Powerflex black rear trailing arm bushes as the original ones on the car look way past their best.
 
Last edited:
  • Like
Reactions: DrStrange and 45bvtc
Red stuff pads arrived for the rear brakes. I don't think the rears do that much so I am fairly sure these will cover my braking requirements at the back.

DSC 2775
 
  • Like
Reactions: 45bvtc, jojo and AlexA4Avant
Impressed with GAZ's customer service, helper springs arrived in the post this morning.
DSC 2780
 
Been looking on Fleabay for a while for some seats. Most of the secondhand seats I have seen have been quite tatty and some still quite expensive. If they have looked ok they have been collection only the other end of the country.
Spotted these last night and snapped them up. Just 6 months old pretty much as new , just down the road from me ,with the side mount brackets less than half the cheapest price I could see them for sale new.
An FIA approved seat so hopefully strong.

DSC 2807

DSC 2805

They fit very well and seem to be pretty comfortable, At least they were for the 15 minutes I sat on the floor watching the telly :) .
Anybody fitted seats into a TT /S3 with any tips on the best way to do this. I know OMP/ Sparco etc make seat bases for these. Don't really need the passenger seat moving back and forward so that can be fixed. May explore the possibility of mounting them on the OE base if it's not to heavy or difficult to do.
 
  • Like
Reactions: jojo
Not updated this for a while been busy doing other stuff unfortunately. Anyway I am now the owner of a pair of OMP seat bases thanks to one of the guys on the TT forum so that will make the installation of the seats a lot easier. Ordered a single slider that I will put on the drivers seat. Passenger will be fixed and as far back as possible. If I am carrying extra weight in the passenger seat they can at least do the courtesy of sitting as far back as possible.
The car went in for it's MOT today, Apparently aliens are not an issue if they don't work. Only cars newer than 2011 have to have working headlight washers if they were originally fitted. So I think I may rejig the pipes on the FMIC when I have the bumper off to fit the oil cooler.Probably get a slightly better run on the intercooler pipes.
It was always potentially going to fail if I didn't do anything with the exhaust as it not longer has a cat. So decided to kill 2 birds with one stones and made my own cat as well as taking the opportunity to correct the dip in the centre of the exhaust under the car.
Ordered some 3 inch flanges off Flea bay and got busy with the angle grinder and welder.

DSC 2833


DSC 2835


Cut up one of the original cats from the car and added some 3 inch flanges each end. Took the existing decat pipe and chopped the front part off the same length as my new cat. With some fiddling around I fixed a new flange on the decat pipe and created a replacement pipe for the decat.
End result is that in about 15 minutes I can drop the cat into the exhaust and get a 100% legal car. Passed the MOT with no issues, The tester actually commented that the CO levels, Lambda etc were all spot on. It doesn't actually seem to make much difference to the performance. But losing 10 or 15bhp in 275 isn't going to be too noticeable.

Just been shopping on Fleabay and bought some 8.5x18 Team dynamics wheels for the car. Had been looking at Porsche staggered setups but with the adaptors they were a bit pricey and complicated.
Looking like 235/40/18 tyres on the front and either 255 or 265/35 on the rear. 265 would be the best as they have the same rolling radius at the 235/40 but they would ideally fit on a 9 inch rim. A 265/35/18 tyre is an approved tyre for an 8.5 inch rim though.

http://toyotires.com.au/images/tyres/factsheet/pdf/proxesr888.pdf
 
I spotted these alloys for sale so have picked them up. Been looking for a while for some cheap light 8.5 inch alloys .
Come to the conclusion that 235/40/18 tyres all round would probably be a good size to go for and an 8.5 inch rim will allow the tyre to give the maximum contact patch.
The Alloys are supposed to weigh 11.1Kg which seems about right as an alloy with 6mm of tread on a 225/40/18 tyre weighs in at 20.5Kg. Something like a Pro race 1.3 in 18x8.5 weighs I believe 10.2Kg. That puts these alloys around 1Kg heavier per wheel. Not that much really.

DSC 2839


The wheels are ET35 so on 2 accounts I have had to space the fronts out as they did fit on a standard TT but on mine with the LCR calipers they catch the caliper, and when the Gaz Gold suspension is fitted the struts are a larger diameter than the OE items and they would be very close if not touching.
I packed 6mm of washers on 3 studs to see what it looked like with a 6mm spacer.

DSC 2840


Now clears the caliper just. So have ordered some 10mm spacers front and rear to move the rears out as well.

DSC 2841


The rear looking very 4x4 as the car hasn't been driven after I have lowered it off the jack.

DSC 2842
 
  • Like
Reactions: jojo and Sandra
Cars looking excellent Karl. Lot if hours of work went into it. Top job :) x
 
Did a few jobs on the car today. Removed the cat and refitted the cat bypass. Only a 15 minute job including getting the car on the ramps.

DSC 2852


Fitted a new handbrake cable on the passenger side. The old one was sticking despite vast amounts of lube squirted down the cable. Not too expensive only £18 for a new old stock genuine item off the bay. Very impressed with how easy it was to change Audi certainly think about these things. New one works fine, I was thinking that it was potentially the caliper sticking but the old cable was definitely tight and sticking. Handbrake should be a lot more effective now.

Harnesses came. Again off Flea-bay. Most people have motorsport stickers on the car like EBC, Sparco etc. I should put an Ebay one on there :) .
These are 6 point TRS Magnum harnesses manufactured for Turn One. I looked at second hand cheaper harnesses and decided to spend a bit more and buy some quality items. For the same reason I bought better spec seats.

DSC 2864


The 10mm spacers arrived for the wheels so fitted them on the car to see what they looked like. Looks like I will nearly be able to change the brake pads without removing the wheels they are so open.

DSC 2863


Will hopefully start on fitting the coilovers and some suspension bushes this weekend.
 
Coilovers fitted, the original suspension had seen better days. These were the rear shockers, No leaks but they weren't putting up much resistance.

DSC 2871


Well coilovers fitted. Not very happy with Gaz though.
The springs they have supplied may be the Lb/In values I requested but they aren't the right length. The rears in particular.
My car is pre facelift so its around 370mm at the front and 375 at the rear. centre of wheel to top of arch.
With the adjuster on the rear set at the minimum height the car is 380mm high at the rear.

DSC 2882


Remove the adjuster and this drops to 360mm. I was aiming for around 340-345 mm so the spring is just way too long.
The supplied spring is 5.5 inch uncompressed length add the perch adjuster on minimum thats 17mm, The OE one is 7.5 inch and it's a much lower spring rating. Doing some maths I have calculated the rear spring needs to be more like 4 inches not 5.5. Without an adjuster I couldn't corner weight the car.
The front spring on the lowest setting gives a ride height around 360mm, If I took the helper out I could probably get the ride height where I want it but there is a lot of weight to come out of the car yet. And I would rather not have the adjuster rings right at the bottom of the strut as it could potentially foul on the tyre.
The front spring is a 7 inch it should really have been a 6 inch item.
I have fired an E-mail off to GAZ and am awaiting a reply.
This is what the car looks like ATM. Fronts as low as they will go with helpers in and rears with no adjuster.

Ride height no adjuster in rear lowest possible front with helpers
 
  • Like
Reactions: 45bvtc
Good news from Gaz about my enquiry with the spring lengths being incorrect. Can't really fault there customer service as they are sending me a pair of 6 inch 550 Lb/In springs today and ordering a shorter pair for the rear . The rear springs are not stock items so will need to be made so will have to wait a bit for those.
 
Had a few hours this afternoon so thought I would start removing some weight. So went for the easiest quick win the nice lump of cast iron under the rear bumper.
Hadn't had the rear bumper off before so was keen to see if it looked ok under there, sometimes you find signs of previous accident damage or other issues. When I was looking for the two 10mm bolts either side in the rear wheelarch I noticed that there was only 1 fitted on each side. So looks like the rear bumper has been off at sometime in the past. I was preparing to find the lump already missing. But upon removing the bumper it was still there.http://www.ttforum.co.uk/forum/search.php?search_id=egosearch&sid=78995abcf6681811d1e81b3f43f90ca0

DSC 2899


With the two steel backing plates from behind the bumper a total of 17kg.

DSC 2902


And got the bucket out and cleaned up everything removing another 10g of mud :) .

DSC 2900


MK2 TT bottom ball joints arrived today so hopefully fit those the weekend. Along with a few other jobs.
 
  • Like
Reactions: jojo
There must be method in the madness, I assume it's all to do with the high speed lift the TT suffers with as this weight was added as part of the mods. I intend to have a nice rear wing on the car as most of the track TT's do to try and mitigate this issue, along with some 255/ 265 tyres . Losing the weight is the equivalent of adding about 3bhp to the car because of the increase in power / weight ratio.

Taking advantage of this unseasonal warm weather to do a few more jobs on the car.
Fitting the Cookbot adjustable arms I bought from the TT forum parts sales area. The plan was to take the existing top arms off clean them up and replace the bushes.
Unfortunately when I cleaned them up a bit found the one had quite a bit of rust on it at the end which had turned into a hole.

DSC 2907

Didn't fancy running this on the car as the rest of the metal around that hole was quite thin. My car is pre Facelift so the upper and lower arms are different lengths. What I didn't know but discovered off here is that facelift cars have the longer arms top and bottom to try and counter the increased camber from the drop. So decided to use the bottom arms in the top and set up the adjustable ones the same length. Thus mimicking a facelift car till I get the ride height sorted so I can get the suspension properly set up.
Replaced the well knackered bushes with the sport Strongflex items. And cleaned the arms up and gave them a coat of black hammerite. Fortunately the outer ball joints on the end of these arms all appear to be OK.

DSC 2908

Painted the trailing arms and driveshaft as well whilst I had the paint out as with these 5 spoke wheels everything is on show.

Moving on decided to change the haldex oil and filter and fit the powertrack in the Haldex controller.
Wow what a faff this job turned out to be. Despite what appears to be an extensive service history the haldex filter has never been changed as it's the original metal one. The metal filter seems to be fractionally bigger than the plastic item as it didn't want to come out. The plastic one went straight in.

DSC 2913

The oil that came out of the haldex was quite dark .
Removed the Haldex controller which in itself is tricky enough , had to cut down a 4mm Allen key to get one short enough to undo the pins. This is the controller and the Powertrack insert along with a new gasket.

DSC 2910

There isn't much difference between the two inserts, That little bit of extra brass keeps the haldex enabled all the time.

DSC 2911

Came to reinsert the insert and when I was putting the circlip back in it snapped. Fortunately I am a bit of a magpie and collect stuff and over 20 years ago I was given this RS assorted box of circlips. Never used any of them till today. But fortunately there was a packet of them the size I needed.

DSC 2912
 
  • Like
Reactions: Misikee and jojo
Unfortunately the windage tray doesn't quite do the same job as a baffled sump. It won't stop all the oil moving to the one side of the sump when cornering hard.
Received a few more bits for the car.
GAZ sent the shorter 6 inch front springs.

DSC 2945

About 0.5Kg lighter for the pair but it's reduced unsprung weight as well. Hopefully be able to get the car to the right height now and also get the tyres in I want on the front as the spring adjusters should be out of the way further up the shock body.
More shopping on Fleabay. SPA 3 stage shift light. Easily configureable shift points and it records the maximum RPM seen on the engine. Several years old but never used. Appears to work fine.

DSC 2944

Whilst I had the front end of the car off on Sunday had a look at possible placements for the oil cooler. Unfortunately with the fittings on it's a little taller than I anticipated.

DSC 2918


After looking for a possible solution it seems that it's OK to mount the oil cooler upside down. This would work as the pipes and fittings will fit in the gap between the FMIC and radiator. I was concerned that this might result in air being trapped but it seems with the high pressure seen in the system any air is quickly removed. Some manufacturers actually fit the oil coolers upside down so if it works for them.

Also figured out how I was going to sort out some brake cooling, bought 2m of this ducting hose. Quite reasonable price compared to similar products.

http://www.ebay.co.uk/itm/APS-Singl...Ducting-Hose-63mm-Bore-1-Metre-/371118543555?
 
  • Like
Reactions: Kakatk
A while ago I bought a set some TT competition alloys with some bald tyres from Fleabay. The plan was to polish them on the front as I have seen some and they look quite good. After spending many hours just trying to do the one I have admitted defeat.
Was recommended a wheel refurb place in Dudley by @jojo where they will do a 3 day turn around on a set of wheels for £100. Full checmical strip, bead blasted to remove the last of paint and corrosion, kerb marks cleaned up then they are painted.
Very impressed with the finish. Went for a light gunmetal color, they have a good selection of standard colors. These wheels will be the set I use when I don't have the track day tyres on.
http://wheelfurb.com/

DSC 2950


Decided to fit the oil cooler this weekend.
Anybody know why part of the front grille is blanked off on the TT. I can see no reason why one side is partially blanked off, unfortunately it was right over part of the oil cooler so it had to be modified.
Before

DSC 2951

After 5 minutes with the angle grinder and nice thin metal cutting disc.

DSC 2952

Fitted the oil cooler upside down as this was the only way it was going to fit in sitting on top of the oil cooler. Quite happy in the end with the way it's fitted.

DSC 2953

DSC 2956


I couldn't keep the larger oil filter though. There is no way that I could screw it on with the front cross bar in place. If I had cut maybe 1/4 inch off the thread on the oil cooler where the filter spins on it would have probably been enough to refit the larger filter. Not a major issue though I just used a standard size filter.
There is more than enough oil in the cooler and pipes.
Disconnected all the coils from the plugs so I could turn the engine over to prime the system. No leaks and oil cooler appears to be working fine.
 
  • Like
Reactions: 45bvtc and jojo
Can you fit a remote oil filter ?
I don't need to fit a remote filter. I had upgraded the oil filter to a larger item when I did an oil change on the car, the one on the left, from the standard one fitted which gave me more oil in the system. With the addition of the oil cooler and piping this was another increase more than the difference between the filters so was happy to go back to a standard size filter.
DSC 2494
 
  • Like
Reactions: Misikee
That makes sense , I was assuming you wanted to keep the big filter.
 
Whilst I had the bumper off had a look at the brake cooling ducts I had planned. Bought some 2.5 inch duct hose off Fleabay and recycled part of the SMIC ducting that is now surplus to requirements. With a bit of silicon sealer I have been able to seal around the hose so hopefully all the air that goes in the duct will end up delivered to the brakes.
DSC 2959


DSC 2961

I need to modify the brake backing plates now to provide a connection point . Worked out where the ducting hose will run to keep it out the way of everything.
Took the car for a run and the oil cooler seems to work well. 10 minute drive and engine upto 90 degrees on 49C with oil showing 75 degrees. Normally it would be quite close to the coolant temp. It has an 80 degree thermostat on so all the oil will flow through the cooler above about 80 degrees.
 
  • Like
Reactions: Misikee