Jim's Black B6 Avant

Jimmy TDI

Pro Tinkerer
Joined
Dec 21, 2013
Messages
1,320
Reaction score
265
Points
83
Location
Manchester
I bought this back at the end of August after deciding it was time for a bigger car than my Bora with a growing family.
Some of the posts might not make perfect sense, but that's due to me copying and pasting from my build thread on one of the other forums I'm on, so apologies for that.


Initial thoughts are its awesome to drive, although I can't get used to not slowing down for speed bumps

The interior is MINT no marks, or wear on the full leathers, and even the buttons are mint which for an Audi is rare as they usually wear badly. It has a fantastic service history with two new tyres, new pads all round, and rear discs changed for the last MOT at the end of November so it runs sweet as a nut.

At the minute my only dislike is the full leather seats, I know that sounds backwards and arsey, but I much prefer 1/2 leathers. I'm going to give it a month to see how I get on with them, then if I still feel the same I'll either buy some 1/2 leathers, or find someone with a set that wants to swap me.

As it stands I'm now flat broke so there will be no mods for a month or so, but as a Brucey bonus it came with a private plate that I've had valued between £700-£1000, so I'll sell that and buy some coilovers.

If anyone is remotely interested in the Bora build HERE is a link to the build thread for it.

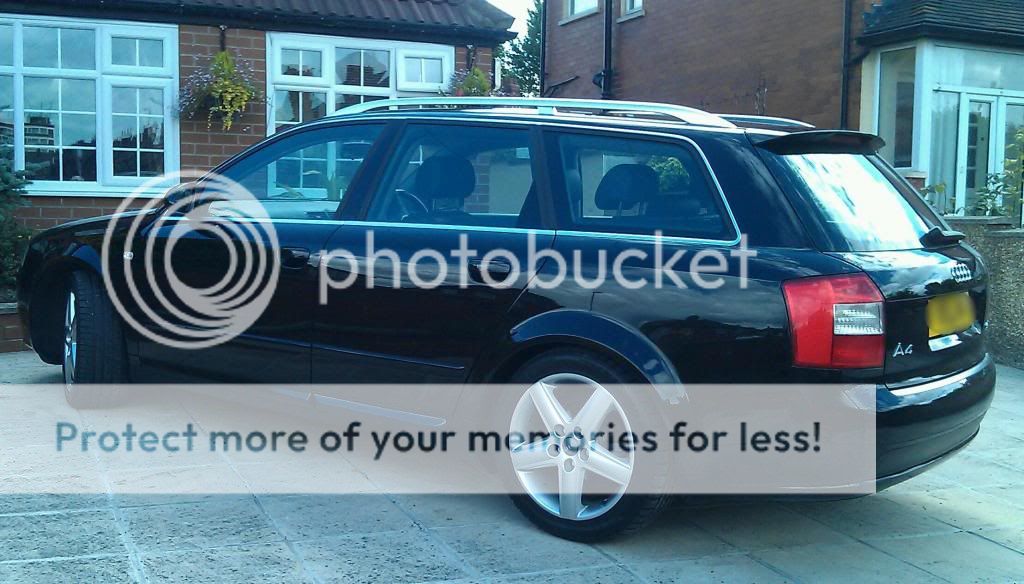
Here is what it looked like from the outside, a bit different to the norm
 
Last edited:
  • Like
Reactions: warren_S5
Right even though I'm on the bones of my **** I figured I've got loads of tins of beans in the cupbord, and bread is only a quid so I'll be ok for my dinners at work all month

I've still not took any pictures as I gave it a good clean on Sunday afternoon, but then we went to Southport on Monday and it's now full of sand inside, and full of bugs, sand, and general shiznit on the outside.
Oh and hound snot on the rear windows thanks to mans best friend aka Bailey


Just a couple of pics of stuff like the heater trim without wear, which doesn't sound that exciting, but it is literally the only one I've seen on my hunt for one of these


The cup holder which tbh is useless compared to the Mk4/Bora one, so I found a good use for it


Anyway I purchased a few bits for it today, nothing expensive or exiting, but this helps me keep track of stuff

Sidelights


Silver indicators


Main beam, and dipped beam
I got the two packs for £40 from my local motor factors as they didn't have the standard night breakers


Fogs (you can't get night breakers in H11)


Audi TT black rear view as mine came with a grey one
 
Well today was a bad day!

Got home from work at 7am and couldn't get to sleep for ages and I had to get up at 1 as I had a busy afternoon planned of taking stuff off the Bora. Also Gaz is coming round for some bits and for me to have a look over his car and scan it with vag-com.

My side light bulbs haven't turned up so I can't fit my bulbs this weekend now as I want to do them all at once as you have to remove the light cluster to swap the bulbs out and I can't be ***** doing it twice in a few days.

My TT mirror came yesterday so I thought right everything for Gaz is off now so I'll fit that. Took the grey one off, opened up the APC bag and the mirror had been pulled off instead of twisted off. Not only was the tab that should be attached to the screen stuck in the mirror base, the bit that that clips to the base had been broken by pulling it off so I couldn't even use it with my base
At this point I was pretty hacked off due to being tired and having my time and money wasted, then when putting the old mirror back on I've cracked the screen

I should be taking loads of stuff off my Bora today, but I've decided to leave it today and just get up early tomorrow now as I'm that wound up with myself I'm gonna end up breaking something else.
 
Well my side light bulbs finally turned up today, but I didn't get in till dusk so I'll change the bulbs over tomorrow.
Aslo my dad has made me some blanking plates for deleting the pipe from the exhaust manifold to the EGR, so if I can be bothered I'll do that tomorrow too
 
Oh I've also been at the dealers on my dinner today too for parts, and service items, pics of said parts to be added over the weekend.


Managed to get a couple of hours to my self yesterday after fitting, and wiring in the seats from my Bora into their new owners car. So I got a few jobs done with the intention of finishing off today, but the monsoon weather that came in last night has put a stop to those ideas.

I picked some parts, and stuff up from Manchester Audi (the one near heaven, oh sorry Old Trafford) on my dinner the other day, and I don't have a bad word to say about their service and parts department as they were very helpful, and even ordered the parts they didn't have in stock to be there the next morning. It is normally a 2day wait on parts and these were here in less than 24hrs.

I also got a full service kit of MAN filters from GSF, as they are the same spec as Audi ones, but half the price


Last edited:
Right Tuesday I got a bit of time to myself so I set about changing all of my bulbs, bar the fogs as they were that fused i snapped my T20 bit so I've sprayed them with a bucket load of WD40 to soak, and I will try to get them swapped at the weekend if I have time.

Here is a little comparison shot of the standard and night breaker bulbs next to each other


mmmmmmmm look at those sexy golden bits


Right down to the nitty gritty, and before you start if your planning on doing this in front of the car because your lazy and can't be bothered walking all the way to the kitchen table get a nice big piece of cardboard.

There are 4 Torx bolts/screws holding each light unit in place.
There are two on top that are clearly visible


One down the left hand side by the radiator hose


One down by the power steering reservoir


The two on the top need to come out completely, but the two at the bottom only need to be loosened off.
There is a little plug that holds part of the loom to the unit that you have to pull out also that is on the inside


Once this has been done the unit will slide out a few inches to allow better access to the main loom plug.
Once out a few inches you can then get a flat headed screwdriver into the release hole for the loom which needs to be pulled off the unit to fully pull it out


The drivers side involves a little bit more as you have to remove the cold air feed pipe, but this is only a case of removing two screws that you can see below. Once these have been removed you simply pull the two pieces of plastic pipe up, and the top piece just clips into the air box.


Also be mindful of the bonnet release cable when removing/refitting the drivers side as it passes along the top of the light unit


Then there are two on top again


One on the inside where you can also see the small loom plug needs to be pulled out


And one down the back near the air box


Now remember that piece of card I spoke of earlier well this is where you use it. Stick it on the floor so you can put the light unit down without damaging it.

There are two metal clips that need to be popped open so you can remove the plastic covers. You can use your fingers so don't be tempted to use a screwdriver, or similar as you will most likely break them.


The indicator bulb holders simply twist then pull out. It's at this point that you need to put a clean pair of gloves on as the oil, dirt, and grease on the gloves you have on will just damage your nice new bulbs.


When you take the plastic covers off you will notice that the sidelight holder is hidden behind the leveling motor, but it simply twists out of the way


Once you have replaced the bulbs its time to fit the light units back into the car which is pretty easy you simply push them back in so that the clips sit into the bottom of the light and around the lower screws.


If the lights won't simply push in with minimal effort then they aren't lined up properly, so don't force them just pull them back out a bit and try again. Once in you just have to push the loom plug back on until it clicks, and clip the little loom back onto the side.
Then sit back and enjoy no more orange in your headlights, and much better light output.
 
Air filter change

Firstly you need to remove the cold air feed pipe. It is actually two pieces that clip together, and they come out pretty easy


Remove the two screws that you can see above the headlight, then it simply pulls up and out as the top piece just clips into the top of the air box


And out the way they go


There are three little clips that hold the MAF sensor wire to the box that just pull out, two on the left, and one on the rear


Once the wire is free unclip the MAF sensor, and unscrew the clamp that holds the TIP onto the box


Once all these are off undo the two screws on the box itself, then the top is free to pull up and out. Got to like the fact that Audi actually bothered to put a heat shield on there too


Note which way it was when you removed it so that you put it back in the right way

Old versus new


Once out remove all the dirt, bugs, leaves, etc left in the housing (the wifes hoover is good for the little bits)


Before you seat the new filter it is a good idea to clean all around the area to avoid any debris getting into the new filter when you fit it.


Make sure you seat the filter correctly so that it seals when the lid is put back on. Then slide the top back down into the hole carefully trying not to get anything on the filter as you go.


Then you screw the two screws back in and reconnect all the clips, pipes, etc and jobs a gooden.
 
New covers


Firstly Ican’t believe Audi decided to cost cut and stop putting these covers on asstandard on the later models, the fools!

Here is apic of how it comes out of the factory (iPhone 4s and speakers not included)


The partsneeded to do the job are cheaper to buy from Audi than eGay so don’t botherlooking on there:
Battery cover – 8E2 819 422 A 01C - £5.71
Scuttlecover – 8E2 819 447 01C - £13.94

The jobtakes all of 10mins to do as there are no screws, bolt, etc to do so no toolsare needed.

  • Unlock car, and pop bonnet
  • pull the seal that runs across the engine bay (you can see it removed in the above picture)
  • pull the pollen filter rain cover towards you
  • Line up the scuttle cover with it’s fixing groove below the wipers, then push it in
  • Put seal back on to hold the front edge down
  • drop the battery cover into the grooves on the scuttle cover, then slide it in the opposite direction of the arrows on it until it clips/locks into place

I like thefact that the battery cover is in the crackle finish like part of the engine cover


Finishedpicture, and how it should be from the factory
 
Last edited:
Also did this whilst changing the air filter on Saturday

Deleting the EGR to turbo pipe

To do this you will need two blanking plates that are available from the likes of eGay, but if you work with steel, or like me your dad does then you can just knock some up out of 2mm stainless.
If you plan on making them yourself then order a new gasket for the EGR side of the pipe as this one is more likely to get damaged when removing it, and use it as a template like so


Firstly you need to remove the engine cover that is held on by three 10mm nuts. These are located under the three caps that just clip in


Once off you can clearly see the little fellow that needs to be removed going into the top of the turbo filling it with coke making those VNT nozzles nice and sticky, which in turn leads to limp mode once clogged enough, which in turn leads to a dead turbo


Ideally you want to remove the air box lid as it will give you far more room to work, so it would be a good idea to either do this in line with a filter change to kill two birds with one stone so to speak.
So begin by removing the cold air feed pipe. It is actually two pieces that clip together, and they come out pretty easy


Remove the two screws that you can see above the headlight, then it simply pulls up and out as the top piece just clips into the top of the air box


And out the way they go


There are three little clips that hold the MAF sensor wire to the box that just pull out, two on the left, and one on the rear


Once the wire is free unclip the MAF sensor, and unscrew the clamp that holds the TIP onto the box


Once all these are off undo the two screws on the box itself, then the top is free to pull up and out. Got to like the fact that Audi actually bothered to put a heat shield on there too


Once all this is out of the way the only thing holding the pipe on are two 12mm nuts on the turbo end, and two 6mm allen head bolts on the EGR end.
If you don’t have the socket type allen bits don’t worry as they are of no use for this job, all you need is a 6mm allen key as there is no access to the inner bolt for the ratchet bits due to the turbo feed pipe.
Once all these are off it’s just a case of wiggling it out of there which is a bit of an art, so take your time so as not to damage any threads on the turbo studs.


You can now attach one to the turbo like so making sure you use the gasket so you don’t get any boost leaks


The other one goes under the EGR, but as you can see the plate is thinner than the pipe you have removed


This means that the bolts are too long, but don’t worry there is an easy solution in the form of two nuts. You simply put a nut onto each bolt before the plate, and gasket to take up the extra length like so


Then it bolts on under the EGR like so


Then you just have to fit a new filter and refit the air box etc and your all done.
 
Pollen filter change

You need to remove this cover which is there to prevent rain water getting into the pollen filter housing.


The front edge simply pops out from under the seal, or you can pull that bit of the seal off

Then it simply pulls outwards towards you to reveal the hosing


You simply press the two clips you can see to unlock it, then lift the front edge up and pull it out towards you.

You will however come across a little obstruction in the form of the terminal cover


Easy resolve to this though you simply unclip it like so


Once out you will see the filter that just lifts up, and out. Take note of which way it is seated in case you forget when you come to fit the new one.


As you can see it needed changing


When you come to fit the housing top, and cover make sure you seat them properly as if they aren’t water gets into the filter causing steamy windows.

 
Well I gave it a good clean inside, and a quick clean outside this morning. Why I was in the process of hoovering Mr postman turned up with a couple of packages for me, one of which was for the car.
There was one bit of the interior that was worn and doing my head in, which I suspect is from the lady rep that leased it for the first 3 years of it's life. Either that or the guy I bought it off went cross dressing on the weekends :lol:


So I ordered a new one off eGay that is obviously a copy, but for £14 delivered, and from this country I thought it was worth a shot.


The fit and finish is really good to be fair, and all seems to be working fine so we shall see how long it lasts. It has made a big improvement though as that was the only bit letting the trim down really.
 
To continue the servicing posts/how to today involved the fuel filter

First you need to remove the engine cover which you do by removing the three plastic covers to reveal the three 10mm nuts that hold the engine cover down


You can now see the filter on the right hand side


You now need to pull the micky mouse clip out and make sure you don’t loose it, or your screwed. Also the spring clips on each of the other two pipes need to be opened and moved onto the filter so they are out of your way
The first pic is of a Bora filter, but it’s the same I just forgot to take one at this stage


Once these are off/moved you can pull the pipes off and move them out of the way. Now the plastic plug that the mickey mouse clip was holding in place just pulls up and out. You get two new seals with your filter one blue, and one black. These go on the bit that pushes into the filter. Take note of which way the old ones are on then pop the old ones off and replace them with the new ones.

Next you need to loosen off the clamp that holds the filter in place. For this you need a 5mm allen key bit


You can now slide the filter out and dispose of it, but be careful as it will be full of diesel.

Ideally you need to fill the new filter up with diesel before fitting it, but I have heard that you can use the prime pump to fill it by turning the ignition on and off. Personally I always fill it up before fitting it, but not with the diesel from your old filter as it will be full of bits and instantly dirty your new filter.

Now it is just a case of working in reverse to fit the new one.

Put the filter into the clamp and tighten it up
Push the plastic plug into the filter and refit the mickey mouse clip
To make sure you don’t forget to put the two spring clips back on slip them onto the filter before you start like so


Then push the two pipes back on, and slide the clips back over them.

If thats all your doing refit the cover and shut the bonnet, job done.
 
Coolant temperature sensor

You need to do this when the engine is cold, otherwise you will burn yourself. This is a job best done in the morning so the fluid has had all night to cool down.
You need a green 4pin temp sensor from Audi, DO NOT buy the cheap ones off eBay, or you will be doing this again very soon. You will also need the seal, and plastic clip to go with it.


Part number for the sensor is


First you need to remove the engine cover, which is done by popping the three plastic clips off to reveal 10mm nuts. It then just pulls up and off.
The sensor is hidden down the back left hand side as your looking from the front of the car, below the EGR valve.
You could possibly get to it as is, but you won’t be able to see what you’re doing so for this reason the best thing to do is either remove the small 90’ elbow that connects the EGR to the plastic IC pipe


Or remove the whole plastic IC pipe which is what I decided to do so as not to damage the clip system that goes into the EGR
Start by undoing the bolt that holds it to the engine 10mm I think


The map sensor

This connector and the connector for the temp sensor are removed by putting a screwdriver into the slot and pushing down like so, then it just pulls off


Pop the two fuel lines out of their holder


Then lift the locking clip at each end until they click
Start with the IC end then pull the pipe out


Then the EGR end and pull it out


Once it is free you can work it out towards the driver’s side of the car without removing anything else.

You can now see the sensor when you look down below where the 90’ elbow pipe was


If you haven’t been in your car yet then there should be no pressure built up in the system, but you should still remove the coolant cap to relieve any pressure, then screw it back on.
Remove the connector to the temp sensor as shown above
There is a plastic U shaped clip that holds the sensor in place, but I couldn’t really get a pic of it. If you look at this pic from a Mk4 Golf you can see it is the same


It clips in from underneath the sensor. You should be able to pull it off with your hand, but if not there is a hole to get a flathead screwdriver in.
Now clip your new sensor into the connector with the seal on the sensor as in the picture at the top of the post. This is to stop any fluid getting onto the terminals of the sensor when you put it in.
Now all you have to do is pull the old sensor out of the housing, then push the new on in. The quicker you do this the less fluid you will lose, but you need to make sure the old seal comes out with the sensor, if it isn’t on the sensor you need to stick your finger in and pull it out.
Now push the new U clip up into the groove to hold the sensor in place. If it won’t clip in the sensor needs pushing into the housing a bit more.
Then it is a case of refitting the IC pipe and clipping the parts back onto it and you’re done.
 
Finally got around to sorting my steamy rear cluster this evening as it really pee'd me off how unsymmetrical the rear looked when I was walking over to it after dropping my son off at school this morning.

Removing the clusters on these is like melting ice with lava compared to the mk4/bora

Let's put some pics to this shall we

Open boot and you will see this plastic plug/cover
null_zps06a37818.jpg


Pop it out and you will see the retaining bolt which is a Phillips, or 8mm socket.
null_zps5b91d5e9.jpg


Once this is unscrewed all that is holding it in are two small plastic plugs at the front edge
null_zpsa76f1f2f.jpg

null_zpseb40c4a8.jpg


Then it's just a case of unclipping the loom plug, which you do by placing a screwdriver in and pushing it downwards
null_zps67c8467a.jpg


Now the thread title may be confusing, but it shall now all become clear, unless your too young to remember the show :lol:

Who ever changed a bulb on this side last got heavy handed and snapped the loom plug socket off. Instead of buying a new one they have glued this one back together, badly. I think this is causing the seal to be out of line which is letting water in as the only way I could get the water out was through the bulb holes.

null_zpse3009a23.jpg


I'm going away next week so I've just put this one back on for now and I'll buy a new one from Audi when I get back.
 
Well not much been happening here as I've decided to put off fitting the coils until next year now incase we get the snow we have had the last couple of years. The GMBH front bumpers are hard to come by second hand and cost a small fortune new so I don't fancy using it as a snow plough.

I've got another black rear view mirror for a bargain off eBay which came today, but I'm going to leave fitting it until after my mot next week just incase it makes the screen any worse as I don't want to risk failing the mot.
null_zps3e68b612.jpg


I also ordered some cree led reverse bulbs from china before I went on holiday that chrisb pointed me too. I fitted those the other day and they're really bright and don't throw any error codes.
null_zpsa73d6b3d.jpg

null_zps661ad9d8.jpg


As you can see above the beam pattern is much larger than the standard filament bulbs too which is quite impressive considering there is only one smd in there.
null_zpsa2b0e1a2.jpg
 
Today was a bad day!

I went doing some Christmas shopping this afternoon, and upon my return to the car I found someone has hit my drivers side. Paint along the side of the front bumper, and wing, with a nice sized dent to the arch with some top coat missing.

I've managed to clay the other cars paint off of mine, and the light line left on the bumper should polish out, but the wing is fudged
 
Well today I've been feeling depressed about yesterday's drama so I've been on vag-com to see what I could do to the car and I've added alarm chirps, and anti hijack.
I've also had a friend from down south rewrite my map with the EGR deleted from it, as since I got rid of the pipe from it to the turbo I would get the emissions light come on. I just turned it off with vag-com when it came on, but with my mot being this week I didn't want it to pop up during the test and fail.
As a bonus he sent me three files, a standard one with the EGR delete, a remapped one with the EGR delete, and a remapped one with EGR delete and a linear throttle pedal for more controled acceleration, mainly in the lower gears.

So I have put the later one on
 
My flip up lighter turned up Friday so I set about cleaning, and de-rubberising it when I got home from work yesterday
IMAG1940_zps5944156c.jpg

IMAG1941_zps2d32d338.jpg


I've also bought some wire so that I can tap into this for power and put a USB port in more convenient place for charging my phone as the wire just gets in the way where the cigarette lighter is.
 
Well all is not well on planet Jim.

I've still not had chance to fit my new flip up lighter as I never seem to get any time to myself.

What's worse is that all plans are currently on hold as on Tuesday I found out in the new year I'm either going to have no job, or if I keep it I will have to take a wage cut.

Then to make things worse is my fecking boiler packed in Thursday and my mate has had to condemn it.

So in short I'm potentially going to have no wage in 8 weeks meaning I needed to save as much as possible between now and then, then I have to shell out £1300 for a new boiler.

On the other hand I started to strip the front end of the Bora down this afternoon ready for the running gear coming out tomorrow morning. I've got a guy driving down from Glasgo for it tomorrow so a morning of cut cold hands awaits.

 
Well it went in for its mot today, and failed.

Bushes on the front lower arms (rear) that Audi wanted £174.41 + vat each for the arms. I went down to ECP and they had a good sale on and I managed to get both sides (Lemforder) with new nuts and bolts for a shade under £150.

So my one day to relax before going back on nights has gone out the window and I'll be down on the cold floor changing them tomorrow morning.
 
It got a clean bill of health yesterday after the pain in my **** job of changing the lower arms


The job itself is a straight forward job as there is only 1 nut, and one nut and bolt holding each side on, but doing it without a ball joint splitter is a right pita.


Get it in the air (take note of the gentle persuader, the bigger the better)


These were what needed changing, well the bushes on the inside, but to me it would have been false economy to just change the bushes, as when the ball joints fail (which they will) I would have to change the arms anyway.


There is the nut on the ball joint to take off, but your best just loosening it about 5mm if you don't have the tool to stop it flying down when you give it some gentle persuasion to loosen it off. Then you can unscrew it and work it out fully.


Also the nut and bolt at the other end


The nut is in a cut out in the subframe


You will need to loosen your undertray to get better access to the nut which you do by removing these two screws so that you can pull it down out of the way.


Last edited:
I have just put a bid in on some factory 18's, and that's me up to date.

It's a bit more of a maintenance build than a modifying build atm, but that should hopefully change soon.
 
Update

My bid has been accepted, and the seller has been in touch with me straight away.
His car is currently in the garage having some work done, so as soon as it's out he's going to give me a shout so I can have a drive up North for them :yahoo:

Now I just have to explain to the other half how they are an investment as I've bought them for less than I can sell them for should I need to :unsure:
 
Ha! I had to do the same when I bought my s4 wheels. How far you going for them? I ended up driving to London for mine, was a long trip but was fun!

Good pics for the lower arms too, handy post. Cheers.
 
Hey Jim! Thanks for the detailed write up so far on your car, I've had a good look around the engine bay of mine but for new people with the same it's helpful. What's the latest on your job? I hope all is ok!
 
Good thread mate. Car looks good.
I'm definately doing the reversing light thing - great tip! What was the seller ID of the E-Bayer that sold you the headlight switch please? Mines very tatty but I wanted to be sure it wouldn't cause me problems ordering a cheapo part instead of the £££ that Audi would want.
Cheers
 
Ha! I had to do the same when I bought my s4 wheels. How far you going for them? I ended up driving to London for mine, was a long trip but was fun!

Good pics for the lower arms too, handy post. Cheers.

I'm coming up to your neck of the woods, so not too far really.

I'm planning on changing the upper two when I lower it too.
 
Hey Jim! Thanks for the detailed write up so far on your car, I've had a good look around the engine bay of mine but for new people with the same it's helpful. What's the latest on your job? I hope all is ok!

It's good to have a record of what you've done, and I didn't have a clue about these before I bought it, so I thought they might help someone out.
I will find out in the new year about my job, so until then I'm in limbo.
 
Good thread mate. Car looks good.
I'm definately doing the reversing light thing - great tip! What was the seller ID of the E-Bayer that sold you the headlight switch please? Mines very tatty but I wanted to be sure it wouldn't cause me problems ordering a cheapo part instead of the £££ that Audi would want.
Cheers
Yeah I was a bit worried it wouldn't work, or fit well, but it's bang on.

HERE is a link to the one I bought mate.
 
Just popped over the road to ECP on my dinner and picked up a snub mount, some ARB bushes, and some 312mm Pagid discs. If you need any bits you want to get them ordered before Sunday as that's when their big sale ends.
I've got some 312mm carriers in the post too that someone bought in error, so I got them for a bargain, and I pick my alloys up next week.
All this plus the coilovers should point to a busy week off for me in a couple of weeks.
 
Great work with all the guides!

just a quick question, what year is your car? and has the engine management light come on since you blocked off the EGR?
 
good work with all the maintenace stuff and guides!

any pics of your sidelights? i need a load of new ones for my audi and L200 but i dont liek the yellow glow that the clear ones have... :|
 
Great work with all the guides!

just a quick question, what year is your car? and has the engine management light come on since you blocked off the EGR?

Cheers mate, it's a 54reg and the eml light did come on, but I sent a friend a dump of my original map and he removed the EGR from it for me which I've wrote over he standard map.
 
good work with all the maintenace stuff and guides!

any pics of your sidelights? i need a load of new ones for my audi and L200 but i dont liek the yellow glow that the clear ones have... :|

Cheers

No I haven't, but I will endeavour to get one for you. They aren't pure white, no filament bulb ever will be, but I couldn't be bothered with the minefield of canbus LEDs and they're whiter than standard bulbs.
 
New 312mm discs, and ARB bushes.


New pads, 312mm carriers, and snub mount. I will order a polly snub mount from the US at some point, but this is a quick cheap replacement of the worn one for now.

 
Cheers lads, hopefully there should be a couple more in the next couple of weeks.
 

Similar threads

Replies
6
Views
943
Replies
4
Views
679
Replies
6
Views
856