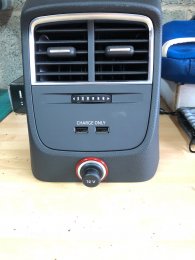
First off I need to Thank forum member RJ-8V for noticing these were available on new cars and for help with the part numbers.
This will add two USB ports to the rear of the centre console underneath the air vents. These are for charging only, (they will not pass data to the MMI). This is a good solution for rear passengers or when you want to plug in a device but don't need it to be connected too the MMI or just need more USB ports with an OEM look.
It does not modify any of the cars original wiring and can be fully reversed.
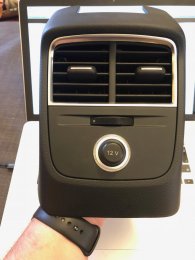
I did this to my car which is an A3 e-tron 8v FL car with the interior LED Pack and storage pack, things may look different on your car ! My car came with a 12v socket in the rear console I do not know if the wiring will be present on a car without this socket. It should be easy to create a fused 12v feed that you could run to this position from the front 12v socket if your car does not have it.

Tools Required

I purchased all of these from the parts request service on this forum apart from the USB hub and centre console air vent as these could not be found on the parts system at the time, these came from ebay.de
8v0819203b x1
5Q0035726L x1
4G0919321A x1
8K0973754B x1
000979024e x1
000979009E x1



Instructions
1. Take both repair wires and cut the about 10cm away from the connectors and strip 5mm of insulation from the end of each. Insert them into pins 1 and 2 on the corresponding connectors they should be easy to insert and click into place (they are a pain to remove so make sure you get the in the right ones first time ) Take your pieces of heat shrink and place them over the wires now. I have used red for +12 and black for -12v.

2. Tin the ends of all 4 wires with solder.
Then solder pin 1 of the black connector too pin 2 of the red connector ( -12v ).
Then solder pin 2 of the black connector too pin 1 of the red connector (+12v ).
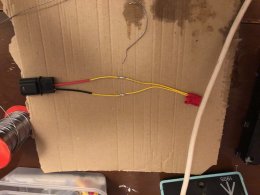
3. Slide the heat shrink over the soldered joint and heat with a hot air gun or lighter to shrink the heat shrink.
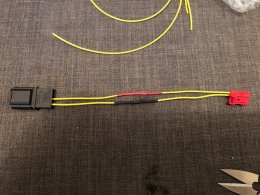
4. Wrap the wire in cloth tape.

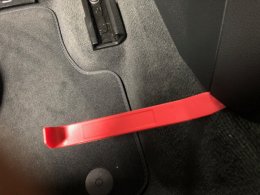
5. Remove the rear air vents. Pry from the bottom corner first, it is a bit stiff. Remove the connector from the 12v socket (the clip you need to push is at the bottom of the connector.

6. Remove the air vent and 12v socket from the trim piece and replace with the USB version. I put some cloth tape around where the USB hub clips in because there was a lot of movement and I hate rattles. Insert the USB hun into the facia.

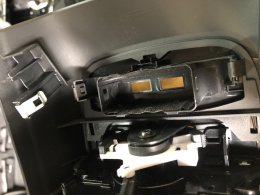
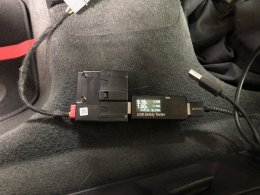
7. Connect the cable from the USB hub to the 12v connector and test. The most I saw the hub put out was about 2 amps I am guessing it is a 3amp unit. I can't seem to find the specs for it online as the company that produced it has been bought up .
8. Resemble

Interesting observations
It seems pin 3 of the black 12v connector is the live for the illumination of the 12v socket (LED in my case as I have the interior light pack). This maybe useful for adding more interior lights at a latter point.


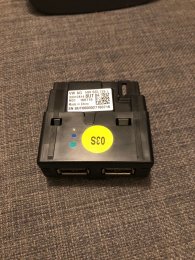
I believe that pins 3 + 4 on the USB hub are the D+ and D- for the USB hub though I have not tested this, it may be possible to add a data connection to these ports but I don't really see the point.


This will add two USB ports to the rear of the centre console underneath the air vents. These are for charging only, (they will not pass data to the MMI). This is a good solution for rear passengers or when you want to plug in a device but don't need it to be connected too the MMI or just need more USB ports with an OEM look.
It does not modify any of the cars original wiring and can be fully reversed.
I did this to my car which is an A3 e-tron 8v FL car with the interior LED Pack and storage pack, things may look different on your car ! My car came with a 12v socket in the rear console I do not know if the wiring will be present on a car without this socket. It should be easy to create a fused 12v feed that you could run to this position from the front 12v socket if your car does not have it.


Tools Required

- Trim Removal Tool
- Cable Snips
- Soldering Iron solder and heat shrink and lighter or hot air gun ( or 2x red butt crimps and crimp tool )
- Cloth Tape or electrical tape
I purchased all of these from the parts request service on this forum apart from the USB hub and centre console air vent as these could not be found on the parts system at the time, these came from ebay.de
8v0819203b x1
5Q0035726L x1
4G0919321A x1
8K0973754B x1
000979024e x1
000979009E x1
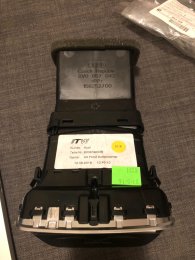
- 8v0819203b Center Console vent and USB face plate (This seems to be all one part even though the vent tube has another part number on it 8v0857042) I paid about €60 delivered for this the facia surround and USB hub delivered from a seller on ebay.de


- 5Q0035726L USB hub £37 from the parts request.

- 4G0919321A 3pin 12v Connector £0.90 from the parts request.

- 8K0973754B 4pin USB hub Connector £2.00 from the parts request. (I am not sure this is exactly the correct connector it fits but does not latch in the socket of the hub)

- 000979024e 12v repair wire (this gives you the male pins for the 3pin 12v socket) £8.20 from the parts request.

- 000979009E repair wire (this gives you the female pins for the USB hub) £3.90 from the parts request

Instructions
1. Take both repair wires and cut the about 10cm away from the connectors and strip 5mm of insulation from the end of each. Insert them into pins 1 and 2 on the corresponding connectors they should be easy to insert and click into place (they are a pain to remove so make sure you get the in the right ones first time ) Take your pieces of heat shrink and place them over the wires now. I have used red for +12 and black for -12v.

2. Tin the ends of all 4 wires with solder.
Then solder pin 1 of the black connector too pin 2 of the red connector ( -12v ).
Then solder pin 2 of the black connector too pin 1 of the red connector (+12v ).

3. Slide the heat shrink over the soldered joint and heat with a hot air gun or lighter to shrink the heat shrink.

4. Wrap the wire in cloth tape.

5. Remove the rear air vents. Pry from the bottom corner first, it is a bit stiff. Remove the connector from the 12v socket (the clip you need to push is at the bottom of the connector.


6. Remove the air vent and 12v socket from the trim piece and replace with the USB version. I put some cloth tape around where the USB hub clips in because there was a lot of movement and I hate rattles. Insert the USB hun into the facia.


7. Connect the cable from the USB hub to the 12v connector and test. The most I saw the hub put out was about 2 amps I am guessing it is a 3amp unit. I can't seem to find the specs for it online as the company that produced it has been bought up .

8. Resemble

Interesting observations
It seems pin 3 of the black 12v connector is the live for the illumination of the 12v socket (LED in my case as I have the interior light pack). This maybe useful for adding more interior lights at a latter point.


I believe that pins 3 + 4 on the USB hub are the D+ and D- for the USB hub though I have not tested this, it may be possible to add a data connection to these ports but I don't really see the point.


