- Joined
- Jun 17, 2015
- Messages
- 126
- Reaction score
- 54
- Points
- 28
- Location
- Charlotte NC USA was Manchester UK
Edit: Forgot to mention - mine is the Premium Plus model. Please check the pins on your ECM's A2 connector (see the ECM section below) first and make sure pins 5 and 45 are there before trying this as I'm not sure all US 2015 A3s have the same ECM. They might, but I don't know.
Here's a write up to install front fog lights on an Audi A3 8V 2015 US model that has regular non-adaptive bi-xenon headlights with those tasteful faux grilles we got. Might work on a 2016 too, but can't be sure if the ECM is the same. If you have an all weather light button above the rear fog button, or the S-line front end, stop reading")
Oh, and if you choose to do this yourself, it's at your own risk and I'm not responsible etc..
Originally I wasn't going to bother with this retrofit as no grilles seemed to match our bumper. Then the other week, after the TDI thing broke, I was on the UK A3 build page having a look to see if TDIs were still being sold back home and noticed their new 2016 model front bumper matched our 2015 front bumper My fellow Brits get front fogs as standard, so then I went to find the part numbers. Note that I wanted to do this as I live in a swamp and it does get foggy here some mornings and the rain is sometimes heavy too. It's not to drive with them on all day like most seem to round here..
New parts are $381.74 (ish) total including shipping, not including the cost of a light switch which you can source pretty easily off eBay for around $70 or thereabouts. You need vag-com to code. No vag-com, add $58 ish for a dongle that codes for you from Kufatec who you get the harness from, but I don't know if the dongle works as I have vag-com. Dealers should be able to code them too at a guess. Could be less overall if you source the parts off eBay too. The grilles are new it seems to the market. The fogs were made in 2013, so seem to have been used on other models so may be around on eBay.
I got lucky and found someone in Hungary selling a new passenger side grille and fog light set for $40 and $10 ish in shipping on eBay, so figured I'd take a risk and see if they fit and if they did, I'd carry on. They did, so I went ahead and ordered the rest of the stuff I needed.
Other than the harness from Kufatec and the passenger side from eBay, I got the other parts from Bernardi in MA ($18 shipping) and it took a little over a week to get them.
On the Kufatec harness, yes you get instructions to download, but they're pretty vague. They tell you to remove the front bumper for example which doesn't apply, and on the subject of passing the harness through the firewall - "The wires have to be laid into the interior through the boot marked in the figure 9.". Not much use since it was a photo of a Golf.
Parts:
Harness: $70.90 (that price includes express FedEx Shipping).
https://www.kufatec.us/shop/en/volkswagen/golf/golf-7-5q/fog-light-wiring-harness-mqb?tab=cross
If no vag-com to code, you might want to buy the dongle at the same time unless you want your dealer to code: https://www.kufatec.us/shop/en/diag...lkswagen-audi/coding-interface-fog-lights-mqb ($58).
Front fog lights ($63 each) and come with Osram H8 bulbs in them:
Passenger/right 8V0-941-700-B
Driver/left 8V0-941-699-B
Grilles ($80 each):
Passenger 8V5-807-682-A-9B9
Driver 8V5-807-681-A-9B9
Screws (x4) ($1.14 each):
WHT-005-764
New light switch (needs auto lights and front and rear fog):
8V0-941-531-AE-5PR is the official one apparently, but it's $180 new, so eBay is your friend here. Just need an auto headlight setting and front and rear fog buttons. Even if the switch has a manual headlight dipping button like mine has that connects to nothing, it'll work (I think the UK non-LED headlights have the manual dip switch too according to their 2015 manual pdf that was posted on here). The switch I got off eBay was $50 (8V0-841-531-Q). **Note: There's a lot on eBay without the Auto lights setting, so get one with**

Bulbs: Regular H8s came with the fogs but I got these and they seem ok: $25/pair for LED 6k
https://www.amazon.com/gp/aw/d/B00N5BAWYK/ref=yo_ii_img?ie=UTF8&psc=1
Prep:
Before starting, test the harness and bulbs. Plug the H8 bulbs into the harness sockets, and using a 12v source, connect ground to the harness spade connector and then positive to one of the gray wire connectors, then check the other gray wire connector for the other bulb.
If the bulbs don't light, either the harness is a dud, or the 12v source is, or the bulb is. On the end of the grey wires mark which one is the passenger (right) side (if you plan to code the fogs for cornering too - if not, I don't think it really matters). I didn't code mine for the cornering, so that's not here, but the coding is here on the forum.
Wiring:
Under the steering wheel, pull up the black piece above the brake pedal and you'll find an unused pear shaped grommet. I didn't take a photo of it before I put the harness through and sealed it off, so here it is afterwards - along with the black part you need to move..


Remember which way the grommet was around (thick edges face engine bay, thin faces inside the car). Pull that out to the inside of the car. Look up inside the hole and you'll see daylight and a thick brown earth wire (and some other stuff I couldn't identify).
Under the hood, drop the 2 gray wires on the kufatec harness behind the battery near the thick brown ground wire. No real need to remove the battery. I could have, but there's not much need.
Look inside the grommet hole for the grey wires and hook them through (may take a couple of goes to get them near the hole).
The grommet is thin rubber so poke a small hole in the grommet and push through the 2 gray wires one at a time, (while remembering which way the grommet will need to go back in the hole - I didn't at first...). You'll end up pulling the grey wires through past the cloth tape on the harness and that's ok.
Remove the side trim near the door and have a look inside - you'll see 3 largeish connectors with white levers on them - this is the vehicle central electrical control system module/CECM/ECM/aka J519.


Pull through only enough wiring to get to the middle one of those 3 connectors on the ECM with a little slack.
Replace the grommet and although it should be good as it is, seal it up around where the wires are with some silicone adhesive anyway. I didn't find any dirt on the back of the grommet when I first took it out, so assume it's pretty well out of the way of the elements, but just to be sure...
Replace the black part and cover the grommet back up.
Leave the 2 gray wires in the cabin where they are for now.
For the new harness wiring in the engine bay, route it all round the back and to the right of the battery and connect the harness ground spade connector to the ground behind the battery - the white nut.
Remove the existing faux grilles:
The erwin body manual says you have to remove the bumper to get these out. I didn't.
Start at the bottom corner closest to the center of the car and pull it out clip by clip. Once that's unclipped, do the same at the top and pull.
Once those are unclipped, pull the whole thing in the direction of the center of the car and they're out.
Clean up all the gunk in there..
Use the clips on the new grilles' clips as a guide so you can see how the old grilles clip in and out.
Harness Route:
Feed the shorter one to the drivers side to the left of the washer fluid reservoir and zip tie on the way down.
Feed the longer to the passenger side. You can go through the bottom of the front grille as there are rubber pieces you can feed through to the passenger light, so no need to go under the car.


If you have front parking sensors, you'll find its wiring harness already in the front underneath the center grille. I zip tied my passenger side wire to that in a couple of spots on the way to the passenger fog (it sits behind the lip here below the center grille).

Fog lights and Grilles:
Make sure the fog bulbs are in the fog light housings first. (Note - you have to remove the harness connector from the bulb to remove the bulb from the fog housing. You can't remove them with the harness still connected).
When the bulbs are in the fog lights, connect the fog harness connectors.
Install the fog lights (there's 2 preexisting pieces each push onto, and 2 holes per side to fit them).

Fit the grilles.

ECM etc.:
Disconnect the car battery negative (you'll lose trip info and the time on MMI..).
Unplug the existing light switch from its wiring.
Remove the driver's side lower panel (hex screw on the left side and two small nuts on the bottom) and remove the existing light switch.
This next step I probably should have removed the panel where the hood release lever is at the bottom of the A pillar, but I found it had enough flex to access the ECM connector I needed.. Just unclips from behind the dead pedal and bend it back enough... If you're not comfortable doing this, ask your dealer to help access the ECM. The hood release lever won't come off, or shouldn't..

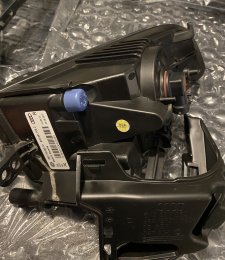
Unplug the middle ECM connector. Under the end of the white lever, press down and pull up the white lever and it unplugs the connector from the ECM. Make sure it's out and then slide it vertically down and away from the ECM.
Here's the middle connector pin assignment (A2) and what our A2 looks like inside too (pins highlighted):


Undo the zip tie on the connector then unclip the 2 sides of the connector from the connector housing.
The pins are labelled well on the sides:
Left/driver's side connector to pin 45.
Right connector to pin 5.
The new harness connectors just go straight in - nothing else to unclip. Just look at the orientation of the existing pins in the connector to know which way in the new ones go. If it won't go in, don't force it, it's probably just going in the wrong way round. Should just clip in with little effort.
Put the two sides back into the connector housing and zip tie the harness back up and plug the connector back to the ECM.
Bend the lower A pillar panel back and behind the dead pedal...
Install the new light switch into the panel and plug it back in.
Put the panels back on and reconnect the battery negative.
After reconnecting the negative to the battery, set the time on MMI, start the car, raise and lower all the windows a couple of times (I read it helps). A crap load of warnings go off about ESC and TPMS etc. Just drive the car round the block and they all go away.
VCDS Coding:
09 Central Electronics.
Security code 31347.
Original US Setting:
Front Left Fog:
(1)-Leuchte12NL LB45-Lasttyp 12 not active
(2)-Leuchte12NL LB45-Lampendefektbitposition 12 0
(3)-Leuchte12NL LB45-Fehlerort mittleres Byte DTC-DFCC 12 0
(4)-Leuchte12NL LB45-Lichtfunktion A 12 not active
(6)-Leuchte12NL LB45-Dimmwert AB 12 0
(10)-Leuchte12NL LB45-Dimmwert CD 12 0
Front Right Fog:
(1)-Leuchte13NL RB5-Lasttyp 13 not active
(2)-Leuchte13NL RB5-Lampendefektbitposition 13 0
(3)-Leuchte13NL RB5-Fehlerort mittleres Byte DTC-DFCC 13 0
(4)-Leuchte13NL RB5-Lichtfunktion A 13 not active
(6)-Leuchte13NL RB5-Dimmwert AB 13 0
(10)-Leuchte13NL RB5-Dimmwert CD 13 0
Changed to:
Front Left Fog:
(1)-Leuchte12NL LB45-Lasttyp 12 23 - allgemeine Scheinwerfer
(2)-Leuchte12NL LB45-Lampendefektbitposition 12 38
(3)-Leuchte12NL LB45-Fehlerort mittleres Byte DTC-DFCC 12 22
(4)-Leuchte12NL LB45-Lichtfunktion A 12 Nebellicht links
(6)-Leuchte12NL LB45-Dimmwert AB 12 100
(10)-Leuchte12NL LB45-Dimmwert CD 12 100
Front Right Fog:
(1)-Leuchte13NL RB5-Lasttyp 13 23 - allgemeine Scheinwerfer
(2)-Leuchte13NL RB5-Lampendefektbitposition 13 42
(3)-Leuchte13NL RB5-Fehlerort mittleres Byte DTC-DFCC 13 23
(4)-Leuchte13NL RB5-Lichtfunktion A 13 Nebellicht rechts
(6)-Leuchte13NL RB5-Dimmwert AB 13 100
(10)-Leuchte13NL RB5-Dimmwert CD 13 100
Coding for the new light switch to tell the car there's a front fog light button:
Module 09 Code: 31347 Long Coding Helper select Byte 7 and enable Bit 3 and save.
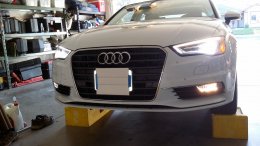
That's it. You should now have front fog lights and a slightly different looking front end
Also, if you're in the Tampa Bay area and don't have vag-com, give me a shout. Am on the map.

Here's a write up to install front fog lights on an Audi A3 8V 2015 US model that has regular non-adaptive bi-xenon headlights with those tasteful faux grilles we got. Might work on a 2016 too, but can't be sure if the ECM is the same. If you have an all weather light button above the rear fog button, or the S-line front end, stop reading
Oh, and if you choose to do this yourself, it's at your own risk and I'm not responsible etc..
Originally I wasn't going to bother with this retrofit as no grilles seemed to match our bumper. Then the other week, after the TDI thing broke, I was on the UK A3 build page having a look to see if TDIs were still being sold back home and noticed their new 2016 model front bumper matched our 2015 front bumper
My fellow Brits get front fogs as standard, so then I went to find the part numbers. Note that I wanted to do this as I live in a swamp and it does get foggy here some mornings and the rain is sometimes heavy too. It's not to drive with them on all day like most seem to round here.. New parts are $381.74 (ish) total including shipping, not including the cost of a light switch which you can source pretty easily off eBay for around $70 or thereabouts. You need vag-com to code. No vag-com, add $58 ish for a dongle that codes for you from Kufatec who you get the harness from, but I don't know if the dongle works as I have vag-com. Dealers should be able to code them too at a guess. Could be less overall if you source the parts off eBay too. The grilles are new it seems to the market. The fogs were made in 2013, so seem to have been used on other models so may be around on eBay.
I got lucky and found someone in Hungary selling a new passenger side grille and fog light set for $40 and $10 ish in shipping on eBay, so figured I'd take a risk and see if they fit and if they did, I'd carry on. They did, so I went ahead and ordered the rest of the stuff I needed.
Other than the harness from Kufatec and the passenger side from eBay, I got the other parts from Bernardi in MA ($18 shipping) and it took a little over a week to get them.
On the Kufatec harness, yes you get instructions to download, but they're pretty vague. They tell you to remove the front bumper for example which doesn't apply, and on the subject of passing the harness through the firewall - "The wires have to be laid into the interior through the boot marked in the figure 9.". Not much use since it was a photo of a Golf.
Parts:
Harness: $70.90 (that price includes express FedEx Shipping).
https://www.kufatec.us/shop/en/volkswagen/golf/golf-7-5q/fog-light-wiring-harness-mqb?tab=cross
If no vag-com to code, you might want to buy the dongle at the same time unless you want your dealer to code: https://www.kufatec.us/shop/en/diag...lkswagen-audi/coding-interface-fog-lights-mqb ($58).
Front fog lights ($63 each) and come with Osram H8 bulbs in them:
Passenger/right 8V0-941-700-B
Driver/left 8V0-941-699-B
Grilles ($80 each):
Passenger 8V5-807-682-A-9B9
Driver 8V5-807-681-A-9B9
Screws (x4) ($1.14 each):
WHT-005-764
New light switch (needs auto lights and front and rear fog):
8V0-941-531-AE-5PR is the official one apparently, but it's $180 new, so eBay is your friend here. Just need an auto headlight setting and front and rear fog buttons. Even if the switch has a manual headlight dipping button like mine has that connects to nothing, it'll work (I think the UK non-LED headlights have the manual dip switch too according to their 2015 manual pdf that was posted on here). The switch I got off eBay was $50 (8V0-841-531-Q). **Note: There's a lot on eBay without the Auto lights setting, so get one with**
Bulbs: Regular H8s came with the fogs but I got these and they seem ok: $25/pair for LED 6k
https://www.amazon.com/gp/aw/d/B00N5BAWYK/ref=yo_ii_img?ie=UTF8&psc=1
Prep:
Before starting, test the harness and bulbs. Plug the H8 bulbs into the harness sockets, and using a 12v source, connect ground to the harness spade connector and then positive to one of the gray wire connectors, then check the other gray wire connector for the other bulb.
If the bulbs don't light, either the harness is a dud, or the 12v source is, or the bulb is. On the end of the grey wires mark which one is the passenger (right) side (if you plan to code the fogs for cornering too - if not, I don't think it really matters). I didn't code mine for the cornering, so that's not here, but the coding is here on the forum.
Wiring:
Under the steering wheel, pull up the black piece above the brake pedal and you'll find an unused pear shaped grommet. I didn't take a photo of it before I put the harness through and sealed it off, so here it is afterwards - along with the black part you need to move..
Remember which way the grommet was around (thick edges face engine bay, thin faces inside the car). Pull that out to the inside of the car. Look up inside the hole and you'll see daylight and a thick brown earth wire (and some other stuff I couldn't identify).
Under the hood, drop the 2 gray wires on the kufatec harness behind the battery near the thick brown ground wire. No real need to remove the battery. I could have, but there's not much need.
Look inside the grommet hole for the grey wires and hook them through (may take a couple of goes to get them near the hole).
The grommet is thin rubber so poke a small hole in the grommet and push through the 2 gray wires one at a time, (while remembering which way the grommet will need to go back in the hole - I didn't at first...). You'll end up pulling the grey wires through past the cloth tape on the harness and that's ok.
Remove the side trim near the door and have a look inside - you'll see 3 largeish connectors with white levers on them - this is the vehicle central electrical control system module/CECM/ECM/aka J519.
Pull through only enough wiring to get to the middle one of those 3 connectors on the ECM with a little slack.
Replace the grommet and although it should be good as it is, seal it up around where the wires are with some silicone adhesive anyway. I didn't find any dirt on the back of the grommet when I first took it out, so assume it's pretty well out of the way of the elements, but just to be sure...
Replace the black part and cover the grommet back up.
Leave the 2 gray wires in the cabin where they are for now.
For the new harness wiring in the engine bay, route it all round the back and to the right of the battery and connect the harness ground spade connector to the ground behind the battery - the white nut.
Remove the existing faux grilles:
The erwin body manual says you have to remove the bumper to get these out. I didn't.
Start at the bottom corner closest to the center of the car and pull it out clip by clip. Once that's unclipped, do the same at the top and pull.
Once those are unclipped, pull the whole thing in the direction of the center of the car and they're out.
Clean up all the gunk in there..
Use the clips on the new grilles' clips as a guide so you can see how the old grilles clip in and out.
Harness Route:
Feed the shorter one to the drivers side to the left of the washer fluid reservoir and zip tie on the way down.
Feed the longer to the passenger side. You can go through the bottom of the front grille as there are rubber pieces you can feed through to the passenger light, so no need to go under the car.
If you have front parking sensors, you'll find its wiring harness already in the front underneath the center grille. I zip tied my passenger side wire to that in a couple of spots on the way to the passenger fog (it sits behind the lip here below the center grille).
Fog lights and Grilles:
Make sure the fog bulbs are in the fog light housings first. (Note - you have to remove the harness connector from the bulb to remove the bulb from the fog housing. You can't remove them with the harness still connected).
When the bulbs are in the fog lights, connect the fog harness connectors.
Install the fog lights (there's 2 preexisting pieces each push onto, and 2 holes per side to fit them).
Fit the grilles.
ECM etc.:
Disconnect the car battery negative (you'll lose trip info and the time on MMI..).
Unplug the existing light switch from its wiring.
Remove the driver's side lower panel (hex screw on the left side and two small nuts on the bottom) and remove the existing light switch.
This next step I probably should have removed the panel where the hood release lever is at the bottom of the A pillar, but I found it had enough flex to access the ECM connector I needed.. Just unclips from behind the dead pedal and bend it back enough... If you're not comfortable doing this, ask your dealer to help access the ECM. The hood release lever won't come off, or shouldn't..
Unplug the middle ECM connector. Under the end of the white lever, press down and pull up the white lever and it unplugs the connector from the ECM. Make sure it's out and then slide it vertically down and away from the ECM.
Here's the middle connector pin assignment (A2) and what our A2 looks like inside too (pins highlighted):
Undo the zip tie on the connector then unclip the 2 sides of the connector from the connector housing.
The pins are labelled well on the sides:
Left/driver's side connector to pin 45.
Right connector to pin 5.
The new harness connectors just go straight in - nothing else to unclip. Just look at the orientation of the existing pins in the connector to know which way in the new ones go. If it won't go in, don't force it, it's probably just going in the wrong way round. Should just clip in with little effort.
Put the two sides back into the connector housing and zip tie the harness back up and plug the connector back to the ECM.
Bend the lower A pillar panel back and behind the dead pedal...
Install the new light switch into the panel and plug it back in.
Put the panels back on and reconnect the battery negative.
After reconnecting the negative to the battery, set the time on MMI, start the car, raise and lower all the windows a couple of times (I read it helps). A crap load of warnings go off about ESC and TPMS etc. Just drive the car round the block and they all go away.
VCDS Coding:
09 Central Electronics.
Security code 31347.
Original US Setting:
Front Left Fog:
(1)-Leuchte12NL LB45-Lasttyp 12 not active
(2)-Leuchte12NL LB45-Lampendefektbitposition 12 0
(3)-Leuchte12NL LB45-Fehlerort mittleres Byte DTC-DFCC 12 0
(4)-Leuchte12NL LB45-Lichtfunktion A 12 not active
(6)-Leuchte12NL LB45-Dimmwert AB 12 0
(10)-Leuchte12NL LB45-Dimmwert CD 12 0
Front Right Fog:
(1)-Leuchte13NL RB5-Lasttyp 13 not active
(2)-Leuchte13NL RB5-Lampendefektbitposition 13 0
(3)-Leuchte13NL RB5-Fehlerort mittleres Byte DTC-DFCC 13 0
(4)-Leuchte13NL RB5-Lichtfunktion A 13 not active
(6)-Leuchte13NL RB5-Dimmwert AB 13 0
(10)-Leuchte13NL RB5-Dimmwert CD 13 0
Changed to:
Front Left Fog:
(1)-Leuchte12NL LB45-Lasttyp 12 23 - allgemeine Scheinwerfer
(2)-Leuchte12NL LB45-Lampendefektbitposition 12 38
(3)-Leuchte12NL LB45-Fehlerort mittleres Byte DTC-DFCC 12 22
(4)-Leuchte12NL LB45-Lichtfunktion A 12 Nebellicht links
(6)-Leuchte12NL LB45-Dimmwert AB 12 100
(10)-Leuchte12NL LB45-Dimmwert CD 12 100
Front Right Fog:
(1)-Leuchte13NL RB5-Lasttyp 13 23 - allgemeine Scheinwerfer
(2)-Leuchte13NL RB5-Lampendefektbitposition 13 42
(3)-Leuchte13NL RB5-Fehlerort mittleres Byte DTC-DFCC 13 23
(4)-Leuchte13NL RB5-Lichtfunktion A 13 Nebellicht rechts
(6)-Leuchte13NL RB5-Dimmwert AB 13 100
(10)-Leuchte13NL RB5-Dimmwert CD 13 100
Coding for the new light switch to tell the car there's a front fog light button:
Module 09 Code: 31347 Long Coding Helper select Byte 7 and enable Bit 3 and save.
That's it. You should now have front fog lights and a slightly different looking front end
Also, if you're in the Tampa Bay area and don't have vag-com, give me a shout. Am on the map.
Last edited: