Fitting DVD headrests...

Markjb

Registered User
Joined
Sep 26, 2014
Messages
187
Reaction score
29
Points
28
Looking for a bit of help.

Does anyone know how to remove the back panels from the front seats in a A6 Avant S Line?

Also, what is the best power supply to use? is it safer to use the supply to the cigarette lighter or power to the lumber support?

Any help appreciated, have trawled google this afternoon and not come up with much.

Thanks in advance.

Mark
 
Looking at this diagram it looks as though the top of the back panel pulls off (clips 31 & 32) then lifts off the bottom hooks.

5564e92f6ed8f6a9fc4a69e22c033bbb
 
  • Like
Reactions: Markjb
Hi Mark,

Have emailed you the instructions. Personally I would go back to the fuse box, you can buy repair wires from Audi with the connector. If you don't want to do that then connect to the cigarette lighter.

Lee
 
  • Like
Reactions: Markjb
Thanks Roy, really helpful. It looks as though it's a bit of a sharp tug and then lift up.

Lee, thanks mate appreciate it. Interesting that the pdf you sent over says about the clips "always renew". I guess that suggests they break if you pop them or can be bent. Will see about getting some ordered - can't be too dear.

Re the wires Lee, is it a straight forward wire with a connector for the fuse box? That could be an option, running it from teh fuse box down the passenger well.

Thanks both

Mark
 
You could always use the fuse location in the rear of the car as well. pic & pn of the fuse wire. Depending on which holder you go for it will either be switched live for permanent live.

000979023E.JPG
 
Cheers Lee.

Will try and find a fuse box diagram as my preference is switched live really I.e. When ignition is on.

Thanks for your help.

Mark
 
Cheers Roy.

Where's the ignition fuse located? Is it behind the dash or underneath the steering wheel?

Cheers

M
 
Cheers Roy.

Where's the ignition fuse located? Is it behind the dash or underneath the steering wheel?

Cheers

M

Open your drivers door, pull the cover off the end of the dashboard and the fuses are there.

Take one of the pink covers off, remove one of the fuses or use an empty position, insert your piggy back fuse holder, put the fuse that you removed into the slot nearest to the fuse board and your new fuse in the other. The wire off the piggy back fuse is your new feed.

Can't remember which row is ignition activated


873A170D 5BC2 4BE6 8968 ADDAC973401D zpsulpcsfxx
 
Cheers Roy.

Where's the ignition fuse located? Is it behind the dash or underneath the steering wheel?

Cheers

M

OK.
I have just taken some pics of my set up.

Remove end cover.
DSC00837


Fuses under end cover'

DSC00838


This shows the two piggyback fuse holders for my front & rear dash cameras. (Live with ignition on)

DSC00841
 
Last edited:
Fantastic - thanks Roy

Assume you've anchored the earth cables on the securing bolts (in the picture)?

M
 
Last edited:
Fantastic - thanks Roy

Assume you've anchored the earth cables on the securing bolts (in the picture)?

M

Yes.

When you fit your piggyback, refit the fuse that you took out of the position that you have used for your tap in point and your new fuse feed in the other slot in the piggyback.
 
Oh, by the way, all of the fuse alocations & sizes are marked on the underside of the cover
 
Got round to this job today. All fitted no problem and thanks to everyone for their help. For ease I cabled the passenger side to the passenger side fuse box and like wise for drivers side.

For removing the seatbacks I found a little trick. If you pull the clips out forcefully, you'll need to replace the whole lot as they collapse. So, if you take the top of the seat back and pull it to the right, the clips will pop out of the seat back holding and still be intact for re-use.

Hopefully that's kids amused on long journeys now.....
 
  • Like
Reactions: rawtor51, B5NUT and RoyC
For removing the seatbacks I found a little trick. If you pull the clips out forcefully, you'll need to replace the whole lot as they collapse. So, if you take the top of the seat back and pull it to the right, the clips will pop out of the seat back holding and still be intact for re-use.

Thanks for this very usefull tip.
 
Will do mate - had to get the job done today but am waiting for some Tesa tape to be delivered to tape up the excess wiring so will take some photos when I tape everything up :)
 
So, a few piccies with a little bit of a write up. Haven't taken any photos of laying the cable or feeding it under the trim (as I guess you know how to do that), but have taken a few photos to show the bits you probably haven't seen.

Likewise, haven't taken any photos of the piggy back fuses, as Roy has done such a great job above!!

So, after taking the original headrest out, you need to remove the seat back so you can start to work. Each seat back is held on by 3 clips that it you forcefully remove, will need to be replaced. To re-use the clips, grab the top of the seat back and move sharply to the right:
Seat back

Once you've done that the seat back will fall towards you and you can see the 3 retaining clips:

Top clips

You'll need to take the back off completely, and to do so you need to pull it upwards to clear the two retaining clips in the next photo. No need for full removal of the material at the bottom as you can just rest the back to you as you're working:
Bottom clips
Next, you need to feed the cable through the poles from the headrests. HOWEVER, the poles that come with the DVD headrests are 10mm wide and the poles for our seats are 14mm wide. You can get 14mm poles to use, but they are used as skins as opposed to replacements and so are not a tight fit and rattle around. I've overcome that by using some Material harness (Tesa) tape to stop the rattle:
IMG 1346


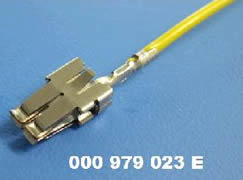
Next is to put the new poles in, ready to feed the cable through, and put the headrests in place. You'll see I've taped the antenna and power cables together for ease of threading through
IMG 1344
IMG 1347


Then feed the cable through all the way and pull it through
IMG 1348


The only downside of these DVD players is the large amount of cabling they come with to connect external sources. Once you've wired up the +ve and earth cables, you're left with this:
IMG 1343

I bound it all together using insulation tape and then a covering of Tesa tape to stop any rattles.

Next is to put the seat back together and the three clips I mentioned before. So in reverse order, make sure the two retaining clips at the bottom are lifted back over the anchor on the seat. Then you need to deal with the top clips. The way I did it was this. I got a pair of pliers to pull them out slightly to the same length:
IMG 1351


You then have to line up all three clips to the anchor point on the seat back, and slide them back in. I did this using my fingers as there is just enough clearance between the seat and the back:

IMG 1352

IMG 1353

IMG 1355


Once all three have slid into their anchor points, push them back fiercely for 3 satisfying pops!!

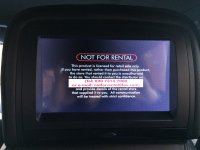
Last job is to test the DVD players and away you go!!
IMG 1358


Hope it's of some use.

Mark
 

Attachments

  • IMG_1346.JPG
    IMG_1346.JPG
    1.6 MB · Views: 337
  • IMG_1356.JPG
    IMG_1356.JPG
    1.8 MB · Views: 371
  • Like
Reactions: Gaz170, RoyC and B5NUT
Great write up Mark, job well done.

Where did you get these dvd's ?

Where do you put the dvd in ?

Can you use headphones with them so as not to annoy other passengers ?
 
Last edited:
Great write up Mark, job well done.

Where did you get these dvd's ?

Where do you put the dvd in ?

Can you use headphones with them so as not to annoy other passengers ?

Thanks Roy. Each headrest is an individual DVD player and screen. Plays off USB and card too. The player is behind the screen. You can just about make out the open button in the photo above the whole screen lifts.

Both have headphone slots and you can use IR headphones too. Or, using the FM antenna you can transmit to your radio.

Picked them up on fleabay - ideal for our up coming 14 hr drive to Austria!

Wanted the Rosens by far too expensive. Think I paid £170 for these.

M
 
  • Like
Reactions: RoyC
Hi Rawtor, sorry for delay.

Chose ignition switched fuses if that's what you mean. Wanted to protect the battery :)
 
Hi mate. If you take a look at Roy's pictures above, I've used the top one which is ignition switched. On the Passengers side I've used location no 8 in the middle bank, which is also ignition switched :)
 
  • Like
Reactions: rawtor51 and Gaz170
No worries mate. Give me a shout if you need anything else
 
  • Like
Reactions: rawtor51
Cheers Mark and Roy for the pics.
basically ive used the top fuse on the drivers side to wire up an extra cigarette plug to charge my ipod
now the cigarette extension itself is rated to 5a and my load uses 2a.
should I stick a 5a or a 2a fuse in the piggy back holder.
 
Sounds like a low load to be honest - if it were me I'd probably go with 2 and switch to 5 if any problems.
 
  • Like
Reactions: rawtor51

Similar threads