Hey all
Recently decided to have a go at refurbishing a set of wheels for my car. Managed to get hold of a set of Le Mans replicas from a friend for a pretty reasonable £80. They needed a bit of love but I thought I'd try my hand at it.
I'm sure there are many better DIYs out there, this won't be the most in depth, I just thought I'd share a little bit of the work I did on these to show that a home refurbishment is possible with a little bit of patience and time.
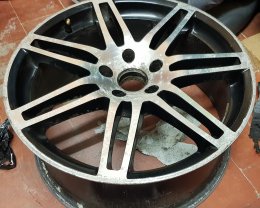
Here is what the wheels looked like as I picked them up. Needless to say they'd been sat around for a little while and needed a little bit of love!

Amazing what just a good wash and scrub can do! The rims were already painted inside the barrel with a polished face. I planned on painting the entire rim black. A lot of the paint inside the rim was peeling off so I did my best to sand it off but keep as dark as possible.

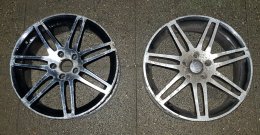
Side by side of the loved and the unloved.

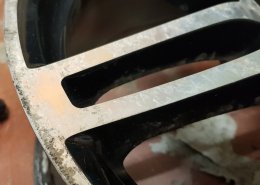
This was the extent of the damage. It was basic kerb damage, the wheel itself was in good condition - no buckles, cracks or repairs so overall it should be a fairly easy job.


Cue the Isopon! £28 from Halfords, a few rattle cans of theirs and off we go. It was really simple to use, instructions were clear and you get plenty of material inside to 4 do wheels. The box states there is enough for up to 20 inch wheels 10J wide so these 18x8 should be fine! I eventually only used 3 sachets out of the 10 provided. The alloy material starts to go off after about 4 minutes. I tried to push my luck and do 2 wheels with one sachet but I did not get away with it. As mentioned though, there is plenty of material provided! I left them to sit and harden overnight (didn't need to but it got late so bed was calling) and the next day I used a palm sander to sand down the excess alloy repair material. I was very surprised with the result - very smooth finish and got into almost every dent and ding there was! One or two bits were a bit deeper than I thought but that's a me problem not the product.


Sadly I forgot to take a photo of the sanded wheel but after this was finished I gave it a quick once over with a damp cloth, then gave it a blast of air to remove any bits of dust and gave it a couple of coats of primer. I used Halfords grey primer. Initially 2 light dustings of primer on both the rim and the centre cap separately to get the paint into the nooks and crannies and then I placed the centre cap in there to be painted together.

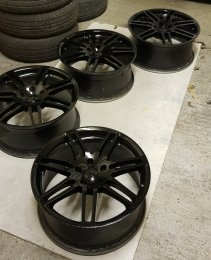
Now the bit that made it all worth it! I left the primer to harden overnight, gave it a quick sand with very fine paper and gave these a good few coats of Halfords gloss black. I quite like the finish of this spray can, for a spray it's not a bad finish in my eyes. Overall I was pleased with how they came out considering the amount of kerb damage there was and that it was my first time! Some of the kerb markings were fairly deep and I got 99% of them out.


Here are a couple of photos of the car now with them on. The arches are filled now and sits flush all the way around. Believe the wheels to be ET44. They are 18x8 with 10mm spacers fitted to the rear only. Definitely gives the car a better stance.


Here's a quick comparison of the stock wheels and the new replicas. Oddly enough I was considering painting the calipers black as I didn't like the combination with the OEM wheels (they need a coat of paint anyway) but now with the black I am considering keeping them red. What are your thoughts?

I hope this was of at least some interest to some of you. It's not the most in depth DIY but I hope it's of some help. Thanks for looking
Eren.
Recently decided to have a go at refurbishing a set of wheels for my car. Managed to get hold of a set of Le Mans replicas from a friend for a pretty reasonable £80. They needed a bit of love but I thought I'd try my hand at it.
I'm sure there are many better DIYs out there, this won't be the most in depth, I just thought I'd share a little bit of the work I did on these to show that a home refurbishment is possible with a little bit of patience and time.
Here is what the wheels looked like as I picked them up. Needless to say they'd been sat around for a little while and needed a little bit of love!

Amazing what just a good wash and scrub can do! The rims were already painted inside the barrel with a polished face. I planned on painting the entire rim black. A lot of the paint inside the rim was peeling off so I did my best to sand it off but keep as dark as possible.

Side by side of the loved and the unloved.

This was the extent of the damage. It was basic kerb damage, the wheel itself was in good condition - no buckles, cracks or repairs so overall it should be a fairly easy job.


Cue the Isopon! £28 from Halfords, a few rattle cans of theirs and off we go. It was really simple to use, instructions were clear and you get plenty of material inside to 4 do wheels. The box states there is enough for up to 20 inch wheels 10J wide so these 18x8 should be fine! I eventually only used 3 sachets out of the 10 provided. The alloy material starts to go off after about 4 minutes. I tried to push my luck and do 2 wheels with one sachet but I did not get away with it. As mentioned though, there is plenty of material provided! I left them to sit and harden overnight (didn't need to but it got late so bed was calling) and the next day I used a palm sander to sand down the excess alloy repair material. I was very surprised with the result - very smooth finish and got into almost every dent and ding there was! One or two bits were a bit deeper than I thought but that's a me problem not the product.


Sadly I forgot to take a photo of the sanded wheel but after this was finished I gave it a quick once over with a damp cloth, then gave it a blast of air to remove any bits of dust and gave it a couple of coats of primer. I used Halfords grey primer. Initially 2 light dustings of primer on both the rim and the centre cap separately to get the paint into the nooks and crannies and then I placed the centre cap in there to be painted together.

Now the bit that made it all worth it! I left the primer to harden overnight, gave it a quick sand with very fine paper and gave these a good few coats of Halfords gloss black. I quite like the finish of this spray can, for a spray it's not a bad finish in my eyes. Overall I was pleased with how they came out considering the amount of kerb damage there was and that it was my first time! Some of the kerb markings were fairly deep and I got 99% of them out.


Here are a couple of photos of the car now with them on. The arches are filled now and sits flush all the way around. Believe the wheels to be ET44. They are 18x8 with 10mm spacers fitted to the rear only. Definitely gives the car a better stance.


Here's a quick comparison of the stock wheels and the new replicas. Oddly enough I was considering painting the calipers black as I didn't like the combination with the OEM wheels (they need a coat of paint anyway) but now with the black I am considering keeping them red. What are your thoughts?

I hope this was of at least some interest to some of you. It's not the most in depth DIY but I hope it's of some help. Thanks for looking
Eren.


