DIY Rust repair - bottom of the doors/blades

Crazypete00

Registered User
Joined
Oct 30, 2007
Messages
496
Reaction score
61
Points
28
Location
NULL
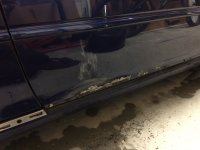
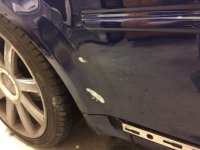
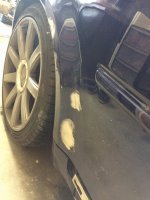
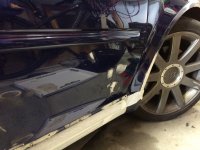
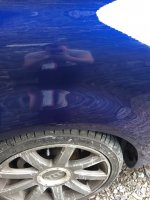
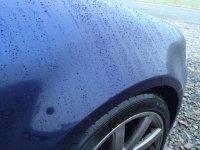
So after removing my blades to wrap them a few weeks ago i noticed the paint bubbling under the blades and since removing its got alot worse and is now climbing the door. at the same time i have a few bad stone chips on the lower rear arch.

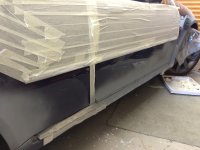
I had a quote from a few autorepairs ranging from £300-£400 to repair it plus respray the front bumper where a tree fell and hit my car plus stone chips. Anyway long story short i've bought a fair bit of stuff for the car recently and didnt really have to the money to spare so for £25 i bought a spray pack from audi, primer, base coat and laquer plus a few bits of wet n dry and filler.

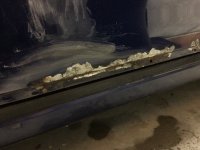
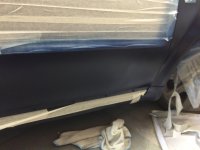
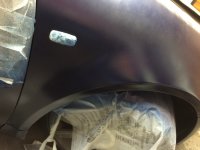
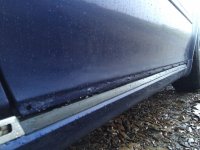
so today i started by chipping the bubbling paint off, sanding and dremelling the rust out.

damn its worse than i thought.
 

Attachments

  • IMG_3229.JPG
    IMG_3229.JPG
    943.6 KB · Views: 4,042
  • IMG_3230.JPG
    IMG_3230.JPG
    1.1 MB · Views: 1,938
  • IMG_3231.JPG
    IMG_3231.JPG
    1.1 MB · Views: 1,502
  • Like
Reactions: Alex C and moisty
Looks pretty bad mate these S3s are terrible for rust but such a good car :( hope you get it sorted mines only just started on front arch might get it done before it get worse!
 
ye ive been picking at it all day with a screw driver. just filled it so waiting for it to dry before sanding. i also have some on the front arch which i am also doing at the same time.
 
filler on
 

Attachments

  • IMG_3234.JPG
    IMG_3234.JPG
    1.3 MB · Views: 1,519
  • IMG_3235.JPG
    IMG_3235.JPG
    1 MB · Views: 2,101
  • IMG_3236.JPG
    IMG_3236.JPG
    924.6 KB · Views: 1,514
  • IMG_3237.JPG
    IMG_3237.JPG
    1.3 MB · Views: 1,404
Looking forward to see how you get on . I was just thinking of starting a post asking for thoughts on way forward . Have same on back quarters and small bubble on top of front arches and bit at bottom of front arches . My car is a daily and will never be a show car just want to protect it
 
its going well so far, i dont expect it to be ultra smooth and show car quality, just like you i want to protect it and stop it spreading. just sanded the filler down and there were a few spots i missed and needed to re go over. so will leave it dry over night and sand it again in the morning.
 
Have you done must prep before? I'm caught between trying to get someone to do mine as a homer and paint bonnet and front wings or try to do it myself. My mate used to be a panel beater but had to stop due to bad health . Said he would tell me what to do and give me a loan of air brush .
 
no, never done it before. its a risk but if all goes to hell then i will just pay the £300 to get it sorted
 
subbed, going to be doing my arch which has started to bubble. As soon as there is room in my garage...............
 
Sanded smooth then did a dust coat of primer followed by 2 heavier coats. Sanded with 1200 grit wet n dry. Noticed a few parts that needed a bit more primer so one last coat now waiting for it to dry.
 

Attachments

  • IMG_3245.JPG
    IMG_3245.JPG
    977 KB · Views: 1,210
  • IMG_3247.JPG
    IMG_3247.JPG
    994.5 KB · Views: 1,184
Progress report.

Its done.......sort of.

So after applying primer and sanding smooth with 1200 grit i added the base colour. one dust coat followed by 4 heavier coats slowly blending each coat further up the wings/door. I then panicked. the colour was very matt looking and felt rough to the touch. i went online and found that you never sand a base coat that has metal flake in it so left it alone and proceeded with the clear coat. again one dust followed by 3-4 heavier coats. after finishing it still looked very matt but i left it over 24 hour before sanding it smooth with 2000 and 2500 grit and finally going over it with a machine polisher with a light cut compound and light cut pad.

The result. it doesnt look too bad. yes i can tell i have sprayed it, blending in some areas not so great but unless you look hard you cant really tell. The colour match was spot on. At the end of the day it looks much better than it did before, no more bubbling pealing paint, plus a load of chips and scratches gone and it only cost £30~ and 2-3 days work.

So the good bits.
The rear arch blend is really good, happy with that.
The lower half of the door has covered well and i no longer have bubbling paint
Front arch no more bubbling paint plus a load of stone chips and a few deep scratches all gone.

the bad bits
Front arch - i ran out of base coat while doing the front arch, i should have ordered 2x 400ml cans. so the blend on this arch is rubbish, i will most likely respray it soon.
The lower half of the door looks ever so slightly darker, only a tiny tiny bit.
I was planning on tidying the front bumper but no more base coat left.

If i was going to do it again, i would have more base colour and also add a few more coats of clear. also i spoke to a repair man and i think i was too light on the 2nd 3rd and 4th base colour coat, i should have put a wetter coat on but i was worrying about runs and orange peal. I think i would also spray the whole front arch rather than trying to blend it up the arch when i redo it next time.

pics will follow soon
 
pictures
 

Attachments

  • IMG_3250.JPG
    IMG_3250.JPG
    907 KB · Views: 1,152
  • IMG_3252.JPG
    IMG_3252.JPG
    980.1 KB · Views: 1,153
  • IMG_3253.JPG
    IMG_3253.JPG
    1.3 MB · Views: 1,148
  • IMG_3255.JPG
    IMG_3255.JPG
    1.3 MB · Views: 1,276
  • IMG_3259.JPG
    IMG_3259.JPG
    1.3 MB · Views: 1,165
  • IMG_3258.JPG
    IMG_3258.JPG
    1.5 MB · Views: 1,305
Progress report.
... I think i would also spray the whole front arch rather than trying to blend it up the arch when i redo it next time...

yep, you better do that next time is much more easily - something you learned thats a good thing :thumbs up:
 
Well done mate, good attempt for sure.