- Joined
- Jun 21, 2017
- Messages
- 31
- Reaction score
- 16
- Points
- 8
After this sh*t show of a year I decided to cheer myself up and order a few bits for the car.
I've wanted to upgrade the rear diffuser for a while but the insane prices I was quoted always put me off. After a bit of evening googling I found an ECS gloss black diffuser for a good price and thought why not? Shipped directly from the states I expected it sometime in Jan but was pleasantly surprised to get it this week. Being bored at home and eager to install I couldnt have chosen a colder day to do it! Working on your car in -1 is not a good idea at all and definitely hindered the install (more on that below).
About a month ago, once I knew I was going to order the ECS diffuser I decided that I wanted to try one of the cheap diffuser fins on ebay. I installed the fins with some velcro in case it was so hideous I needed to remove it ASAP. Surprisingly, it didn't turn out too bad but you could clearly see it was a bolt on which didn't sit well with me as I like oem/sleek looking upgrades. This is how it looked:

Not as bad as I expected but still not what I was looking for. Thankfully the ECS diffuser turned up quickly.
All of the online DIYs say install is a doddle. Just unscrew 3 T25 torx screws, pull on the old diffuser and it pops right off. This is rubbish imo. If your car is only a few years old and the weather is favourable where you live (warm, less rain and road crap than UK roads) then you might have a chance but my car is 10 years old and the diffuser was on solid. I believe the cold also played a big role in the issues I faced as it made the plastic extremely brittle and hard to manoeuvre. The diffuser tabs were all covered in dirt and debris which had fused the plastic together.
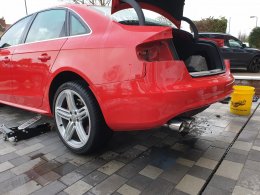
After spending 20 mins trying to finesse it off I gave up and decided to remove the rear bumper. If you're looking to do this install I'd highly recommend going this route. Rear lights have to come out but thats easy and then there are only 3 points either side of the bumper that you'll need to undo before removing. If you have parking sensors they don't need to be individually removed, there's one connector powering all 4. I didnt remove this connector as I was worried the cold had made the plastic too brittle. I left it connected and just maneuvered around it.
With the bumper off the diffuser was easier to remove but still a pain. I had to spray each tab with degreaser and then pry with a screwdriver to remove it properly. Unfortunately this meant I broke a couple of tabs on either end. I had planned to sell the original but the damage will affect the price now. Oh well... time to fit the new diffuser and smile again

Fitment of the ECS diffuser is very good. The diffuser itself is very light but well made. It was well packed and had no damage upon arrival. I did however reinforce all tabs with JB Weld to ensure they didn't break during installation. I also polished, sealed and ceramic coated the diffuser to ensure it had a good layer of protection once fitted.
Final result:


Tips & Summary:
• Remove the bumper for an easier install
• Tools needed: T25 torx, flat head screwdriver, 10mm deep socket and adjustable pliers (for removing rear lights), car jack to get to wheel arch lining torx screws
• Avoid installing in cold weather
• If it is cold, be careful when removing the old diffuser as the plastic will be brittle. Use some degreaser on the tabs to help
• Start on the tabs at either end and work towards the middle when removing the original
• Reinforce the tabs on the new diffuser with an epoxy (i used JB Weld) to ensure they don't break
• Add a little washing up liquid to each tab to help lubricate it when fitting
• Polish and ceramic coat the new diffuser - once its on it'll be subject to our weather and road crap so protect it as much as you can!
• When installing, I started at one end and then popped tabs in as I moved towards the other side. This worked well in ensuring both sides lined up with no gaps but the middle now has a very small gap and sags very very slightly. Having done the install I think you'll inevitably get some part of the diffuser that won't be flush regardless of how you fit it. I plan on adding some epoxy to the middle to reduce the gap as I doubt I'll ever take the diffuser off again
• Consider fitting with another person to speed things up
• Drink tea or coffee if its cold and be prepared to swear a lot
• Have a beer afterwards and admire your work. Take pics and share
I'm very happy with the final result and wouldn't change back as it totally transforms the rear of the car.
On to the next mod which will be a remap at Unicorn. I've installed the JHM OAD 207mm crank pulley and will be getting Rick to map for dual pulley. Im currently stage 1 with it installed and no issues but need the remap to utilise the extra power/torque. This may need to wait as the tiered system means i can't really travel until Boris tells me its OK. This is very frustrating as I'll literally just drive there, wait whilst Rick remaps and then drive back but it is what it is.
Hopefully this long winded post helps anyone looking to upgrade their diffuser
I've wanted to upgrade the rear diffuser for a while but the insane prices I was quoted always put me off. After a bit of evening googling I found an ECS gloss black diffuser for a good price and thought why not? Shipped directly from the states I expected it sometime in Jan but was pleasantly surprised to get it this week. Being bored at home and eager to install I couldnt have chosen a colder day to do it! Working on your car in -1 is not a good idea at all and definitely hindered the install (more on that below).
About a month ago, once I knew I was going to order the ECS diffuser I decided that I wanted to try one of the cheap diffuser fins on ebay. I installed the fins with some velcro in case it was so hideous I needed to remove it ASAP. Surprisingly, it didn't turn out too bad but you could clearly see it was a bolt on which didn't sit well with me as I like oem/sleek looking upgrades. This is how it looked:
Not as bad as I expected but still not what I was looking for. Thankfully the ECS diffuser turned up quickly.
All of the online DIYs say install is a doddle. Just unscrew 3 T25 torx screws, pull on the old diffuser and it pops right off. This is rubbish imo. If your car is only a few years old and the weather is favourable where you live (warm, less rain and road crap than UK roads) then you might have a chance but my car is 10 years old and the diffuser was on solid. I believe the cold also played a big role in the issues I faced as it made the plastic extremely brittle and hard to manoeuvre. The diffuser tabs were all covered in dirt and debris which had fused the plastic together.
After spending 20 mins trying to finesse it off I gave up and decided to remove the rear bumper. If you're looking to do this install I'd highly recommend going this route. Rear lights have to come out but thats easy and then there are only 3 points either side of the bumper that you'll need to undo before removing. If you have parking sensors they don't need to be individually removed, there's one connector powering all 4. I didnt remove this connector as I was worried the cold had made the plastic too brittle. I left it connected and just maneuvered around it.
With the bumper off the diffuser was easier to remove but still a pain. I had to spray each tab with degreaser and then pry with a screwdriver to remove it properly. Unfortunately this meant I broke a couple of tabs on either end. I had planned to sell the original but the damage will affect the price now. Oh well... time to fit the new diffuser and smile again
Fitment of the ECS diffuser is very good. The diffuser itself is very light but well made. It was well packed and had no damage upon arrival. I did however reinforce all tabs with JB Weld to ensure they didn't break during installation. I also polished, sealed and ceramic coated the diffuser to ensure it had a good layer of protection once fitted.
Final result:
Tips & Summary:
• Remove the bumper for an easier install
• Tools needed: T25 torx, flat head screwdriver, 10mm deep socket and adjustable pliers (for removing rear lights), car jack to get to wheel arch lining torx screws
• Avoid installing in cold weather
• If it is cold, be careful when removing the old diffuser as the plastic will be brittle. Use some degreaser on the tabs to help
• Start on the tabs at either end and work towards the middle when removing the original
• Reinforce the tabs on the new diffuser with an epoxy (i used JB Weld) to ensure they don't break
• Add a little washing up liquid to each tab to help lubricate it when fitting
• Polish and ceramic coat the new diffuser - once its on it'll be subject to our weather and road crap so protect it as much as you can!
• When installing, I started at one end and then popped tabs in as I moved towards the other side. This worked well in ensuring both sides lined up with no gaps but the middle now has a very small gap and sags very very slightly. Having done the install I think you'll inevitably get some part of the diffuser that won't be flush regardless of how you fit it. I plan on adding some epoxy to the middle to reduce the gap as I doubt I'll ever take the diffuser off again
• Consider fitting with another person to speed things up
• Drink tea or coffee if its cold and be prepared to swear a lot
• Have a beer afterwards and admire your work. Take pics and share
I'm very happy with the final result and wouldn't change back as it totally transforms the rear of the car.
On to the next mod which will be a remap at Unicorn. I've installed the JHM OAD 207mm crank pulley and will be getting Rick to map for dual pulley. Im currently stage 1 with it installed and no issues but need the remap to utilise the extra power/torque. This may need to wait as the tiered system means i can't really travel until Boris tells me its OK. This is very frustrating as I'll literally just drive there, wait whilst Rick remaps and then drive back but it is what it is.
Hopefully this long winded post helps anyone looking to upgrade their diffuser