Hi guys,
Realise this tread is a little old now but I replaced my drivers side external B pillar trim the other day & after doing it I thought I'd take a couple of pics for people that may be needing to replace theirs.
View attachment 53529 View attachment 53530
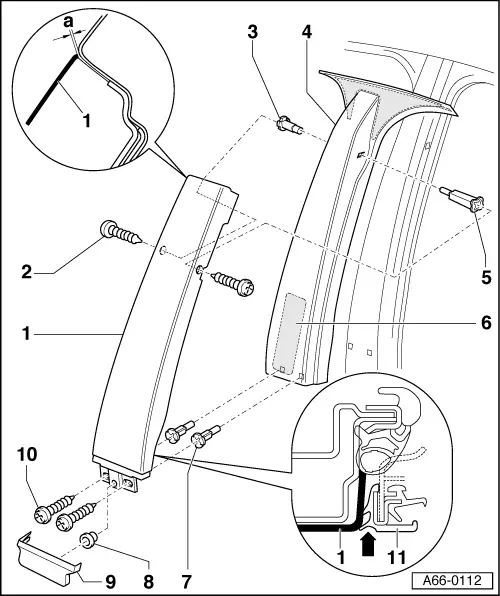
This was the old peeling one that seems to be a common problem. The location of the 3 rivets is pretty obvious, just behind the door seal.
View attachment 53532 View attachment 53536
When drilling them out I used a paint scraper wedged behind the trim to move the rubber door seal out of the way and just drilled until the head of the rivet came away. Did this for all 3 rivets. Once the rivet heads had been drilled off, I used a centre punch to tap the remaining rivet piece into the B pillar, leaving the trim free to be removed.
View attachment 53562 View attachment 53563
By pulling from the bottom of the trim first I was able to release the clip near the window attaching the trim. The top was a little harder but once I had space for my fingers it was just a matter of a little persuasion and the top clip came away from the window and the trim could be removed.
View attachment 53564 View attachment 53565
This shows the clips that are attached to the window via a protective rubber seal. Before replacing the new trim on, there is a small foam pad that fixes at the bottom of the trim, I guess just to keep it away from the paint work when the door is closed. I did my best to remove the old one then glued it to my new trim.
View attachment 53566
I ordered the 3.2x10mm Black rivets required from eBay, very cheap.
View attachment 53567 View attachment 53568
Once I had fitted the new trim by lining up the window clips and hand tapping into position, I found it easier to insert the rivets first then attach the rivet gun because of the rubber door seal. 3 Pops of the gun and it was job done...!
Hope this helps out anyone looking to change their B pillar trims.


") .
.