

Westfaliaman
Registered User
Hi guys,
Bought a 4 yr old Q3 SLine plus , one lady owner, 25k miles recently from a non franchised dealer, noticed during my inspection that the fuel flap wouldn’t open unless you hit the unlock button on key a few times. Salesperson tried to tell me all Audi’s were like this! Anyway, told him I wanted it fixed before picking up car.
On collection all appeared fine, their workshop had “reset central locking and lubricated actuator”! A few days later when I went to refuel the same problem arose, flap eventually opened after a few unlocks on the key. After googling and checking a few forums discovered this was a common problem not just on Q3’s, and the fix was a new actuator. I checked with my local Audi dealer, they had part in stock,actuator 4L0 862 153D, but advised that I would also need a new fuel flap surround 8U0 809 906B as this often got damaged during removal and was basically a sacrificial part. As I had no confidence in the dealer I bought the car from fixing the issue, ( main Vauxhall dealer),I got them to supply and pay for the original Audi parts. Checking a few YouTube videos seemed to confirm the surround would be damaged during fitment, as various owners were attacking it with screwdrivers etc to prise it off, puncturing 4 holes into it.
After examining the new part I thought it might be possible to remove the actuator and fit new one without causing any damage to or replacing the surround . Here’s how:
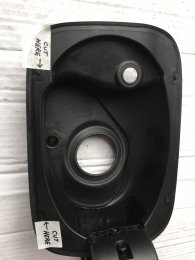
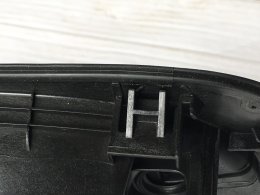
Contrary to advice on forums or YouTube there is no need to do anything in the boot, or remove trim, it’s all done from the outside. Open flap, on the surround you’ll see 4 indents, 2 top , 2 bottom, where you are supposed to push a flat head screwdriver through . The screwdriver then has to engage in a groove in a plastic catch and you lever down slightly to disengage it from the surrounding metal bodywork.
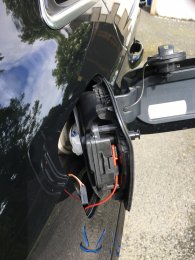
I simply cut a small slit ( about 4-5 mms) above the bottom 2 indents with a sharp craft knife, I then inserted screwdriver in bottom left one and put pressure upwards onto plastic catch , it disengaged easily, I inserted a plastic trim tool under this end then to prevent it clicking back into place. I did same with bottom right one, disengaged it, inserted another plastic trim tool. Once both bottom catches are released you can press downwards on surround and release the top 2 , without having to shove a screwdriver through them at all.Pull housing out about 2 inches, protect tank filler inlet with a plastic bag,remove wiring connector, only thing holding it in now is the wee drainpipe. There was no slack in this and I didn’t want to detach it in case I had bother reattaching it. As I couldn’t get my 20 torx screwdriver in behind now to release the 2 actuator screws, I improvised by putting the size 20 torx head in a brake adjusting spanner and used it as a wrench to remove the 2 screws. I detached the red pull string from the old actuator to save having to rethread back into boot.
Installation of new actuator is just reversal of above, reattach red string to new actuator , then simply click whole housing back into place. No damage at all to the supposedly sacrificial plastic surround, I was left with 2 unnoticeable small slits where I had inserted the screwdriver, but just to finish off I pressed a small bit of black silicon into each. Tested actuator, perfect! I’ll try to add a few photos. All in about 25 minutes. In the photos I have used the new surround to indicate where to make the 2 slits on your existing flap surround, and also show plastic catch (H shape), and where screwdriver should press from other side.
Bought a 4 yr old Q3 SLine plus , one lady owner, 25k miles recently from a non franchised dealer, noticed during my inspection that the fuel flap wouldn’t open unless you hit the unlock button on key a few times. Salesperson tried to tell me all Audi’s were like this! Anyway, told him I wanted it fixed before picking up car.
On collection all appeared fine, their workshop had “reset central locking and lubricated actuator”! A few days later when I went to refuel the same problem arose, flap eventually opened after a few unlocks on the key. After googling and checking a few forums discovered this was a common problem not just on Q3’s, and the fix was a new actuator. I checked with my local Audi dealer, they had part in stock,actuator 4L0 862 153D, but advised that I would also need a new fuel flap surround 8U0 809 906B as this often got damaged during removal and was basically a sacrificial part. As I had no confidence in the dealer I bought the car from fixing the issue, ( main Vauxhall dealer),I got them to supply and pay for the original Audi parts. Checking a few YouTube videos seemed to confirm the surround would be damaged during fitment, as various owners were attacking it with screwdrivers etc to prise it off, puncturing 4 holes into it.
After examining the new part I thought it might be possible to remove the actuator and fit new one without causing any damage to or replacing the surround . Here’s how:
Contrary to advice on forums or YouTube there is no need to do anything in the boot, or remove trim, it’s all done from the outside. Open flap, on the surround you’ll see 4 indents, 2 top , 2 bottom, where you are supposed to push a flat head screwdriver through . The screwdriver then has to engage in a groove in a plastic catch and you lever down slightly to disengage it from the surrounding metal bodywork.
I simply cut a small slit ( about 4-5 mms) above the bottom 2 indents with a sharp craft knife, I then inserted screwdriver in bottom left one and put pressure upwards onto plastic catch , it disengaged easily, I inserted a plastic trim tool under this end then to prevent it clicking back into place. I did same with bottom right one, disengaged it, inserted another plastic trim tool. Once both bottom catches are released you can press downwards on surround and release the top 2 , without having to shove a screwdriver through them at all.Pull housing out about 2 inches, protect tank filler inlet with a plastic bag,remove wiring connector, only thing holding it in now is the wee drainpipe. There was no slack in this and I didn’t want to detach it in case I had bother reattaching it. As I couldn’t get my 20 torx screwdriver in behind now to release the 2 actuator screws, I improvised by putting the size 20 torx head in a brake adjusting spanner and used it as a wrench to remove the 2 screws. I detached the red pull string from the old actuator to save having to rethread back into boot.
Installation of new actuator is just reversal of above, reattach red string to new actuator , then simply click whole housing back into place. No damage at all to the supposedly sacrificial plastic surround, I was left with 2 unnoticeable small slits where I had inserted the screwdriver, but just to finish off I pressed a small bit of black silicon into each. Tested actuator, perfect! I’ll try to add a few photos. All in about 25 minutes. In the photos I have used the new surround to indicate where to make the 2 slits on your existing flap surround, and also show plastic catch (H shape), and where screwdriver should press from other side.
Attachments
-
 883334F3-8BBA-455D-B484-B86504FE87CE.jpeg611.5 KB · Views: 2,101
 -
 EFC307B8-3293-4263-ADED-5026BE9F4C6F.jpeg761.6 KB · Views: 1,988
 -
 6AD33617-B267-47A9-869D-995640C99B9E.jpeg761.6 KB · Views: 3,333
 -
 68C87B32-273B-4AA9-A278-264541007E89.jpeg465 KB · Views: 1,921
 -
 EE504AD8-7AAD-48A7-8930-5F3D6183539D.jpeg544.8 KB · Views: 1,968
 -
 1B633ADF-2B33-477E-901E-875D5925834E.jpeg739.6 KB · Views: 2,068
 -
 03365400-FF22-4C5B-886F-97B247242EB1.jpeg590.5 KB · Views: 2,136
Last edited:
