Audi A6 V6 TDi Intake Manifold EGR cleaning refurbishment help & info ...

gupsterg

Registered User
Joined
Jun 27, 2012
Messages
348
Reaction score
68
Points
28
Location
Lurking over a keyboard!
Hi peeps
smile.png
...

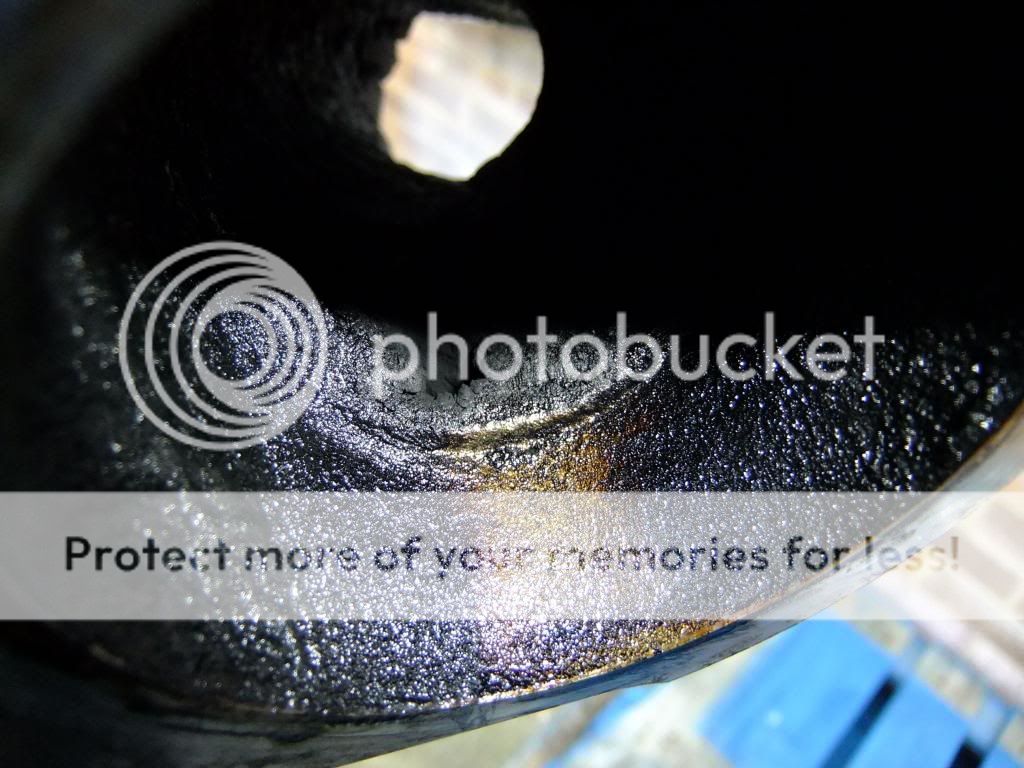
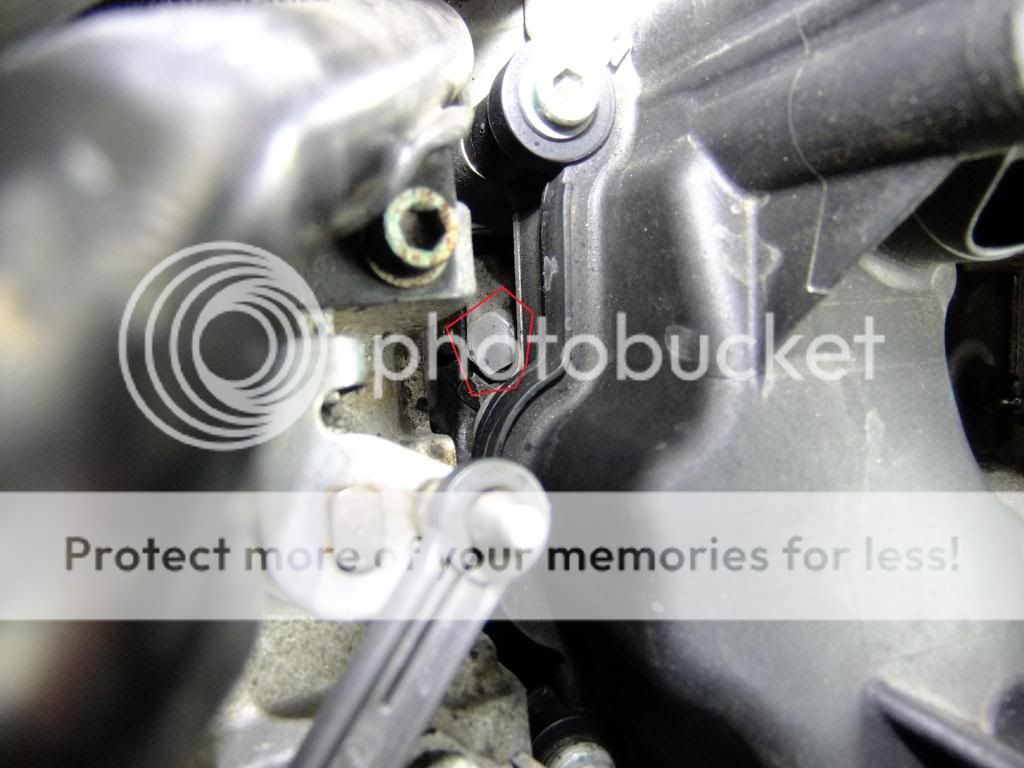
Recently been going over data and found this in my photo library from when I changed my throttle body...

2012_10260123_zps8e70b969.jpg


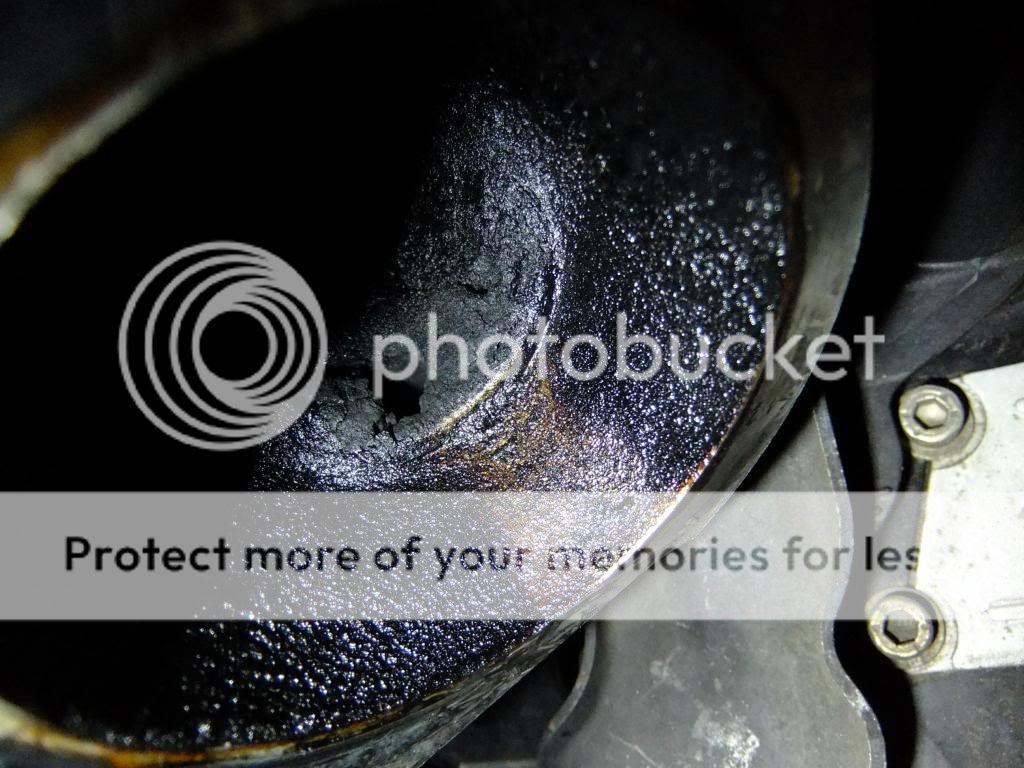
Above is the throttle body adapter which connect to the top section of the intake system on engine...

I don't know why I never took note of above photo before
confused.png
...

Flow_zps34ea7f42.jpg


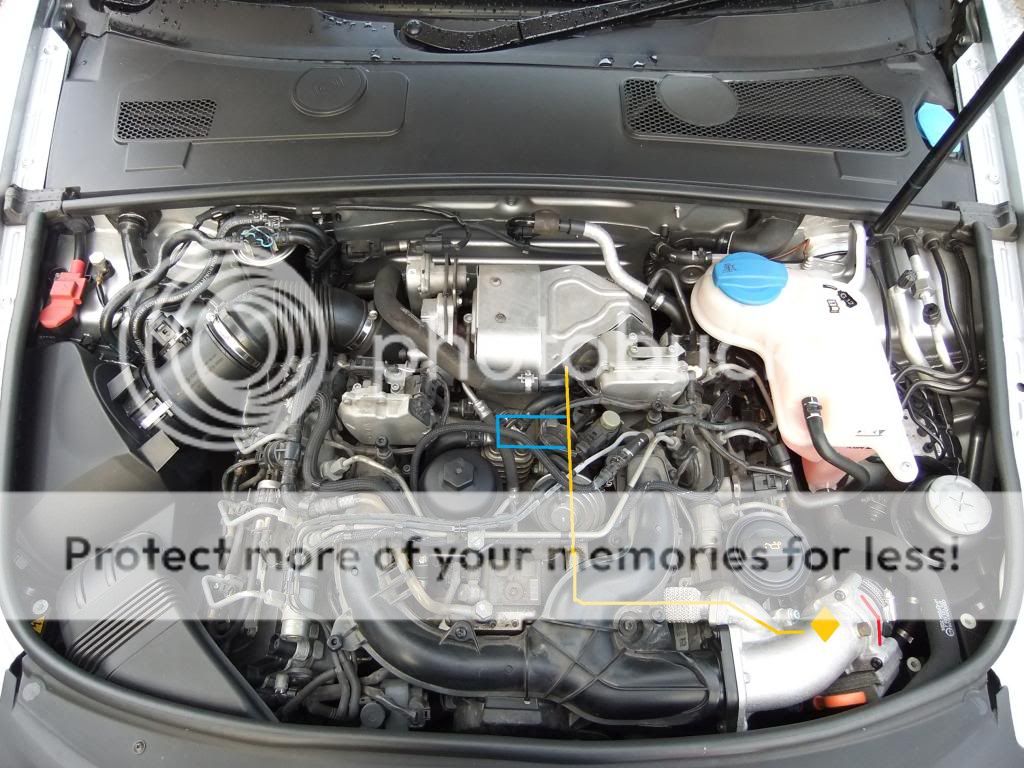
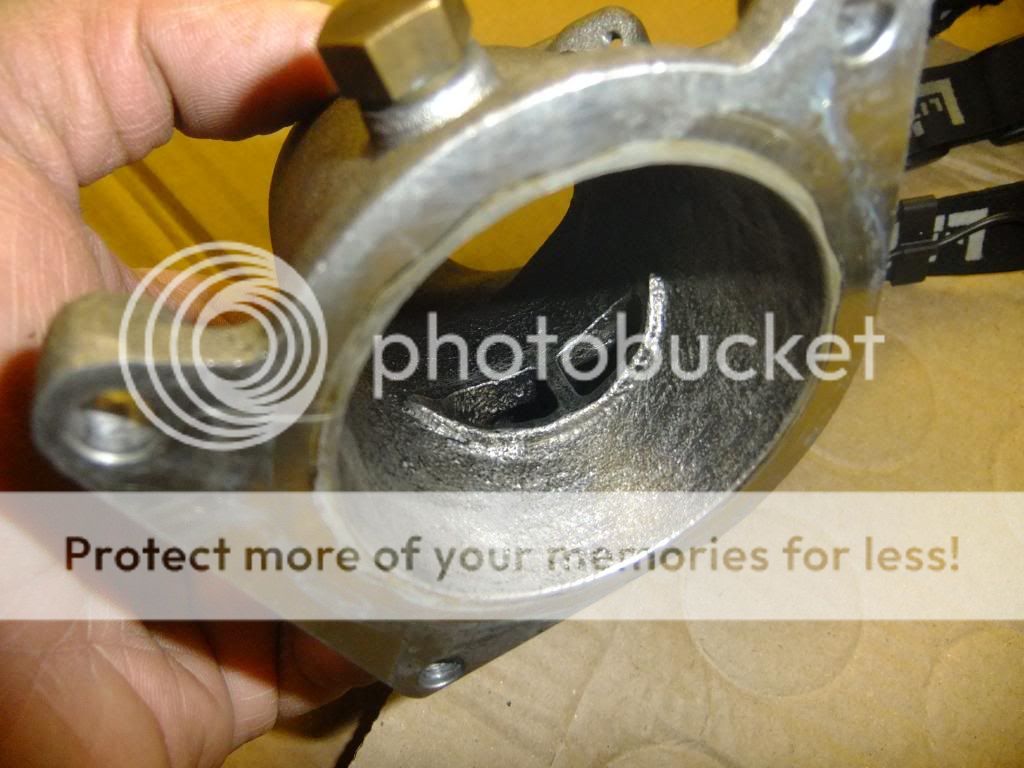
The red line is the throttle body which was replaced and camera shot is from that view point...

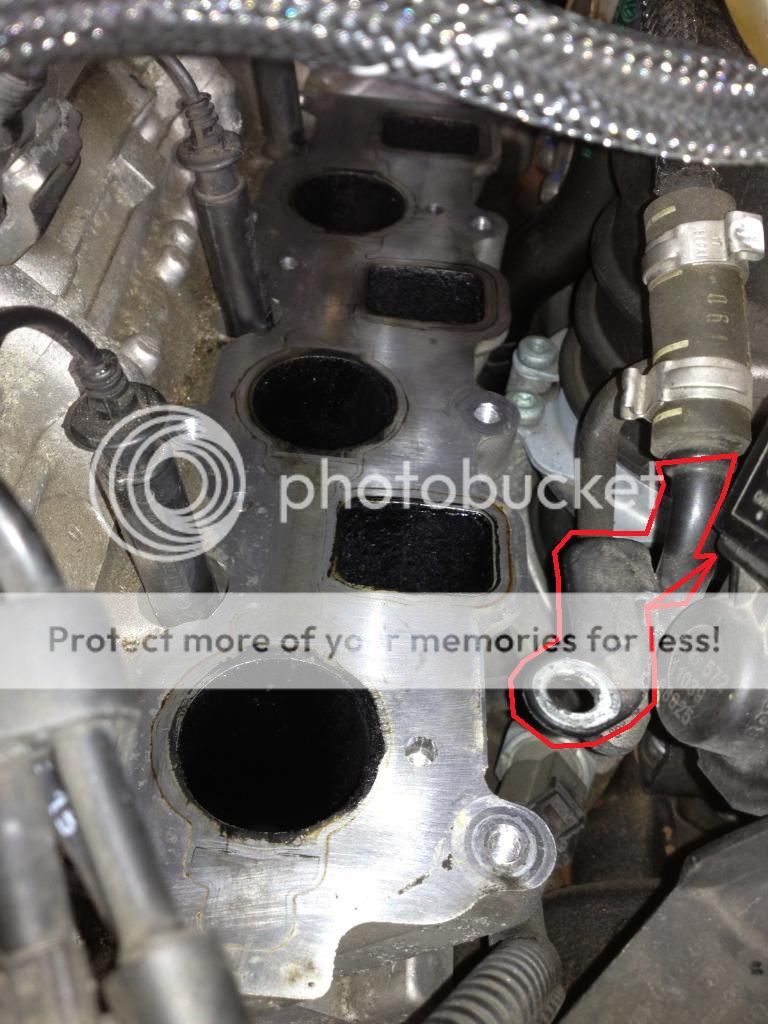
The yellow diamond is roughly the location of the clogged holes... yellow line is the EGR gas flow, blue lines when going through EGR cooler...

Cleaning throttle body adapter manually seems very doable easily as does the EGR pipe going to EGR valve (ref the the dome like thing for non mech.viewers like me
Blush.gif
)...

I'm tempted to change EGR valve instead of cleaning (£80) and the EGR control flap & vacuum unit (£60)... the two reasons are firstly for speedier swapout, secondly the vacuum elements to these parts would be new...

I've found a used EGR cooler reasonably priced on ebay which I could clean before hand to speed up swap over...

Now that leaves the rest of the intake system the black upper/lower section... instead of removing I'm thinking Terraclean Or Link:- Diesel Intake System Cleaning
Near the latter part of this video I was amazed at the smoke
yikes.gif
...

In the past additives have never helped me but I keep an open mind and new products are always available...

I may just do manual clean of throttle adapter and replace EGR systems parts and find and don't need to go further... ie the chemical cleaners above to clean rest of intake system...

The chemical cleaners seem so enticing as you think no part removal...

But last time when I cleaned my old throttle body I found that some of the carbon just wiped off and some was so stubborn that had to use a screwdriver to etch/scratch off
frown.png
...

throttle_zpsc0544cff.jpg


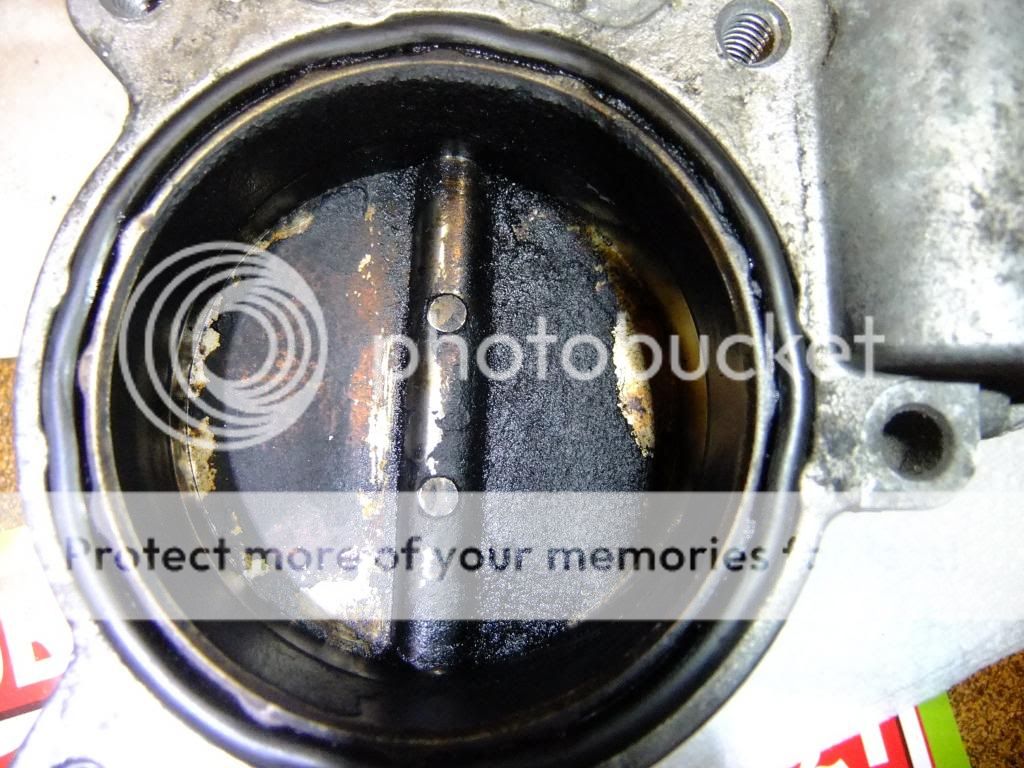
Above throttle was the original from factory IMO as date code 01/08/05 on it... above throttle body was replaced with new
smile.png
...

*** WARNING IMAGES MAYBE DISTURBING TO VIEWERS
yikes.gif
***


Upper manifold Bank 1 ...

TIMBank1_zps8c807ffb.jpg


Lower manifold Bank 1...

LIMBank1_zps7f1d1b83.jpg


Upper manifold Bank 2...


TIMBank2_zpsdd58f6e6.jpg


Lower manifold Bank 2...


LIMBank2_zps857429e8.jpg


*** WARNING LIVE VIDEO ACTION MAYBE DISTURBING TO VIEWERS
yikes.gif
***


*** WARNING FURTHER IMAGES MAYBE DISTURBING TO VIEWERS
yikes.gif
***


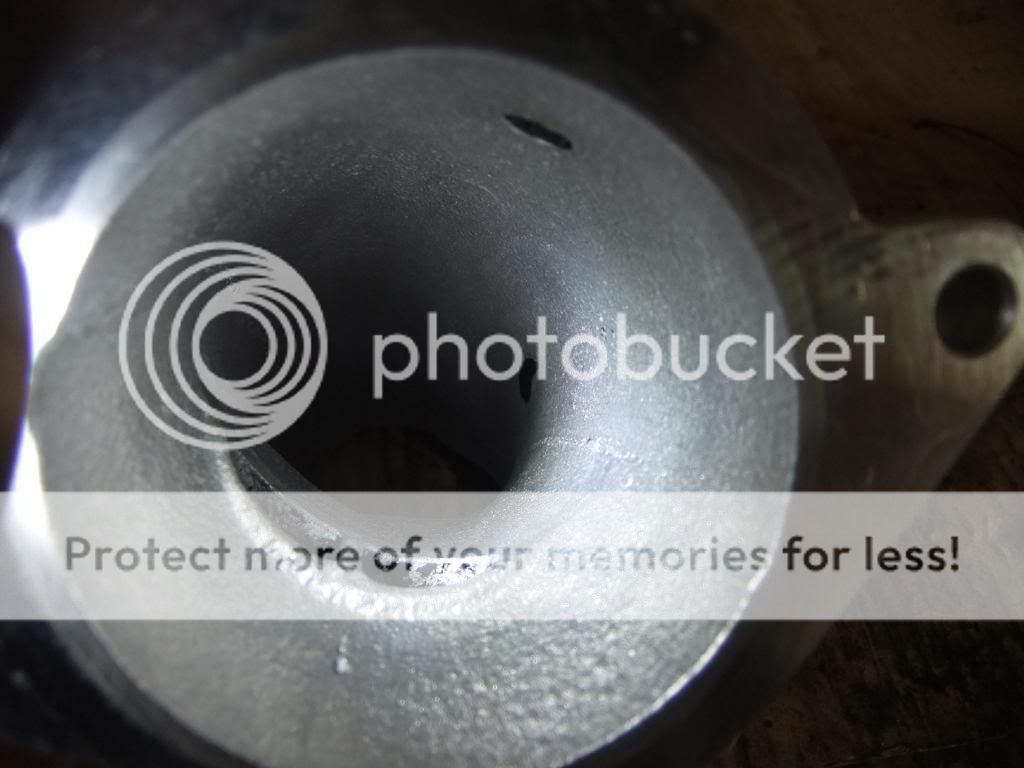
Upper manifold throttle body adapter side (adapter removed)...


TIMTBASide2_zps34e7f758.jpg


Zoom shot...

TIMTBASide3_zps1cf3616b.jpg


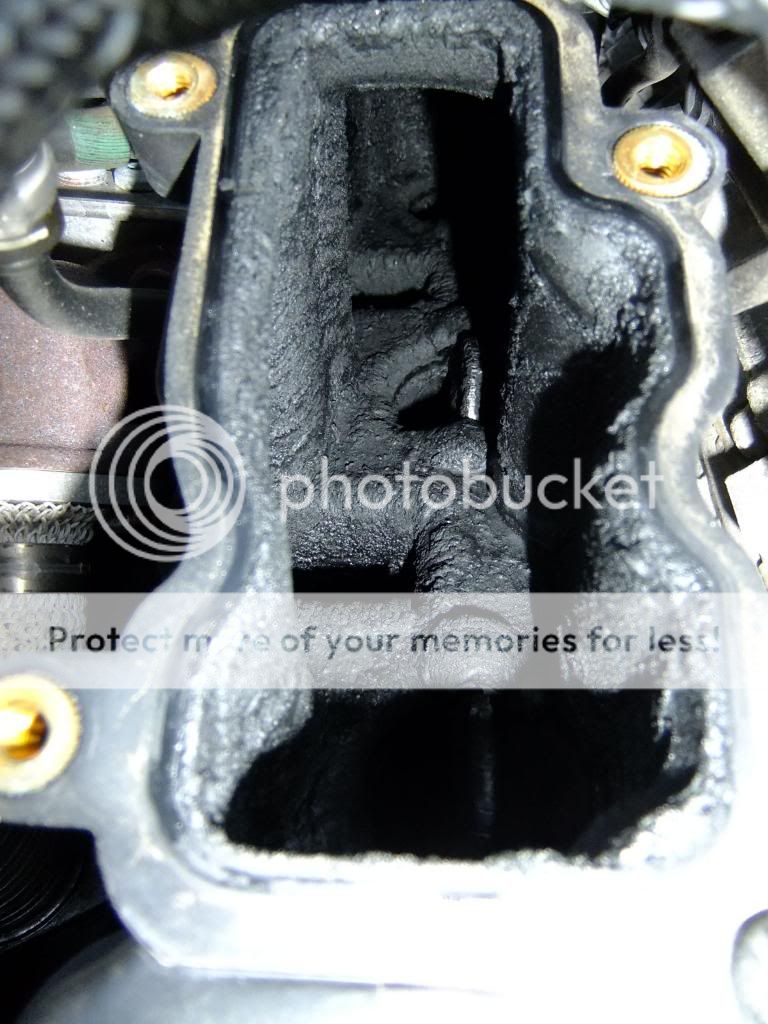
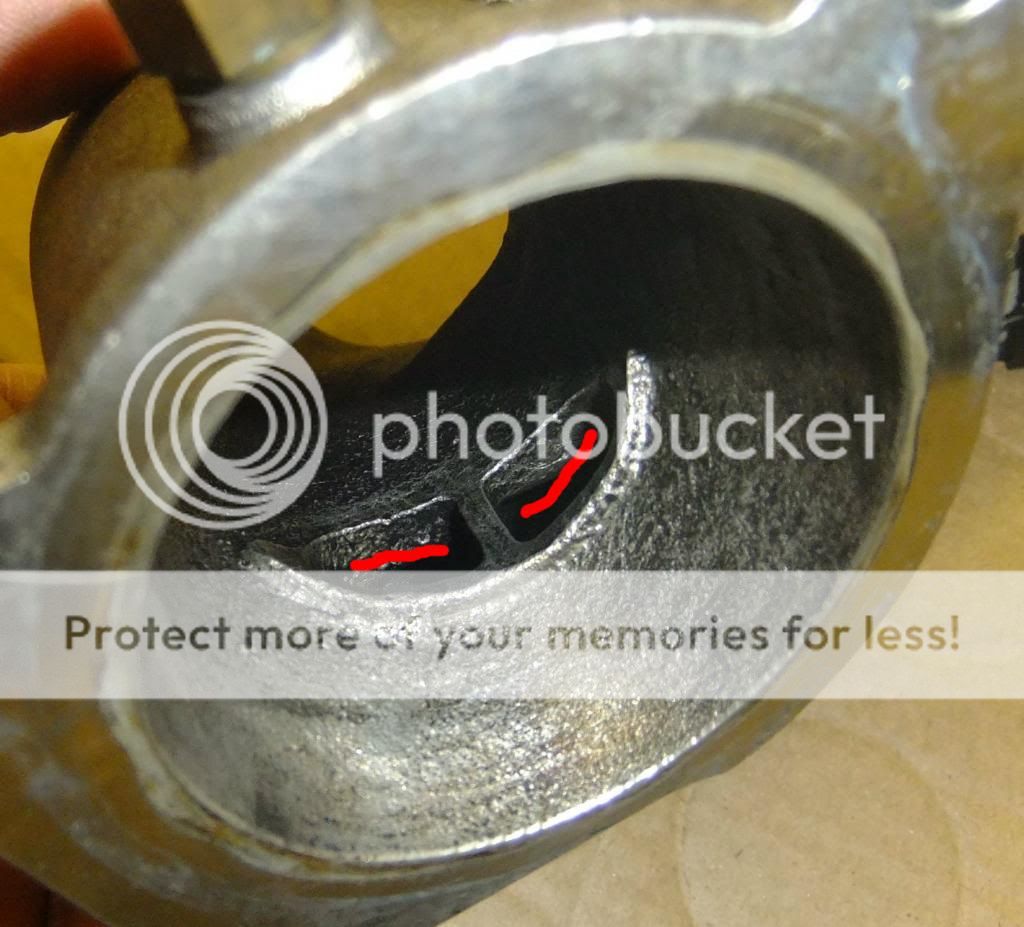
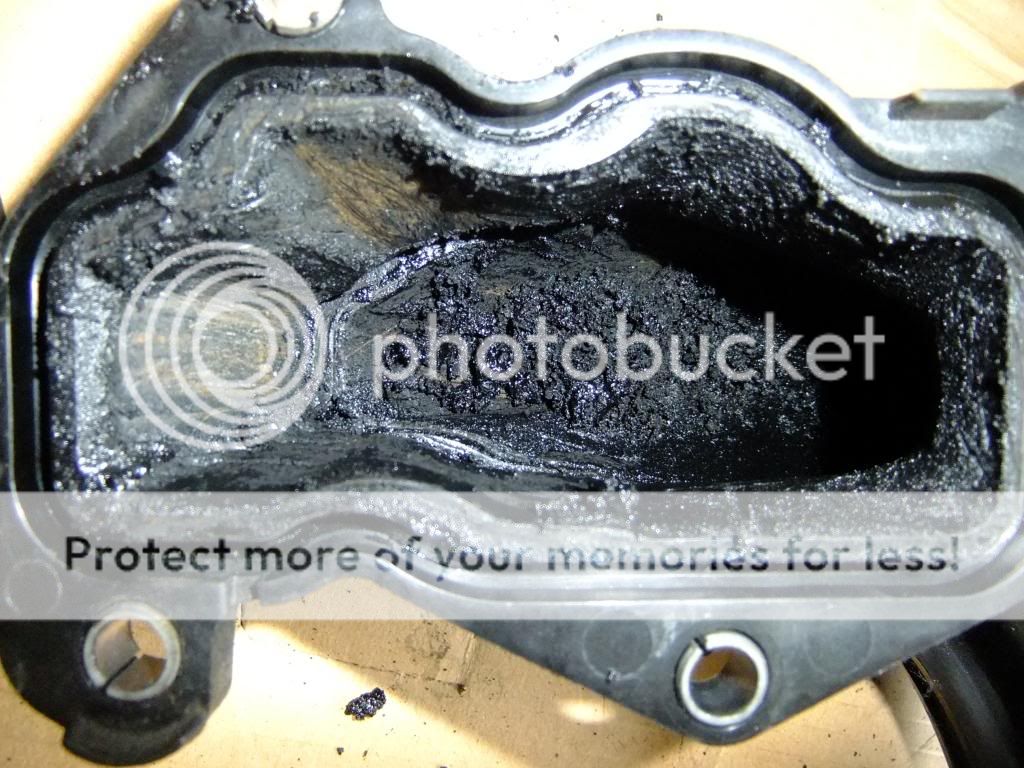
The throttle body adapter... please note the very constricted EGR gas ports...


TBABefore_zps4da5b74c.jpg


After cleaning ...


TBAAfter_zpsdb754057.jpg


The cleaning process
smile.png
...

Step one scrape with screwdriver/tool... result below...


Clean0_zpsfb9a2a0b.jpg


The mid clean video...


I also used my homemade tool from injector seat cleaning... to vacuum clean TBA...

Tool1_zps64a1079e.jpg


Plus I used my mates air compressor to blast TBA... now the ports highlighted in red below... I used a 4mm2 elec wire bent as a hook to clean out any stubborn remnants...

TBAAfter_zpsdb754057-1_zps2c720a12.jpg


Then I soaked a tea towel in diesel and cleaned bigger port on TBA... then I used a cable tie to feed cloth through EGR port...

Clean1_zpsff2cc3b5.jpg


Clean2_zps8e59db5c.jpg


Clean5_zpsc3868a8a.jpg

2
Clean4_zps85d75a18.jpg


I repeated steps as necessary to minimise chance of carbon passing with charge air to engine...

Early signs are looking good
smile.png
....
gonna weigh the carbon from the throttle body adapter... my guess it could fill a 250g to 500g marg pot easily...
 
Last edited by a moderator:
  • Like
Reactions: ScottD3, Tuddie, Andy27168 and 2 others
I'm going to have to tackle this next month, but I'm also thinking about an EGR delete and remap.
 
Awesome write up Gups!
 
  • Like
Reactions: gupsterg
Hi,
I have had to do almost exactly the same thing recently to my A4 Cab 3.0TDI, I was getting EGR DTC codes coming up on VCDS, and thought I had a blocked EGR valve but taking the car apart it was due to the fact the "Throttle Adapter" pipe to the EGR unlike yours mine was completely blocked, to the point that you could,nt even see the two holes inside it, it was so blocked up.
My upper/lower manifolds had a coating inside though not quite as bad as yours, the throttle body was completly clean as was the EGR.
symptons were white exhaust smoke, very smelly diesally smell, slightly rough tick over, glow plugs failling (probably just age)
Though this seemed to cure it for a little while, it came back, it turned out to be dodgy injectors.
Are you going to do anything with the lower manifolds? As I want to remove mine together with the upper manifold and get them cleaned, not sure who can do this even if they can be, but though about maybe sonic cleaning or some sort of dipp cleaning.
 
I'm going to have to tackle this next month, but I'm also thinking about an EGR delete and remap.

Really nasty messy job :( , but I think with age/mileage need to be done. I've been investigating EGR delete/remap but been way laid with other stuff and also want car running spot on at stock before meddle further.

Awesome write up Gups!

Cheers mate ;)

Hi,
I have had to do almost exactly the same thing recently to my A4 Cab 3.0TDI, I was getting EGR DTC codes coming up on VCDS, and thought I had a blocked EGR valve but taking the car apart it was due to the fact the "Throttle Adapter" pipe to the EGR unlike yours mine was completely blocked, to the point that you could,nt even see the two holes inside it, it was so blocked up.
My upper/lower manifolds had a coating inside though not quite as bad as yours, the throttle body was completly clean as was the EGR.
symptons were white exhaust smoke, very smelly diesally smell, slightly rough tick over, glow plugs failling (probably just age)
Though this seemed to cure it for a little while, it came back, it turned out to be dodgy injectors.
Are you going to do anything with the lower manifolds? As I want to remove mine together with the upper manifold and get them cleaned, not sure who can do this even if they can be, but though about maybe sonic cleaning or some sort of dipp cleaning.

Hi Andy,

My ECU had old SW but after an update started showing MIL for EGR ports being low flow.

This info is old, I just thought I would share here also, I have cleaned upper manifold and am DIY refurnishing lower manifolds with some new parts, I will add all this content very soon so keep tuned ;) .

ATB
Gup
 
  • Like
Reactions: Andy27168
Besides other issues which led me to view EGR/Intake there was VCDS data in MVB 03 module 01 which was out of spec IMO.

SO after clean of throttle body adapter (shown above) I did MVB 03 again and results were good.

TBACleaned_zpsd679da9e.jpg


Air mass data good, but my car still had idling issues and I had replaced injectors (as MVB's out), battery (as original & about 8yrs old@time), glowplugs (seemed original), throttle unit (as teeth on plastic cog went and would stick) plus SW updates on ECU done.

Each time my idling would go nuts MVB 03 was out.

So further investigation began and as time was low to work on car I started buying new and used parts to clean and get idea on what to do, so I made a shopping list :).

EGRSystem_zps01434996.jpg


In above image is location of EGR Cooler (Blue box), EGR cooling flap (Turq.box) & EGR Valve (Purple box)...

Below is an image I found on ebay showing the ports in EGR cooler...

EGRCoolerports_zps6be23984.jpg


So I thought perhaps my cooler is blocked?

Then I saw this video on YT concerning internal wear inside manifolds by another V6 owner.


I thought perhaps I shouldn't clean lower manifolds until I source cheap pair from ebay or get replacement butterflies/bearings as the coking could be filling gaps of wear.


Off ebay I got new genuine cooling flap unit for £60.


Next off ebay got new genuine EGR valve for £40.


Then I bought a used EGR cooler from ebay for £30, cooling unit had bolts snapped in it so I though when I undo mine to be careful or perhaps spray penetrating oil before doing work.


So I tried to get the EGR valve and connecting pipe to upper intake section off to view EGR cooler/flap unit without removing them.

This was the view I was trying to achieve... but "In situ"...

HFoyQXRzGAjd131429018913P270_zps09208151.jpg


So I thought undo these two...

DSCF5321_zps8889e4d6.jpg


Then these two..

DSCF5322_zps7e9cc925.jpg


DSCF5323_zps9a6187e4.jpg


But look at this (this is a metal pipe)...

DSCF5324_zps67d352fb.jpg
 
Last edited by a moderator:
  • Like
Reactions: Tuddie
Now here is a video showing the elements in photos which were an issue ...


Now what is this? coolant bleeder pipes on cylinder heads ...

So in video above at about start (0.06/0.07) you will see a banjo bolt... there is another which is located approximately near the EGR cooling flap unit on engine block (red outline below image)...

DSCF5376_zpsa023e5d4.jpg


Now I thought it's a PITA to remove the upper/lower manifolds but you also seem to have to contend with the "Coolant bleeder pipe".

Mechanics must loathe V6 owners (IMO!) when they turn up for work to be done

So I thought these coolant pipes must be an issue when manifolds are replaced and started looking at write ups on the web.

Below image is from one of these write ups you can see an owner has unbolted metal section of coolant bleeder pipes (red outline) from manifolds and guided manifold out.

Mani3_zpsf0f2cf52.jpg


So my only option is to remove complete intake manifold system, clamp coolant hoses, undo the EGR connecting pipe from turbo to EGR flap unit, remove bolts on mounting plates of EGR cooling system?

P1010645_zps18c4ca48.jpg


So I end up with this out of engine some how manoeuvred between the plethora of pipes/wires,etc ...
 
Last edited by a moderator:
  • Like
Reactions: Tuddie and Andy27168
Great write up only issue is now i will have to strip mine down as it has covered 158k
hate to think of all that carbon clogging up the works
Will wait for a sunny day ? and get my hands dirty
cheers
 
It is stunning on the 3.0TDi engine, how Audi came up with a design that requires so many little pipe that runs across the engine, It drive me nuts working on the dam thing. Top tip if you ever have to remove the blower motor try not to rest on the engine cover, I did and ended up snapping one of the small coolant pipes even with the engine cover on..
 
It is a right rats nest compared to a 1.9 TDI. I am considering doing this on my car but mine is a CAPA engine so slightly different the whole inlet manifold is aluminium.

Audi A4 8K A5 8T Q5 8R V6 TDI Saugrohr Druckrohr 059145762M | eBay

Looking at ELSA WIN it says that the HP fuel pipe that connects the 2 common rails and crosses across the top needs removing.
I think I will try and manouvre the manifold out with it on, it looks like it will come out with this in place.
Would rather not have to break the fuel lines.


Karl.
 
I bought a 2nd hand top manifold to clean, here are the before pictures of that manifold.

1_zpsfd31b1dc.jpg


As cleaning progresses can start to see the seems on intake ...

2_zps6856114e.jpg


3_zps84b477a0.jpg


When I was scrapping away at the carbon in the top section of the manifold, I got to a point where the majority of it had been removed but there was the last layer left. I carried on scraping and sprayed intake with some WD40, the drier layer of carbon instantly soaked up oil and become this bubblegum like consistency glob.


The aftermath of the cleaning area ...

4_zps9fa21770.jpg


After a rinse off with water ...

5_zps689e303e.jpg


DSCF5968_zps62fac4ee.jpg


DSCF5971_zps5bb357cf.jpg


Here is a zoom shot of an area which was left after using screwdriver/coat hanger wire to clean intake ...


DSCF5972_zpsb7f85811.jpg


Above was then taken care of by using metal scourer attached to wooden pole ... note on the left of pic there is a divider, which I've marked on below photo as well ...

DSCF5962_zps914e3a57.jpg


This smaller two chambers were more difficult to clean, I used a metal scourer attached to a electrical wiring rod by some disc's cut from topup cards.

Oven cleaner also worked a treat on manifold and throttle body adapter, I used cheap Big D oven cleaner foam.

DSCF5984_zps3f62839b.jpg


In below image Green + Orange boxed area scourer by hand. Blue boxed area scourer was used by not fixing to wooden pole but sandwiching scourer between intake and pole to move it/apply pressure. Red boxed area scourer attached to flexible electrical wiring rod, smaller scourer for section right of red rectangle and larger to left, the scourer needs to be sized to fit snugly in sections to achieve abrasive action. I used metal ball shaped scourers.

DSCF59622_zpsebde2e6e.jpg


I also bought a 2nd hand EGR cooler from ebay.

First blasted it with air compressor set to 8 bar, soot did fly out in puff's. Next used foaming oven cleaner, I would leave it to soak for x period before draining and repeating process. The channels are not in a U shape in the cooler but after the weld/blue line is an empty expanse.

fc36f874-ff92-491e-b851-86cb3770671a_zps89af8441.jpg


In above video you will note how water rise from all channels rather than one, again due to the area at end of cooler.

Water look clean in that video from day 1 of cleaning but even on 2nd day when using a straw to fill cooler with oven cleaner soot/carbon is coming out.

It took about 5-7 days of repeatedly soaking the cooler, leaving it for a period with oven cleaner then draining and refilling to clean well so no soot was coming in water.
 
Last edited by a moderator:
  • Like
Reactions: ScottD3, Tuddie and Barkafer
wow! The best thread I've ever read! So much detail.
Do you intend polishing the ally bits you replaced to reduce the soot build up when you have to do this again?
 
  • Like
Reactions: gupsterg
wow! The best thread I've ever read! So much detail.

Cheers! :thumbsup:

Do you intend polishing the ally bits you replaced to reduce the soot build up when you have to do this again?

That is a great :idea:, will have to find time. I know some one which on a pre facelift 3 letter V6 fitted the facelift 4 letter V6 ally top intake.

You see on the 2004 -2009 V6 the gasket to seal intake is on top manifold where as the later one it is on the lower manifold plus some other minor fitting tweaks.

He also fitted a catch can for oily vapour of the crankcase ventilation system which vents into charge air/intake system.

My opinion is that the oily vapour + EGR gas mixing with the charge air is reason for my coking but Audi god only knows!
 
You must be owed a good many cyber beers Gup for all the valuable info you post, nice one yet again mate.
 
  • Like
Reactions: gupsterg
This job was on my list of things to do so had a look at the weekend. The car is an 08 plate with 75K on the clock and the engine code is CAPA. It had a one piece aluminium manifiold rather than the plastic item.
Not too difficult to remove the manifold, I was hoping to get it off without undoing the high pressure fuel lines but had too undo 3 joints as not able to remove the manifold otherwise. No problem with this though when restarting the car just took a few seconds to prime the system again and all was good.
It didn't look as bad as I feared it might be and I cleaned pretty much all the oil/ coke buildup off the manifold using Comma Hyperclean engine degreaser. The swirl flaps looked reasonable , I don't think theres too much play in the rubber bearings.
when the car is remapped I will be getting the EGR mapped out so that will be the end of any future build up of carbon

Left hand intake


Right hand intake


Left hand intake


Right hand intake


I did notice the one side was more coked up than the other. That is the right hand intake had more coke in it I think because of the design of the intake. Air going to the left side of the engine has to do a bit of an about turn so any solid particles in the airstream are more likely to go straight on and end up on the one side of the intake.
The EGR intake holes on the manifold were not blocked at all.

Karl.
 
Last edited:
  • Like
Reactions: ScottD3 and gupsterg
Gup I never tire of your dirty pictures m8 :applaus:
 
  • Like
Reactions: gupsterg
A big thankyou to gup my 2.7 tdi has been given a new lease of life prior to cleaning all of the above items as described by gup it seemed to be running fine apart from when idling in traffic it used to chuck out white/blue smoke pull away then it would clear mpg could have been better
Now for the good bits no more smoking but still keep looking behind me feels a lot more responsive on take off and accelerating when in high gear mpg better will see next week doing 500 mile trip running better then when i first bought it
again cheers keep up the good work
 
Ordered the 3 gaskets for the EGR assembly on my 3.0 from dealer and came to around £15, will attempt an EGR clean in this slightly milder weather over the next few days..and will post up the part no's for the gaskets

Weirdly at over 100k miles (22k in my ownership) my TB butterfly looks like new with no coking to be seen and only a slight tarnish, not sure if this is indicative of the condition of my EGR? Confusing if so considering my car only runs on supermarket fuel.

It has been terracleaned and also had a dose of auto-rx engine cleaner.
 
  • Like
Reactions: dentsy