Hi All,
It's been a while since I've posted something, ironically my last thread also related to rattles/creaks, but on the A4 B9.
Just to put some quick context to this - I was lucky enough to trade up to an A6 C8 in December 2019, the magic was spoilt some what during the initial drive home, unfortunately due to the dashboard rattles/creaks that seemed to appear. Although I had done two test drives of the vehicle before committing, I hadn't picked up on the rattles/creaks previously (I'll explain a bit more about my thoughts on that further in the thread).
Once the initial COVID lockdown had cleared, I was able to get the car booked in around August 2020, to have what I considered the 'major rattle' looked at - It seems to be one that plagues quite a few owners, from what I've read - The noise that can come from around the main screen area, along with the big chunk of plastic in front of the passenger seat. In fairness to the dealership, they sorted the horrible creak/squeak that came from the screen area, they explained that the metal trim that runs around the screen didn't have the relevant 'foam tape' fitted - Thankfully this particular noise hasn't returned since that work being carried out, however plenty of other noises remain from the big chunk of plastic and also the drivers side air vent area and finally the instrument binnacle plastic around the virtual cockpit.
So, with some annual leave booked and nothing else better to do, I decided to try and tackle these myself. I wouldn't necessarily class this as a guide, given the source of the rattles/creaks will vary per vehicle, but I'm hoping this might help point people in the right direction. Very quick disclaimer, if you're not overly confident removing the parts shown below, perhaps ask a friend or family member who potentially has experience with this sort of thing and can help - Some of the trim pieces can be rather stubborn, so knowing how much pressure to apply on something can be quite useful, once you have a feel for that sort of thing, it definitely helps. Failing that, perhaps just using this thread as a point of reference to show your dealer, might help with explaining to them where your rattles/squeaks might be coming from etc.
With that in mind, a few items below that will help with this work:
- 3-4 Hours Spare
- Plastic trim removal tool set (Would highly advise against the use of screw drivers for something like this, one wrong move could leave certain trim pieces looking rather nasty!)
- 8mm socket (I used a 1/4" rachet and socket screwdriver)
- T10 torx bit
- Wire Harness Tape
- Foam Tape
- *Optional* - Plastic specific super glue & Sugru moldable putty (During the process below, I did break one clip, thankfully between super glue and sugru, I was able to put it back together, nice a strong repair once the Sugru had set).
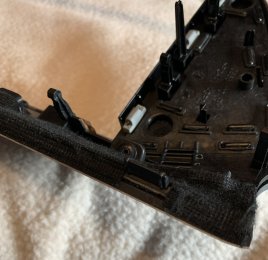
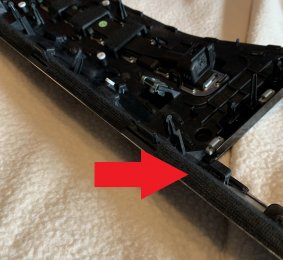
To kick off, you need to remove the end dashboard cover, as pictured below, the trim tool will squeeze in where the arrow is shown, work your way down the trim, then remove completely:

Whilst in this area, the small trim piece on the end of the 'plastic chunk' also needs to come off. This one can be quite stubborn, but I found putting a trim tool underneath (Shown by the arrow) is best. Once it initially 'pops' from the first fixings, it should then come off relatively easily:

I don't have a picture with just those two bits removed, but it should now look something like this:

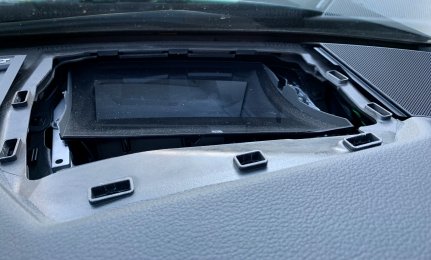
Next you'll need to drop the glovebox down. I recommend leaving the airbag switch plug connected, so not to generate an airbag error on the dash. If you have a code reader that can reset error lights, then it might be worth unplugging to create some more space in the footwell. In my instance, I left it connected and rested the glovebox onto a folded blanket. There are two 8mm bolts at the dashboard end (Essentially where you just removed the end cap trim piece from), four inside the glovebox and two underneath:

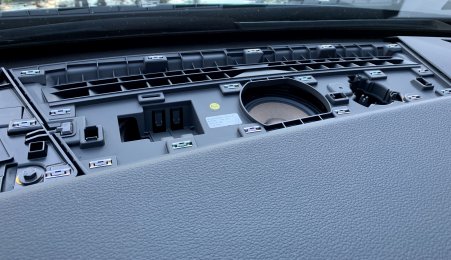
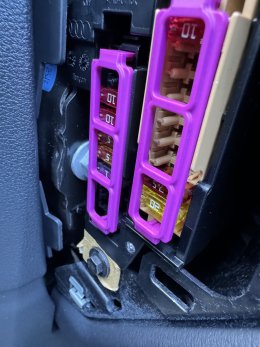
Now with the glovebox removed, you'll need to poke your head underneath the dash to remove the two 8mm bolts holding the 'plastic chunk' in place. It was difficult to get a decent image of where the bolts are underneath the dash, so instead I've highlighted the two gold pieces below, on top the dash - This at least shows the spacing of the bolts, so you know roughly where they are once you're underneath. Be careful not to drop the bolt nearest the screen, once it's loose, would advise removing the last few threads with your fingers, just in case it drops down behind the main centre console:

This next image isn't mine, just a general virtual cockpit image - You now need to remove the instrument binnacle plastic too. Easiest way is to work each side of the plastic at a time, don't pull both together as it might break the clips. Start on the left and pull where the arrows are with both hands, once released, do the same with the right hand side too (Putting the steering wheel into the lowest position may help here):

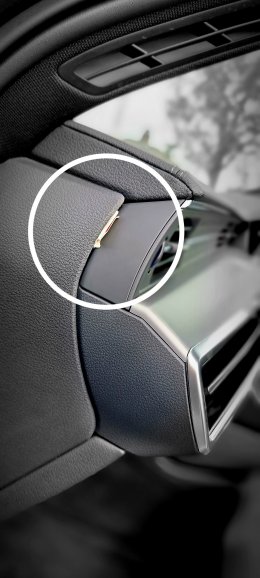
Now everything should be out of the way, ready for the main 'plastic chunk' to be removed. Without having a video (Which I may do if I end up doing this again for whatever reason), it's slightly difficult to explain how to do this. I advise starting at the top right of the trim, inserting a trim tool into the gap created by removing the instrument binnacle, circled in the picture below. Once that has 'popped' the right hand side of the plastic, next to the main screen, you can start working your way along the bottom of the trim piece and pull gently on the left hand end, ideally making sure to remove the whole piece as squarely as possible, to minimise damage to any clips etc. Once the trim feels like it has come away completely, don't forget to unplug the lighting strip connector:

With the trim removed, setting it down onto something relatively soft will hopefully stop any scratches appearing in the piano black finish, I just used another blanket. The aluminium top comes off by unscrewing the 5x T10 torx head screws, once removed it should slide away from the main plastic piece. In this instance I was then able to see the efforts from my Audi dealership, with the wire harness tape having been applied:

If your car hasn't been in for this work, more than likely this tape won't be in place, from the factory, I believe the only tape on this piece is the white sticky back stuff you can see. To try and mitigate any rattles directly from the aluminium piece, I would suggest essentially doing what Audi have done in the picture above - I only added to this, to make sure coverage was as good as possible.
So, the bit that was neglected slightly, is around the edge of the trim, which clips into the other plastic piece, that contains the AC vents. Shown below, I've applied the wire harness tape to the entire piece, end to end. I don't have it pictured, but then I placed a strip of foam tape, again, end to end:

The pieces that make up the silver strip also need some tape:

Back on the dash itself, please see the image below to see where both foam tape and wire harness tape has been applied (I haven't highlighted all with arrows, so not to take up the whole image with arrows):

Once you're happy with the tape coverage, assembly is then in reverse order of the steps above, don't forget to plug the lighting connector back in too. The 8mm screws can be 'nipped' relatively tight, but don't go too mad with them, as some of the fixings are essentially going into plastic.
To give you an idea of what it may look like once back together, the image below is looking down on top of the large aluminium piece. Personally I feel you hardly notice it and looks reasonably OEM, it just looks like some sort of seal or gasket is in place between the trip pieces:

Whilst the instrument binnacle plastic was removed, I also used the foam tape to form a 'seal' along the edge of the plastic, this one really does help stop the creaking around the virtual cockpit area:

In this final image, it shows the same process having been done to the drivers side AC vent area. To gain access, it's similar to the process explained above for the passenger side trim. The dashboard end piece needs to be removed, followed by the small end piece (Again, the more difficult bit to remove). The only difference here being, once those two bits are removed, the small aluminium top piece can then be removed by inserting a trim tool underneath it and gently pulling upwards - It isn't secure by screws, clips only:

In conclusion, the intention of the foam tape is to create a seal between the multiple plastic pieces, which should decrease the amount of rattles/creaking, on the basis of fewer parts coming into contact/vibrating when going over rough surfaces. Since doing this work and driving the car for around a week, this has definitely improved things, but as a side note, there are still some road conditions that cause certain noises to return. For example, expansion joints can still sometimes cause a sudden jolt through the whole dashboard. Although improved, dependant upon temperature, I feel experiences may vary with this sort of thing. I'm sure others may have experienced this - Certain creaking of the plastic can occur when the vehicle is stationary, mainly I believe to be caused by the AC - These generally only occur when the vehicle is travelling for the first few miles, as the AC starts doing its thing, the pipe work inside the dash is a different temp, so as the mixture of cold and hot pieces throughout the dash combine, the various noises can occur. Due to the material choices for this particular cabin, I don't think there's a way to get away from this 100%, but the process described throughout this thread has definitely helped improve the cabin 'ambiance' of my A6
I intend to 'seal' the dashboard mounted speaker grilles mounted towards the windscreen too, so I'll post an update and hopefully include some pictures of how to do those too.
Hope this helps someone!
It's been a while since I've posted something, ironically my last thread also related to rattles/creaks, but on the A4 B9.
Just to put some quick context to this - I was lucky enough to trade up to an A6 C8 in December 2019, the magic was spoilt some what during the initial drive home, unfortunately due to the dashboard rattles/creaks that seemed to appear. Although I had done two test drives of the vehicle before committing, I hadn't picked up on the rattles/creaks previously (I'll explain a bit more about my thoughts on that further in the thread).
Once the initial COVID lockdown had cleared, I was able to get the car booked in around August 2020, to have what I considered the 'major rattle' looked at - It seems to be one that plagues quite a few owners, from what I've read - The noise that can come from around the main screen area, along with the big chunk of plastic in front of the passenger seat. In fairness to the dealership, they sorted the horrible creak/squeak that came from the screen area, they explained that the metal trim that runs around the screen didn't have the relevant 'foam tape' fitted - Thankfully this particular noise hasn't returned since that work being carried out, however plenty of other noises remain from the big chunk of plastic and also the drivers side air vent area and finally the instrument binnacle plastic around the virtual cockpit.
So, with some annual leave booked and nothing else better to do, I decided to try and tackle these myself. I wouldn't necessarily class this as a guide, given the source of the rattles/creaks will vary per vehicle, but I'm hoping this might help point people in the right direction. Very quick disclaimer, if you're not overly confident removing the parts shown below, perhaps ask a friend or family member who potentially has experience with this sort of thing and can help - Some of the trim pieces can be rather stubborn, so knowing how much pressure to apply on something can be quite useful, once you have a feel for that sort of thing, it definitely helps. Failing that, perhaps just using this thread as a point of reference to show your dealer, might help with explaining to them where your rattles/squeaks might be coming from etc.
With that in mind, a few items below that will help with this work:
- 3-4 Hours Spare
- Plastic trim removal tool set (Would highly advise against the use of screw drivers for something like this, one wrong move could leave certain trim pieces looking rather nasty!)
- 8mm socket (I used a 1/4" rachet and socket screwdriver)
- T10 torx bit
- Wire Harness Tape
- Foam Tape
- *Optional* - Plastic specific super glue & Sugru moldable putty (During the process below, I did break one clip, thankfully between super glue and sugru, I was able to put it back together, nice a strong repair once the Sugru had set).
To kick off, you need to remove the end dashboard cover, as pictured below, the trim tool will squeeze in where the arrow is shown, work your way down the trim, then remove completely:
Whilst in this area, the small trim piece on the end of the 'plastic chunk' also needs to come off. This one can be quite stubborn, but I found putting a trim tool underneath (Shown by the arrow) is best. Once it initially 'pops' from the first fixings, it should then come off relatively easily:
I don't have a picture with just those two bits removed, but it should now look something like this:
Next you'll need to drop the glovebox down. I recommend leaving the airbag switch plug connected, so not to generate an airbag error on the dash. If you have a code reader that can reset error lights, then it might be worth unplugging to create some more space in the footwell. In my instance, I left it connected and rested the glovebox onto a folded blanket. There are two 8mm bolts at the dashboard end (Essentially where you just removed the end cap trim piece from), four inside the glovebox and two underneath:
Now with the glovebox removed, you'll need to poke your head underneath the dash to remove the two 8mm bolts holding the 'plastic chunk' in place. It was difficult to get a decent image of where the bolts are underneath the dash, so instead I've highlighted the two gold pieces below, on top the dash - This at least shows the spacing of the bolts, so you know roughly where they are once you're underneath. Be careful not to drop the bolt nearest the screen, once it's loose, would advise removing the last few threads with your fingers, just in case it drops down behind the main centre console:
This next image isn't mine, just a general virtual cockpit image - You now need to remove the instrument binnacle plastic too. Easiest way is to work each side of the plastic at a time, don't pull both together as it might break the clips. Start on the left and pull where the arrows are with both hands, once released, do the same with the right hand side too (Putting the steering wheel into the lowest position may help here):
Now everything should be out of the way, ready for the main 'plastic chunk' to be removed. Without having a video (Which I may do if I end up doing this again for whatever reason), it's slightly difficult to explain how to do this. I advise starting at the top right of the trim, inserting a trim tool into the gap created by removing the instrument binnacle, circled in the picture below. Once that has 'popped' the right hand side of the plastic, next to the main screen, you can start working your way along the bottom of the trim piece and pull gently on the left hand end, ideally making sure to remove the whole piece as squarely as possible, to minimise damage to any clips etc. Once the trim feels like it has come away completely, don't forget to unplug the lighting strip connector:
With the trim removed, setting it down onto something relatively soft will hopefully stop any scratches appearing in the piano black finish, I just used another blanket. The aluminium top comes off by unscrewing the 5x T10 torx head screws, once removed it should slide away from the main plastic piece. In this instance I was then able to see the efforts from my Audi dealership, with the wire harness tape having been applied:
If your car hasn't been in for this work, more than likely this tape won't be in place, from the factory, I believe the only tape on this piece is the white sticky back stuff you can see. To try and mitigate any rattles directly from the aluminium piece, I would suggest essentially doing what Audi have done in the picture above - I only added to this, to make sure coverage was as good as possible.
So, the bit that was neglected slightly, is around the edge of the trim, which clips into the other plastic piece, that contains the AC vents. Shown below, I've applied the wire harness tape to the entire piece, end to end. I don't have it pictured, but then I placed a strip of foam tape, again, end to end:
The pieces that make up the silver strip also need some tape:
Back on the dash itself, please see the image below to see where both foam tape and wire harness tape has been applied (I haven't highlighted all with arrows, so not to take up the whole image with arrows):
Once you're happy with the tape coverage, assembly is then in reverse order of the steps above, don't forget to plug the lighting connector back in too. The 8mm screws can be 'nipped' relatively tight, but don't go too mad with them, as some of the fixings are essentially going into plastic.
To give you an idea of what it may look like once back together, the image below is looking down on top of the large aluminium piece. Personally I feel you hardly notice it and looks reasonably OEM, it just looks like some sort of seal or gasket is in place between the trip pieces:
Whilst the instrument binnacle plastic was removed, I also used the foam tape to form a 'seal' along the edge of the plastic, this one really does help stop the creaking around the virtual cockpit area:
In this final image, it shows the same process having been done to the drivers side AC vent area. To gain access, it's similar to the process explained above for the passenger side trim. The dashboard end piece needs to be removed, followed by the small end piece (Again, the more difficult bit to remove). The only difference here being, once those two bits are removed, the small aluminium top piece can then be removed by inserting a trim tool underneath it and gently pulling upwards - It isn't secure by screws, clips only:
In conclusion, the intention of the foam tape is to create a seal between the multiple plastic pieces, which should decrease the amount of rattles/creaking, on the basis of fewer parts coming into contact/vibrating when going over rough surfaces. Since doing this work and driving the car for around a week, this has definitely improved things, but as a side note, there are still some road conditions that cause certain noises to return. For example, expansion joints can still sometimes cause a sudden jolt through the whole dashboard. Although improved, dependant upon temperature, I feel experiences may vary with this sort of thing. I'm sure others may have experienced this - Certain creaking of the plastic can occur when the vehicle is stationary, mainly I believe to be caused by the AC - These generally only occur when the vehicle is travelling for the first few miles, as the AC starts doing its thing, the pipe work inside the dash is a different temp, so as the mixture of cold and hot pieces throughout the dash combine, the various noises can occur. Due to the material choices for this particular cabin, I don't think there's a way to get away from this 100%, but the process described throughout this thread has definitely helped improve the cabin 'ambiance' of my A6
I intend to 'seal' the dashboard mounted speaker grilles mounted towards the windscreen too, so I'll post an update and hopefully include some pictures of how to do those too.
Hope this helps someone!