Hi All,
I fitted my new RS4 type Grille yesterday which involved me having to remove the front bumper and the original grille. I could not find any guides online relating to the B8 and the only similar one was for an A5 which has a slightly different bumper and was not a comprehensive guide. Therefore I decided to write-up my own guide with photos for each stage. Please excuse the quality of the photos as they were taken on an iPhone.
I purchased the grille from seller tcboverstock on eBay:
Audi A4 S4 B8 09-12 RS Style Gloss Black Mesh Front Hood Bumper Grill | eBay
It cost £60.37 with £36.58 delivery which incurred a £12 custom & admin charge when it arrived in the UK from the US.
The car involved was a 2009 S line. I cannot confirm if this guide would work for the SE bumper or the facelift model.
**ANY PERSONS FOLLOWING THIS GUIDE DO SO AT THEIR OWN RISK AND I TAKE NO RESPONSIBILITY FOR ANY DAMAGE ETC. CAUSED**
The time taken to carry out this task, was around 1.5 hours, but by following this guide it may be possible to do it quicker. I am not a mechanic and the guide is written as step-by-step guide for all abilities.
Tools needed are as follows: (these can be purchased from Halfords)
1x Torx t27, 1x Torx t26, 1x 3/8" Ratchet, 1x 3/8" 10" Extension Bar, 1x 3/8" 10mm socket, 1 x small torch (not essential), 1x small screwdriver, and some protective matting in front of the bumper.


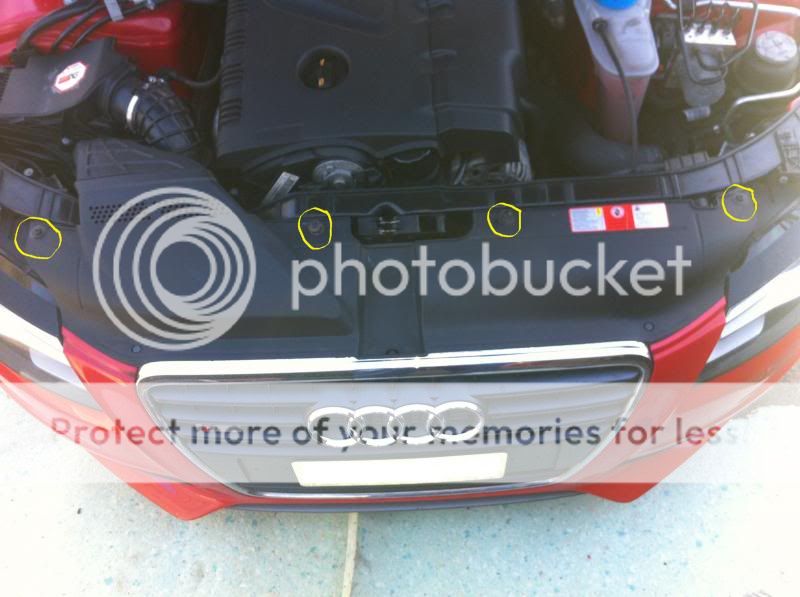
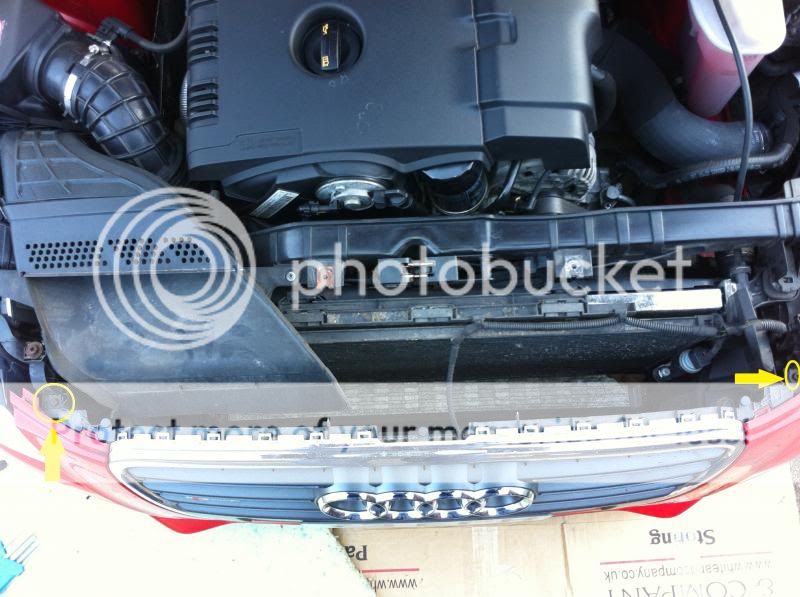
STEP 1: After opening the bonnet, remove the 4 bolts on the Airflow panel indicated below, using a t26.
STEP 2: Locate the 3 plastic bolts indicated below.

Push down on these plastic bolts.

STEP 3: Remove the Airflow panel by pulling towards the engine bay and lifting upwards.
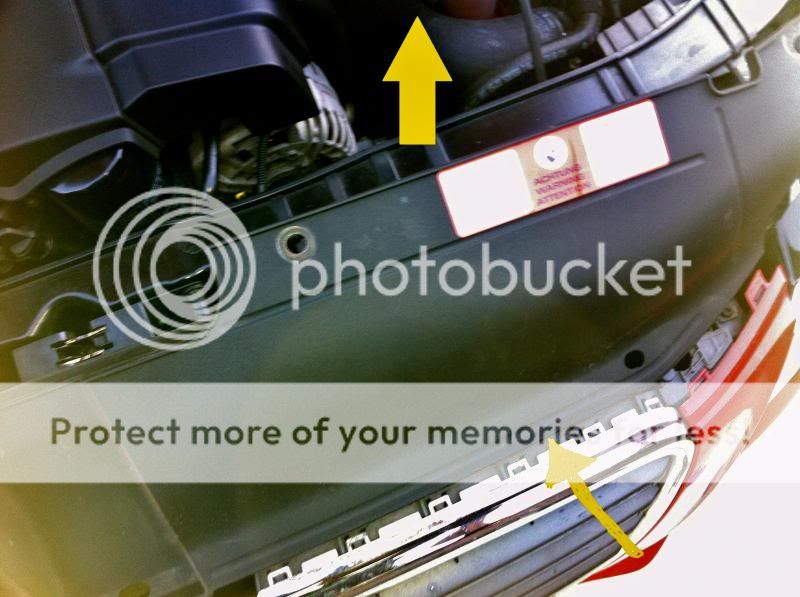
The engine bay will now look like this once the Airflow panel has been removed.

STEP 4: On the drivers side, turn the wheel inwards and locate the two bolts on the front edge of the wheel arch, as indicated below.

Remove these 2 bolts using a t27.

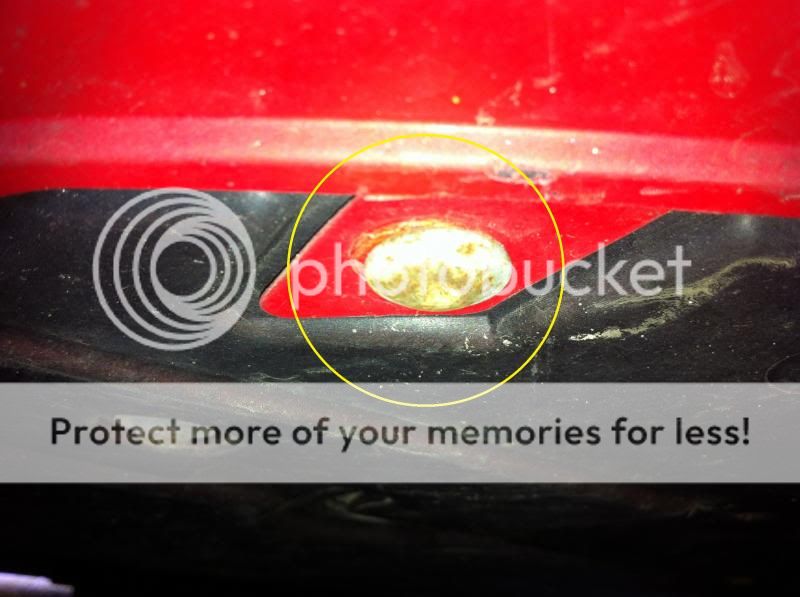
STEP 5: Peel back the wheel arch liner and locate the bolt, indicated below, which is located just below the headlight. (Note: A small torch might be useful in locating this bolt)

Remove this bolt using the Ratchet with the attached Extension Bar and 10mm socket.

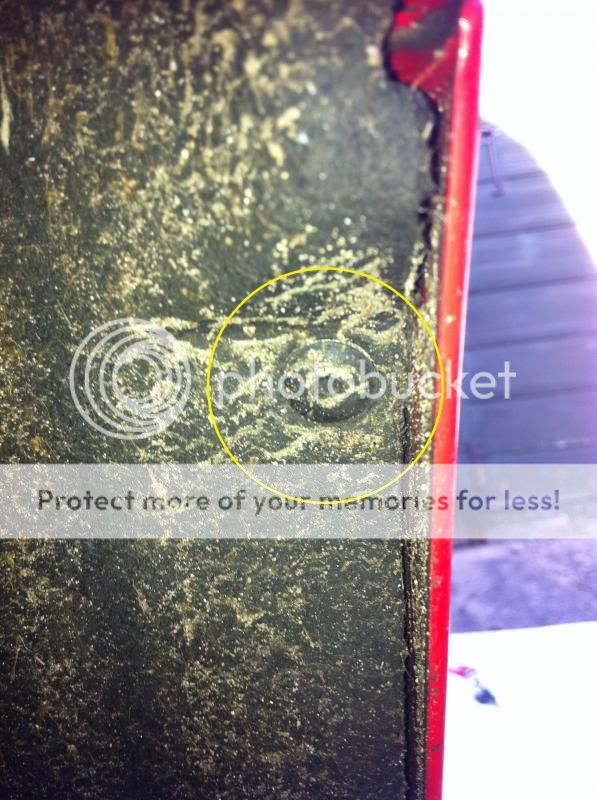
STEP 6: There are 5 bolts located below the bumper. Remove these using a t26. (Note: There is a bolt located on the far edges of each side of the bumper. This is indicated on the left of the photo below. These bolts are different to the other 3 bolts so make sure you don't mix these up.)

STEP 7: On the passengers side, turn the wheel inwards and locate the two bolts on the front edge of the wheel arch (exactly the same as what was carried out on the drivers side.) Remove both of these bolts using a t27.


STEP 8: Peel back the wheel arch liner.

Locate the bolt, as indicated below, which is located just below the headlight. (Note: A small torch might be useful in locating this bolt)

Remove this bolt using the Ratchet with the attached Extension Bar and 10mm socket.

STEP 9: Locate the two bolts on the top of the bumper, as indicated below.
Remove these bolts using a t26.

Use a screwdriver, lift the flange located underneath each of the two bolts. (Note: Be careful not to damage the paint of the bumper when using the screwdriver)

STEP 10: Remove the Fog Light surrounds on either side by giving them a good pull outwards. (Note: This is not mandatory but I found it helpful for the next step)

STEP 11: ENSURE THAT THE IGNITION IS OFF AT THIS STAGE TO PREVENT POSSIBLE FAULT CODES FLAGGING UP!
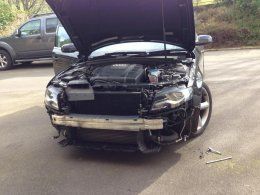
Remove the bumper from the car by gently wiggling and pulling on all sides, fog light hole, and from top and bottom. (Note: this is where step 10 proves useful). Make sure that protective matting is in place in front of the bumper in case the bumper is dropped etc. Be aware that the bumper will still be attached to the car at this stage, via wires.
STEP 12: Once the bumper is free, the airtemp sensor will then need to be removed from the bumper by gently pulling it free.

STEP 13: Unplug the fog lights by using a screwdriver to unclip the socket.

The bumper will now be fully free from the rest of the car at this stage.

STEP 14: Place the bumper face down on the protective matting and locate the 12 bolts indicated below.
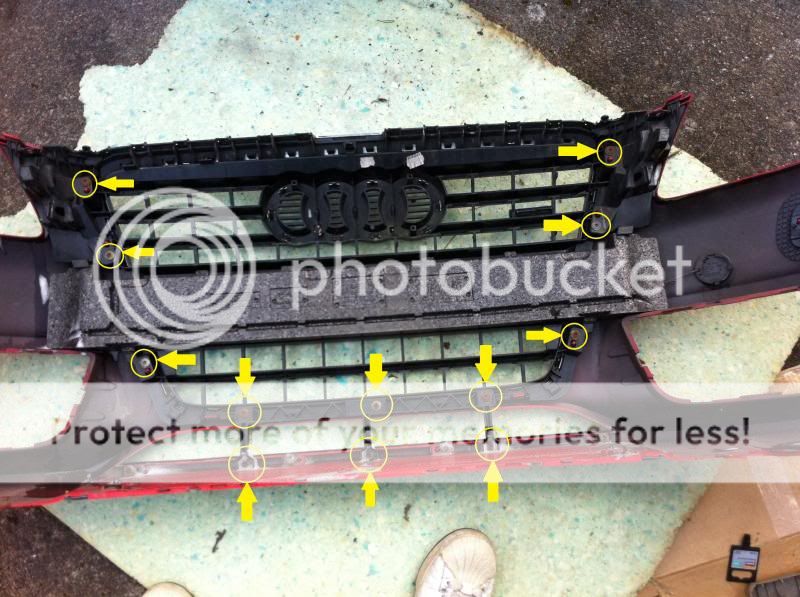
Remove these bolts using a t26. The bottom bracket indicated below can be removed once the 6 bolts holding it in have been taken out. This bracket has to be added to the replacement grille.

STEP 15:Unclip the 4 clips, 2 on either side of the top of the grille, using a screwdriver.

STEP 16: Unclip the 4 clips, 2 on either side of the grille, using a screwdriver.

I fitted my new RS4 type Grille yesterday which involved me having to remove the front bumper and the original grille. I could not find any guides online relating to the B8 and the only similar one was for an A5 which has a slightly different bumper and was not a comprehensive guide. Therefore I decided to write-up my own guide with photos for each stage. Please excuse the quality of the photos as they were taken on an iPhone.
I purchased the grille from seller tcboverstock on eBay:
Audi A4 S4 B8 09-12 RS Style Gloss Black Mesh Front Hood Bumper Grill | eBay
It cost £60.37 with £36.58 delivery which incurred a £12 custom & admin charge when it arrived in the UK from the US.
The car involved was a 2009 S line. I cannot confirm if this guide would work for the SE bumper or the facelift model.
**ANY PERSONS FOLLOWING THIS GUIDE DO SO AT THEIR OWN RISK AND I TAKE NO RESPONSIBILITY FOR ANY DAMAGE ETC. CAUSED**
The time taken to carry out this task, was around 1.5 hours, but by following this guide it may be possible to do it quicker. I am not a mechanic and the guide is written as step-by-step guide for all abilities.
Tools needed are as follows: (these can be purchased from Halfords)
1x Torx t27, 1x Torx t26, 1x 3/8" Ratchet, 1x 3/8" 10" Extension Bar, 1x 3/8" 10mm socket, 1 x small torch (not essential), 1x small screwdriver, and some protective matting in front of the bumper.


STEP 1: After opening the bonnet, remove the 4 bolts on the Airflow panel indicated below, using a t26.

STEP 2: Locate the 3 plastic bolts indicated below.

Push down on these plastic bolts.

STEP 3: Remove the Airflow panel by pulling towards the engine bay and lifting upwards.

The engine bay will now look like this once the Airflow panel has been removed.

STEP 4: On the drivers side, turn the wheel inwards and locate the two bolts on the front edge of the wheel arch, as indicated below.

Remove these 2 bolts using a t27.


STEP 5: Peel back the wheel arch liner and locate the bolt, indicated below, which is located just below the headlight. (Note: A small torch might be useful in locating this bolt)

Remove this bolt using the Ratchet with the attached Extension Bar and 10mm socket.

STEP 6: There are 5 bolts located below the bumper. Remove these using a t26. (Note: There is a bolt located on the far edges of each side of the bumper. This is indicated on the left of the photo below. These bolts are different to the other 3 bolts so make sure you don't mix these up.)


STEP 7: On the passengers side, turn the wheel inwards and locate the two bolts on the front edge of the wheel arch (exactly the same as what was carried out on the drivers side.) Remove both of these bolts using a t27.


STEP 8: Peel back the wheel arch liner.

Locate the bolt, as indicated below, which is located just below the headlight. (Note: A small torch might be useful in locating this bolt)

Remove this bolt using the Ratchet with the attached Extension Bar and 10mm socket.

STEP 9: Locate the two bolts on the top of the bumper, as indicated below.

Remove these bolts using a t26.

Use a screwdriver, lift the flange located underneath each of the two bolts. (Note: Be careful not to damage the paint of the bumper when using the screwdriver)

STEP 10: Remove the Fog Light surrounds on either side by giving them a good pull outwards. (Note: This is not mandatory but I found it helpful for the next step)

STEP 11: ENSURE THAT THE IGNITION IS OFF AT THIS STAGE TO PREVENT POSSIBLE FAULT CODES FLAGGING UP!
Remove the bumper from the car by gently wiggling and pulling on all sides, fog light hole, and from top and bottom. (Note: this is where step 10 proves useful). Make sure that protective matting is in place in front of the bumper in case the bumper is dropped etc. Be aware that the bumper will still be attached to the car at this stage, via wires.
STEP 12: Once the bumper is free, the airtemp sensor will then need to be removed from the bumper by gently pulling it free.

STEP 13: Unplug the fog lights by using a screwdriver to unclip the socket.

The bumper will now be fully free from the rest of the car at this stage.

STEP 14: Place the bumper face down on the protective matting and locate the 12 bolts indicated below.

Remove these bolts using a t26. The bottom bracket indicated below can be removed once the 6 bolts holding it in have been taken out. This bracket has to be added to the replacement grille.

STEP 15:Unclip the 4 clips, 2 on either side of the top of the grille, using a screwdriver.

STEP 16: Unclip the 4 clips, 2 on either side of the grille, using a screwdriver.

Last edited:


 )
)