

You are using an out of date browser. It may not display this or other websites correctly.
You should upgrade or use an alternative browser.
You should upgrade or use an alternative browser.
Hi. You posted my video This can be done by eeprom edit. Read with programmer and changed a few bytes.
 This can be done by eeprom edit. Read with programmer and changed a few bytes.
If its just needle sweep you need go to the Vcd's section on the site and look for a member who is close to you and PM him / her and ask if they know how to do it for you probably cost you a few beer tokens . If you have ur own cable check out youtube as it could be on there or try this ( audi-sport.net/needlesweep) put into google

Yup - I tried it and it doesn’t work through vcds. The coding is accepted and then gets reset.It ain’t possible with only vcds.

Sorry lads my bad , so i have found a post from a very very respected retrofitter and hopefully this will answer the OP's question , plus this is a 7yrs ago post so the A3 might have changed depending on age 
Attachments
Somebody basically messed with RS3 firmware on an a3 cluster & also managed to feck up his steering rack programming to zeros & couldn't get it back iirc.
I believe its possible but its quite involved.
I believe its possible but its quite involved.
Basically, you need to read 24c eeprom chip, edit 3 consecutive bytes in the dump and write it back to the chip. All white clusters have the ns and lap timer in the flash, but they are “locked” on non-rs clusters. There’s no danger at all, nothing can be fecked up if you know what you are doing. It has nothing to do with the steering rack nor other modules. Pretty simple to do, but you have to know the offsets in the dump as mentioned before. On 982H I managed to unlock boost and oil temp. Also, these clusters can be cross flashed so it’s again simple to unlock eco menu and boost on older clusters. Can’t post what and where in dump to change, as everyone keeps it secret, but I can edit eeprom if yous can read it with either a programmer or with a good piece of hardware. Don’t try to do it with Chinese clones, as you may face problems with immo

I didn't say if it was done correctly it would effect the rack, I was specifically referring to the user who messed with his car to get it working & messed up his steering coding & couldn't fix.
As above, you really need to know what you're doing or things will go wrong very quickly.
As above, you really need to know what you're doing or things will go wrong very quickly.
Funny thing is , having an RS with this feature, I never use it,
The last thing you have time to do, when making progress in an RS3 , is look at the boost meter, you need to be looking at the road.
The last thing you have time to do, when making progress in an RS3 , is look at the boost meter, you need to be looking at the road.
Funny thing is , having an RS with this feature, I never use it,
The last thing you have time to do, when making progress in an RS3 , is look at the boost meter, you need to be looking at the road.
Like that lol

The last thing you want to be doing when you are tramping on is watching "one foot in the grave" but people still fit TV's in the dash.
He died at 145mph and the last thing he heard was " i don't believe it !!"
He died at 145mph and the last thing he heard was " i don't believe it !!"
found a video on youtube with a link to a guide on how to do it. guide is on a french a3 forum, and its a ballache to sign up but got there in the end.
link is http://www.a3forum.fr/tutoriaux-8p-...layage-aiguille-et-menu-lap-timer-t42283.html and will add a google translated version of the guide below.
credit goes to jbprod on the french a3 forums
video
link is http://www.a3forum.fr/tutoriaux-8p-...layage-aiguille-et-menu-lap-timer-t42283.html and will add a google translated version of the guide below.
credit goes to jbprod on the french a3 forums
video
Last edited:
This publication is the sole responsibility of the author, who under no circumstances may be held liable
responsible for the use that could be made of the information contained therein.
Hello,
Here's how I promised you this new little tutorial to activate the scanning hands and the lap-timer menu on the FL2 meters.
This modification has been tested and validated on the counters with a white ODB and having the following references:
8p0920931
: easy: 8p0920932
: easy: 8p0920901
: easy: 8p0920983 (UK)
TT meter:
: easy: 8J0920981 (UK)
: easy: 8j0920930H
This change will not work for counters with the following references because they do not have the same eeprom and software:
A3 counter
: hard: 8P0920930
if you have validated it on other references thank you to let me know about this post to update the list
Even if I give the steps step by step,
it is best to have knowledge of electronic component programming for this tutorial.
The meter is an expensive and essential element for starting your car.
Any mishandling can put it out of use and you will not be able to use your car without going through the Audi box by leaving them a small check of 1000 € minimum!
You are now warned of the risks so if it happens bad not worth complaining!
Tools needed:
A hair dryer
Pipe wrench / ratchet socket 8
Torx screwdriver
A test clip SOIC8 SOP8 clip with its adapter (example)
An eeprom i2c programmer with its software (ex: CH341A, EZP2010, Minipro)
The Hex Rechner program that you can download by clicking HERE
Disassembly of the Instrument Holder:
To avoid any error message afterwards I strongly advise you to disconnect the negative cable of your battery before disassembling the meter,
then follow the official procedure below


Opening of the Instrument Holder
On the photos you see on the car tag I made them on my English test account
take a hair dryer and heat the label
A video of the disassembly and reassembly of the meter and available below: wink:
Take a torx screwdriver and unscrew the 2 screws behind the meter

once the screws are removed it will be necessary to attack the clips to remove the block of the counter glass,
there are 4 clips above, 1 on each side and 2 below.
take a flat screwdriver and start with a clip on the side,
slide the flat screwdriver under the clip and lever with the screwdriver to unclip while pulling the 2 parts of the counter to try to move them away,
done the same then with all the clips above and the other side to finish with those below.
Once all the unlocked clips put the counter on a table and gently lift the part with the glass up (pay attention to the 2 manual controls in the middle)
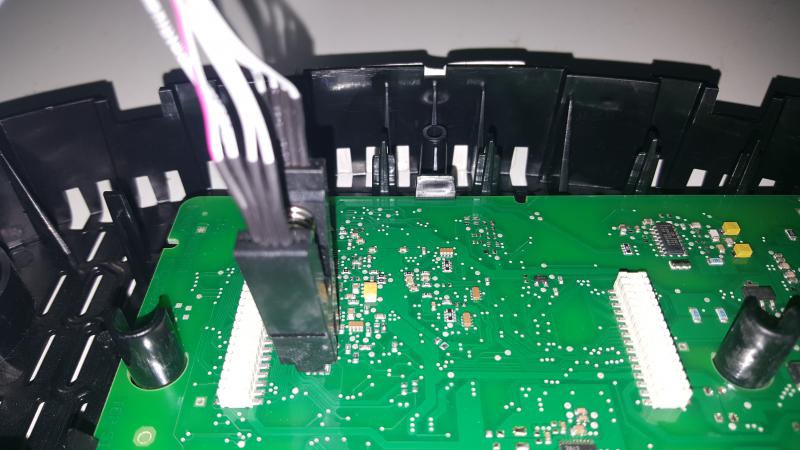
Once the window remove you have something like that

The counter contains 2 electronic cards,
the one with the hands, dial, odb, ... and the one that interests us with electronics including the eeprom.
To access the map that interests us it will now be necessary to disassemble the needles, remove all the dials, unsolder the screen ... No I'm kidding! : Lol:
in fact the two cards are just plugged into each other via 2 connectors
it will just now have to lift the top card to separate it from the one below.
There are notches to help us do this properly

the notches below

the notches of the top
with your thumbs in the bottom notches, push the card a little outwards,
then with your index fingers in the notches at the top pull the card outward,
alternate up and down to completely unclip the top card


and put the top side card (tip: put the glass back on to protect from dust)
Video disassembly and reassembly of the instruments
responsible for the use that could be made of the information contained therein.
Hello,
Here's how I promised you this new little tutorial to activate the scanning hands and the lap-timer menu on the FL2 meters.
This modification has been tested and validated on the counters with a white ODB and having the following references:
8p0920931
: easy: 8p0920932
: easy: 8p0920901
: easy: 8p0920983 (UK)
TT meter:
: easy: 8J0920981 (UK)
: easy: 8j0920930H
This change will not work for counters with the following references because they do not have the same eeprom and software:
A3 counter
: hard: 8P0920930
if you have validated it on other references thank you to let me know about this post to update the list
Even if I give the steps step by step,
it is best to have knowledge of electronic component programming for this tutorial.
The meter is an expensive and essential element for starting your car.
Any mishandling can put it out of use and you will not be able to use your car without going through the Audi box by leaving them a small check of 1000 € minimum!
You are now warned of the risks so if it happens bad not worth complaining!
Tools needed:
A hair dryer
Pipe wrench / ratchet socket 8
Torx screwdriver
A test clip SOIC8 SOP8 clip with its adapter (example)
An eeprom i2c programmer with its software (ex: CH341A, EZP2010, Minipro)
The Hex Rechner program that you can download by clicking HERE
Disassembly of the Instrument Holder:
To avoid any error message afterwards I strongly advise you to disconnect the negative cable of your battery before disassembling the meter,
then follow the official procedure below
Opening of the Instrument Holder
On the photos you see on the car tag I made them on my English test account
take a hair dryer and heat the label
A video of the disassembly and reassembly of the meter and available below: wink:
Take a torx screwdriver and unscrew the 2 screws behind the meter
once the screws are removed it will be necessary to attack the clips to remove the block of the counter glass,
there are 4 clips above, 1 on each side and 2 below.
take a flat screwdriver and start with a clip on the side,
slide the flat screwdriver under the clip and lever with the screwdriver to unclip while pulling the 2 parts of the counter to try to move them away,
done the same then with all the clips above and the other side to finish with those below.
Once all the unlocked clips put the counter on a table and gently lift the part with the glass up (pay attention to the 2 manual controls in the middle)
Once the window remove you have something like that
The counter contains 2 electronic cards,
the one with the hands, dial, odb, ... and the one that interests us with electronics including the eeprom.
To access the map that interests us it will now be necessary to disassemble the needles, remove all the dials, unsolder the screen ... No I'm kidding! : Lol:
in fact the two cards are just plugged into each other via 2 connectors
it will just now have to lift the top card to separate it from the one below.
There are notches to help us do this properly
the notches below
the notches of the top
with your thumbs in the bottom notches, push the card a little outwards,
then with your index fingers in the notches at the top pull the card outward,
alternate up and down to completely unclip the top card
and put the top side card (tip: put the glass back on to protect from dust)
Video disassembly and reassembly of the instruments
here you are now with the electronic card.

Programming:
The component that interests us is the eeprom in the red frame as below
connect your eeprom programmer to your computer and launch the software supplied with it.
Select from the list of available components of your programmer the manufacturer ST then the component M24C32 or L24C32 or ST24C32 according to the programmers.
insert the adapter for the clip in your programmer by lifting the lever and positioning it according to the diagram shown for your programmer.
Most of the time the PIN 1 of the programmers is the 1st at the top left like this


it may be different with other programmer,
refer to the diagram on the programmer or its documentation
then connect the clip clamp to the adapter, respecting the direction,
(the red thread represents Pin No. 1)

then connect the clip clip to the eeprom respecting the direction,
(the red thread represents the pin # 1 and in our case the pin 1 is the one identified below)

Once the clip is in place start reading the eeprom by clicking on the Read button of your software
if you get an error or that FF FF FF .... is that your clamp is wrong position or not in contact with all the pin of the eeprom,
reposition it and try again until you find the correct position.
Once you have been able to read the eeprom save your reading to a .bin file.
I advise you to do several reading and backup different security to be sure to have a good backup.
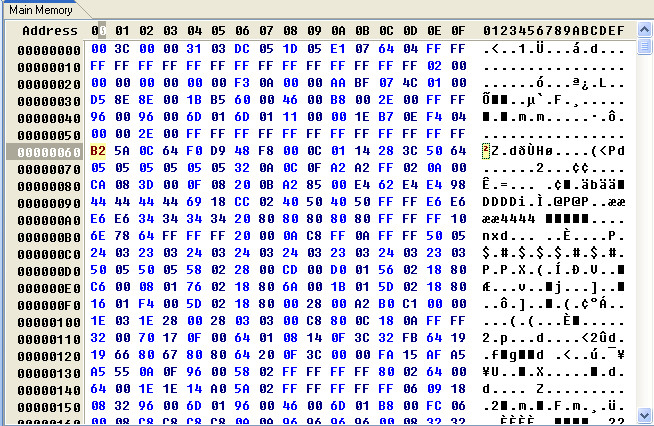
Once your eeprom read you should get something like below

The hexadecimal addresses we are interested in are the first 2 of the 7th lines,
the address 00000060 for the lap timer and the address 00000061 for the needle scan

Unlock the lap-timer:
To unblock the timer you have to activate the bit N ° 5 of the address 00000060
Open the Hex Rechner program and enter the hexadecimal value you have at address 00000060 in my example the value is 92

tick the box bit 5 and note the new hexadecimal value obtained B2 instead of the other in your file

Unlock the needle sweep:
To unblock the needle scan you need to activate the bit # 2 of address 00000061
Open the Hex Rechner program and enter the hexadecimal value you have at address 00000061 in my example the value is 5A

tick the box bit 2 and note the new hexadecimal value obtained 5E instead of the other in your file


for security save your modified .bin file under another name then click on the Write button to rewrite it in the eeprom of your cluster.
Normally most programmers do a check after programming but if you are not sure click on the Verify button to be checked,
or restart a reading and compare the 2 .bin files with hexadecimal software like HxD - Freeware Hex Editor
That's it for the programming part,
you still have to activate the functions via vag-com (see the rest of the tutorial) but if you want you can directly activate the new functions in the eeprom without going through the vag-com box, for this go see the section Add at the end of the tutorial.
remove the clip clip from the eeprom,
reposition the map with the dials on the other map and press it at the red dots below with your fingers or with the eraser at the end of a pencil.
(Be careful not to touch the ODB screen and leave fingerprints on it)

all you have to do is put the glass block back into position (pay attention to the two rods) and press it to re-clip the whole thing.
Put back the 2 screws and the label,
reconnect your meter in the car and reassemble it.
Finally reconnect the - terminal of your battery
Now that the functions have been unlocked we have to activate them and for that we have to go through the vag-com
Connect the vag-com and go to 17 Instruments,
then Adaptation -10
Special Function 1 then enable the last bit and the penultimate bit


save and leave
here you should normally have the needle sweep activated at the next start.
Programming:
The component that interests us is the eeprom in the red frame as below
connect your eeprom programmer to your computer and launch the software supplied with it.
Select from the list of available components of your programmer the manufacturer ST then the component M24C32 or L24C32 or ST24C32 according to the programmers.
insert the adapter for the clip in your programmer by lifting the lever and positioning it according to the diagram shown for your programmer.
Most of the time the PIN 1 of the programmers is the 1st at the top left like this
it may be different with other programmer,
refer to the diagram on the programmer or its documentation
then connect the clip clamp to the adapter, respecting the direction,
(the red thread represents Pin No. 1)
then connect the clip clip to the eeprom respecting the direction,
(the red thread represents the pin # 1 and in our case the pin 1 is the one identified below)
Once the clip is in place start reading the eeprom by clicking on the Read button of your software
if you get an error or that FF FF FF .... is that your clamp is wrong position or not in contact with all the pin of the eeprom,
reposition it and try again until you find the correct position.
Once you have been able to read the eeprom save your reading to a .bin file.
I advise you to do several reading and backup different security to be sure to have a good backup.
Once your eeprom read you should get something like below
The hexadecimal addresses we are interested in are the first 2 of the 7th lines,
the address 00000060 for the lap timer and the address 00000061 for the needle scan
Unlock the lap-timer:
To unblock the timer you have to activate the bit N ° 5 of the address 00000060
Open the Hex Rechner program and enter the hexadecimal value you have at address 00000060 in my example the value is 92
tick the box bit 5 and note the new hexadecimal value obtained B2 instead of the other in your file
Unlock the needle sweep:
To unblock the needle scan you need to activate the bit # 2 of address 00000061
Open the Hex Rechner program and enter the hexadecimal value you have at address 00000061 in my example the value is 5A
tick the box bit 2 and note the new hexadecimal value obtained 5E instead of the other in your file
for security save your modified .bin file under another name then click on the Write button to rewrite it in the eeprom of your cluster.
Normally most programmers do a check after programming but if you are not sure click on the Verify button to be checked,
or restart a reading and compare the 2 .bin files with hexadecimal software like HxD - Freeware Hex Editor
That's it for the programming part,
you still have to activate the functions via vag-com (see the rest of the tutorial) but if you want you can directly activate the new functions in the eeprom without going through the vag-com box, for this go see the section Add at the end of the tutorial.
remove the clip clip from the eeprom,
reposition the map with the dials on the other map and press it at the red dots below with your fingers or with the eraser at the end of a pencil.
(Be careful not to touch the ODB screen and leave fingerprints on it)
all you have to do is put the glass block back into position (pay attention to the two rods) and press it to re-clip the whole thing.
Put back the 2 screws and the label,
reconnect your meter in the car and reassemble it.
Finally reconnect the - terminal of your battery
Now that the functions have been unlocked we have to activate them and for that we have to go through the vag-com
Connect the vag-com and go to 17 Instruments,
then Adaptation -10
Special Function 1 then enable the last bit and the penultimate bit
save and leave
here you should normally have the needle sweep activated at the next start.
I'd probably find that I put all that effort in for a needle sweep, and wouldn't see it anyway as I usually turn on the ignition and then reach for the seatbelt as it runs the diagnostic checks, or start entering data in the sat nav.
90% of the time I wouldn't see it, so for me it is a massive amount of effort for very little/no benefit.
90% of the time I wouldn't see it, so for me it is a massive amount of effort for very little/no benefit.
There's quite a work involved into doing this.
Polar fis or fis control might be expensive but way easier and with much more useful data than rs boost bar which doesn't work correctly on tuned cars and oil temp that stays on for 10 sec.
Polar fis or fis control might be expensive but way easier and with much more useful data than rs boost bar which doesn't work correctly on tuned cars and oil temp that stays on for 10 sec.
Credit to the original french guy tbh, I'd give it a whirl as its a good learning curve, however only on another cluster initially.
One hint: eeprom be read via OBD with proper tools, ie Smok
That french chap didn’t mention about boost and oil temperature - it’s done the same way, but it works on newer clusters like 982h and so on.
That french chap didn’t mention about boost and oil temperature - it’s done the same way, but it works on newer clusters like 982h and so on.
One hint: eeprom be read via OBD with proper tools, ie Smok
That french chap didn’t mention about boost and oil temperature - it’s done the same way, but it works on newer clusters like 982h and so on.
Great input bud.
One hint: eeprom be read via OBD with proper tools, ie Smok
That french chap didn’t mention about boost and oil temperature - it’s done the same way, but it works on newer clusters like 982h and so on.
Hey, do you mind sharing the addresses for the boost and oil temp as well ?
Cheers,
Somebody basically messed with RS3 firmware on an a3 cluster & also managed to feck up his steering rack programming to zeros & couldn't get it back iirc.
hahahaha not one to mince words albeit true
- Joined
- Dec 27, 2016
- Messages
- 76
- Reaction score
- 22
- Points
- 8
I think I many have to give this a go myself. Does the chip have to be read on the bench or is it possible to read/write the chip with the likes of Vag commander? Excuse me if it is a sill question. Thanks
- Joined
- Dec 27, 2016
- Messages
- 76
- Reaction score
- 22
- Points
- 8
Thanks, now i have aquired the correct equiptment to be able to read/write the eeprom. Can you provide the info to enable boost? My cluster is 8P0 920 982 K. Regards.It has to be read on the bench.
Basically, you need to read 24c eeprom chip, edit 3 consecutive bytes in the dump and write it back to the chip. All white clusters have the ns and lap timer in the flash, but they are “locked” on non-rs clusters. There’s no danger at all, nothing can be fecked up if you know what you are doing. It has nothing to do with the steering rack nor other modules. Pretty simple to do, but you have to know the offsets in the dump as mentioned before. On 982H I managed to unlock boost and oil temp. Also, these clusters can be cross flashed so it’s again simple to unlock eco menu and boost on older clusters. Can’t post what and where in dump to change, as everyone keeps it secret, but I can edit eeprom if yous can read it with either a programmer or with a good piece of hardware. Don’t try to do it with Chinese clones, as you may face problems with immo
So is the boost byte 000062?
Address 62 .... activate bits 4 and 5 ...
Address 63 .... activate bits 1 and 7 ...
Can someone confirm this?
Hello Gents,
Please do you know is correct? ive found a guy who can mod eprom for me but i need to give him clear info.
Thank you
This will not work on 2009 to 2010 clusters. No need to try. Only work son 2010+ clusters. Only option is to upgrade eeprom + micronas dump to 2010+ status. Don't know if that will be worth it.Hello Gents,
Please do you know is correct? ive found a guy who can mod eprom for me but i need to give him clear info.
Thank you
Hello Gents,
Please do you know is correct? ive found a guy who can mod eprom for me but i need to give him clear info.
Thank you
60, 61 and 62 mate
so on mine manufacuted Dec 2009, S3 FL with needle sweep and lap timer from factory, update of eprom is not enough to have oil temp and boost?
do you know cluster part numbers it does / does not work so double-check mine? 8P0 XXXXX?
Thank you for help.
do you know cluster part numbers it does / does not work so double-check mine? 8P0 XXXXX?
Thank you for help.
[QUOTE = "Pelle27, post: 3643250, member: 146492"] Salve signori,
Per favore, sai che è corretto? Ho trovato un ragazzo che può modificare l'eprom per me, ma devo dargli informazioni chiare.
Grazie [/ QUOTE]
Ciao, a me ha funzionato tacho 2011
Per favore, sai che è corretto? Ho trovato un ragazzo che può modificare l'eprom per me, ma devo dargli informazioni chiare.
Grazie [/ QUOTE]
Ciao, a me ha funzionato tacho 2011
Are you sure? Look here:This will not work on 2009 to 2010 clusters. No need to try. Only work son 2010+ clusters. Only option is to upgrade eeprom + micronas dump to 2010+ status. Don't know if that will be worth it.
https://i.postimg.cc/ydnny8D9/DSC0095136.jpg
This dash is from 2009 - 8p0 920 931S
")
Needle sweep and lap timer will work on ANY micronas cluster. Even those red ones from 2007 onwards.
José Manuel
New Member
Good afternoon and thanks for your contributions to this forum, I am trying to activate the functions in my panel Ref 8p0 920 931 S and I cannot do it, could someone give me a hand? This is the reading I got from the eeprom. Thanks in advance
Last edited: