- Joined
- Jul 27, 2015
- Messages
- 184
- Reaction score
- 28
- Points
- 28
There doesn't seem to be any decent guides out there related to this so as I was doing this retrofit myself I thought I'd create one as I know it helps others out.
This guide is based on the 3 door sline model although I imagine the sportback will be very similar.
I used only genuine parts in this guide so if your using aftermarket this may not suit.
Tools you'll need:
Torx 20 screwdriver
Small flat head screwdriver
Bojo Tools/Flat head screwdriver will also work but is not recomended
heat gun or hair dryer.
Trolley Jack
Axel Stands
Time it took me:
3 hours although I was taking photos")
Part numbers:
10x Orange screw in rivits - 8P0853802A
8x Clear clips - 8P0853585
1x Left S3 end cap - 8P0853579GRU
1x Right S3 end cap - 8P0853580GRU
2x Black rivit - N90821401
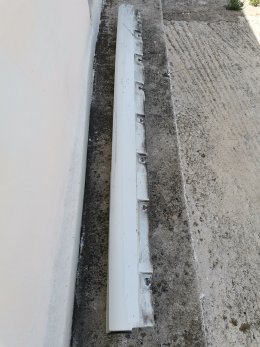
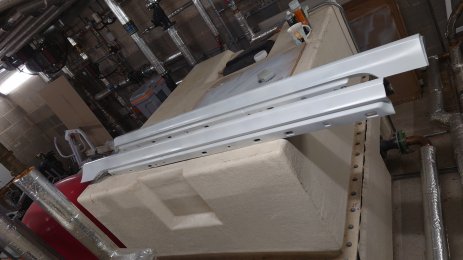
x1 Left S3 sideskirt - 8P4853859GRU
x1 Right S3 sideskirt - 8P4853860GRU
x2 Black Rivit - 8P0853802
You will also need the S3 sills and door blades for this to work without modding your exsiting ones,
1. First thing you'll need to do is remove the front door blades off the car, there are two small torx20 screws on the inside at each end. Once the screws are removed DO NOT just pull the blade towards you, they need to be slid towards the rear of the car and they should then release. Mine were a little tough so be persistent and they'll release.


2. Next thing is to clean dirt from under the door blade once removed, this isn't necessary as there's no adesive going back on but well worth doing while there off. I just used some waterless wash and wax.


3. Now we need to remove the door sills, you will need to heat these up with a heat gun or hair dryer to make them easier to remove. I then slid one of my BoJo tools under the sill and slowly worked it along, slowly pull at the same time and it will come off.


4. This next part is the most time consuming part of the install, as the residue glue can take some time to remove. I found that heating the glue and using the glue remover in conjunction worked far better than just using the glue remover on its own. Grab a microfiber cloth and get rubbing, make sure you clean it well!


5. On the the rear quarter blade, for this we need to again heat the surface up to make it easier to remove. Using a BoJo tool slide it under the back and start to work it around, once it has lifted slightly slowly pull towards you being careful not to bend it too much.


6. Again clean the surface under the rear door blade making sure there is zero to little glue/residue left.

7. Next is to remove the front arch cap at the bottom, you will need a torx 20 screwdriver for this. Once out this simply pulls off, I didn't need any tools to remove as it came away quite easily. Clean any rubbish that's behind them...Mine was caked in dirt!!


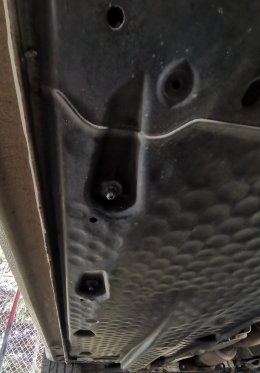
8. Now grab a trolley jack and jack the car up, make sure you use axel stands as we don't want any accidents! This will make it easier to install the skirts and clean the surface under the car.

9. Next I simply got a firm brush and some warm soapy water and cleaned the sill and under the car where the sideskirts would sit, This was my own prefrence as I didn't want to use Tiger seal agaisnt a dirty surface.

10. Now grab the sideskirt for the side you are doing, make sure all the clear clips are in place on the skirt itself. Place the skirt over the sill and lineup the clips with the holes in the side of the car.


11. Once the skirt is in place, you can grab the fittings and clip them in place at the top of the skirt.


12. Next is to grab the door blade, we will need to swap some parts over in order for the S3 blades to fit as the screw holes are located slightly differently on both. You will need to remove the clips with the screw holes in from your original blade (Both ends) and transfer them over to the S3 blades. This is quite simple and I found using a small flat head screwdriver was the easiest way.
simply get the end of the screwdriver behind the 4 tiny metal retainer clips and work them loose. Don't rush this as they can easily break.


13. Once they have been swapped over the S3 blade should now fit perfect and the holes should line up with the holes in the door. You can now screw these back on.

14. Next grab the sideskirt end cap and simply push this into place, it should just clip on. Screw the torx 20 screw back in, I don't think this actually does anything anymore apart from hold the arch liner in place anyway.

15. Tiger Seal the underside of the skirt to the car, I won't show photo's of this simply becauase different people will have different ways of doing this and may even use another method to secure them up.

16. Fianlly get your S3 door moulded sills and apply a small amount of Tiger Seal or double sided tape to underside and stick in place.


Now grab a cupper, sit back and admire your hard work!


Thanks Nathan
This guide is based on the 3 door sline model although I imagine the sportback will be very similar.
I used only genuine parts in this guide so if your using aftermarket this may not suit.
Tools you'll need:
Torx 20 screwdriver
Small flat head screwdriver
Bojo Tools/Flat head screwdriver will also work but is not recomended
heat gun or hair dryer.
Trolley Jack
Axel Stands
Time it took me:
3 hours although I was taking photos
Part numbers:
10x Orange screw in rivits - 8P0853802A
8x Clear clips - 8P0853585
1x Left S3 end cap - 8P0853579GRU
1x Right S3 end cap - 8P0853580GRU
2x Black rivit - N90821401
x1 Left S3 sideskirt - 8P4853859GRU
x1 Right S3 sideskirt - 8P4853860GRU
x2 Black Rivit - 8P0853802
You will also need the S3 sills and door blades for this to work without modding your exsiting ones,
1. First thing you'll need to do is remove the front door blades off the car, there are two small torx20 screws on the inside at each end. Once the screws are removed DO NOT just pull the blade towards you, they need to be slid towards the rear of the car and they should then release. Mine were a little tough so be persistent and they'll release.
2. Next thing is to clean dirt from under the door blade once removed, this isn't necessary as there's no adesive going back on but well worth doing while there off. I just used some waterless wash and wax.
3. Now we need to remove the door sills, you will need to heat these up with a heat gun or hair dryer to make them easier to remove. I then slid one of my BoJo tools under the sill and slowly worked it along, slowly pull at the same time and it will come off.
4. This next part is the most time consuming part of the install, as the residue glue can take some time to remove. I found that heating the glue and using the glue remover in conjunction worked far better than just using the glue remover on its own. Grab a microfiber cloth and get rubbing, make sure you clean it well!
5. On the the rear quarter blade, for this we need to again heat the surface up to make it easier to remove. Using a BoJo tool slide it under the back and start to work it around, once it has lifted slightly slowly pull towards you being careful not to bend it too much.
6. Again clean the surface under the rear door blade making sure there is zero to little glue/residue left.
7. Next is to remove the front arch cap at the bottom, you will need a torx 20 screwdriver for this. Once out this simply pulls off, I didn't need any tools to remove as it came away quite easily. Clean any rubbish that's behind them...Mine was caked in dirt!!
8. Now grab a trolley jack and jack the car up, make sure you use axel stands as we don't want any accidents! This will make it easier to install the skirts and clean the surface under the car.
9. Next I simply got a firm brush and some warm soapy water and cleaned the sill and under the car where the sideskirts would sit, This was my own prefrence as I didn't want to use Tiger seal agaisnt a dirty surface.
10. Now grab the sideskirt for the side you are doing, make sure all the clear clips are in place on the skirt itself. Place the skirt over the sill and lineup the clips with the holes in the side of the car.
11. Once the skirt is in place, you can grab the fittings and clip them in place at the top of the skirt.
12. Next is to grab the door blade, we will need to swap some parts over in order for the S3 blades to fit as the screw holes are located slightly differently on both. You will need to remove the clips with the screw holes in from your original blade (Both ends) and transfer them over to the S3 blades. This is quite simple and I found using a small flat head screwdriver was the easiest way.
simply get the end of the screwdriver behind the 4 tiny metal retainer clips and work them loose. Don't rush this as they can easily break.
13. Once they have been swapped over the S3 blade should now fit perfect and the holes should line up with the holes in the door. You can now screw these back on.
14. Next grab the sideskirt end cap and simply push this into place, it should just clip on. Screw the torx 20 screw back in, I don't think this actually does anything anymore apart from hold the arch liner in place anyway.
15. Tiger Seal the underside of the skirt to the car, I won't show photo's of this simply becauase different people will have different ways of doing this and may even use another method to secure them up.
16. Fianlly get your S3 door moulded sills and apply a small amount of Tiger Seal or double sided tape to underside and stick in place.
Now grab a cupper, sit back and admire your hard work!
Thanks Nathan
Last edited: