Ambient light

a_venka

New Member
Joined
May 26, 2021
Messages
14
Reaction score
0
Points
1
Location
Vienna
Hi
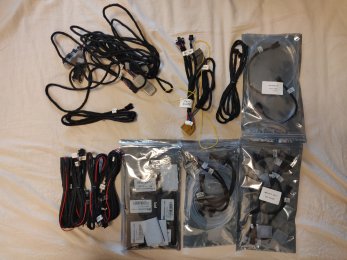
I bought a Ambient light Set in AliExpress and I'm so confused about the cabling.
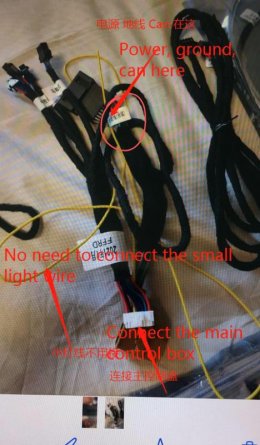
The original Guide is kinda Chinese half Translation from Google i think.

Anyway, I have to Connect the Main Controller to Can Gateway (Passenger Side, have to remove Glove Box.)


Can someone understand how it should be cabled?
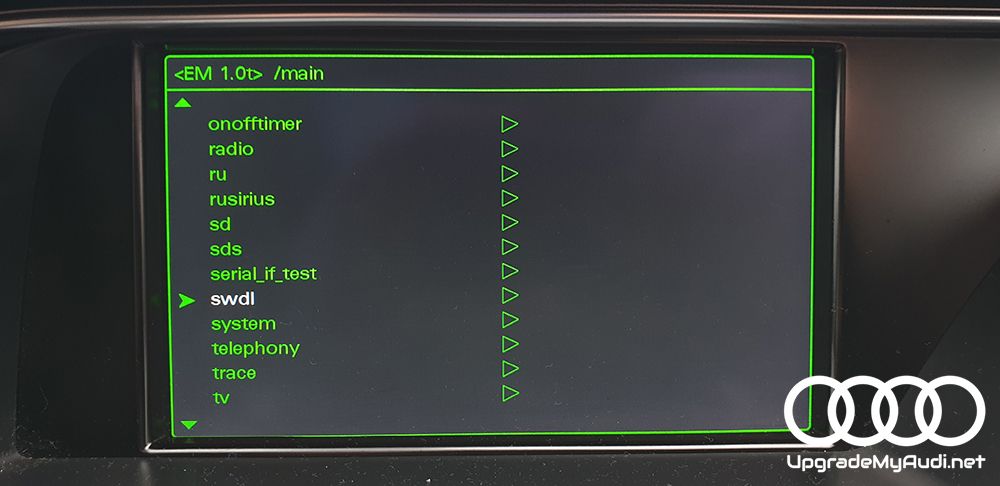
I have attached original "instructions" and Images from my original CAN Gateway.

I tried to plug without changing anything but then my Radio didn't Start and Car turned Off within 2s after trying to start.


Any Help is appreciated.
 

Attachments

  • install_chinese.pdf
    2.7 MB · Views: 564
  • install_english.pdf
    589.2 KB · Views: 295
  • IMG_20210525_134520.jpg
    IMG_20210525_134520.jpg
    2.2 MB · Views: 349
  • IMG_20210526_142632.jpg
    IMG_20210526_142632.jpg
    1.7 MB · Views: 403
  • IMG_20210526_142930.jpg
    IMG_20210526_142930.jpg
    2 MB · Views: 383
  • IMG_20210525_134513.jpg
    IMG_20210525_134513.jpg
    4.8 MB · Views: 290
Looks like you need the beige plug from the pack and plug into the socket you unplugged that connector from up under the glove compartment.

Then plug the original plug into the femal black connector on that same beige connector loom.

You then need to run a cable from pin 5 to the plug terminal on the glove box.

Sent from my ONEPLUS A6013 using Tapatalk
 
  • Like
Reactions: a_venka
Looks like you need the beige plug from the pack and plug into the socket you unplugged that connector from up under the glove compartment.

Then plug the original plug into the femal black connector on that same beige connector loom.

You then need to run a cable from pin 5 to the plug terminal on the glove box.

Sent from my ONEPLUS A6013 using Tapatalk
I got everything except the PIN Part.
Can you Show me with one of the Images what you mean?
It also says unplug pin15 but don't understand the English Translation Well


Gesendet von meinem ONEPLUS A6013 mit Tapatalk
 
Last edited:
It looks like they have a yellow repair wire in pin 5 of the new beige 20 pin connector. Is that correct, its hard to see from the photo.
I can't actually see from the instructions where they want that repair wire to be plugged into.

Maybe send them a chat on aliexpress and ask where that should go. I see the instructions are for A4L and Q5 which could have slightly different wiring although usually these aliexpress wire packs are pretty good.
Yes ... seller told me that it should also work for A5 same, but it does not.
Also the PIN Steps are quite unclear tbh.

I'll ask seller, if it doesn't work I have to return :(
 
Yes ... seller told me that it should also work for A5 same, but it does not.
Also the PIN Steps are quite unclear tbh.

I'll ask seller, if it doesn't work I have to return :(
I would expect maybe that wire has to go into your comfort controller (J519) 32pin grey connector with purple latch under the steering wheel. That way when you code the function to activate it it will send the signal down that wire to light up the lights. (i could be very wrong).

This guide may offer some help as well.

He says there are two plugs under the steering wheel that need wires connecting. So maybe you can find those wires in your kit?
He says..
"Once you have located the J519 module (comfort module) you need to find the black plug (D) and the Grey connector (32Pin)"

"For the black connector you need to slide out the purple slider and push the pin into slot 14 which is marked on the plug itself, and the cover on the grey plug slides off and the pin goes into slot 17, again all numbered"
Only cable I have for the Controller is the one you See in the attached Image.
According to seller I can ignore yellow wire but I'm Sure I have to Pin something Just don't know what.

Still waiting for seller reply

Thanks a bunch for your replies. ✌
 

Attachments

  • IMG-20210526-WA0009.jpg
    IMG-20210526-WA0009.jpg
    56.7 KB · Views: 268
Only cable I have for the Controller is the one you See in the attached Image.
According to seller I can ignore yellow wire but I'm Sure I have to Pin something Just don't know what.

Still waiting for seller reply

Thanks a bunch for your replies. ✌
ok yeah bit odd not wiring anything to the J519. Keep us posted on what the seller comes back with. I find they are usually pretty good on the info.
 
  • Like
Reactions: a_venka
@***DK*** Looks like i've not plugged in very well first time.
I did this again same and it worked :)

The lights can be controlled either via MMI OR Steering wheel, both are not supported yet by the main controller.

Can't attach video files here, but it works now :)
 
@***DK*** Looks like i've not plugged in very well first time.
I did this again same and it worked :)

The lights can be controlled either via MMI OR Steering wheel, both are not supported yet by the main controller.

Can't attach video files here, but it works now :)
ah great nice work - so just the beige plug adapter and nothing more to plug in?
 
  • Like
Reactions: a_venka
@***DK*** Looks like i've not plugged in very well first time.
I did this again same and it worked :)

The lights can be controlled either via MMI OR Steering wheel, both are not supported yet by the main controller.

Can't attach video files here, but it works now :)
Hello... how did you enable the control via MMI or steering wheel. I bought a similar kit in Aliexpress and has completed the install for the main box controller and the cup holder, center console and foot well lamps. Before continuing to install the door module and lights, I tried to change the color settings but was unable since there is no menu in MMI. Also tried different steering wheel button presses but did not work. Hope you can help.

danshonin
 
@***DK*** Looks like i've not plugged in very well first time.
I did this again same and it worked :)

The lights can be controlled either via MMI OR Steering wheel, both are not supported yet by the main controller.

Can't attach video files here, but it works now :)
Can you also directly send me the video on how to setup the MMI or steering wheel?


You'll need the green menu activated first either using. Vcds or obdeleven, carista or something similar.

Or a script file
Details here


Sent from my ONEPLUS A6013 using Tapatalk


You'll need the green menu activated first either using. Vcds or obdeleven, carista or something similar.

Or a script file
Details here


Sent from my ONEPLUS A6013 using Tapatalk

Hello, I have activated Green Menu already. What would be the next step? Thanks in advance for the help.
 
Hello, I have activated Green Menu already. What would be the next step? Thanks in advance for the help.
Did you watch the YouTube video above? That give the steps in the green menu to activate.
Unless you want something different and I have misunderstood?

Sent from my ONEPLUS A6013 using Tapatalk
 
Did you watch the YouTube video above? That give the steps in the green menu to activate.
Unless you want something different and I have misunderstood?

Sent from my ONEPLUS A6013 using Tapatalk
Thanks DK. I have installed the multi-colored ambient light for my B9, is this the same?
 
Sorry no that is for b8 not b9.

I found this thread for b9 that might help. You need to set coding adaptation using vcds or obdeleven.

See link here

Maybe read that whole post, looks quite detailed.


Sent from my ONEPLUS A6013 using Tapatalk
 
Sorry no that is for b8 not b9.

I found this thread for b9 that might help. You need to set coding adaptation using vcds or obdeleven.

See link here

Maybe read that whole post, looks quite detailed.


Sent from my ONEPLUS A6013 using Tapatalk
Thanks so much for the help DK. Let me check the details in the link you shared.
 
Thanks so much for the help DK. Let me check the details in the link you shared.
Just want to say that I successfully coded the ambient light setting menu in MMI. All I have to do was to activate (via long coding) Byte 11 - Bit 3 in Central Electrics (09).

danshonin
 
Great work! Satisfying feeling!

Sent from my ONEPLUS A6013 using Tapatalk