Actuator fuel flap won't open A3 E-Tron, how to replace?

Tuttivini

Registered User
Joined
Apr 4, 2019
Messages
130
Reaction score
16
Points
18
Location
Nederland
The fuel door/flap of my A3 E-Tron often does not open anymore.
I think it's a slightly more 'special' system than with other Audi's (am I correct?):

The system is automatically vented when the tank valve is closed.
This is to 'preserve' the fuel. Because there are people who always drive fully electric with this plug-in hybrid. So if you have the same unused gasoline in your tank for months/years, it's not degrading (or less...).

If you want to refuel (petrol), you pull a electronic switch on the driver's door.
Then the system bleeds itself and indicates on the virtual dashboard (Facelift 2017 A3 E-Tron) that the system is bled and then that you can refuel.
You will hear that it electronically unlocks the fuel filler flap and the flap will open/pop a few centimeters so that you can insert your fingers between it and open it all the way, unscrew the fuel cap and refuel ...

I think with 'normal' A3 8v's (facelift) it does not open with a switch inside the drivers door, but you have to 'press' on the fuel filler flap, after which it opens? And the actuator only serves as an automatic lock as soon as the car is locked ... (so there is no button on the inside of the driver's door and nothing is vented). Correct?

Now this automatic pushing open no longer works for me.
The A3 E-Tron indicates that the system has been bled and that I can refuel, but the tank valve isn't opening (popping).

I get it open via manual red pull cord / emergency release. Sometimes I also have to use a plastic card or something while you pull that red emergency handle.

Silicone spray on the actuator didn't solve it...

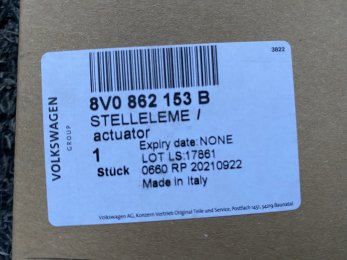
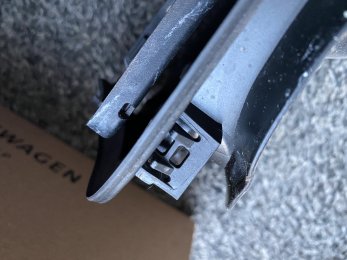
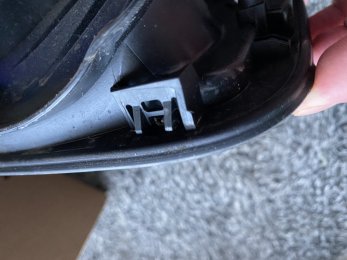
I understand this is presumably a faulty ACTUATOR.
Read a lot about it on forums (with normal A3s, not so much about the E-Tron).

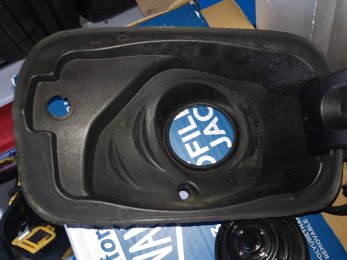
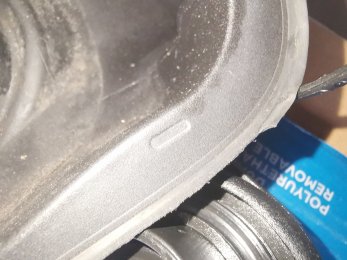
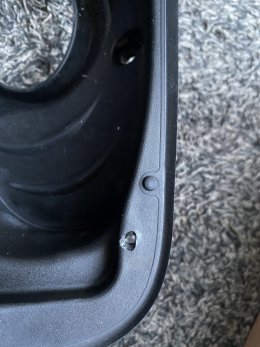
But in order to get to it, you have to 'punch four holes' on the fuel filler housing and buy a new fuel filler housing, because the old one is broken.
Is this correct?

And if so, how do I do this?
Anyone happen to have access to ETKA drawings how I can replace this with the A3 E-Tron?
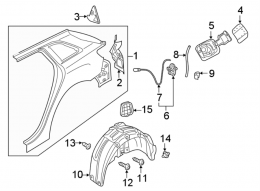
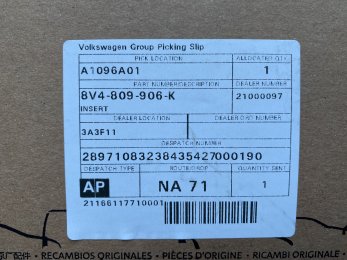
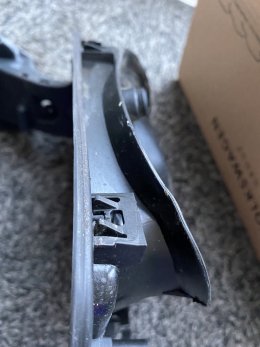
And what order number (specific actuator with automatic opening for the A3 E-Tron, partnr 6 on picture) and possibly order number for the comple fuel filler housing, partnr 5 on picture (if old one needs to be punched).

I Guess my local Dutch dealer will charge >+150,- euro's for replacement ...

(tried to describe my problem in English, which is not my native language)
 

Attachments

  • 1312782.png
    1312782.png
    173.3 KB · Views: 701
Don’t know about the e-tron but the fuel filler cap locking solenoid is a common fault on the A3 ICE cars. It just seizes and the red plastic release wire in the boot just breaks - mine did at 2.5 years old. Solenoid design weakness. I now open mine every 2-3 weeks just to ensure it doesn’t seize again.
 
  • Like
Reactions: Tuttivini
Who knows how to remove the 'fuel filler flap', without damaging it/punching 4 holes, to get to/replace the actuator?
 
It’s actually quite a common problem across a wide range of Audi models.

This YT video gives you a good general view of what needs to be done


You can carefully remove the the surround and just replace the actuator.
 
@RAF_S7 Thanks for the info.
Would it be possible to remove the cover (so I can reuse it) without punching/damaging the 4 holes, like the guy in the youtube clip does?
 
@RAF_S7 Thanks for the info.
Would it be possible to remove the cover (so I can reuse it) without punching/damaging the 4 holes, like the guy in the youtube clip does?

Ive not had to do this on my S7, but came close on my previous A7, where I struggled a few times to get it open.

It’s quite a “hard plastic” surround, held onto the car body by four clips - just where he uses the tool to break the clips through the hole covers.

You could reuse the old one, as long as you don’t mind a little damage showing when you open the fuel flap. I’m not sure if you can remove the surround from inside...

John. :racer:
 
I am having issue with actuator not opening. I managed to remove the plastic surround using plastic trim tools without breaking it at all, I only had to scrape thin rubber lip around it so I can push the trim into the gap. Slight pull with trim tool around each point where the workshop guide suggests to make a hole through. I have got the actuator working again after lots of lithium grease.
 

Attachments

  • IMG_20210627_175437.jpg
    IMG_20210627_175437.jpg
    2.1 MB · Views: 341
  • IMG_20210627_175501.jpg
    IMG_20210627_175501.jpg
    3.9 MB · Views: 299
  • Like
Reactions: oldskoolflash
I did this today and can confirm that it is a royal pain in the ***. Any hope of a neat removal quickly evaporated, it really is an appauling design, even after neatly creating a slot there is no feedback from the clips inside, whatever way I angled the screwdriver I could not get them free. Brute force was the only way and this resulted in a chip and a scratch to my paintwork. As you can imagine, I am pretty ****** off at this moment in time and find it staggering that Audi consider this an acceptable design to remove a part that is known to fail over the whole range. The only advice I can give its concentrate on the top and bottom LEFT corners as the right side is also retained by the hinge. Oh, if you want a real laugh, Audi charge an additional £7.50 for the sticker that tells you what fuel to put in the vehicle....
 
These are the part numbers in case anyone needs to order the parts (for a 2016 S3 8V).

Also, after studying the broken part it seems you need to insert a small flat blade screwdriver in an upwards direction (for the slots at the top) and then angle it down to release the clip. reverse this action for the clips at the bottom (see photos and video).


Attachments

  • IMG_7949.jpg
    IMG_7949.jpg
    2.7 MB · Views: 214
  • IMG_7950.jpg
    IMG_7950.jpg
    3.7 MB · Views: 222
  • IMG_7951.jpg
    IMG_7951.jpg
    2 MB · Views: 173
  • IMG_7952.jpg
    IMG_7952.jpg
    1.9 MB · Views: 233
  • IMG_7955.jpg
    IMG_7955.jpg
    2.3 MB · Views: 151
  • IMG_7956.jpg
    IMG_7956.jpg
    1.9 MB · Views: 194
  • IMG_7957.jpg
    IMG_7957.jpg
    1.7 MB · Views: 230
I did this today and can confirm that it is a royal pain in the ***. Any hope of a neat removal quickly evaporated, it really is an appauling design, even after neatly creating a slot there is no feedback from the clips inside, whatever way I angled the screwdriver I could not get them free. Brute force was the only way and this resulted in a chip and a scratch to my paintwork. As you can imagine, I am pretty ****** off at this moment in time and find it staggering that Audi consider this an acceptable design to remove a part that is known to fail over the whole range. The only advice I can give its concentrate on the top and bottom LEFT corners as the right side is also retained by the hinge. Oh, if you want a real laugh, Audi charge an additional £7.50 for the sticker that tells you what fuel to put in the vehicle....
You supposed to use plastic pry tools not metal ones..
then you wouldn't scratch it

And you shouldn't follow that poor video but slide plastic pry tool above the ''minus'' marks and press down will press clips down and release the cover.
Only top ones and then slowly pull it out

 
Last edited:
  • Like
Reactions: ZeA38VSport
You supposed to use plastic pry tools not metal ones..
then you wouldn't scratch it

And you shouldn't follow that poor video but slide plastic pry tool above the ''minus'' marks and press down will press clips down and release the cover.
Only top ones and then slowly pull it out

You'd need to create a massive hole/slot to get any of those pry tools in there. The access point is the 'minus shaped" slot as the plastic is thinner here. The trick is to push up at an angle and then lever the tool down to release the clip. I just wish could have found out the info beforehand about how to release the clips (hence my video which I hope helps someone). Still, a very poor design to service a part that suffers from a known issue.
 
I did this today and can confirm that it is a royal pain in the ***. Any hope of a neat removal quickly evaporated, it really is an appauling design, even after neatly creating a slot there is no feedback from the clips inside, whatever way I angled the screwdriver I could not get them free. Brute force was the only way and this resulted in a chip and a scratch to my paintwork. As you can imagine, I am pretty ****** off at this moment in time and find it staggering that Audi consider this an acceptable design to remove a part that is known to fail over the whole range. The only advice I can give its concentrate on the top and bottom LEFT corners as the right side is also retained by the hinge. Oh, if you want a real laugh, Audi charge an additional £7.50 for the sticker that tells you what fuel to put in the vehicle....

I managed to remove the surround with plastic trim.. did not bother the minus signs, instead inserted trim tool behind the surround at those positions
Pics in previous post already
 
I managed to remove the surround with plastic trim.. did not bother the minus signs, instead inserted trim tool behind the surround at those positions
Pics in previous post already
Yeah, I'm impressed you managed to do that - did you go behind the plastic insert from the front or via the rubber surround by the fuel tank filler hole, I wasn't able to get enough play to get anything behind without fear of damaging it (although I don't have any pry tools).
 
Screenshot 20220105 165744 edit 77956753975083

See the damage in Yellow compared to Red arrow section.. its soft rubber on edges and the surround has hard plastic behind it ..
Tricky to get under soft rubber and then under hard plastic but once i managed that, released one clip, rest was super easy
 
  • Like
Reactions: oldskoolflash
Yeah, I'm impressed you managed to do that - did you go behind the insert from the front or via the rubber surround by the fuel tank filler hole?
Went in where I've marked yellow... Was tricky getting under it and that was the only damage.. thats very thin soft rubber so you can't spot when fitted back
 
  • Like
Reactions: oldskoolflash