A4 B8 Projector install

M90KKL

Registered User
Joined
Mar 5, 2013
Messages
220
Reaction score
36
Points
28
Location
NULL
Hi all, so I have my projector kit supplied by Trups and after some back and forwarding texts with Trups im on my way to installing these projectors to my A4 B8 SE, check back for updates I'll upload loads of pics and info and I'll try do a video to YouTube,

Iv used this forum loads for hints and tips so it's about time I gave back, I know lots of people are wanting to do this mod so I hope my thread will help

(big thanks to Trups for supplying the kit and for being the fountain of retro fit knowledge)
 
  • Like
Reactions: desertstorm
Will keep an eye out for this, Possibly might make this mod in the next few weeks, months. Just got a nice big cardboard box to convert into an oven .
Are they 2.5 inch projectors for the B8 and what shrouds do you have ??

Karl.
 
Karl,

I used my actual oven the lamp was a squeeze but went it eventually. baked it at 120c for 10 mins and the lense literally fell off it was perfect (Fan assisted range master oven)

Not sure of the sizes of the projector just the ones supplied by Trups, and the shrouds are the plain silver iris ones I think,

I can't seem to upload pics from my IPhone to the forum but I'll sort something tomo and gets pics up!
 
  • Like
Reactions: desertstorm
Upload the photos to photobucket. Then paste the IMG link into the thread. Dead easy and free :)
 
Ok so here my write up for the instal;

1. Firstly place light in the Oven at 120c for 10 mins (make sure all caps and metal holding clips removed)

2. Remove from oven (wear gloves) and then prize apart the lamp


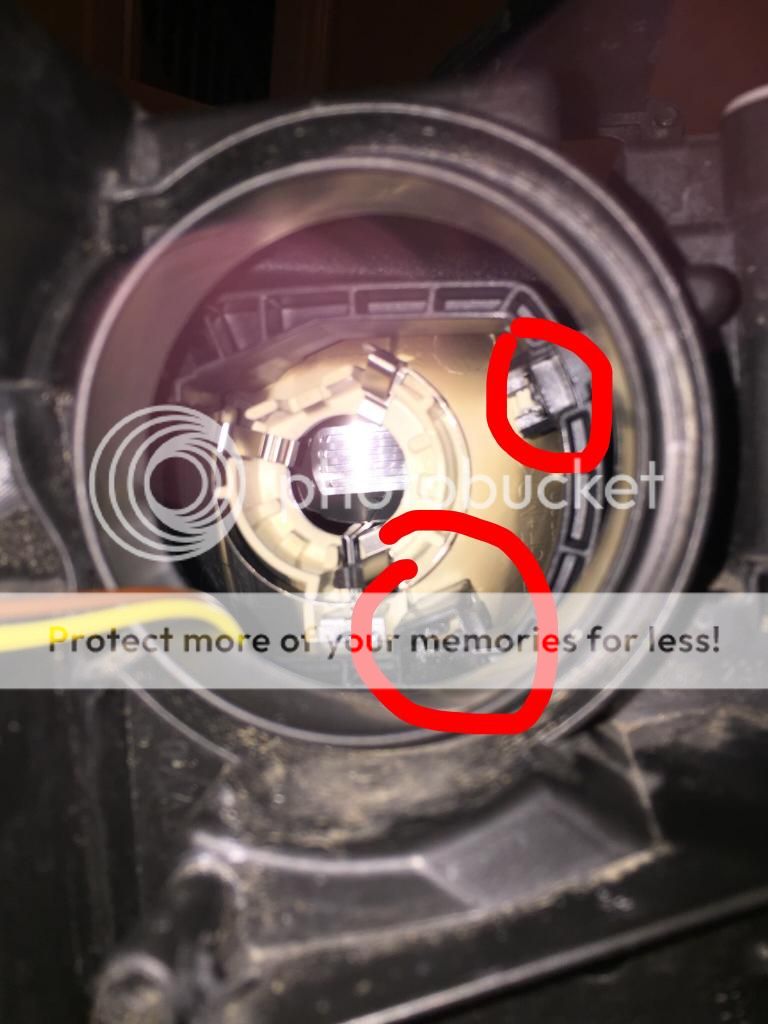
3. Release clips show in pictures below to remove whole of dipped beam reflector, use flat head screwdriver, pull gently and wiggle and it will come out


4. From rear of reflector, remove silver circular clip and bulb cap with an Alan key type tool
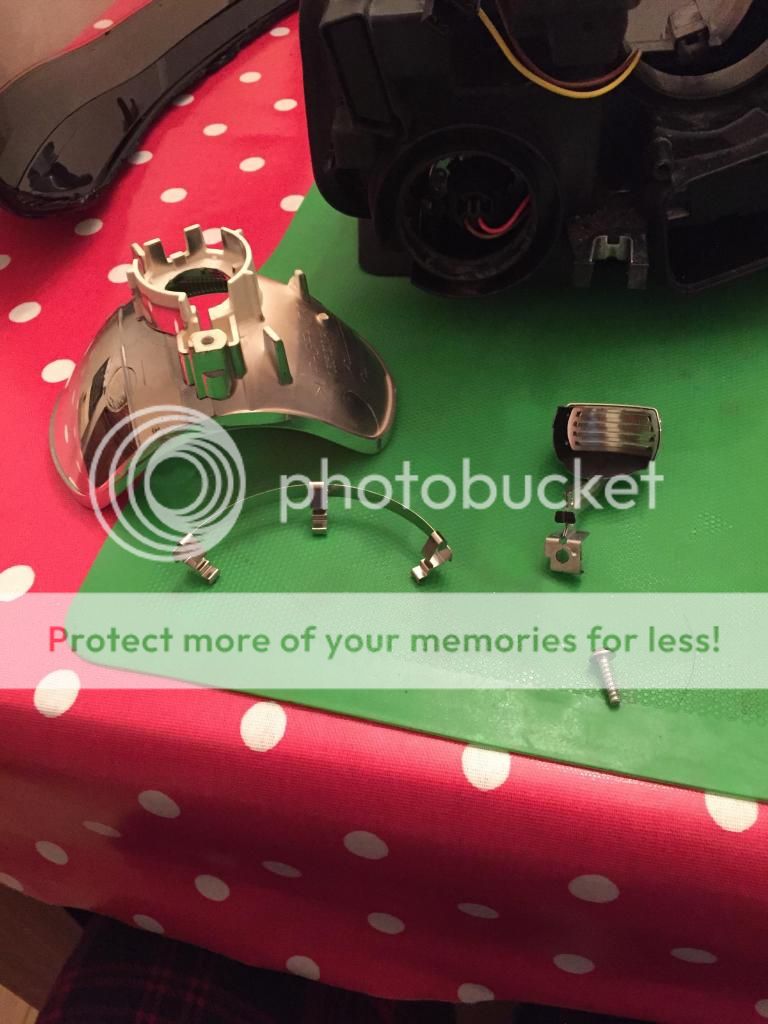


5. Place smaller rubber circle around projector, feed through the wires into the hole in the reflector + then file down the H7 adaptor to create a smooth circle within centre, and place on rear of projector


6. Screw on rear projector nut using nose pliers, keep projector straight at all times


7. Screw on H1 adaptor using screws already within projector
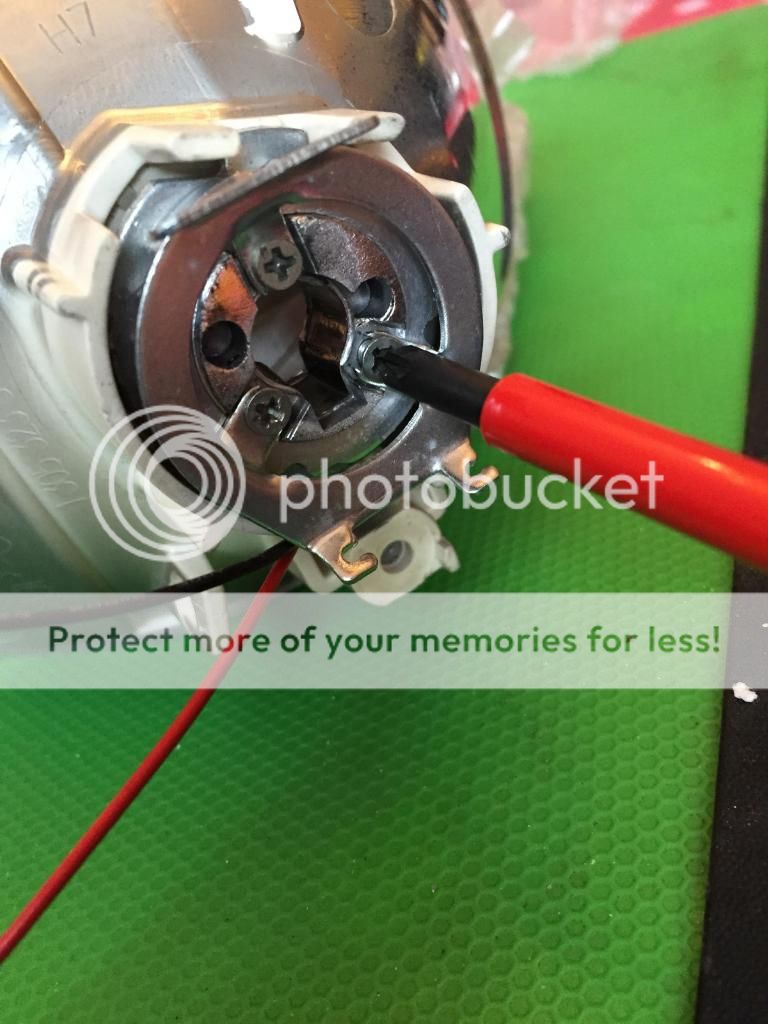


8. Insert projector back into headlamp feeding wores through rear of headlamp


9. At this stage, wire up projector to the main beam, I used a plug and play look from Trups, which in my opinion is the easier option

10. Cut shroud to roughly shape of the reflector, I did this with a hack saw and just took my time, then filed the rough edges


11. Using some strong glue (I chose JB kwick weld) apply a small amount to the outer plastic of the projector and slide the shroud in place, **before doing this make sure there is enough space above and below shroud for adjustment of your headlihht if required**

12. At this stage once dried I polished the inside of the lamp with a lint free cloth.

13. Replace outer headlamp cover and push together as best as you can, then place back in the oven at 120c for 10 mins

14. Once removed from the oven, press together and re apply the metal clips and rubber corner covers, then replace all bulb caps as required

15. Instal and check headlihht alignment.

** Note that it's an optional part of the process to glue around the rear of the projector where the nut it before putting on the h1 adapter, this can prevent the projector moving, however I did not do it this as I feel the projector is tight enough**

Overall as an experience it was really easy, very nerv racking but actually very simple, the hardest part was fiddling around to loop the wires around as there is a lack of space in the back of the light,

This has by far been the best MOD iv done so far, gives the car a great higher spec looks, and certainly saves on getting S-line lights.

I may have missed things so please highlight if I have, and any questions or help just PM me, I'm In the glasgow area and could offer assistance if needed.

Hope this helps folks

Thanks

Kall
 
  • Like
Reactions: Josh Pereira, RS5 JON, desertstorm and 1 other person
All kit supplied by Trups, quality service as always!!
 
  • Like
Reactions: t8ups
Ooo I so want to do this but just would not have the patience. If only someone in Northern Ireland could do this for me
 
As I imagined not really that tricky to do, will probably give this a go in the near future, did you get the Canbus H1 HID kit from Trups as well.
I think I might have been tempted to drop the lights in the car to check the alignment before I put the front back on. I know you can tweak it if it's not far off but I think you might have an issue adjusting the beam pattern to get it horizontal. Another reason for not applying any glue.
Also I have seen on some how to's people adding extra sealant to make sure the light stops watertight.


You can get the butyl rubber tape from Flea bay

http://www.ebay.co.uk/itm/BOLT-ON-P...877?pt=LH_DefaultDomain_3&hash=item3a8a33c19d

Karl.
 
Did you also soldier the wire onto the main beam so you have main beam hid from the projector as well?

No I got Trups to make up a plug and play kit so literally just plugged the wires into a pre made loom! Very easy!
 
As I imagined not really that tricky to do, will probably give this a go in the near future, did you get the Canbus H1 HID kit from Trups as well.
I think I might have been tempted to drop the lights in the car to check the alignment before I put the front back on. I know you can tweak it if it's not far off but I think you might have an issue adjusting the beam pattern to get it horizontal. Another reason for not applying any glue.
Also I have seen on some how to's people adding extra sealant to make sure the light stops watertight.


You can get the butyl rubber tape from Flea bay

http://www.ebay.co.uk/itm/BOLT-ON-P...877?pt=LH_DefaultDomain_3&hash=item3a8a33c19d

Karl.


You could add more but there was tons on my lamps, so I didn't want to over do it and not be able to re apply the metal clips again! Yes the kit came from Trups. As for adjustment I made sure before removing the lamps the lights where at the highest setting, and of course making sure there is enough cut from the shroud to allow for adjustment, and my lights are at a perfect height! I didn't actually have my car to hand to test height before sealing the unit as I took the lights to my parents place for use of tools and left the car at my house over 100 miles away! Just incase I messed up and didn't have lights for the car lol

Kall
 
Ooo I so want to do this but just would not have the patience. If only someone in Northern Ireland could do this for me

Honestly it's easier than it looks! I'd do it again in no time!
 
Want to fly over and do it for me ? :lmfao:

Pay my flight and will talk lol love this mod more and more every time I drive the car, I live out in the sticks so it makes a big difference with xenons but with the projector activating with high beam it's perfect!
 
  • Like
Reactions: Brennan
I think I'd rather die than put my Audi headlights in my oven... Ooohh I smell the burning plastic already ...
 
How is the height on yours? I needed to trim more off the shroud so I did...but I've noticed one floor in mine...the shroud touches the lens at the top so stops it going any higher..my beam is touching just the top of a rear bumper in a vectra when it's quite close up :(
 
How is the height on yours? I needed to trim more off the shroud so I did...but I've noticed one floor in mine...the shroud touches the lens at the top so stops it going any higher..my beam is touching just the top of a rear bumper in a vectra when it's quite close up :(

Have you checked your beam pattern at a MOT testing station? I need to check mine, but I think I'll me removing my lamps to trim a little bit more from the top of the shroud incase I need to adjust the height! I'll be checking it this week. I'd say my beam is about the top of a bumper of the car Infront too, but don't have another car spare to compare it too?!
 
I guess it would be best to find a wall or garage door at home and mark where the car is parked and where the dip beam is before you take the original lights out. Then you know where to set the lights to after you have done the conversion.
 
I guess it would be best to find a wall or garage door at home and mark where the car is parked and where the dip beam is before you take the original lights out. Then you know where to set the lights to after you have done the conversion.

:-( I admititedly didn't do this! lol
 
I have actually ordered some projector lights and ballasts to do this mod. Will be a while before I will be doing it though as mine are winging there way from China.
Gone for what hopefully looks like some slightly better spec parts with S max shrouds.
Done stuff before with headlights and marked the garage door with tape. This is what I will be doing with these, park car, mark garage door, fit lights, test lights and if they are OK seal them back up.
Only takes a few minutes to fit and test a light and I would be really peed off if the beam pattern wan't quite right and I had to take it apart again.


Karl.

Karl, can you measure the height of the beam pattern and tell us how far away your car was from the garage, this way we can test ours and make sure it's to the right height?

Thanks

Kall
 
I fancy pitting a projector in my bike, but don't want one that has lots of scatter. Also limited space behind the headlamp so cant live with something that sticks out a lot more than a bulb holder. How much do these stick out the back?
 
I fancy pitting a projector in my bike, but don't want one that has lots of scatter. Also limited space behind the headlamp so cant live with something that sticks out a lot more than a bulb holder. How much do these stick out the back?

About 2 inches most! The whole projector itself is about 6 inches long maybe!
 
Unfortunately that wouldn't work as my drive isn't level. This only works for my car as I am setting the beam back to what it is already set at. It also wouldn't give you the points where the beam kicks up which is determined by the left to right adjustment.
You can calculate the height of the cut off point by the percentage fall of the headlight.
On the top of the headlight at the front there is a % figure for the fall of the light on my car it's 1%. Just been out and measured the height of the centre of the light and it's 65cm from the ground.
So if the centre of the headlight is 650mm, 10 metres from the car the beam should be 100mm down so 550mm high at 10M.
This would give you a theoretical range of 65M for the lights, but the amount of light at that distance is quite small so the lights don't appear to have that range. This is where HIDS come in because they produce 3 times the light of a normal bulb at the outer extremes there is 3 times more light.
The tolerance on an MOT is 0.5 - 2%. so 1% is a good place to aim for.

http://www.motuk.co.uk/manual_180.htm

The beam kick where it goes up on the left should be around 2% so at 10M the beam kick will be at 20cm from the centreline of the bulb. You can scale these measurements to whatever distance you want.

Karl.
 
Lads these won't pass an MOT. Once the projectors are fitted, only a H1 HID bulb can be fitted to them. Cars with HID lights and without washer jets and self-levelling systems will fail the MOT test.

You will need to buy a spare set of halogen headlights and fit them before MOT to guarantee a pass.
 
Brennan, sorry to **** on your Fire, but see below a report issued from VOSA and DVLA last year. In April 2013 there was a law brought out about cars fitted with HID kits and It would be made illegal under VOSA MOT rules to pass cars with these kits, however some months later this law got amended to say that cars fitted with auto levelling lights and and headlight washers must show that these components work to pass the test, that being said cars without these components can avoid this issue, thus making the illegal HID rule no longer applicable. (I know this as I used to work for Volvo car UK)

**
6) The test in Great Britain is required to comply with the European Framework Directive on periodic technical inspection. In this regard the annual test is to be amended in April this year to include the satisfactory operation of automatic levelling and washing systems where these are fitted. However, these systems are not mandatory for all vehicles fitted with HID lamps as it is dependant on light output and/or suspension movement. As it is not possible for a tester to determine at the time of test (annual or roadside) whether these components are required, there is no reason for rejection, either in the directive or the amended manual.

**this being said if it's changed AGAIN since I left Volvo in Jan 2014 I do apologise**

Kall
 
My Passat never had an issue passing with HIDS. They were factory fitted projectors on that.
As long as the beam pattern is good and the lights aren't dazzling the guy who does my MOT's hasn't an issue. The first time I took my Passat after I fitted the HIDS he commented on how bright the lights were.
Not sure if the MOT over there in Ireland is more strict than we have over here.
 
Maybe law is different in England but cars fitted with HIDs here must also be fitted with washers and levellers
 
Unfortunately that wouldn't work as my drive isn't level. This only works for my car as I am setting the beam back to what it is already set at. It also wouldn't give you the points where the beam kicks up which is determined by the left to right adjustment.
You can calculate the height of the cut off point by the percentage fall of the headlight.
On the top of the headlight at the front there is a % figure for the fall of the light on my car it's 1%. Just been out and measured the height of the centre of the light and it's 65cm from the ground.
So if the centre of the headlight is 650mm, 10 metres from the car the beam should be 100mm down so 550mm high at 10M.
This would give you a theoretical range of 65M for the lights, but the amount of light at that distance is quite small so the lights don't appear to have that range. This is where HIDS come in because they produce 3 times the light of a normal bulb at the outer extremes there is 3 times more light.
The tolerance on an MOT is 0.5 - 2%. so 1% is a good place to aim for.

http://www.motuk.co.uk/manual_180.htm

The beam kick where it goes up on the left should be around 2% so at 10M the beam kick will be at 20cm from the centreline of the bulb. You can scale these measurements to whatever distance you want.

Karl.

Brain = fried lol, my car is in for a service this week so I'll get them to check it and I think no doubt I'll need to adjust the height!
 
M90KKL and Brendan TDi you are both correct for where you are. The difference is that the NI MOT says washers and levellers MUST be fitted and must work. In the UK currently it says that they MAY be fitted and where fitted they must work. This may however change in the UK in the future.
Cheers.
 
  • Like
Reactions: Brennan
Had a Passat courtesy car with xenons so iv marked the wall with the height and I'll set my lights to this tomo. I'll also measure height on wall and distance from wall to help
 
As long as the height of the centre of the projector is the same and you park the car the same distance from the wall then that would be a good starting point.