A3 8V Removing J519 T46b in Attempt to install Footwell and Cupholder Lights

fatyin

Registered User
Joined
May 24, 2016
Messages
43
Reaction score
31
Points
18
Hello all,

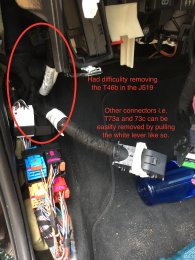
As I am attempting to install the footwell light and cupholder light, I really had difficulty in removing one of the three connectors T46b (A2) in the attached pic. Normally you'd pull the white lever and the connector just pop out easily; whereas the white lever of T46b does have any give and it just stay in its place no matter how hard i pulled. Anyone had this issue before????

As I am reading in this forum, the lights can be connected to other power source e.g. the cigarette lighter. However, I'd love to have them to be controlled by the MMI.

Appreciate you guys help in my 3rd retrofitting project to my A3.
 

Attachments

  • IMG_0877.JPG
    IMG_0877.JPG
    2.2 MB · Views: 12,733
  • IMG_0925.PNG
    IMG_0925.PNG
    483.7 KB · Views: 10,183
From memory you need to slide the J519 slightly rearwards (towards the back of the car) and then disconnect the middle one
 
Bit difficult to see any catches with it being white but I'd be surprised if there's not some sort of catch or release lever somewhere. Try wobbling it side to side and where it's most rigid may lead you to it.
 
Thanks for you help. It turned out that there's a tab that prevents the lever from moving. I just forced through the bigger connectors (T73a and T73c) without noticing the tab.

I have uploaded the finished photo. The footwell lights just look fantastic.
 

Attachments

  • IMG_1079.JPG
    IMG_1079.JPG
    556.3 KB · Views: 4,876
  • IMG_1077.JPG
    IMG_1077.JPG
    882.3 KB · Views: 5,456
  • IMG_1062.JPG
    IMG_1062.JPG
    989.9 KB · Views: 5,946
  • Like
Reactions: Shay, Schizophonic, Rob2k68 and 1 other person
Looks great! Might need to order these now as I was waiting for someone to do this for instructions. So the wires just go in 73 and 43 and that's it? How about the rear lights, anything special to know before hand?
 
Thanks for you help. It turned out that there's a tab that prevents the lever from moving. I just forced through the bigger connectors (T73a and T73c) without noticing the tab.

I have uploaded the finished photo. The footwell lights just look fantastic.

Very nice indeed - fully coded for full OEM operation through the MMI.

Good job !!! ;o)
 
Thanks for you help. It turned out that there's a tab that prevents the lever from moving. I just forced through the bigger connectors (T73a and T73c) without noticing the tab.

I have uploaded the finished photo. The footwell lights just look fantastic.
How did you code it through the mmi? Care to share your settings?
 
  • Like
Reactions: MKC, lenny151 and rcnacura
Thanks for you help. It turned out that there's a tab that prevents the lever from moving. I just forced through the bigger connectors (T73a and T73c) without noticing the tab.

I have uploaded the finished photo. The footwell lights just look fantastic.

Awesome job @fatyin ! :grin:
Do you have part numbers for the cupholder lights?
Did you successfully install the cupholder lights and code?

I would also like to know how you coded the footwell lights through the MMI? :yes:
 
Awesome job @fatyin ! :grin:
Do you have part numbers for the cupholder lights?
Did you successfully install the cupholder lights and code?

I would also like to know how you coded the footwell lights through the MMI? :yes:

Sorry for the late reply guys.

The cupholder light part number: 8V0 947 157A.

Actually the seller gave me the wrong jumper (the one they gave me was too small to fit the pin in T46b). So I am expecting the new cable to arrive this week. By then, my install will be complete.

I am willing to share my code, but I'd rather to share it only after I can get BOTH of the footwell and cupholder light to work later this week.

Slightly off topic here. Along with the shipment coming this week, I have ordered the reverse camera. Can't wait to have it installed.
 
  • Like
Reactions: rcnacura, Schizophonic and Rob2k68
There is coding for footwell but Its low lighted for me so be interesting to see what difference.

Sent from my Nexus 6 using Tapatalk
 
  • Like
Reactions: rcnacura
Can you let me know the exact pin for the installation?
Does your car comes with HID headlight or just halogen?

Sorry for the late reply guys.

The cupholder light part number: 8V0 947 157A.

Actually the seller gave me the wrong jumper (the one they gave me was too small to fit the pin in T46b). So I am expecting the new cable to arrive this week. By then, my install will be complete.

I am willing to share my code, but I'd rather to share it only after I can get BOTH of the footwell and cupholder light to work later this week.

Slightly off topic here. Along with the shipment coming this week, I have ordered the reverse camera. Can't wait to have it installed.
 
  • Like
Reactions: rcnacura
Hi guys, the footwell connector is to pin 72 of T73c for footwell light.

However, I have no luck in making cupholder light to work. I have connected it to pin 2 of T46b for xenon headlights. I believe i need to enable it thru VCDS? I have enabled ALL interior lights under adaptations of module 9 central electronics. Still no luck. Anyone have any idea?


Sent from my iPhone using Tapatalk
 
  • Like
Reactions: Luisfoav
I asked djalix about the vcd coding. Waiting for his response. So you got the footwell lights but not the cup holders working with the wiring diagram you posted?
 
Yup, your understanding is correct. Foot well light works but not cup holder lights. I will post my VCDS settings for footwell later today :)


Sent from my iPhone using Tapatalk
 
  • Like
Reactions: rcnacura
I was thinking about installing the cup holder but looks like you need a heat gun to separate the glue? Is this what you did and was it difficult?
 
Melting the heated seal is good only when cutting the taps is not possible due to the cutter itself cannot access the taps and cut them. Melting is not the most efficient method because you never know whether you melt enough to disengage the locking. Moreover, you could also melt the base plastic too.

I am suggesting to melt the taps only if cutting is not possible.

I have attached a sketch to demonstrate.

I took me 3 hours doing it. I definitely worth the time only if I could get it working. :(


1a90ea202531fb47f8ac7389e3ed5f2b.jpg
57a7435bda353a339f2934c8da177f7b.jpg


Sent from my iPhone using Tapatalk
 
  • Like
Reactions: rcnacura
Hmm looks a Lil more involved than I'm willing to do. Wonder if I could just add a light/led strip near the cigarette plug instead.
 
Let me just put the VCDS code with my memory cuz I am aware that @DJAlix is working on this in the VCDS mods post.

The most critical is the following adaptations:
09 Central Electronics (ADP-(8)-Interior light; light configuration-Foot well lighting) from not installed to installed

To enable ambient light adjustment thru MMI: (credit to stemei.de)
Select channel (6) Vehicle Menu operation-menu_display_ambient_illumination
value on activated adapt
Select channel (8) Vehicle Menu operation-menu_display_ambient_illumination_over_threshold_high
value on activated adapt
Channel (15) vehicle function list BAP interieur_light_0x08 Select
value to adjust activated

This coding seems secondary because the footwell light turns on regardless the bit are checked or not:
09 Central Electronics Module 0 Byte 17 bit 3 enables footwell lights installed

Enabling the following will get you a LED light DTC, so I have disabled it:
09 Central Electronics Module 0 Byte 05 bit 7 active -> Footwell Light installed


Sent from my iPhone using Tapatalk
 
  • Like
Reactions: rcnacura
The same happen to me before I have the footwell lights installed. So no worry~

Tried the coding but mmi menu didn't show up. I don't have the lights in yet, however, still shipping.


Sent from my iPhone using Tapatalk
 
  • Like
Reactions: rcnacura
Let me just put the VCDS code with my memory cuz I am aware that @DJAlix is working on this in the VCDS mods post.

The most critical is the following adaptations:
09 Central Electronics (ADP-(8)-Interior light; light configuration-Foot well lighting) from not installed to installed

To enable ambient light adjustment thru MMI: (credit to stemei.de)
Select channel (6) Vehicle Menu operation-menu_display_ambient_illumination
value on activated adapt
Select channel (8) Vehicle Menu operation-menu_display_ambient_illumination_over_threshold_high
value on activated adapt
Channel (15) vehicle function list BAP interieur_light_0x08 Select
value to adjust activated

This coding seems secondary because the footwell light turns on regardless the bit are checked or not:
09 Central Electronics Module 0 Byte 17 bit 3 enables footwell lights installed

Enabling the following will get you a LED light DTC, so I have disabled it:
09 Central Electronics Module 0 Byte 05 bit 7 active -> Footwell Light installed


Sent from my iPhone using Tapatalk
Will post this within the VCDS main thread, but this is what I have so far by way of Interior Light Coding:

*I am currently unable to test any of this myself
**Footwell lights MUST be LED. If normal bulbs are in use then Leuchte channels need changing
***Rear Door coding needs the use of the current VCDS v16beta. If still using v15.X and you are not wanting to install the current Beta you will need to add modules BB and BC to the CAN Gateway Installation List.

Interior Lighting MMI Menu
  • 5F - Information Electr
  • Adaptations
  • (15)-Vehicle function list BAP-interieur_light_0x08 = Activated (should be set as factory default)
  • (6)-Vehicle menu operation-menu_display_ambient_illumination = activated
  • (7)-Vehicle menu operation-menu_display_ambient_illumination_clamp_15_off = not activated
  • (8)-Vehicle menu operation-menu_display_ambient_illumination_over_threshold_high = activated
  • (9)-Vehicle menu operation-menu_display_ambient_illumination_standstill = not activated
  • (10)-Vehicle menu operation-menu_display_ambient_illumination_after_disclaimer = not activated
  • Reset MMI
Footwell Lights
  • 09 Cent Elect
  • Long Coding
  • Byte 5
  • Bit 7 = Active (Footwell Lights Installed)
  • 09 Cent Elect
  • Adaptations
  • (6)-Ambient lighting-Innenlichtinszenierung = Installed (ambient lighting - interior lighting)
  • (1)-Ambient lighting-Defaultwert Ambienteprofil Fussraum = 100% (default value setting profile footwell)
  • (3)-Ambient lighting-Defaultwert Ambienteprofil Vorn = 100% (default value setting profile front)
  • (1)-Leuchte30FR LC72-Lasttyp 30 = 46 - LED Kleinleistung
  • (2)-Leuchte30FR LC72-Lampendefektbitposition 30 = 0
  • (3)-Leuchte30FR LC72-Fehlerort mittleres Byte DTC-DFCC 30 = 2
  • (4)-Leuchte30FR LC72-Lichtfunktion A 30 = Footwell Light
  • (6)-Leuchte30FR LC72-Dimmwert AB 30 = 100
  • (7)-Leuchte30FR LC72-Lichtansteuerung HD AB 30 = Always
Door Handle Lights
  • 42 - Door Elect Driver
  • Long Coding
  • Byte 1
  • Bit 3 = Active (Interior Door Handle Illumination Installed
  • 52 - Door Elect Pass
  • Long Coding
  • Byte 1
  • Bit 3 = Active (Interior Door Handle Illumination Installed
  • BB - Door Rear Drv Side
  • Long Coding
  • Byte 1
  • Bit 3 = Active (Interior Door Handle Illumination Installed
  • BC - Door Rear Pass
  • Long Coding
  • Byte 1
  • Bit 3 = Active (Interior Door Handle Illumination Installed
  • 09 - Cent Elect
  • Adaptations
  • (4)-Ambient lighting-Tuerinnengriffbeleuchtung mit I-Tafel = Installed (door Interior handle light with dashboard)
  • (5)-Ambient lighting-Tuerinnengriff mit Tuertafel = Installed (door Interior handle door panel )
In addition to the above there is an additional adaptation channel available for configuration but I am not sure as to what function it performs:

(2)-Ambient lighting-Defaultwert Ambienteprofil Tuer = XX% (default value setting profile door)
 
  • Like
Reactions: dantdi and rcnacura
Thanks sooooo much for this. @DJAlix

I am not sure whether I am making any sense here but I wanna give it a shot to understand the inner workings of the J519.

According to the logic, in order to enable footwell lights, I will need to enable the adapations that is relevant to the T73c pin 72, which is represented by "LC72".

If i were to enable the cupholder lights, adaptations relevant to T46b pin 2 needs to be enabled. However, I can't find any adaptation that has the label "LB2". Does it mean that my J519 model does not support cup holder lights?
 
  • Like
Reactions: rcnacura
Sorry to go slightly off topic, but are there any known 12v wires that can be spliced into around the footwell area?
 
Got the mmi menu finally working!
Turns out I had 99% of the coding but i needed to do the option below:

  • 5F - Information Electr
  • Adaptations
  • (15)-Vehicle function list BAP-interieur_light_0x08 = Activated (should be set as factory default)


Not to forget for @DJAlix for helping with his coding. Thanks bae!
 
  • Like
Reactions: MKC, Rob2k68, rcnacura and 1 other person
Got the mmi menu finally working!
Turns out I had 99% of the coding but i needed to do the option below:

  • 5F - Information Electr
  • Adaptations
  • (15)-Vehicle function list BAP-interieur_light_0x08 = Activated (should be set as factory default)


Not to forget for @DJAlix for helping with his coding. Thanks bae!

Your welcome :)
 
  • Like
Reactions: Rob2k68
Got my lights a few days ago and attempted at installing however could not get the menu to come on.

Also only one light out of the four would come on, however after checking all the lights, they work individually just not plugged it harness.

Checked with another 12v source and seems like my harness is messed up.

Were you able to get the harness switched out? I was able to get the menu on my MMI after doing this:
-09 Cent. Elect.
-Adaption
-(8)-Interior light; light configuration-Foot well lighting

However it only says interior lighting as the only option. Maybe since I haven't wired the rear ones yet? Btw, where did you route the rear ones?
Unfortunately, I'm still fighting to get the company to send me a working wire harness after about a month. I think the rear wires have to be routed under the center console area.
 
Sorry to revive an old thread but looking to do this on my A3 8V and was just wondering if someone could definitively tell me if the BCM is behind the glovebox on a RHD please? I think the first picture in this thread suggests that, but everything else I have seen suggests it might be above the pedals, although that always appears to be on LHD cars.

Thanks in advance
Adam
Its behind the glovebox and to the left hand side. Its in the same position in LHD cars and all official Audi diagrams are LHD.
 
  • Like
Reactions: adamal
That was what I thought. Thanks very much for your speedy reply.

Regards
Adam
 
  • Like
Reactions: DJAlix
I carried out my install today (apart from seating the rear lights which I'll do properly when all is working).

The footwell light circuit I made takes uses the newer front LEDs and connectors bought from Audi to replace the front lights in an 8P LED footwell light circuit - I think that should be fine, and it worked fine when tested with a 12v battery.

I connected the positive source to pin 72 of the T73c connector and I double checked all was seated properly and that there is a male pin actually in my BCM. I connected the negative to what I thought was a good earth point using a ring terminal under a screw on the earthing point.

However, on coding as above I only get a simple background lighting option in the MMI (i.e. no picture of the car with options to set front and door) and my lights don't come on. I'm quite confused as I've checked the coding and all seems ok, but I am getting a fault suggesting short to plus or open circuit on the footwell lights which I can only think is related is to my choice of earthing point.

So a few questions for anyone who has done this successfully please:
Which earthing points did you use, or did you splice into the BCM brown earth wire?
Am I not seeing the options on the MMI in the picture above because I only have footwell lights please, or should I see them greyed out and hence have some continued coding issues?

Thanks in advance
Adam
 
Last edited:
Just to clarify on this, the lights are now working on door open. The ring wasn't properly attached to the earth wire so I resoldered and am in business.

However they dim and quickly go off once the ignition is turned on. Could this all simply be because I only have a midline BCM?

Thanks
Adam
 
Just to clarify on this, the lights are now working on door open. The ring wasn't properly attached to the earth wire so I resoldered and am in business.

However they dim and quickly go off once the ignition is turned on. Could this all simply be because I only have a midline BCM?

Thanks
Adam
Do you have the mmi controls to brightness? You might need some additional coding.

Sent from my SM-N910V using Tapatalk
 
Thanks for your response.

I was being dull and testing it with the lights off!! It works fine and yes I have a brightness dial in the mmi. What i dont have is the picture of the car with a choice of opfions for footwell, door etc, just a single dial, as if they would all be set together not independently. This maybe because I only have footwell lighting at present, cupholder to follow, so will see if that makes a difference.

Thanks
Adam
 
  • Like
Reactions: stote
Thanks for your response.

I was being dull and testing it with the lights off!! It works fine and yes I have a brightness dial in the mmi. What i dont have is the picture of the car with a choice of opfions for footwell, door etc, just a single dial, as if they would all be set together not independently. This maybe because I only have footwell lighting at present, cupholder to follow, so will see if that makes a difference.

Thanks
Adam
It's a setting in the mmi I believe. You'll need to enable footwell, then it will be an option in the mmi. There is also dash and door options too.

If I can figure out the steps I'll post up. I've done it a few times, just haven't got my lights in still as the wiring harness I bought seems to be crap from aliexpress.

Sent from my SM-N910V using Tapatalk
 
Thanks, you were right. I also needed to enable footwell and door separately in the mmi to get the independent settings via the car menu above, via:

Interior light; light configuration-Fussraumbeleuchtung = installed
Interior light; light configuration-Cockpitbeleuchtung = installed

There is also Interior light: light configuration-Ambiente_Lautsprecher but that is not installed in my case - think that's the B&O speakers lighting. These are all the options but I doubt many of the others are relevant to many.
IDE09732-ENG115872-Interior light: light configuration-Ambiente_Lautsprecher
IDE09732-ENG125646-Interior light: light configuration-Cockpitbeleuchtung
IDE09732-ENG125648-Interior light: light configuration-Dachbeleuchtung
IDE09732-ENG125651-Interior light: light configuration-Farbwahl ueber Fahrprofil
IDE09732-ENG125650-Interior light: light configuration-Farbwahl ueber HMI
IDE09732-ENG114629-Interior light: light configuration-Foot well lighting
IDE09732-ENG125647-Interior light: light configuration-Mittelkonsolenbeleuchtung
IDE09732-ENG125649-Interior light: light configuration-Panoramaschiebedachbeleuchtung

If it helps regarding the loom, I took one from eBay and swapped out the front lights for standard ones from Audi, parts 4G0919390B (light) and 8K0973754 (connector). In my case the terminal on the loom for the BCM was included, but I've heard of cases where they are the wrong size or not included. The correct size terminal is on the end of Audi repair wire 000979025. An example is:
http://www.ebay.co.uk/itm/LED-Inter...-Q5-VW-Jetta-Golf-Passat-Tiguan-/321505443949
Thanks
Adam
 
  • Like
Reactions: rcnacura
Thanks, you were right. I also needed to enable footwell and door separately in the mmi to get the independent settings via the car menu above, via:

Interior light; light configuration-Fussraumbeleuchtung = installed
Interior light; light configuration-Cockpitbeleuchtung = installed

There is also Interior light: light configuration-Ambiente_Lautsprecher but that is not installed in my case - think that's the B&O speakers lighting. These are all the options but I doubt many of the others are relevant to many.
IDE09732-ENG115872-Interior light: light configuration-Ambiente_Lautsprecher
IDE09732-ENG125646-Interior light: light configuration-Cockpitbeleuchtung
IDE09732-ENG125648-Interior light: light configuration-Dachbeleuchtung
IDE09732-ENG125651-Interior light: light configuration-Farbwahl ueber Fahrprofil
IDE09732-ENG125650-Interior light: light configuration-Farbwahl ueber HMI
IDE09732-ENG114629-Interior light: light configuration-Foot well lighting
IDE09732-ENG125647-Interior light: light configuration-Mittelkonsolenbeleuchtung
IDE09732-ENG125649-Interior light: light configuration-Panoramaschiebedachbeleuchtung

If it helps regarding the loom, I took one from eBay and swapped out the front lights for standard ones from Audi, parts 4G0919390B (light) and 8K0973754 (connector). In my case the terminal on the loom for the BCM was included, but I've heard of cases where they are the wrong size or not included. The correct size terminal is on the end of Audi repair wire 000979025. An example is:
http://www.ebay.co.uk/itm/LED-Inter...-Q5-VW-Jetta-Golf-Passat-Tiguan-/321505443949
Thanks
Adam
Looks like the harness I have, just for some reason only one light turns on out of the four.

Thank you for posting your info too as it will come in handy when I revisit this project. I was having issues with the mmi controlling the dimming. I think I might have the wrong module.

Sent from my SM-N910V using Tapatalk
 
I installed my cupholder light today but can't get it to light up. Its definitely in the correct pin on the J519 but no joy. I suspect I am missing something in the coding - does anyone know the correct coding please?

Thanks
Adam
 
Good morning!
I need your help, because even if I read a post (http://www.audi-sport.net/xf/thread...install-footwell-and-cupholder-lights.276625/) that talks about the subject, it does not make clear what I need. I explain:
I have installed the footwell lights and they work correctly. I have also installed the door lights and everything is correct. Instead, I installed the cup holder light but it does not turn on. I imagine that I will need to activate something with the vagcom, but I do not know what. Might you help me?
I have also seen in the MMI, that after activating everything as indicated in the post, on the screen I only see the following options within the ambient light menu: "All zones" and "footwell lights". In some internet photo I have seen that people also have 2 more options: ""Doors" and "Front zone"
Can you help me with these 2 things? Thank you!!!!!!!!!!!!!!!!!!!!!!