A3 3.2 8P1

Jlambert

Registered User
Joined
Feb 23, 2013
Messages
62
Reaction score
42
Points
18
Hi all, long time lurker, first time poster.

After using the forum to identify a few problems I thought I'd finally introduce myself and my car.


It's a 2005 8P1 A3 3.2 Sport Quattro S-Line.
Having come from classic minis, I fancied some more reliable motoring. Of course it's been pretty reliable in my 6 months of ownership. Although it has required more than I was expecting, having needed 2 long term problems fixing, a faulty Haldex controller and a leaky radiator. The second being a bit more involved to fix! It's also a damn sight more expensive than the minis! But I like a challenge.


The aim was an OEM+ look, as it already had the rs6 18s and dealer fitted body kit from new. So only really a few mods so far. H&R wheel spacers, RS brushed wingmirror.

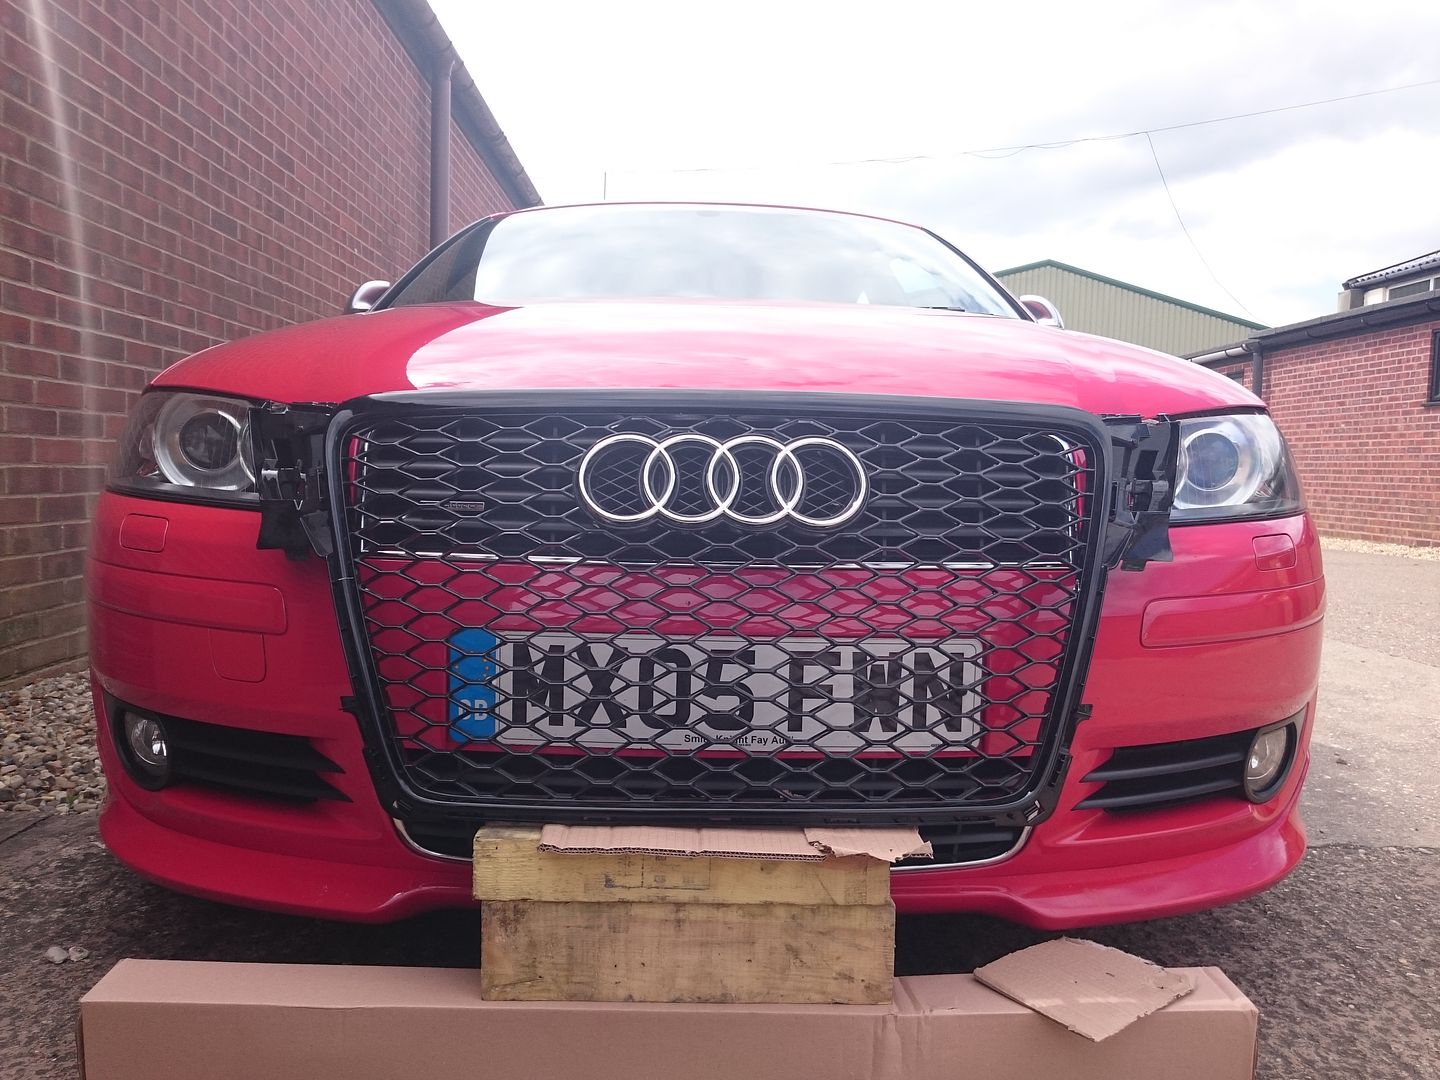
And something I haven't seen anyone else doing, an RS mesh conversion to the original 8P1 grills.
Everyone seems to go straight for the 8p2 single frame grill. But I didn't want to make my car into something it was wasn't, but it did need a little something. I only finished yesterimprov am very happy with the results.


Let me know what you think.

Joe
 
  • Like
Reactions: mister.c., Ahmed Hoang, millsy4002 and 2 others
Car looks great Joe. :) x
 
Welcome to Audi motoring!....nothing comes cheap unfortunately,but the car looks nice.
 
  • Like
Reactions: Sandra
Thanks :)
Im quite happy with how it's turned out.
I certainly wasn't expecting cheap motoring. But even compared to a tuned mini driven hard, the 3.2 has a serious drinking problem! I've got one gripe still to rectify though, being a slightly earlier car it's still got the hesitance at 2k. I know exactly what I'm asking for buy I'm really struggling to find a dealer who will even give me the time of day!

Joe
 
You need to press them for the upgrade, it is TPI 2010289/7.
It also helps if the dealer has done the upgrade before, that way they will have the disc they need to run it and know what it's about.
It makes a big difference to the smooth running of the car.

:smile new:
 
Thanks, I'm currently trying dealers. I went into Leicester Audi, they where skeptical as soon as I mentioned the word forum. They did at least look for the CD but when they couldn't find it they didn't really seem bothered. They offered to have it booked in for a diagnostics test, but i produced a print out from my VCDS showing no faults. This was the same guy who assured me that haldex controllers never fail and he'd never seen one replaced.

Currently waiting on a call back from Norwich Audi.
Does it have to be a main dealer?

Joe
 
Last edited:
Unfortunately, it does have to be done by a main dealer, yes.
I'm pretty sure that Stoke Audi have been mentioned on here as having done it.
Highland Audi in Inverness did my one but, I doubt you will want to make that trip...!
 
I've had similar experience with Audi Newbury and Audi Oxford. Phone operators being clueless, and hard to convince to look up the numbers since there were no upgrades flagged for my car..... DOH Gave up TBH. Does the remap make a huge difference?
 
It does. Much smoother running.
TBH, nobody should have to pay for it either, I ended up getting a new ECU out of it because they fried my original one.
They were very good about it and gave me a new A1 for the week that it was in the garage, but they were totally embarrassed about it.
 
  • Like
Reactions: AdamC95
I've been in exactly the same boat omblad0n it's just degrading as they treat you like you've made something up.
Got a call back from Norwich Audi, they found the TPI but informed me it wasn't even remotely relevant to my car and weren't prepared to go any further. I think I'm going to have to bite the bullet and give Derby Audi a ring as I've heard many members have had success there, the most recent being only a few months ago. But apart from that the new radiator has been perfect, and the grills have held up really nicely. So not all bad!

Joe
 
  • Like
Reactions: omblad0n, Jake 61 and shadow1993
Hey Joe, nice job, do you mind telling how you got that grill looking the way you did?
 
Hey Joe, nice job, do you mind telling how you got that grill looking the way you did?

Hi Dave,

Thanks for the feedback. Ive been really happy in how the car turned out.
I always felt the grills let the car down and really wasn't a fan (putting it mildly) of the ABT centre fill option as the only real alternative. I was always a fan of the C5 RS6, so knew the twin honey comb could look the business. Knowing there wasn't anything on the market I decided to make my own.

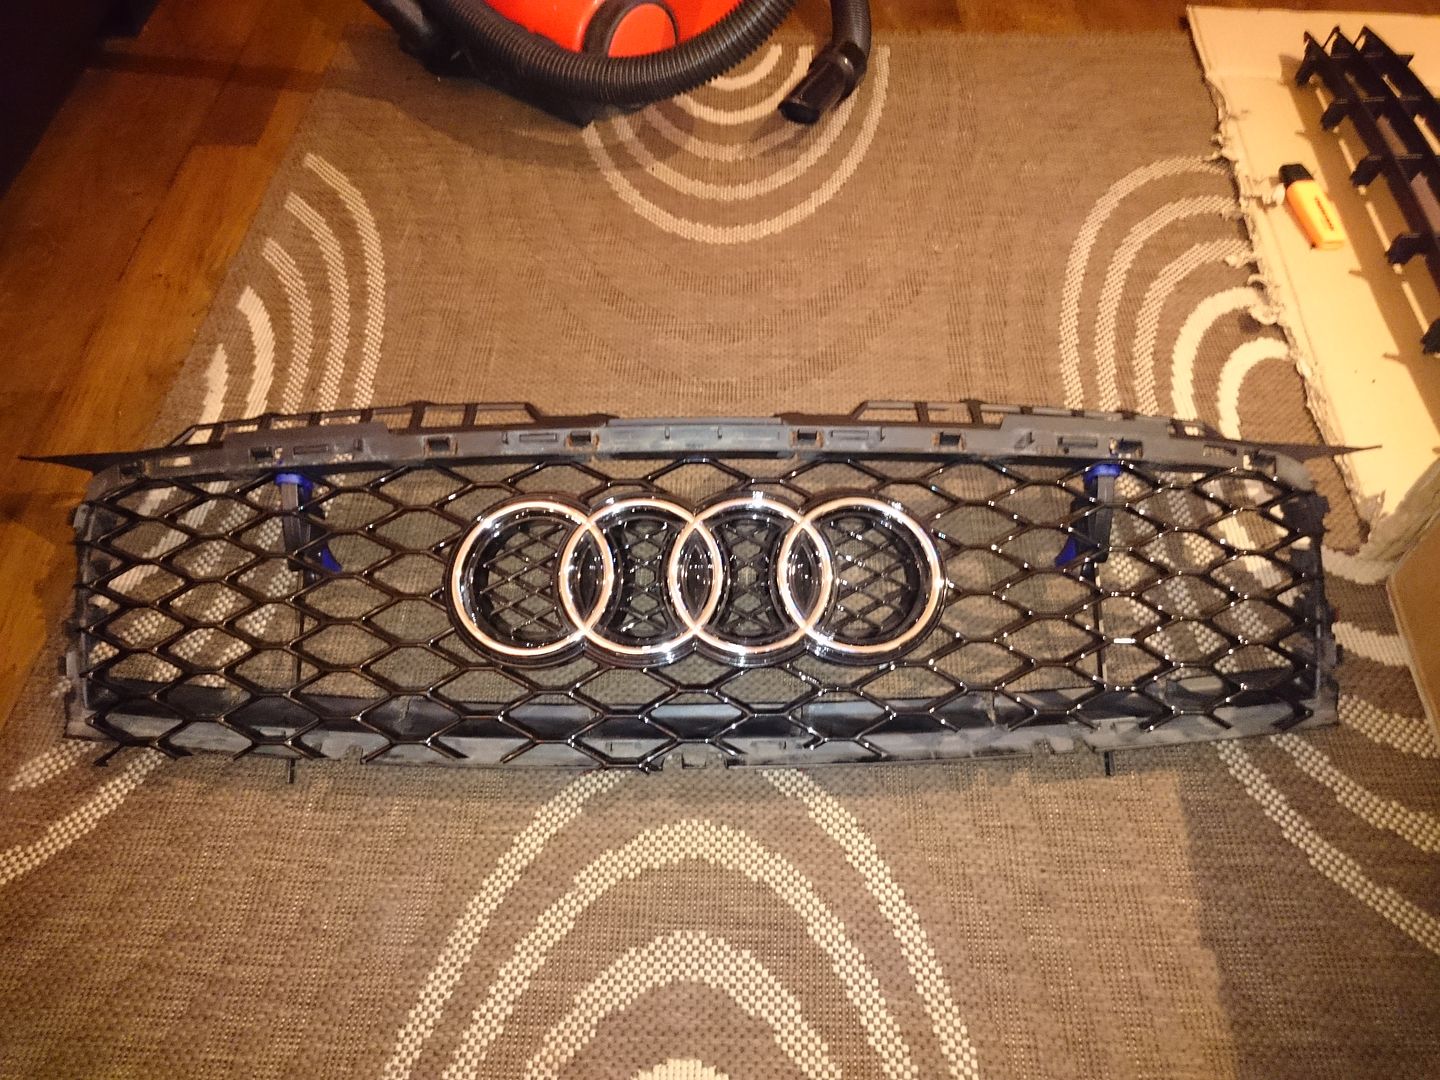
I bought a replacement pair of a3 grills (didn't want to destroy the originals) and a damaged B8 RS4 large frame honey comb grill. It has to be the replica one fitted to B8 a4's though as this is the only grill I found to be wide enough at the top to fill the a3 grill space. I then proceeded to butcher them both roughly following the principal of this blog.

http://nickscarblog.com/diy/how-to-fit-an-rs6-grille-on-a-b7-a4-s4-or-rs4-all-mesh-no-filler-plate

The end result being.


Im not going to lie it was an incredibly labour intensive process! I can get you some more pics of the actual build if you like?

Joe
 
Wow, it does sound elaborate. But I really like the look and I do enjoy a good project. If you could post up some more pics that would be great!
 
That would be the one.


I emailed that guy and he went though his stock measuring all the grills he had to find the widest, most would seem are be rounded off at the top so no good.

Must have been very confused.

I also picked this one as it has the proper built in badge plinth with the smaller honey comb inbetween.
So much better than the clip in versions available.


Joe
 
So the process sounds quite simple, but of course there's hours of cutting and fettling involved at most stages.

So it began with the sourcing of a replacement pair of grills. I was keeping the chrome surrounds so one in good nick was needed. Still only cost me £40 for the pair though.


Then the chrome needs splitting from the plastic.


Placing the chrome over the new grill gives you an idea of how tight it is!


Removing the honeycomb was relatively straight forward, I used a small hacksaw blade and holder.
You do need to cut as close to the frame as possible though as you need as much as you can get at the top.


This shows the original grill with the centre fins cut out. You need to be incredibly careful at this point as the strength of the frame is definitely in the slats and removing them makes the frame very floppy. You can see how thin it is in the side! Which when you're relying on it to give you all the fixings is quite unnerving! This also makes the sizing quite difficult as the frame now moves around quite a lot.

I used a dremel to smooth off the remains of the slats leaving just the frame. This does leave V shaped gaps in the base but you hardly notice them when it's together.

Then you lop the honey comb slightly larger than the top grill and begin sizing it up.


Until finally after hours of measuring, filing, and cutting you end up with this.
It's also doubly difficult as there's a massive curve and angle to the grill too contend with.


Writing this makes me remember how much effort this was! I'll carry on when the rest of the pics have uploaded!

Joe
 
Last edited:
  • Like
Reactions: mister.c. and Ahmed Hoang
Thanks. I took quite a few pics just as a matter of course but I'm glad you enjoy them.

So once you've got the honeycomb to the right size I finished off prepping the frame. You can see that in this pic I wet sanded the frame to get a good key for the glue.


I decided to use plastic repair glue to bond the honeycomb to the frame.
http://www.diy.com/departments/unibond-repair-plastic-epoxy-glue-25ml/36255_BQ.prd

Superglue doesn't really work for this application as the gaps created are too large and this also works as a small filler for the gaps. I also didn't want to use Sikaflex like previously suggested as that stuff is disgusting.

I also needed something that I could paint after as well as the frame contrasts badly against the gloss black grill.


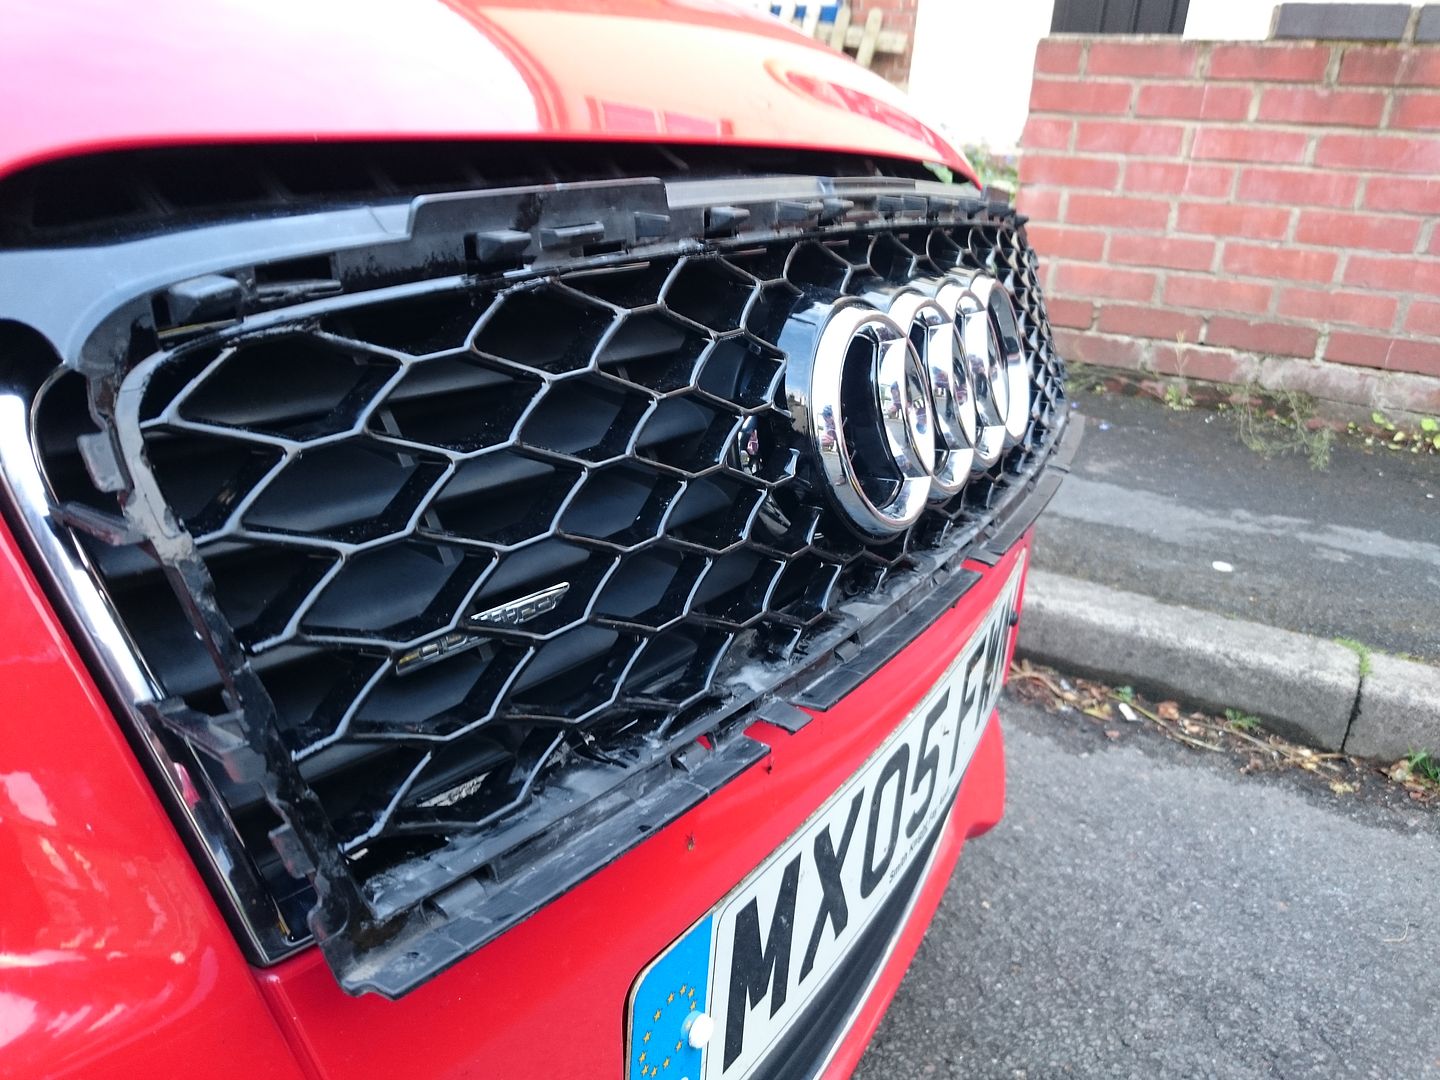
This shows the grill post glue, but pre paint.


This is the best picture I have showing the curve of the grill. It curves along the length as well as the depth.
This was post paint, I went with a gloss black enamal which blended well and should give a really hard durable finish.


Once it's all dry the chrome frame should just clip nicely back on.

Like the RS6 grill this honeycomb has to sit inward of the chrome unlike the A3 grill which protrudes onto the chrome. This does mean that there's a slight shadow left where the old grill sat over the chrome but it isn't such an issue.


Comparing it to the C5 RS6 grill I was pretty pleased with the results.


The bottom grill is much easier as there's no curve to it, so much easier to mount. Exactly the same gluing and paint was used.


Luckily (or unluckily) as this project was going on my car developed a coolant leak so when the bumper came off for that it was a perfect opportunity to change the grill. As the genuine frame was used all the original fixings just clip in.


Before.


After.


I also didn't bother putting any badges on it I felt it didn't need it.

In the end it ended up costing me a few hundred quid and a few weeks of working on it in the evenings. Probably not worth it, but I really didn't like the stock grill.

It's held up remarkably well, it's been on the car for a year now and still looks as good. Just gives it a slightly more aggressive look over the standard grill and doesn't look after-market, which was my main aim.


Most people don't even notice anything's different and if they do, they don't believe me when I tell them where it came from. Which I take as a compliment on my handiwork!

Any questions feel free to ask.

Joe
 
  • Like
Reactions: mister.c., mookster, Alex_Wil and 1 other person
A great mod Joe. And a great write up. Did you get anywhere with the main dealer and the ECU update?


Sent from my iPhone using Tapatalk
 
Great write up mate. Thanks for all the info. Does look like a lot of work but I really like the outcome. When/if I decide to do it myself, I'll drop you a line to make sure I'm buying the right RS4 replica.
 
Thanks all for the positive response.


A great mod Joe. And a great write up. Did you get anywhere with the main dealer and the ECU update?


Sent from my iPhone using Tapatalk


The Car went in for it's 80k service in September, when i dropped it off the service desk asked me what they could do to make the trip perfect.
I handed them the job sheet along with all the info about the update it needed. They said they'd look into it for me. When I picked it up there was a job sheet to say "Engine ECU updated carried out at customer request" FOC

It's been perfect ever since.
Very happy chappy.


Great write up mate. Thanks for all the info. Does look like a lot of work but I really like the outcome. When/if I decide to do it myself, I'll drop you a line to make sure I'm buying the right RS4 replica.

Glad it's been informative! I'm not going to lie it was a lot of work, but I really think it's worth the effort.

Defintely do, or if you have any other questions.

Joe
 
So it's been much longer than I thought since I last updated this. Car's still running beautifully and I've been tinkering as usual.

Since I last updated it's had its regular oil service, a new exhaust and a full brake refresh.

So lets start with the exhaust. I've always felt that the stock 3.2 system is overly silenced, and since the car has had a Votex body kit since new, never seemed to fit in properly with the rear of the car.


This picture really highlights the issue, showing the exhaust tips coming up quite short to the rear diffuser.

I know a competent exhaust shop could have cut and relocated the tips, but I'm a sucker for an OEM solution. I'd done my research and realised that the stock S3 system looks visually at least, almost identical using the same mounts and the same bore diameter. But critically comes out about 2" further at the rear to match the S3 diffuser. So off I went to source a suitable system. Luckily for me one of the first mods people do with an S3 is swap out the standard system so there's an abundance of choice! I kept an eye out for one that I could pick up locally and a couple of months ago the right one came up. A pre-facelift 3 door S3 system with less that 50k miles on it.


I couldn't wait to swap it over and the next free afternoon I had off came the standard system.


Spent an hour or so cleaning the sooted up tips and on it went.


After playing with the mounts this is as good as I can get it, It's not perfectly central as the S3 system comes a little more to the left as it comes out.. But it's minor and in my opinion looks the nuts.


It's also completely changed the sound of the car, going from very muted to a lovely bassy tone. It's also increased the volume quite a bit! Yet visually remaining a completely stock system.

I've connected the vacuum operated valve as the standard system has and it means lovely and quite at low throttle and a beautiful bark as soon as you floor it. Must be quite a bit freer flowing!

Pretty much a perfect mod!


The cars currently undergoing a complete brake and suspension overhaul, so just teasers of that for now while I sort out the pictures. Hope you've enjoyed the pictures! I'll also try to sort out a video so you can hear how it now sounds.


Nothing particularly exciting but better than what it's replacing, and yes if you're wondering I have fully customised a set of S3 caliper pad clips to fit more with my car!


Joe
 

Attachments

  • upload_2017-4-3_18-16-5.png
    upload_2017-4-3_18-16-5.png
    256 bytes · Views: 209
  • upload_2017-4-3_18-16-9.png
    upload_2017-4-3_18-16-9.png
    256 bytes · Views: 205
  • Like
Reactions: mister.c. and Jake 61
I wonder what the difference is between them ?, they certainly look identical.
 
I wonder what the difference is between them ?, they certainly look identical.

I'm now very curious too, as you said I had both systems side by side to check it'd fit and they are (apart from the tail pipes) visually identical. Must be quite different internally though. Definitely sounds and feels much more free flowing.
 
Nice mods Joe, just changed the discs on my one. I went for Kinetix discs with Brembo pads and noticed a big difference. Nowhere near as harsh at low speeds and very progressive otherwise.
I was hunting for those caliper pad clips before, but gave up. Do you have a part number...?
 
Nice mods Joe, just changed the discs on my one. I went for Kinetix discs with Brembo pads and noticed a big difference. Nowhere near as harsh at low speeds and very progressive otherwise.
I was hunting for those caliper pad clips before, but gave up. Do you have a part number...?

Thanks Jake, I've gone for MTEC drilled discs and the silver coating with Brembo pads. Still bedding them in but i definitely agree, they're definitely less harsh than the OEM option. Looking forward to trying them out properly.

I'd also been looking for the pad clips, and actually stumbled on these being sold on ebay.


This is the listing for the clips though, the finish is like a zinc-ed effect. I spent some time rubbing them smooth and painting them properly.

http://www.ebay.co.uk/itm/142322165797?_trksid=p2060353.m1438.l2661&ssPageName=STRK:MEBIDX:IT


Joe
 
  • Like
Reactions: Jake 61
So this one is more basic maintenance with a twist rather than a mod.

While rotating wheels back to front I noticed that the rear discs where looking a little worse for wear (believe they're original) , as well as the rear shocks had started to show signs of weeping. The calipers are also untouched since the car was new and are looking a little nasty. Referring back to pictures when the car was new (approximately 2 months old) The calipers where originally silver, with silver small caliper clips.


This worked well with the original wheel finish, but with the anthracite colour the wheels are currently in I decided on gloss black calipers. So a decent supply of VHT gloss black caliper paint was purchased.

Being a Sport Quattro 3.2 it shares identical brakes to the S3/R32 set-up (345/310) Although requiring specific 3.2 pads. So I'd been keeping an eye out for some bigger caliper clips to customise. This along with Brembo pads, MTEC drilled silver coated discs, and Bilstein shocks should be a very nice improvement.

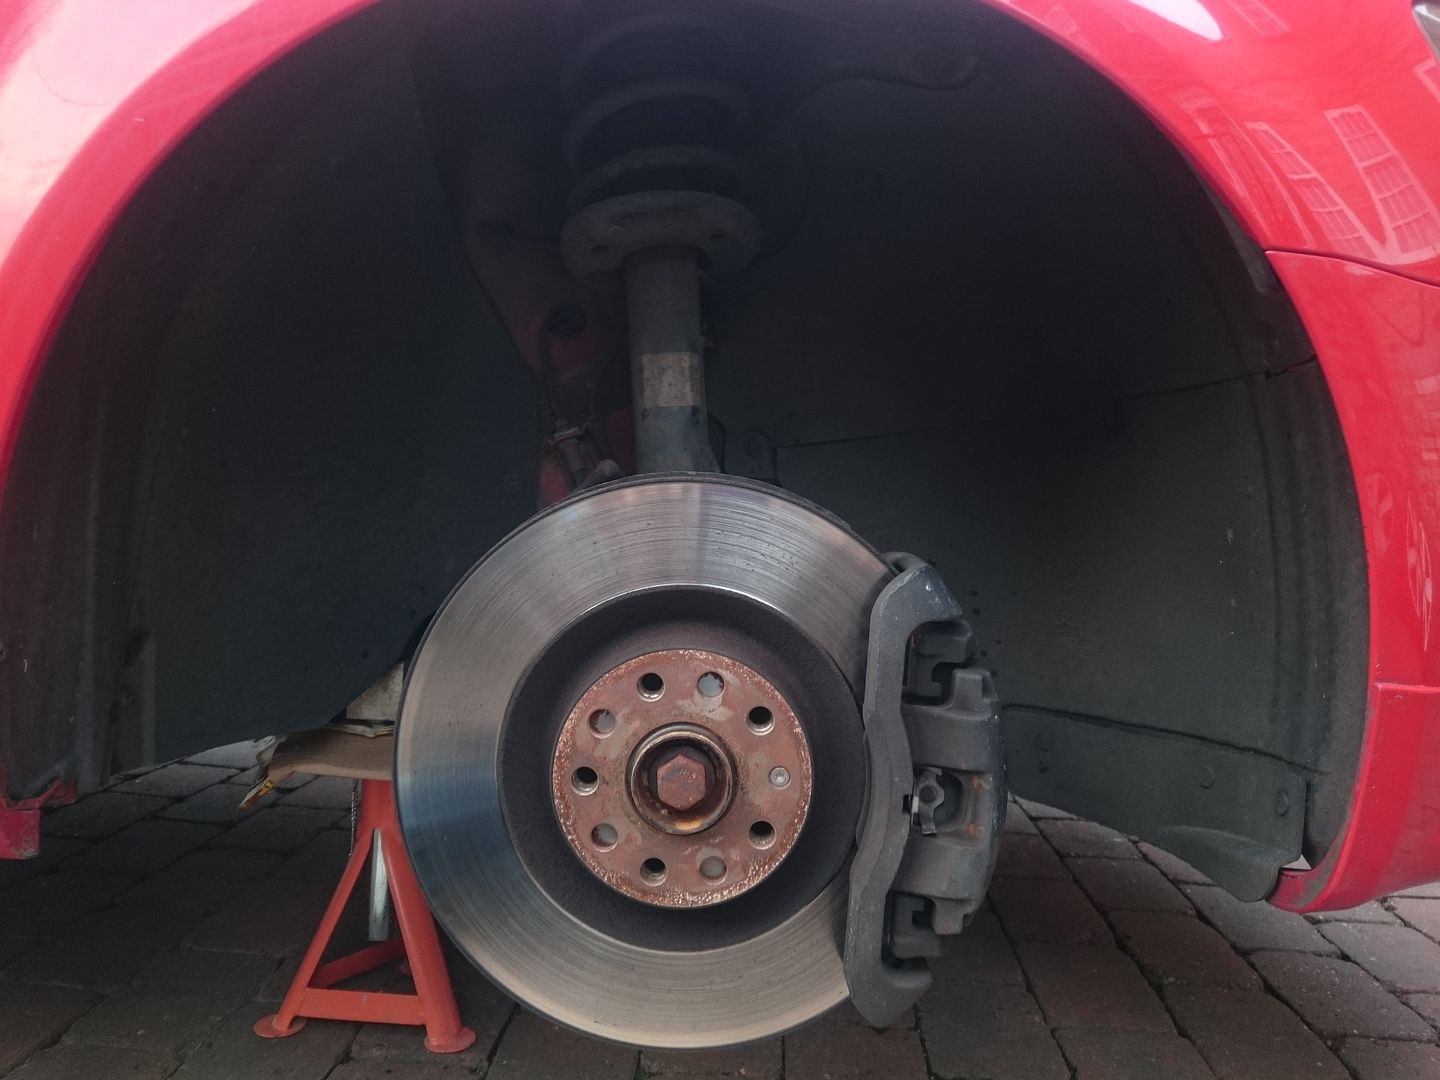
So here's what I started with.

Just your standard used brake and suspension set-up.


So off it all came!


Leaving me with a big old pile of nasty!


Many hours where spent cleaning the years of rubbish off the calipers and carriers leaving a perfect surface for paint.


This was post baking.

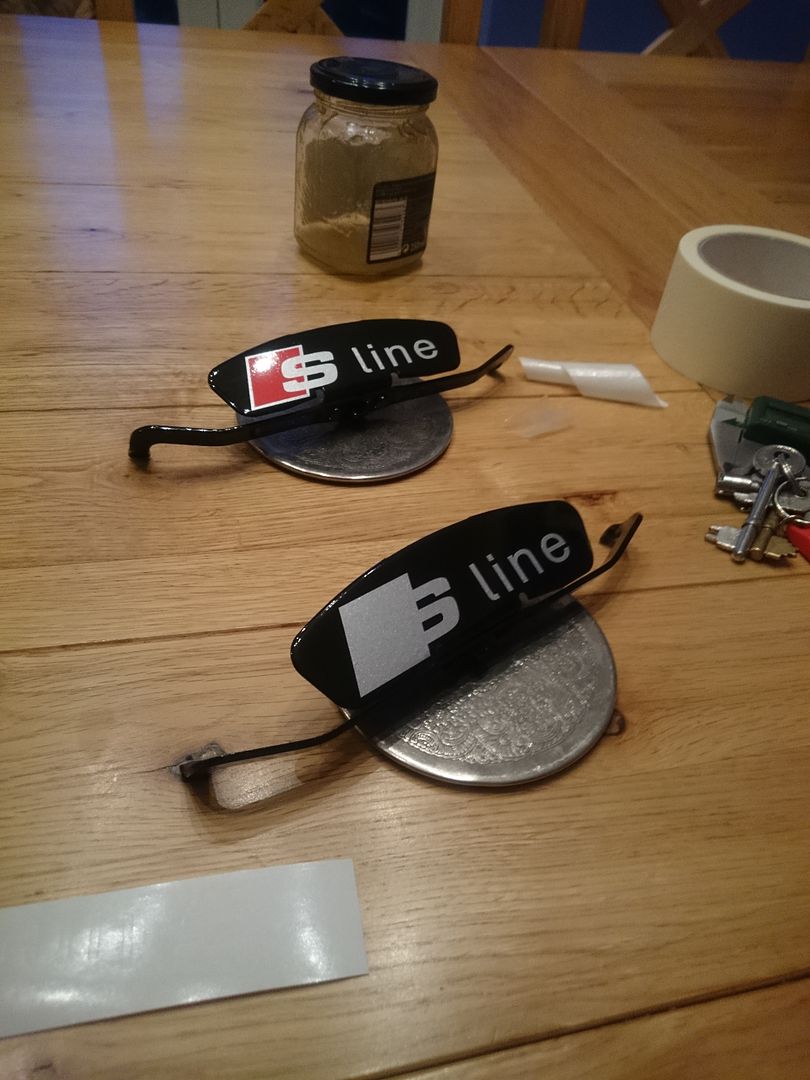
I did eventually find some new blank S3/R32 caliper clips listed on ebay. These where purchased and promptly painted up also in VHT gloss black and baked.


Many hours were wasted deciding on a suitable logo choice. In the end a simple S-line was chosen.


I then used VHT Clear over the decals to further protect them, the front caliper bodies where also clear coated.


Once my beautifully shiny discs from MTEC, pads from Brembo, and shocks from Bilstein had arrived I could go about assembling the whole set-up.

I bought special sliding caliper grease and everything went together beautifully.

This was all installed leaving me with this. You can also see the coating beginning to come off the mating surface, leaving the bells and venting properly protected.


Absolutely Lovely!

Didn't have time for the front suspension in that sitting, so that gone done a week later!

Can't beat that red flash of the S logo and drilled rotors though!


Joe
 
  • Like
Reactions: Jake 61, DJ_26 and Whodafunk
Very nice work mate. Can't beat the look of new discs and fresh calipers #carporn
 
  • Like
Reactions: Jlambert
Very nice work mate. Can't beat the look of new discs and fresh calipers #carporn

Thanks man, really happy with how the brakes turned out. They really stop the car too!

So I finally got around to finishing off the suspension refresh and installed the front struts. for what i use the car for the replacement shock inserts are perfect. Coilovers would be overkill! Not that i wasn't tempted by lowering it a tad...

The original springs are still in lovely nick, and just required a little rub back and paint where the coating had chipped and come off.

Annoyingly while changing the struts I snapped one of the 3 ball joint to lower control arm studs!
Can you replace just the stud, of course not, despite me knocking it out and asking around.
So a trip to TPS was needed and a pair of brand-new ball joints and bolts where added to the list of new items.


The new struts are a definite improvement over the worn originals!


Refreshed standard S-Line springs


Reassembled ready to go back into the car.


And sitting pretty all assembled.


The ride comparison is quite amazing, but then again the original shocks had taken quite a beating over the last 12 years, so it was always going to be an unfair comparison.

Car feels much more composed and controlled, especially over bumps.

The steering is also much smoother and a tad lighter, might have the ball joints to thank for that!


Leaving the car as it sits now. Ready for many more miles making lovely noises!


Joe
 
  • Like
Reactions: Jake 61 and DJ_26
Really like this thread, even the maintenance aspect is a good read. I like the brake set-up and the work you have done to refresh them! Do you like the ride of standard s-line springs and dampers? I find the S-line ride annoying at times. It has a nice solidity, but it can be bit too jiggly, so isn't that comfortable, if that makes sense. Mine are probably the same as your old dampers, as they are also around 12 years old too.

These are the money shots, really like that last pic.

Thanks, glad you enjoyed it! After I took that pic I had to go back and properly clean the inner arches though, sadly it was dark when I finished though so no pic!

Yeah I love the brakes, the flash of red through the wheels makes me smile every time i see it! Sad I know.


I had the same feelings towards the S-line dampers. I remember when the car was new the ride was never great, but with their age they got harsher and more crashy over bumps. With the Bilsteins the car hasn't lost any of that road holding but actually feels more controlled and taught. The ride is also definitely better, you still feel the bumps but it doesn't feel crashy. It's really noticeable going over the table top speed bumps, the car now follows the drop coming off them as before it felt like it fell off them.

To be fair to the S-line dampers are probably because they're knackered! The rears especially when off the car could easily be pushed in with little resistance and didn't return to their original position. You could also see the leak marks on the bodies in the pics in my previous post. Definitely worth replacing, especially since the Bilsteins are a bargain!

I've now got a few hundred miles on both the suspension and the brakes letting everything settle, and after doing a final torque check I'm really happy.


Joe
 
I've been working on a short video showing how the S3 exhaust sounds.


Let me know what you think.


Joe
 
  • Like
Reactions: Jake 61 and DJ_26
Good video, the car sounds really good. This is how it should have sounded from the factory. Still does make me smile that Audi did fit the 3.2 in the A3 especially when you remember that they shifted so many TDI versions (I've got an 2005 TDI). The noise is very much OEM+, it definitely suits the route you are going with the car. Think I will watch that video again. Great timing with the A45!
 
  • Like
Reactions: Jlambert
Sounds sweet, nice result and much chepness. Even with the Neuspeed on my one, it still lacks that rasp you get from an R32.
Might pay a visit to the exhaust guru down in Elgin to have it 'played' with.
 
  • Like
Reactions: Jlambert
Good video, the car sounds really good. This is how it should have sounded from the factory. Still does make me smile that Audi did fit the 3.2 in the A3 especially when you remember that they shifted so many TDI versions (I've got an 2005 TDI). The noise is very much OEM+, it definitely suits the route you are going with the car. Think I will watch that video again. Great timing with the A45!

Thanks, I'm still really enjoying how much better it sounds. I appreciate that a lot, as far as changes I think I've done almost all I wanted with the car, so I'll just be enjoying it and keeping it going.

The A45 did make me laugh, must have seen me taking off and thought he'd join in!

It really is such an oddball model when you look at the rest of the model range, but I'm glad they did make it though, especially since they went in such a different direction with the S3.

Sounds sweet, nice result and much chepness. Even with the Neuspeed on my one, it still lacks that rasp you get from an R32.
Might pay a visit to the exhaust guru down in Elgin to have it 'played' with.

It's definitely given the car the bark it was missing. It really accentuates the VR engines warble.
I've also left the vacuum valve connected so its quite subtle unless you don't want it to be. You can actually hear the valve clicking open over about 1/3 throttle.

That's interesting with the Neuspeed, I don't think I've heard one of their systems. How much of your system is aftermarket?
 
[QUOTE="
That's interesting with the Neuspeed, I don't think I've heard one of their systems. How much of your system is aftermarket?[/QUOTE]

They're American and big on the R32 scene.
I thought it was a Powerflow system, but on further inspection, it was a Neuspeed cat back system with Powerflow tailpipes.
Nice piece of kit, which has stood up to a good few wallop's from sleeping policemen....!